This is a translation with minor changes from the original post according to advice from comments.
Hello, folks! We have studied the boot sequence of the Windows operating system as part of a project from Acronis with students of Innopolis University. You can find more about the project here and there. There was an idea to execute the logic even before the boot sequence of the OS. Therefore, we tried to write something just to try, for a smooth immersion in UEFI. In this article, we will go through the theory and practice to read and write to disk in a pre-OS environment.

There are not so many teams in Acronis that deal with UEFI, so I decided to figure it out on my own. Plus, there is a proven way to get tons of accurate advice for free — just start doing something and post it online. Therefore, comments and recommendations under this post are highly appreciated! The second goal of this post is to collect a small digest of articles about UEFI and help everyone to move in this direction.
Useful links
First, I want to list sources that helped me a lot. Perhaps they will also help you and answer all your questions.
- First of all, these are UEFI and EDK II Learning and Development lectures from tianocore. A beautifully structured and illustrated course that will help you understand what happens at boot time and what UEFI is. This course is an ideal solution if you are looking for accurate theoretical information on a topic. If you want to quickly move on to writing UEFI drivers, then go straight to Lesson 3.
- There are articles on habr.com: one, two and three. Many thanks to the author. This is a great, hands-on guide for beginners. I will cite these masterpieces with minor changes. Without these publications, it would be much harder to get started. Sorry they are in Russian.
- For those who are already familiar with basics, I recommend this article and others by the same author.
- Since we are planning to write a driver, the official guideline for writing a driver will help a lot. The most correct advice will be there.
- Well, as a last resort, the UEFI specification.
A bit of theory
I would like to remind you of the requirements and goals of the Active Restore project. We plan to prioritize files on the system for more efficient recovery. To do this, you need to start at the earliest stage of the OS boot. To understand our capabilities in the UEFI world, it's worth diving into some theory about how the boot cycle goes. The information for this part is taken entirely from this source, which I will try to retell popularly.
UEFI
UEFI, or Unified Extensible Firmware Interface, is the evolution of the Legacy BIOS. The UEFI model also has a basic I / O system for interacting with hardware, however, the system boot process differs. UEFI uses GPT (Guid partition table). GPT is closely related to the specification and it is a more advanced model for storing information about disk partitions. The process has changed, but the tasks remain the same: initializing I / O devices and transferring control to the operating system. UEFI not only replaces most of the BIOS functionality but also provides a wide range of options for pre-OS development. There is a good comparison between Legacy BIOS and UEFI here.

From this point of view, BIOS is a component that provides direct communication with hardware and is the firmware. UEFI is the unification of the hardware interface for the operating system, which makes life much easier for developers.
In the UEFI world, we can develop drivers or applications. Also, there is a special subtype of applications — loaders. The only difference is that these applications do not end in the way we are used to (by calling return from the main function). They end with a call to the ExitBootServices() function and transfer control to the operating system. To decide which driver you need, I recommend taking a look here to expand your understanding of the protocols and recommendations for their use.
Dev kits
A small list of what we will use in our practice:
- EDKII (Extensible Firmware Interface Development Kit) is a free project for the development of UEFI applications and drivers, which we will also use. At first, we will not go deep into it.
- VisualUEFI is a project that simplifies the development in Visual Studio. You no longer need to bother with .inf files and poke around in 100,500 Python scripts. All this has already been done for you. Inside this project, you can find a QEMU to run our code. The project provides examples of applications and drivers.
- Coreboot is a complex project for the firmware. It helps to develop a solution for starting hardware and transferring control to the payload (for example, UEFI or GRUB), which in turn will load the operating system. We will not be covering coreboot in this article. We'll leave it for future experiments when I get my hands on the EDKII. Coreboot + Tianocore UEFI + Windows 7 x64 will probably be the right vector of development.
Boot sequence
Let's briefly analyze what stages our machine goes through before we see the logo of the operating system. To do this, consider the following diagram:
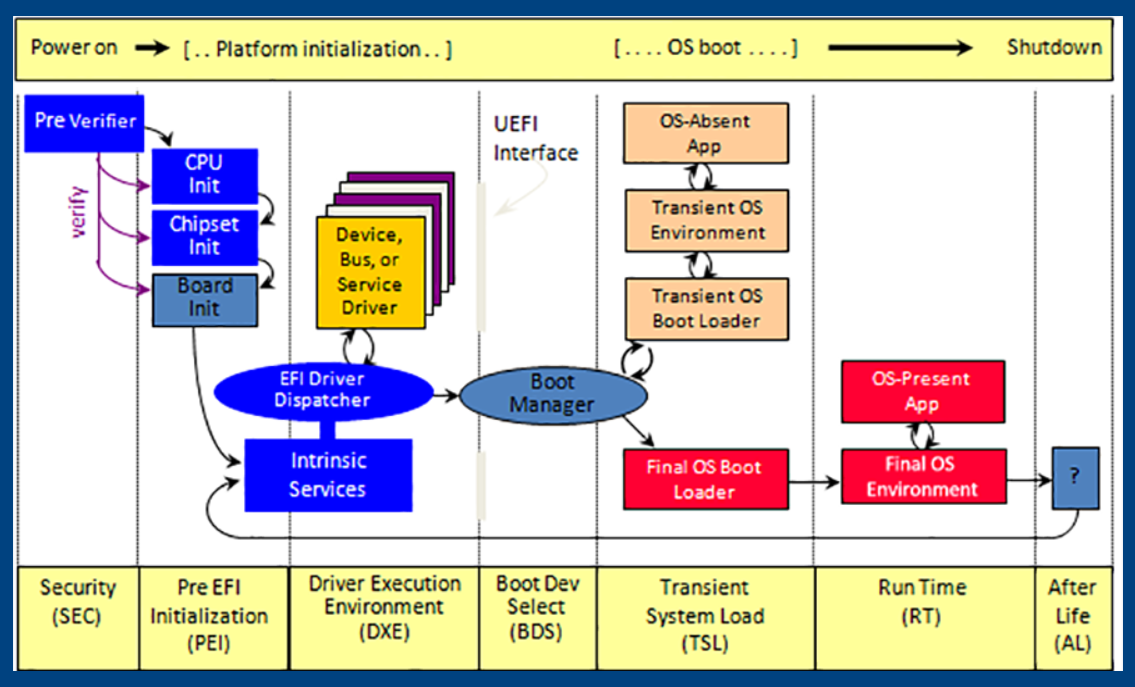
Platform Initialization is the process from the moment you press the power button and until the UEFI interface is fully ready. PI is divided into several phases:
- Security (SEC) — depends on the platform and the processor, usually implemented by assembly instructions, performs the initial initialization of temporary memory, checks the rest of the platform for security in various ways.
- Pre EFI Initialization (PEI) — in this phase, the work of the EFI code is starting, the main task is to download the DXE Foundation, which will start the DXE drivers in the next phase. In fact, there is a lot going on here, but what we are planning to develop will not fit here, so we move on.
- Driver Execution Environment (DXE) — at this stage, drivers start their work. The most important phase for us, because our driver will also be launched here. This driver execution environment is the main advantage over Legacy BIOS. This is where the code starts executing in parallel. DXE behaves like an operating system. This allows different companies to implement their drivers. The DXE Foundation, deployed in the previous phase, finds drivers, libraries, and applications one by one, deploys them in memory and executes them.
- Boot Device Selection (BDS) phase takes over next. You have probably personally seen this phase. Here there is a choice on which device to search for the operating system loader. After selection, the transition to the operating system begins. DXE boot drivers start unloading from memory. On the contrary, the operating system loader is loaded into memory using the block I / O protocol BLOCK_IO.
Not all DXE drivers are terminated here. There are so-called runtime drivers. They will have to mark up the memory they occupy in a notation understandable to the loaded operating system. In other words, virtualize your addresses into the Windows address space when the SetVirtualAddressMap() function is called. Once the environment is ready, the “Main” function of the OS kernel will begin execution, and the EFI phase will end with a call to ExitBootServices(). Control is completely transferred to the operating system. Then Windows will decide which and where to load the diver, how to read and write to the disk, and what kind of file system to use. A picture summarize the sequence:

You could find a cool story about the loading stages here.
Project preparation
It's time to set yourself a simple task. We can load our driver in the DXE phase, open a file on disk, and write some data to it. The task is simple enough to practice.
As I already mentioned, we will use the VisualUEFI project, but I also recommend trying the methods described here, at least because it is easier to use the debugger in the method described by the link.
I will assume that you already have Visual Studio. In my case, I have Visual Studio 2019. First, we clone our VisualUEFI project:
git clone --recurse-submodules -j8 https://github.com/ionescu007/VisualUefi.gitWe need NASM (https://www.nasm.us/pub/nasm/releasebuilds/2.15.02/win64/). Go ahead and download it. At the time of this writing, the current version is 2.15.02. After installation, make sure you have NASM_PREFIX in environment variables which points to the folder where NASM was installed. In my case, this is C:\Program Files\NASM\.

Let's build EDKII. To do this, open EDK-II.sln from \VisualUefi\EDK-II, and just click build on the solution. All projects in the solution should be successfully assembled, and you can proceed to ready-made examples. Opening samples.sln from \VisualUefi\samples. We press build on the application and driver, after which you can start QEMU by simply pressing F5.

We check our UefiDriver and UefiApplication. This is how the examples in the samples.sln solution are called.
Shell> fs1:
FS1:\> load UefiDriver.efi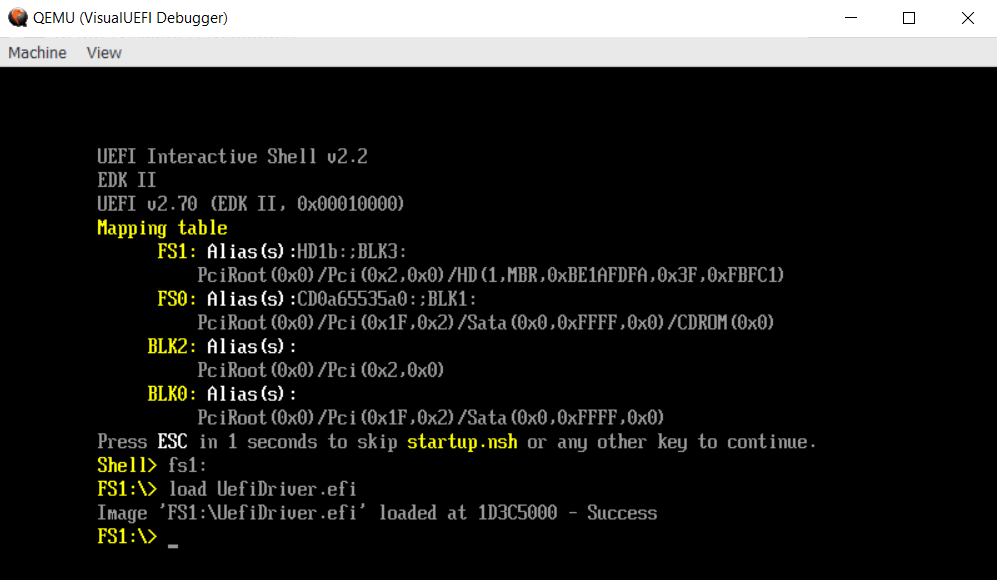
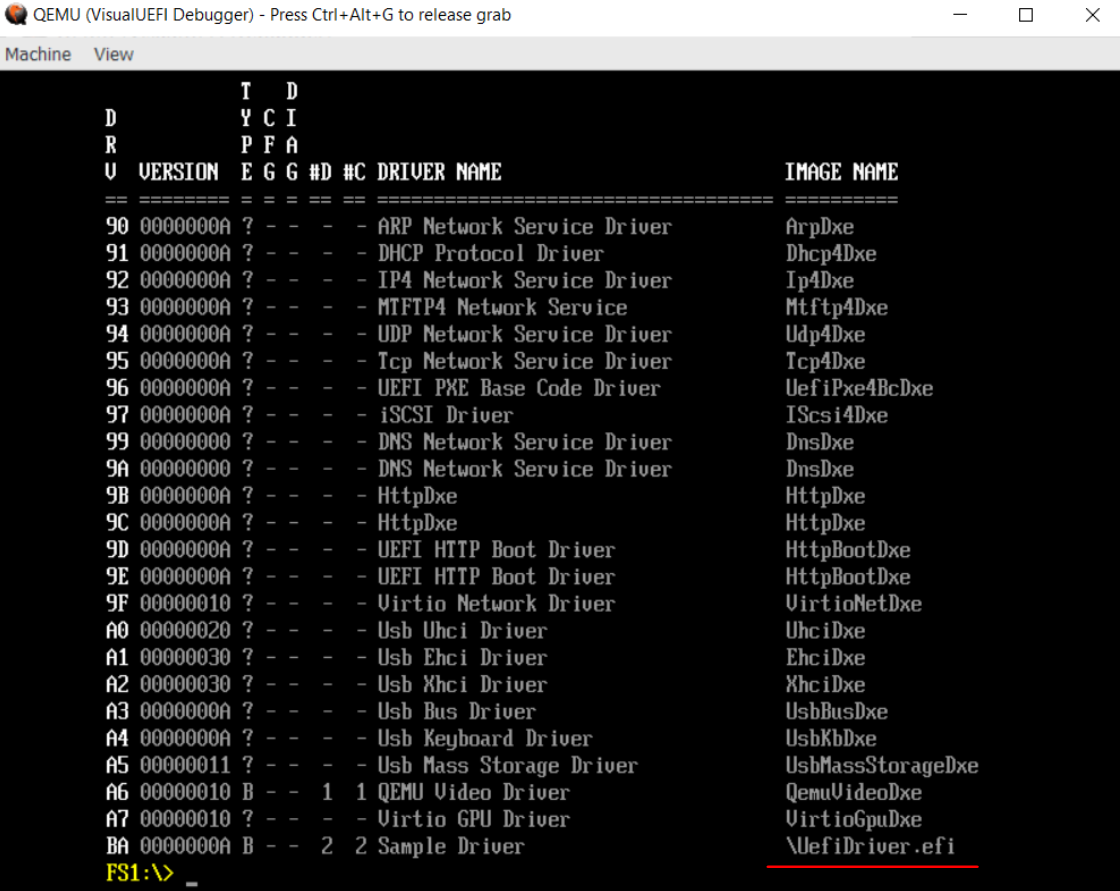
Great, the driver not only compiled but also loaded successfully. After running the command “drivers”, we will even see it on the list.
If we did not return EFI_ACCESS_DENIED in the UefiUnload function in the code, we could even unload our driver by running the command:
FS1:\> unload BANow let's call our application:
FS1:\> UefiApplication.efi
Code
Let's consider the code of the driver provided to us. It all starts with the UefiMain function, which is located in the drvmain.c file. We could have named the entry point by a different name if we were writing the driver from scratch, cause this name is specified in the .inf file.
By the way, speaking about code style. It is better to use the one defined by tianocore — C code style
EFI_STATUS
EFIAPI
UefiUnload (
  IN EFI_HANDLE ImageHandle
  )
{
  //
  // Do not allow unload
  //
  return EFI_ACCESS_DENIED;
}

EFI_STATUS
EFIAPI
UefiMain (
  IN EFI_HANDLE       ImageHandle,
  IN EFI_SYSTEM_TABLE *SystemTable
  )
{
  EFI_STATUS EfiStatus;

  //
  // Install required driver binding components
  //
  EfiStatus = EfiLibInstallDriverBindingComponentName2(ImageHandle,
                                                       SystemTable,
                                                       &gDriverBindingProtocol,
                                                       ImageHandle,
                                                       &gComponentNameProtocol,
                                                       &gComponentName2Protocol);
  return EfiStatus;
}
In the project, we are not required to register the Unload function, since VisualUEFI already does this “under the hood”, we just need to declare it. In the example, it is in the same file and the function is called UefiUnload. In this function, we can write code that will free all the resources we are using, since it will be called when the driver is unloaded. The registration of the Unload function in the VisualUEFI project occurs in the DriverEntryPoint.c file, in the _ModuleEntryPoint function.
// _DriverUnloadHandler manages to call UefiUnload
Status = gBS->HandleProtocol(ImageHandle,
                             &gEfiLoadedImageProtocolGuid,
                             (VOID **)&LoadedImage);

// todo check Status if error

LoadedImage->Unload = _DriverUnloadHandler;
In our example, in the UefiMain function, the EfiLibInstallDriverBindingComponentName2 function is called, which registers the name of our driver and the Driver Binding Protocol. According to the UEFI driver model, all device drivers must register this protocol in order to provide the controller with Support, Start, Stop functions. The Support function answers whether our driver can work with this controller. If so, the Start function is called. More details about this are well described in the specification (section Protocols — UEFI Driver Model). In our example, the Support, Start and Stop functions set up our custom protocol. Its implementation in drvpnp.c file:
//
// EFI Driver Binding Protocol
//
EFI_DRIVER_BINDING_PROTOCOL gDriverBindingProtocol =
{
  SampleDriverSupported,
  SampleDriverStart,
  SampleDriverStop,
  10,
  NULL,
  NULL
};

…

//
// Install our custom protocol on top of a new device handle
//
EfiStatus = gBS->InstallMultipleProtocolInterfaces(&deviceExtension->DeviceHandle,
                                                   &gEfiSampleDriverProtocolGuid,
                                                   &deviceExtension->DeviceProtocol,
                                                   NULL);

// todo check error

//
// Bind the PCI I/O protocol between our new device handle and the controller
//
EfiStatus = gBS->OpenProtocol(Controller,
                              &gEfiPciIoProtocolGuid,
                              (VOID**)&childPciIo,
                              This->DriverBindingHandle,
                              deviceExtension->DeviceHandle,
                              EFI_OPEN_PROTOCOL_BY_CHILD_CONTROLLER);
The EfiLibInstallDriverBindingComponentName2 function is implemented in the UefiDriverModel.c file and is actually very simple. It calls InstallMultipleProtocolInterfaces from Boot Services (see spec page 210). This function binds the handle (in our case the ImageHandle, which we received at the entry point) and the protocol.
// install component name and binding
Status = gBS->InstallMultipleProtocolInterfaces(
                       &DriverBinding->DriverBindingHandle,
                       &gEfiDriverBindingProtocolGuid, DriverBinding,
                       &gEfiComponentNameProtocolGuid, ComponentName,
                       &gEfiComponentName2ProtocolGuid, ComponentName2,
                       NULL);
Logically, it is possible and necessary, at the time of unloading the driver, to remove the installed components. We will do this in our Unload function. Now our driver can be unloaded by calling the command "unload ", or before transferring control to the operating system.
EFI_STATUS
EFIAPI
UefiUnload (
  IN EFI_HANDLE ImageHandle
  )
{
  gBS->UninstallMultipleProtocolInterfaces(
    ImageHandle,
    &gEfiDriverBindingProtocolGuid, &gDriverBindingProtocol,
    &gEfiComponentNameProtocolGuid, &gComponentNameProtocol,
    &gEfiComponentName2ProtocolGuid, &gComponentName2Protocol,
    NULL
  );
  //
  // Changed from access denied in order to unload in boot
  //
  return EFI_SUCCESS;
}
As you can see, in our code we interact with UEFI through the gBS (global Boot Services) global field. Also, there is gRT (Global Runtime Services), and together they are part of the System Table structure. Source.
gST = *SystemTable;
gBS = gST->BootServices;
gRT = gST->RuntimeServices;
To work with files, we need the Simple File System Protocol (see spec page 504). By calling the LocateProtocol function, you can get a pointer to it, but the more correct way to list all handles on the file system devices is using the LocateHandleBuffer function, and after going through all the Simple File System protocols, choose the appropriate one that will allow us to write and read to a file. An example of such code is here. We are going to use the easier way. The protocol has only one function and it will allow us to open the volume.
EFI_STATUS
OpenVolume(
  OUT EFI_FILE_PROTOCOL** Volume
)
{
  EFI_SIMPLE_FILE_SYSTEM_PROTOCOL* FsProto = NULL;
  EFI_STATUS Status;
  *Volume = NULL;

  // get file system protocol
  Status = gBS->LocateProtocol(
    &gEfiSimpleFileSystemProtocolGuid,
    NULL,
    (VOID**)&FsProto);

  if (EFI_ERROR(status)) {
    return Status;
  }

  Status = FsProto->OpenVolume(FsProto, Volume);

  return Status;
}
Next, we need to be able to create a file and close it. Let's use EFI_FILE_PROTOCOL, which has functions for working with the file system (see [spec]https://uefi.org/sites/default/files/resources/UEFI%20Spec%202.8B%20May%202020.pdf) page 506).
EFI_STATUS
OpenFile(
  IN  EFI_FILE_PROTOCOL*   Volume,
  OUT EFI_FILE_PROTOCOL**  File,
  IN  CHAR16*              Path
  )
{
  EFI_STATUS Status;
  *File = NULL;

  //  from root file we open file specified by path
  Status = Volume->Open(
    Volume,
    File,
    Path,
    EFI_FILE_MODE_CREATE |
    EFI_FILE_MODE_WRITE |
    EFI_FILE_MODE_READ,
    0);

  return status;
}

EFI_STATUS
CloseFile(
  IN EFI_FILE_PROTOCOL* File
  )
{
  //  flush unwritten data
  File->Flush(File);
  //  close file
  File->Close(File);

  return EFI_SUCCESS;
}
To write to a file, we will have to manually move the carriage. To do this, we will ask the file size using the GetInfo function.
#define REQUIRE_NOERR(stat, label) if (EFI_ERROR(stat)) goto label;

EFI_STATUS
WriteDataToFile(
  IN VOID*              Buffer,
  IN UINTN              BufferSize,
  IN EFI_FILE_PROTOCOL* File
)
{
  UINTN InfoBufferSize = 0;
  EFI_FILE_INFO* FileInfo = NULL;

  //  retrieve file info to know it size
  EFI_STATUS Status = File->GetInfo(
    File,
    &gEfiFileInfoGuid,
    &InfoBufferSize,
    (VOID*)FileInfo);

  if (EFI_BUFFER_TOO_SMALL != Status) {
    return Status;
  }

  FileInfo = AllocatePool(InfoBufferSize);

  if (NULL == fileInfo) {
    Status = EFI_OUT_OF_RESOURCES;
    return Status;
  }

  //    we need to know file size
  Status = File->GetInfo(
    File,
    &gEfiFileInfoGuid,
    &InfoBufferSize,
    (VOID*)FileInfo
  );

  REQUIRE_NOERR(Status, FINALIZE);

  //    we move carriage to the end of the file
  Status = File->SetPosition(File, FileInfo->FileSize);

  REQUIRE_NOERR(Status, FINALIZE);

  //    write buffer
  Status = File->Write(File, &BufferSize, Buffer);

  REQUIRE_NOERR(Status, FINALIZE);

  //    flush data
  Status = File->Flush(File);

FINALIZE:

  if (NULL != FileInfo) {
    FreePool(FileInfo);
  }

  return Status;
}
We call our functions and write random data to our file.
EFI_STATUS
WriteToFile(
  VOID
)
{
  CHAR16 Path[] = L"\\example.txt";
  EFI_FILE_PROTOCOL* File = NULL;
  EFI_FILE_PROTOCOL* Volume = NULL;
  CHAR16 Something[] = L"Hello from UEFI driver";

  //
  //  Open file
  //
  EFI_STATUS Status = OpenVolume(&Volume);

  if (EFI_ERROR(Status)) {
    return Status;
  }

  Status = OpenFile(Volume, &File, Path);

  if (EFI_ERROR(Status)) {
    CloseFile(Volume);
    return Status;
  }

  Status = WriteDataToFile(Something, sizeof(Something), File);

  CloseFile(File);
  CloseFile(Volume);

  return Status;
}
There is an alternative way to accomplish our task. The VisualUEFI project has already implemented what we wrote above. We can simply include the ShellLib.h header file and call the ShellInitialize function at the very beginning. All the necessary protocols for working with the file system will be open, and the ShellOpenFileByName, ShellWrite, and ShellRead functions are implemented in almost the same way as we have.
#include <Library/ShellLib.h>

EFI_STATUS
WriteToFile2(
  VOID
)
{
  SHELL_FILE_HANDLE FileHandle = NULL;
  CHAR16 Path[] = L"fs1:\\example2.txt";
  CHAR16 Something[] = L"Hello from UEFI driver";
  UINTN WriteSize = sizeof(Something);

  EFI_STATUS Status = ShellInitialize();

  if (EFI_ERROR(Status)) {
    return Status;
  }

  Status = ShellOpenFileByName(Path,
    &FileHandle,
    EFI_FILE_MODE_CREATE |
    EFI_FILE_MODE_WRITE |
    EFI_FILE_MODE_READ,
    0);

  if (EFI_ERROR(Status)) {
    return Status;
  }

  Status = ShellWriteFile(FileHandle, &WriteSize, Something);

  ShellCloseFile(&FileHandle);
  return Status;
}
The result:

→ The code for this example is on github
If we want to switch to VMWare, then the most correct would be to modify the firmware using UEFITool. Here you could find a demo on how to add an NTFS driver to UEFI.
Conclusion
To complicate the idea of our driver and bring it closer to the requirements of the Active Restore project, we can do the following: open the BLOCK_IO protocol, replace the read functions on the disk with our functions, which will write the data read from the disk to the log and then call the original functions. This can be done as follows:
// just pseudo code
...

// open protocol to replace callbacks
gBS->OpenProtocol(
      Controller,
      Guid,
      (VOID**)&protocol,
      DriverBindingHandle,
      Controller,
      EFI_OPEN_PROTOCOL_GET_PROTOCOL
    );

// raise Task Priority Level to max avaliable
gBS->RaiseTPL(TPL_NOTIFY);

VOID** ProtocolBase = EFI_FIELD_BY_OFFSET(VOID**, FilterContainer, 0);
VOID** OldCallback = EFI_FIELD_BY_OFFSET(VOID**, *ProtocolBase, OldCallbackOffset);
VOID** OriginalCallback = EFI_FIELD_BY_OFFSET(VOID**, FilterContainer, OriginalCallbackOffset);

//  yes, I know that it is not super obvious
//  but if first and third is equal (placeholder and function)
//  then the first one is not the function it is offset!
//  and function itself is by offset of third one
if ((UINTN) NewCallback == OriginalCallbackOffset) {
  NewCallback = *OriginalCallback;
}

PRINT_DEBUG(DEBUG_INFO, L"[UefiMonitor] 0x%x -> 0x%x\n", *OldCallback, NewCallback);

//saving original functions
*OriginalCallback = *OldCallback;
//replacing them by filter function
*OldCallback = NewCallback;

// restore TPL
gBS->RestoreTPL(OldTpl);
In addition, we have to subscribe to ExitBootServices() to get the pointers back in place. After the file system filter in Windows is ready, the minifilter will continue to log reads from the disk.
// event on exit
gBS->CreateEvent(
      EVT_SIGNAL_EXIT_BOOT_SERVICES,
      TPL_NOTIFY,
      ExitBootServicesNotifyCallback,
      NULL,
      &mExitBootServicesEvent
    );
But these are already ideas for future articles. Thanks for your attention.
