
In the comment sections of our articles about our server there are often users who say: "Why would you jump through so many hoops, when you can do the same with a single line of code in FFmpeg!?"
Take screensharing, for example. In FFmpeg, with a single command we can record what is happening on screen into a file. But what next? What if we need, for example, to broadcast the screen to a website? We would have to record the video, upload it to a server and then play it on the website. This way might be suitable for static content, but it will hardly be enough for a dynamic stream.
This is the point where "a single command" stops being sufficient (although, spoilers, we did manage to get by with a single command), and something extra is required: some intermediate agent that could transform the screensharing content captured via FFmpeg into a WebRTC stream.
The task is simple — to broadcast what is happening on screen to a website, where the stream will be played via WebRTC. Additionally, both audio and video need to be captured.

Let us take a look at two possible ways to accomplish it with FFmpeg, for Linux and for Windows.
When perfect is the enemy of good
At this point, I'd like to make a confession. Research for this article was my first experience with FFmpeg. And for that reason, I spent a long time pouring through guides and googling solutions. Eventually, I managed to find a combination of keys for FFmpeg that would allow to screenshare and capture audio. Following the manual I added the keys for screensharing into the stream going to a WCS server, successfully tested publishing via FFmpeg and playback via WebRTC on Windows and Linux and started writing this article.
While testing I caught myself thinking the FFmpeg screensharing command was rather chaotic. And so, I decided to tidy up the code a bit — I put all the code for video capture and encoding first, put the code for audio capture and encoding second, and put the code for data transfer and stream formation last.
NB! DO NOT use this command!
ffmpeg.exe -f gdigrab -i desktop -draw_mouse 1 -rtbufsize 100M -framerate 30 -probesize 10M -c:v libx264 -r 30 -preset ultrafast -tune zerolatency -crf 25 -pix_fmt yuv420p -f dshow -i audio="@device_cm_{33D9A762-90C8-11D0-BD43-00A0C911CE86}\wave_{F585B65B-4690-4433-8109-F16C6389C066}" -acodec aac -f flv rtmp://demo.flashphoner.com:1935/live/rtmp_streamBefore publishing the article on the blog, I tested it again and, to my dismay, saw that the stream was lacking both video and audio.

That made me go back to Google manuals and guides.
I checked the FFmpeg keys over and over, I even found an alternative way for capturing system sounds in Windows (see below). I tested different Windows drivers and different desktop versions of Ubuntu, but all of it was in vain:
The WCS server would receive an empty stream.
In one of the guides I read a phrase that stuck with me. Is said: "Do not mix the video and audio keys!". So I diligently avoided doing that and tried to neatly separate them. First I would put the keys related to audio, then — to video, then — to streaming.
Then, at one point, I tried the original code again, the one that looked a chaotic mess. And lo and behold! It worked. I took a close look at the code and realized my mistake. The keys for video and audio must not be mixed with keys for different actions!
By trial and error, I concluded that the code must follow the following structure:
keys for audio capture + keys for video capture + keys for audio encoding + keys for video encoding + keys for transmitting the data into the stream going to the serverUnfortunately, FFmpeg doesn't support any service keys for separating the code sections, so it might be a bit confusing for inexperienced users. Later in the article, in the code descriptions, I will explain what keys relate to what actions.
FFmpeg screensharing on Windows
Let's take a look at how to stream the screensharing via FFmpeg. In the command prompt, run the following command:
ffmpeg.exe -f gdigrab -rtbufsize 100M -framerate 30 -probesize 10M -draw_mouse 1 -i desktop -c:v libx264 -r 30 -preset ultrafast -tune zerolatency -crf 25 -pix_fmt yuv420p -f flv rtmp://demo.flashphoner.com:1935/live/rtmp_streamwhere:
//capture of video component of screensharing
-f gdigrab — Windows driver for screen capture;
-rtbufsize 100M — video buffer. The stream must be fast and smooth, with no frame drops. What's why it's better to record video to RAM, and then stream it using FFmpeg.
-framerate 30 — framerate upon screen capture;
-probesize 10M — number of frames necessary for FFmpeg to identify a stream;
-draw_mouse 1 — mouse cursor capture;
-i desktop — command for capturing the whole screen;
//encoding of video component of screensharing
-c:v libx264 — compress video into MP4 with x264 codec;
-r 30 — codec shall record the video at 30 frames per second;
-preset ultrafast — tells the codec to not stall and start encoding as soon as possible (relevant when doing screen recording);
-tune zerolatency — an optional section for x264 codec that helps fasten the encoding;
-crf 25 — video quality (the bigger the number, the worse the quality, and the lower the number — the better);
-pix_fmt yuv420p — color format of the resulting video;
//forming the stream and transmitting it to WCS
-f flv rtmp://demo.flashphoner.com:1935/live/rtmp_stream — records into a stream titled "rtmp_stream" and transmits it to a server titled demo.flashphoner.com.
And so, we capture the screen for streaming
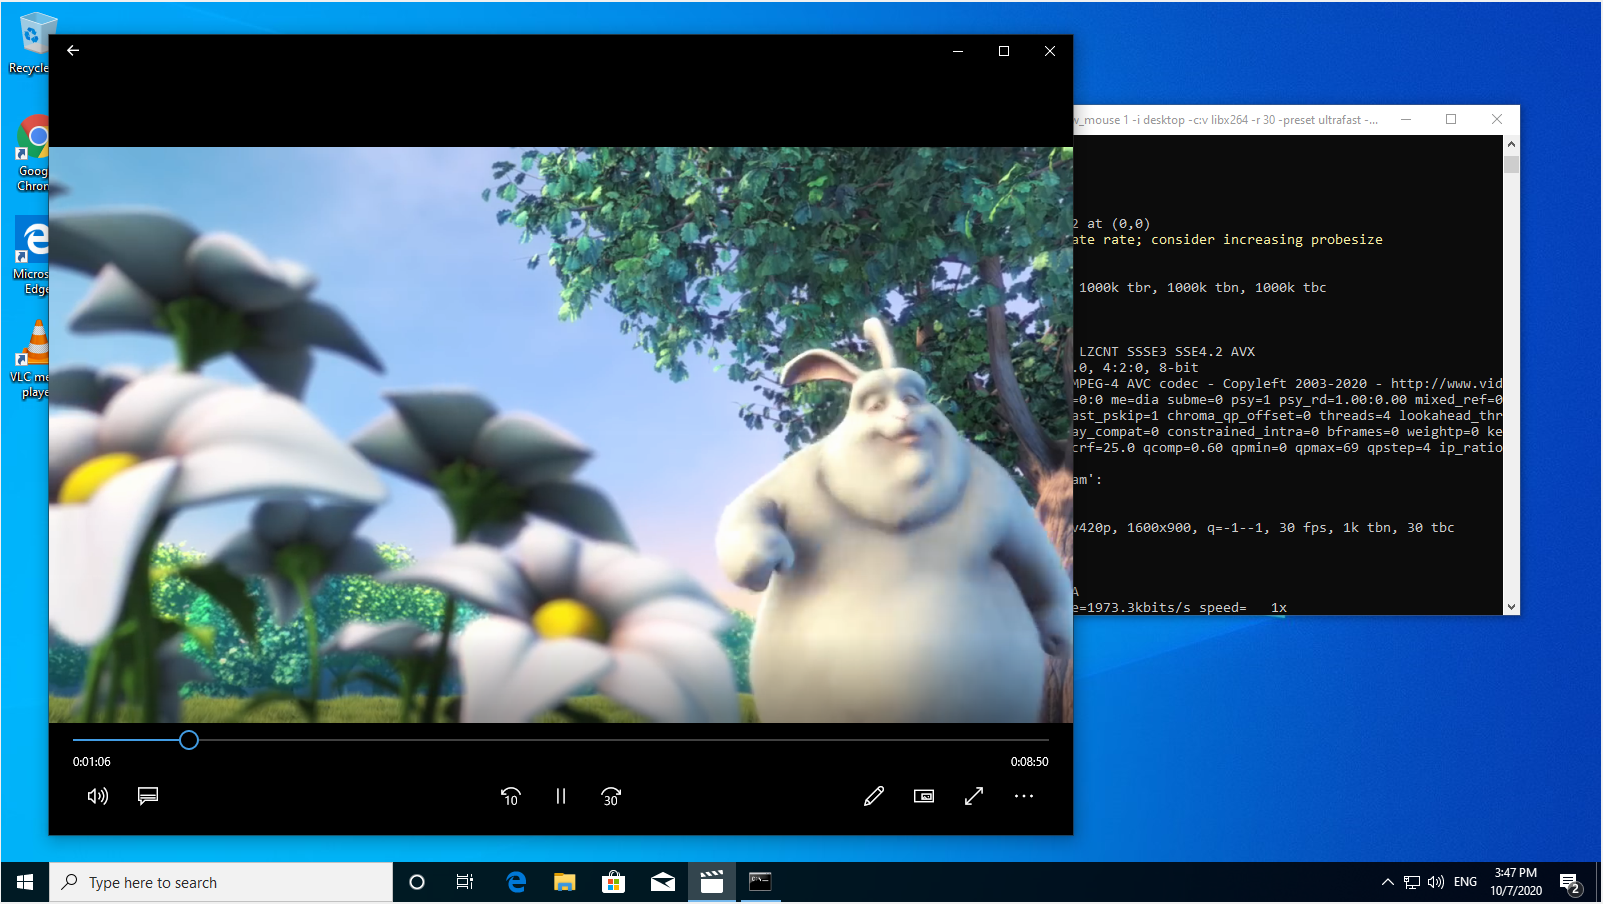
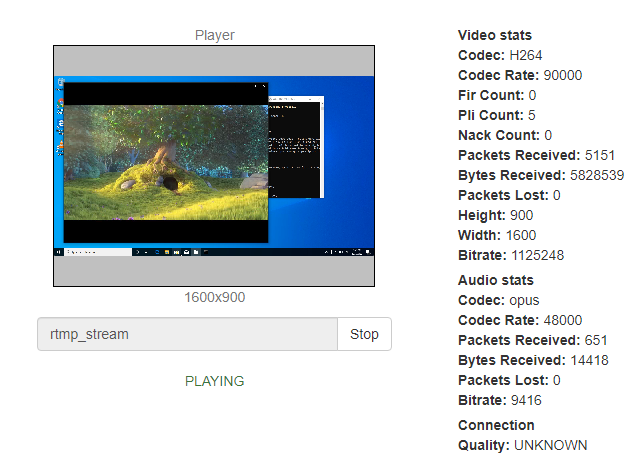
and receive it on the WCS side. (From this point on, I use the player from this example: "Media Devices", because it allows to indicate the absence and presence of audio stream on a screenshot.)

Receive the stream, albeit with no sound. The screenshot shows that the Audio stats section is full of zeroes.
Now let's move on to audio capture.
The first thing to do is to determine what devices are available for audio capture. In the Windows console, run the following command:
ffmpeg -list_devices true -f dshow -i dummyReceive the following response:
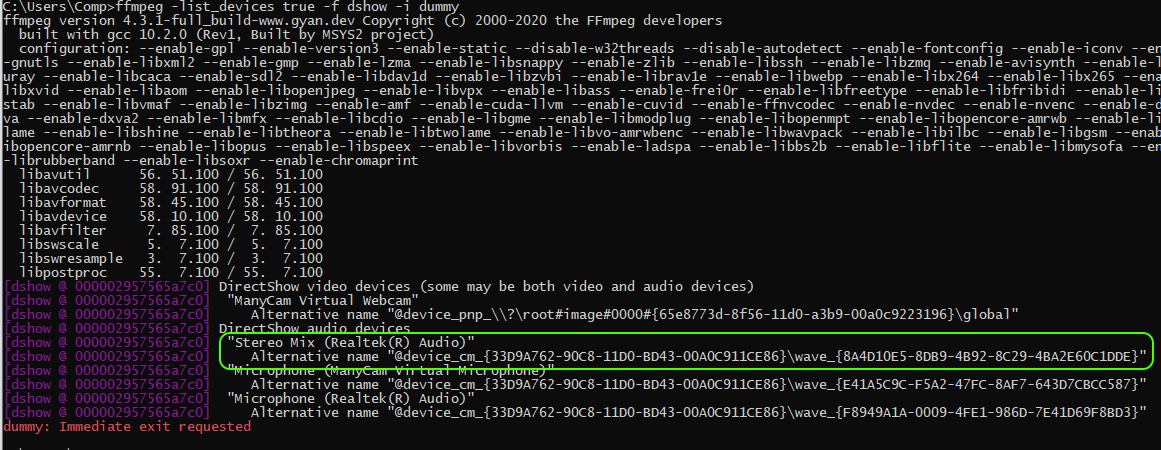
The command brings up a list of devices that can record or playback sound: speakers, microphones and webcams. Find the name of the device you want to use for audio capture (the speakers). On the following screenshot the device I chose for capture is called Stereo Mix (Realtek (R) Audio). Stereo Mix is one of the best devices when it comes to audio capture. It is a virtual device that allows to mix various audio sources, those that are from within the OS and the ones from the microphone.
To start audio capture, add the following keys into the original screensharing code:
-f dshow -i audio="@device_cm_{33D9A762-90C8-11D0-BD43-00A0C911CE86}\wave_{8A4D10E5-8DB9-4B92-8C29-4BA2E60C1DDE}" ... -acodec aacwhere:
//capture of audio component of screensharing
-f dshow — Windows driver for audio capture;
-i audio= — here, set the "audio" parameter as your the thing you use instead of our "Stereo Mix (Realtek (R) Audio)";
//capture of video component of screensharing
//encoding of audio component of screensharing
-acodec aac — audio compression is done via the aac codec;
//encoding the video component of screensharing
//forming the stream and transmitting it to WCS
Launch it:
ffmpeg.exe -f dshow -i audio="@device_cm_{33D9A762-90C8-11D0-BD43-00A0C911CE86}\wave_{8A4D10E5-8DB9-4B92-8C29-4BA2E60C1DDE}" -rtbufsize 100M -f gdigrab -framerate 30 -probesize 10M -draw_mouse 1 -i desktop -acodec aac -c:v libx264 -r 30 -preset ultrafast -tune zerolatency -crf 25 -pix_fmt yuv420p -f flv rtmp://demo.flashphoner.com:1935/live/rtmp_streamAnd enjoy:
There is also an alternative method. It might be useful if your PC doesn't have a Stereo Mix device or if your audio card driver doesn't support it for some reason.
For this method you'll need a small VB-Audio Virtual Cable utility (at the moment of this writing it is free).
VB-CABLE — is a virtual audio device that functions as a virtual audio cable. All the audio that goes into the CABLE input, is transmitted to the CABLE output.
Download and install VB-CABLE. The installation is nothing special.
Run the installer as Administrator:

Click "Install Driver"

Once the installation is complete, set the default device to playback and record audio onto the virtual cable.

Now, the audio from the running software will be sent to the Cable Output virtual device, which functions as a regular microphone, which allows for audio capture. There is one caveat, however: you will be unable to hear what you're recording (meaning the audio will be transmitted to the virtual device instead of the speakers or the headset).
Now, determine the available devices for audio capture
ffmpeg -list_devices true -f dshow -i dummyA new device has appeared on the list: CABLE Output (VB-Audio Virtual Cable)

Launch screensharing capture using this device. Address it using the alternative name:
ffmpeg.exe -f dshow -i audio="@device_cm_{33D9A762-90C8-11D0-BD43-00A0C911CE86}\wave_{F585B65B-4690-4433-8109-F16C6389C066}" -rtbufsize 100M -f gdigrab -framerate 30 -probesize 10M -draw_mouse 1 -i desktop -acodec aac -c:v libx264 -r 30 -preset ultrafast -tune zerolatency -crf 25 -pix_fmt yuv420p -f flv rtmp://demo.flashphoner.com:1935/live/rtmp_stream
FFmpeg screensharing on Linux
In this example, we're launching screensharing on ОS Ubuntu Desktop 20.04 LTS.
Let's begin with determining the audio devices available for capture. Run the following command in the console:
pacmd list-sourcesThe results should look as shown on the screenshot. For further actions, we're looking to the device titled Monitor of Built-in Audio Analog Stereo. It's a virtual device that, much like its cousin Windows Stereo Mix, allows to mix the system audio with audio from the microphone. To proceed we shall require the index value of that device.

Start the screensharing stream via FFmpeg:
ffmpeg -f pulse -ac 2 -i 0 -f x11grab -rtbufsize 100M -s 1200x720 -framerate 30 -probesize 10M -draw_mouse 1 -i :0.0 -acodec aac -c:v libx264 -r 30 -preset ultrafast -tune zerolatency -crf 25 -pix_fmt yuv420p -f flv rtmp://demo.flashphoner.com:1935/live/rtmp_streamwhere:
//capture of audio component of screensharing
-f pulse — Linux driver for audio capture;
-ac 2 — stereo audio mode (-ac 1 — mono audio mode);
-i 0 — specify the device index for audio capture. As described, for Monitor of Built-in Audio Analog Stereo that value is "0" ;
//capture of video component of screensharing
-f x11grab — required option for screen capture in Linux;
-rtbufsize 100M — video buffer;
-s 1200x720 — size of captured screen area (px);
-framerate 30 — framerate of capture;
-probesize 10M — number of frames required for FFmpeg to identify a stream;
-draw_mouse 1 — mouse cursor capture;
-i :0.0 — coordinates of the first pixel of the captured screen area;
//encoding of audio component of screensharing
-acodec aac — audio compression is done via the aac codec;
//encoding of video component of screensharing
-c:v libx264 — compress video into MP4 with x264 codec;
-r 30 — codec shall record video at 30 frames per second;
-preset ultrafast — makes it so the encoding is done as fast as possible (relevant when doing screen recording);
-tune zerolatency — an optional section for x264 codec that helps fasten the encoding;
-crf 25 — video quality (the bigger the number, the worse the quality, and the lower the number — the better);
-pix_fmt yuv420p — color format of the resulting video;
//forming the stream and transmitting it to WCS
-f flv rtmp://demo.flashphoner.com:1935/live/rtmp_stream — records into a stream titled "rtmp_stream" and transmits it to a server titled demo.flashphoner.com.
Now let's test it.
Start the playback of a video in the player, then run the abovementioned FFmpeg command in the Ubuntu console:

On the WCS server side, open any suitable player and launch the playback of the captured screensharing stream via WebRTC (stream name — rtmp_stream).

A side-by-side comparison of FFmpeg commands for Windows and Linux
Here's a comparison table for the FFmpeg keys for screensharing with system audio capture and WCS streaming
Windows | Linux | |
|---|---|---|
Driver for audio capture | -f dshow | -f pulse |
Displaying the audio capture device |
| -i 0 |
Driver for screen capture | -f gdigrab | -f x11grab |
Video buffer | -rtbufsize 100M | -rtbufsize 100M |
Captured screen area size | -i desktop | -i :0.0 -s 1200x720 |
Framerate of screen capture | -framerate 30 | -framerate 30 |
Number of frames necessary for stream identification | -probesize 10M | -probesize 10M |
Mouse cursor capture | -draw_mouse 1 | -draw_mouse 1 |
Codec for audio compression | -acodec aac | -acodec aac |
Codec for video compression | -c:v libx264 | -c:v libx264 |
Framerate of resulting video | -r 30 | -r 30 |
Option for faster encoding | -preset ultrafast | -preset ultrafast |
Option for faster encoding for x264 codec | -tune zerolatency | -tune zerolatency |
Quality of captured video | -crf 25 | -crf 25 |
Color format of the resulting video | -pix_fmt yuv420p | -pix_fmt yuv420p |
Streaming to the demo.flashphoner.com server | -f flv rtmp://demo.flashphoner.com:1935/live/rtmp_stream | -f flv rtmp://demo.flashphoner.com:1935/live/rtmp_stream |
Conclusion
Today we've taken a close look at screensharing with audio capture using FFmpeg for Windows and Linux. You can perform any actions that are supported by WCS with the screensharing streams you now know how to make. You can record them, play, retranslation them, transcode them or add them to mixer.
Good streaming to you!
Links
Quick deployment and testing of the server
