Taking a brief glance at OpenShift, I noticed that applications took longer to start and ran slower. Further research revealed that one of the Nodes had fallen out of the OS cluster. I attempted to try and fix the problem via SSH, but then I remembered that I left my SSH key on the office computer. The message "Permission denied (publickey,gssapi-keyex,gssapi-with-mic)" only confirmed my unfortunate situation. There I was, looking at the VM screen on the Hypervisor console, unable to get inside. Oh well!
Below is a retrospective on how I restored the Node’s functionality. As the saying goes, any resemblance to actual events, locales or persons is purely coincidental.
Emergency boot and gaining access to the terminal
It all started with an emergency boot. In order to obtain access to the emergency shell when the system starts, we have to append a certain kernel parameter — rd.break.
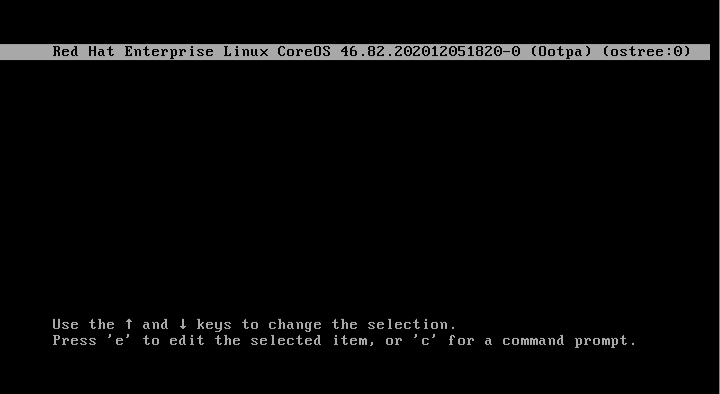
As the system starts, we’re presented with the grub boot menu. We press E and add rd.break to the linux string:

Press Ctrl+X and wait for the system to boot.
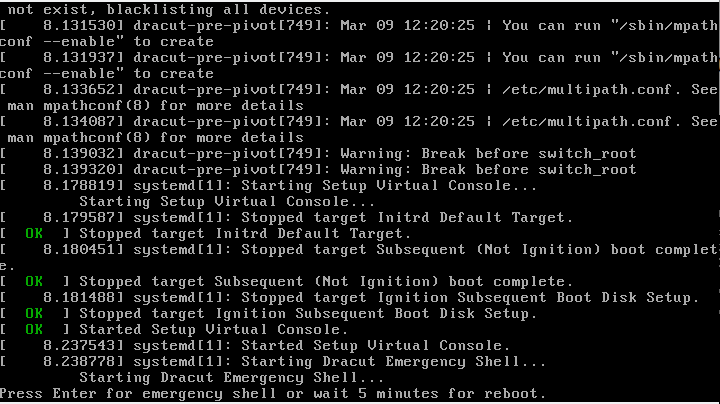
The system boots, but the terminal does not appear. What's wrong?
As it turns out, it was necessary to disable the interactive terminal. To do so, remove the following strings: “console=tty0 console=ttyS0,115200n8”:

The final code will look like this:

Press Ctrl+X for the system to boot.
Press Enter to gain access to the vital shell:
Changing the core user password

To change the password, I temporarily changed the root directory using the chroot command:
mount -o remount,rw /sysroot
chroot /sysroot
passwd core
OpenShift runs with SELinux enabled; therefore, the file must have the corresponding attributes:
ls -Za /etc/shadow
? /etc/shadow/

Add the relevant attribute:
chcon -h system_u:object_r:shadow_t:s0 /etc/shadow*Ensure that:
ls -Za /etc/shadow system_u:object_r:shadow_t:s0 /etc/shadow
Now reboot the system using the following command:
/sbin/reboot -fAlternatively, click the button on the control panel for the virtual machine/server to reboot.
Solving the SSH login problem
By default, the system can only be accessed with SSH keys which are stored in .ssh/authorized_keys

If you left your SSH key at work or lost it in the usual routine or, if you need to add another SSH key, this is the file you’re after. We’ll have to add a new key from your id_rsa.pub. Before that, however, check if the file has the relevant rights and SELinux attributes:
chmod 600 -Rv ~/.ssh/
chown core:core -Rv ~/.ssh/
chcon -t unconfined_u:object_r:ssh_home_t:s0 ~/.ssh/authorized_keys
or
restorecon -v ~/.ssh/authorized_keysEnabling login using username and password without SSH keys
Attention! This action compromises system security! You must log in as the core user, using your SSH key.
You can solve the problem of forgotten SSH keys radically by enabling system login using username and password. To do this, use one of two options, depending on the available system functionality:
Option 1. You are able to log into the system as the core user
Obtain admin privileges and gain access to the file system:
sudo su
mount -o remount,rw
vi /etc/ssh/sshd_config

Edit the file to enable username/password login. Change the PasswordAuthentication parameter to yes.

Log out of root and restart the service.

Additionally, verify that the file retains its SELinux attribute. This will come in handy for option 2.

Option 2. Booting in rd.break mode
Edit /etc/ssh/sshd_config in the same manner, by setting
PasswordAuthentication yes
Save and check the SELinux attributes:

As we can see, the SELinux attributes were lost. Restore them:
chcon -h system_u:object_r:etc_t:s0 /etc/ssh/sshd_configConfiguring network interfaces
If you need to restore or configure network interfaces for a virtual machine, use the nmcli utility.
You can display network connections with this simple command:
nmcli connection showUse nmcli connection mod “connection_name” to edit the network settings and then restart the network interface.

Tuning the system core
As we are actively using the command line, we can take this chance to modify the kernel. On systems that use rpm-ostree, you can add or remove kernel parameters that are set when the system boots.
For example, we can improve system performance by disabling protection against the Spectre v1 and Spectre v2 vulnerabilities. To do this, add the following parameters:
"nospectre_v1,nospectre_v2,nospec_store_bypass_disable"This is accomplished by the following commands:
rpm-ostree kargs --append="nospectre_v1" --append="nospectre_v2" --append="nospec_store_bypass_disable"
Staging deployment... done

Kernel arguments updated.

Run "systemctl reboot" to start a reboot

[root@localhost core]# rpm-ostree kargs mitigations=auto,nosmt console=tty0 console=ttyS0,115200n8 ignition.platform.id=metal $ignition_firstboot ostree=/ostree/boot.1/fedora-coreos/0045ea4dd22400fe745be6b98741225cd831069a635d08100f5d25f1c77a13ac/0 root=UUID=de3da0d6-308e-4f4e-b60a-04db75452575 rw rootflags=prjquota boot=UUID=02e3df85-38cd-4173-a672-3b6fb5dfe4b0 nospectre_v1 nospectre_v2 nospec_store_bypass_disable
After the system is rebooted, you can check if the kernel parameters have been applied by running the command:
rpm-ostree kargsConversely, if you want to remove kernel parameters, you can run the following command:
sudo rpm-ostree kargs --delete="nospectre_v1" --delete="nospectre_v2" —delete="nospec_store_bypass_disable"You can view help for this command by running:
rpm-ostree kargs –helpAdditional parameters that you might need:
--append="ipv6.disable=1"
--append="quiet"
The quiet mode allows you to delete these messages from the virtual console of the first system screen:
sudo rpm-ostree kargs --append="quiet"
Staging deployment... done

Kernel arguments updated.

Run "systemctl reboot" to start a reboot
Mounting a new drive to the system
Additionally, we’ll take a look at how to mount a second hard drive. The drive name may differ, depending on the type of the hard drive controller in the system/virtual machine. In my example, the disks are called /dev/sd*.
First, we’ll partition the disk:
fdisk /dev/sdb
mkfs.ext4 /dev/sdb1 -L disk2_test

In order to mount the drive to /usr/local/1, create the following Unit file systemd:
mkdir -pv /usr/local/1
cat << EOF >/etc/systemd/system/var-usrlocal-1.mount
[Unit]
Description = Mount for Container Storage

[Mount]
#What=/dev/sdb1
What=/dev/disk/by-uuid/7fb1139c-b9c9-404c-91fa-9b2f251fb11c
Where=/var/usrlocal/1
Type=ext4

[Install]
WantedBy = multi-user.target

EOF
Enable auto-start and run it:
systemctl enable var-usrlocal-1.mount
Created symlink /etc/systemd/system/multi-user.target.wants/var-usrlocal-1.mount → /etc/systemd/system/var-usrlocal-1.mount.

systemctl start var-usrlocal-1.mount
Check if the partition (df -h) has been mounted:
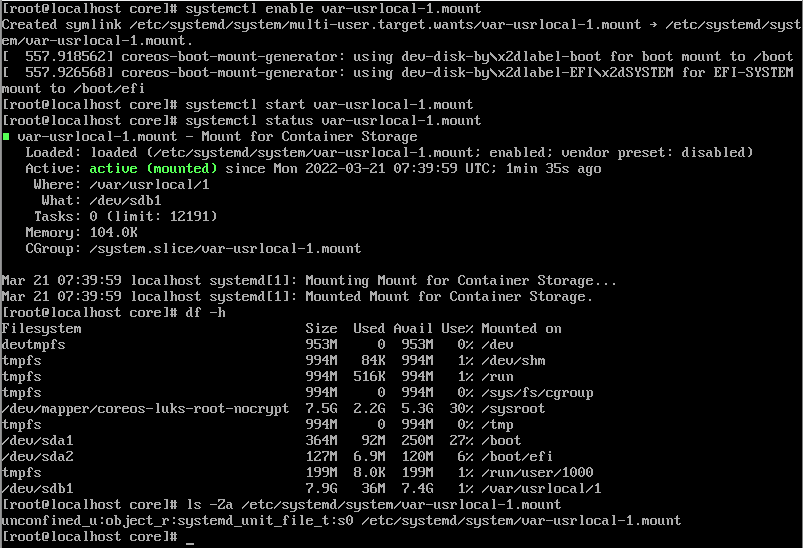
Critically, pay attention to the SELinux attributes required for the systemd unit file (system_u:object_r:systemd_unit_file_t:s0).
If you’re mounting a drive to the /var/lib/containers folder, review the following information:
https://bugzilla.redhat.com/show_bug.cgi?id=1692513
What's next?
After gaining access to the system, read through the service log files as usual. After concluding diagnostics and reparing faults, which should hopefully see the offending Node return to the OpenShift cluster, we can use the standard utilities for collecting log files from all OpenShift Nodes:
oc adm must-gather
If your Node’s data (stored on its Persistent Volume) connected to its HostPath has been saved, and there are further plans to install the system again on a clean virtual machine/server, then you can use this concise cheat-sheet:
If nothing helps
If the above methods of restoring access to the Node do not bear results, then your only recourse is to re-install the system. You can use one of the two most popular images for installing OpenShift:
RHCOS (Red Hat Enterprise Linux CoreOS)
https://mirror.openshift.com/pub/openshift-v4/dependencies/rhcos/4.6/4.6.8/
Fedora CoreOS
https://getfedora.org/ru/coreos?stream=stable
After you start using the rhcos-4.6.8-x86_64-live.x86_64.iso image, the welcome screen and the core-installer sample information will appear.
In the case of a manual install and image preparation, the installation is started using the coreos-installer, it will necessitate the input of the necessary installation parameters, a URL to the ignition files (for bootstrap, compute node and worker node) files and the like.
This may also require additional configuration, such as setting a proper IP address for the pertinent virtual machine or server, DNS names, addresses to where the images are located, etc. Here's one of my examples for KVM virtualisation:
sudo coreos-installer install /dev/vda --ignition-url http://192.168.122.239:8080/okd4/master.ign --insecure-ignition --append-karg rd.neednet=1 --append-karg ip=192.168.122.16::192.168.122.1:255.255.255.0:okd4-control-plane-1.lab.okd.local:ens3:none --append-karg nameserver=192.168.122.1 --append-karg nameserver=192.168.122.239 --image-url http://192.168.122.239:8080/okd4/fcos.raw.xzP. S. If you want to train "for fun", to always be ready for a situation when you have no SSH key on hand, you can install the ISO on a virtual machine. For example, on VirtualBox:

