The beginning
It all started when I found an app. on Apple market, that supposedly was able to determine the ripeness of a water mellon. A program was… strange. Just think about it: instead of knocking using your knuckles, you were supposed to hit the water mellon with your iPhone! Nevertheless, I have decided to repeate that functionality on an Andtoid platform.
Selecting Tools
There are few ways to solve the problem we have, and I had to apply certain efforts to avoid an easy one. Which is, Fourier transforms, wavelets and signal editor. I wanted to learn neural networks after all.
I chose Keras as a NN library, a wonderful tool from Google, a wrapper around TensorFlow and Theano. If you are a beginner, this is definitely the best tool. On one side, Keras is a powerful tool, optimized by speed, memory and hardware (and yes, it works with GPUs). On the other — it hides all the boring staff from the user, allowing to focus on the task itself. Very convenient.
Keras, and neural networks in general, are usually tied to Python, the language that like a giant snake… never mind. Anyway, one need to know Python in order to work in a Deep Learning field. Fortunately, it is an easy language that can be learned very fast.
In addition to Python you will need a few extra libraries, but mastering them is easy — even compared to Python itself. You will need a (shallow) experience with NumPy, PyPlot and possibly couple of other libraries.
Finally it is worth mentioning that we are not going to need GPU clasters: our problem can be solved on a single CPU, slow, but not critically slow.
Plan of work
First of all, we need to create a neural network, using Python and Keras, in Ubuntu environment. One can do it in Windows, but time you would spend configuring things should be enough to learn Ubuntu instead.
The next step is to write a program. I plan on doing it on Java for Андроид. It is going to be a prototype, meaning that it will have the UI, but no NN — yet.
Why do we have to write a dummy program? Here is the trick: any deep learning needs data to, well, learn. How many water mellons should I test (in both meanings of this word) to provide the NN with sufficient amount of data> A hundred? More?
Here we are going to use the dummy program: I will place it on Google Play, give it away (ok, force all my friends to install it) and collect data from it… Where?
The next step is to write a server side program, one receiving data from our Android client. This is a very simple task, it took me about twenty minutes to write, but still, it is a separate step.
Finally, when we have enough data, we can teach the NN.
Then we need to port the resulting NN to Java and to release a new version of our program, to replace a «dummy» one.
Profit. No, wait. The program is free. Just the experience.
Creating the NN
Working with audio signal, which knocking the water mellon definitely is, means either recurrent neural networks or so called one dimentional CNN. As CNNs are easier to use and — for short signals — better, we are going to use them. The idea of a convolutional NN is in «sliding» a «sensor window» over an array of our data (which is a audio signal). As the result, instead of analysing all data simultaneously, we look for local sub-patterns. Each following layer of the NN works with patterns obtained by the previous one, looking for higher level patterns.
To make it easier, imagine that we have to locate a seagull in the photo of an ocean. We slide a small «window» across the picture, looking for a white «checkmark-like» pattern. Now, that was a 2D convolutional neural network, whike for a one-dimensional signal, 1D CNN is a logical choice.
The NN had the following structure:
model = Sequential()
model.add(Conv1D(filters=32, kernel_size=512, strides=3,
	padding='valid', use_bias=False, input_shape=(nSampleSize, 1), name='c1d',
	activation='relu'))
model.add(Activation('relu', input_shape=(nSampleSize, 1)))
model.add(MaxPooling1D(pool_size=(2)))

model.add(Conv1D(32, (3)))
model.add(Activation('relu'))
model.add(MaxPooling1D(pool_size=(2)))

model.add(Conv1D(64, (3)))
model.add(Activation('relu'))
model.add(MaxPooling1D(pool_size=(2)))

model.add(Flatten())
model.add(Dense(64))
model.add(Activation('relu'))
model.add(Dropout(0.5))
model.add(Dense(nNumOfOutputs)) #1))
model.add(Activation('sigmoid'))

model.compile(loss='mean_squared_error',
	optimizer='adam',
	metrics=['accuracy'])
This NN has two outputs (it predicts two values: sweetness and ripeness. Sweetness can be 0 (not sweet), 1 (normal) and 2 (excellent). As for ripeness, it can be 0 (too rigid), 1 (good) and 2 — too soft, like cotton with sand.
To create those labels (outputs), we need data prepared by humans, the way it is done is discussed later, in a chapter about Android program. The objective for our NN is to predict, using audio sample, the estimations a human would do.
Writing a program
As I mentioned, there is going to be two versions of a program: «dummy» and «final». A dummy one does a random predictions (and the user is going to be warned about it). As it does so, it records audio samples and sends them to our server along with user estimations of a real quality of the water mellon. In other words, the program simply collects the data.
Here is a page of the final version of a program, it is free.
What it does:
1. When the «microphone» button is pressed, a recording begins. The user has five seconds to knock the water mellon three times, it is quite similar to knocking the door. Then you can press the «water melon» button to get the «prediction».
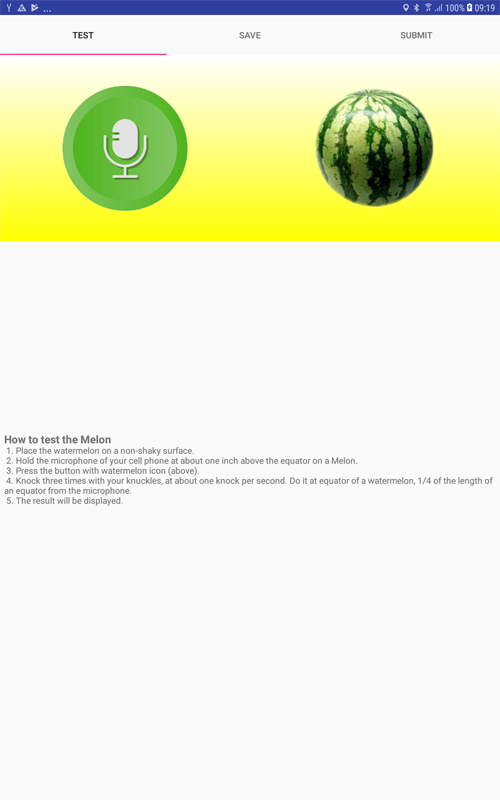
2. The recording we made is saved as a temporary file. By temporary i mean that it will be overwritten by the next recording. It allows to repeat knocking if someone talks in the room (you wouldn't believe how difficult it is to make people quiet for five seconde!), or water runs, or some other noise has place.
Ok, say the water mellon is purchased and you have brought it home. You have made a recording, and then you cut it.Now you are ready to estimate its taste.
Choose the «Save» tab.
On this tab we have two combo boxes: sweetness and ripeness. Select the values, and click Save.
Important! You can only press Save once! It is done to prevent users from sending multiple estimations for the same water mellon. It also mean that you have to select values carefully, and only then to click Save. After you saved the result, an audio file is renamed, and it will not be deleted next time you do recording.

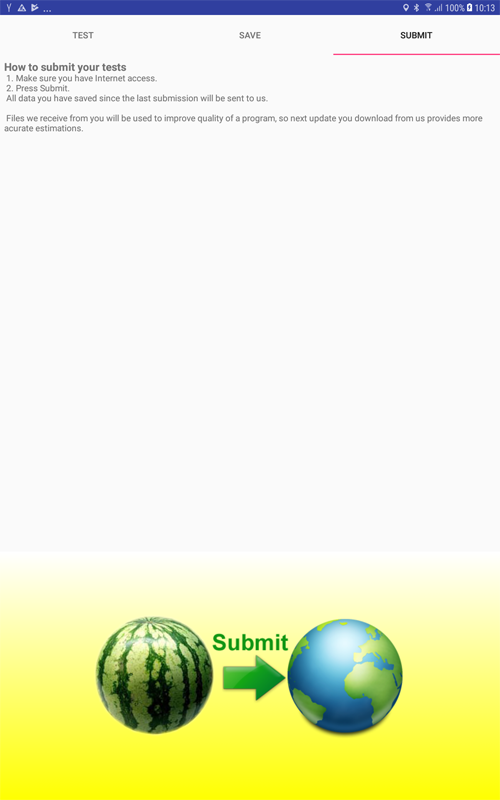
3. Finally, after you have made estimations (meand eaten) dosen of water mellons, you have returned from the village where you had an unlimited access to water mellons, but no Internet. Now you are online. Open the Submit tab and press the button. A package containing info for all watermellons you haven't submitted yet, will be sent to our server.
Writing the server side program
It is really easy, so I better just publish the source code. The program «catches» files, assigns unique names and places them to a folder that is accessible to site owner only.
<?php

	if (is_uploaded_file($_FILES['file']['tmp_name']))
	{
		$uploads_dir = './melonaire/';
		$tmp_name = $_FILES['file']['tmp_name'];
		$pic_name = $_FILES['file']['name'];

		$filename = md5(date('Y-m-d H:i:s:u'));

		move_uploaded_file($tmp_name, $uploads_dir.$filename);
	}
	else
	{
		echo "File not uploaded successfully.";
	}

?>
Training the NN
We split data to training (70%) and testing (30%). Neural Net converges well, no surprises here. A note for beginners: do not forget to normalize the input data, it will save you a lot of time and nerves. Something like this:
for file_name in os.listdir(path):
	nSweetness, nRipeness, arr_loaded = loadData(file_name)
	arr_data.append(arr_loaded / max(abs(arr_loaded)))
	# 2 stands for num. of inputs of a combo box - 1
	arr_labels.append([nSweetness / 2.0, nRipeness / 2.0])
Porting to Java
There are few ways to port the NN from Python to Java. Lately, Google made this process really convenient, so if you decide to study textbooks, make sure they are not obsolete. Here is how I did it:
from keras.models import Model
from keras.models import load_model
from keras.layers import *
import os
import sys

import tensorflow as tf

# -------------------

def print_graph_nodes(filename):
    g = tf.GraphDef()
    g.ParseFromString(open(filename, 'rb').read())
    print()
    print(filename)
    print("=======================INPUT=========================")
    print([n for n in g.node if n.name.find('input') != -1])
    print("=======================OUTPUT========================")
    print([n for n in g.node if n.name.find('output') != -1])
    print("===================KERAS_LEARNING=====================")
    print([n for n in g.node if n.name.find('keras_learning_phase') != -1])
    print("======================================================")
    print()

# -------------------

def get_script_path():
    return os.path.dirname(os.path.realpath(sys.argv[0]))

# -------------------

def keras_to_tensorflow(keras_model, output_dir,
	model_name,out_prefix="output_", log_tensorboard=True):

    if os.path.exists(output_dir) == False:
        os.mkdir(output_dir)

    out_nodes = []

    for i in range(len(keras_model.outputs)):
        out_nodes.append(out_prefix + str(i + 1))
        tf.identity(keras_model.output[i], out_prefix + str(i + 1))

    sess = K.get_session()

    from tensorflow.python.framework import graph_util, graph_io

    init_graph = sess.graph.as_graph_def()

    main_graph = graph_util.convert_variables_to_constants(sess, init_graph, out_nodes)

    graph_io.write_graph(main_graph, output_dir, name=model_name, as_text=False)

    if log_tensorboard:
        from tensorflow.python.tools import import_pb_to_tensorboard

        import_pb_to_tensorboard.import_to_tensorboard(
            os.path.join(output_dir, model_name),
            output_dir)

model = load_model(get_script_path() + "/models/model.h5")
#keras_to_tensorflow(model, output_dir=get_script_path() + "/models/model.h5",
#	model_name=get_script_path() + "/models/converted.pb")

print_graph_nodes(get_script_path() + "/models/converted.pb")
Note the last line: in Java code, you will need the name of the input and output layers of the NN. The «print» statement displays them for us.
Next, we place the exported file to «assets» folder of the Android Studio project (file name is concerted.pb, don't ask), add the library (here, here or better, here tensorflowinferenceinterface, and… that's it.
That's it. When I did it for the first time, I expected problems, but… everything just worked.
Here is the call to our NN from Java code:
        protected Void doInBackground(Void... params)
        {
            try
            {
                //Pass input into the tensorflow
                tf.feed(INPUT_NAME, m_arrInput, 1, // batch ?
                        m_arrInput.length, 1); // channels ?

                //compute predictions
                tf.run(new String[]{OUTPUT_NAME});

                //copy the output into the PREDICTIONS array
                tf.fetch(OUTPUT_NAME, m_arrPrediction);
            } catch (Exception e)
            {
                e.getMessage();
            }
            return null;
        }
Here «m_arrInput» — an array containing two elements, with our prediction (sweetness, ripeness), in 0 to 1 range.
Conclusion
I believe I am supposed to thank my audience for attention and to express hope that it was interesting. Instead, I wish you more sweet water mellons, and i hope you will send me new audio samples, as you eat them (mellons, not samples, huh!)
The program is free, of course.
