 Недавно я решил разобраться, как делать живые обои для андроида, а разбираться лучше всего на хорошем примере — таком, который потом пригодится. Я всегда хотел удобные часы. Для андроида уже существует достаточное количество подобных обоев, но обычно они рисуют большие часы в каком-нибудь фиксированном углу экрана и перекрываются виджетами, которых у меня немало. Мне хотелось, чтобы часы были разбросаны по всему экрану, тогда вероятность увидеть их будет выше.
Живые обои для андроида представляют собой сервис (фоновый процесс, в терминах платформы), причем в SDK уже существует готовый класс для живых обоев, в котором нужно переопределить несколько методов, чтобы получить результат.
Для начала в манифесте описывается, что приложение будет предоставлять живые обои:
<service
    android:name="LiveWallpaperService"
    android:enabled="true"
    android:icon="@drawable/icon"
    android:label="@string/app_name"
    android:permission="android.permission.BIND_WALLPAPER">
    <intent-filter android:priority="1" >
        <action android:name="android.service.wallpaper.WallpaperService" />
    </intent-filter>
    <meta-data
      android:name="android.service.wallpaper"
      android:resource="@xml/wallpaper" />
</service>
Самые важные строки здесь android:permission и intent-filter
Потом, собственно, кодирование. Мы создадим свой класс-наследник WallpaperService и переопределим его методы onCreate, onDestroy, onVisibilityChanged, onSurfaceChanged, onSurfaceCreated, onSurfaceDestroyed
Эти методы будут реагировать на системные события. Главное их назначение — включать и выключать отрисовку обоев, когда меняется их видимость, чтобы экономить батарею.
Фактически, нас интересуют только:
@Override
public void onVisibilityChanged(boolean visible) {
	if (visible) {
		painting.resumePainting();
	} else {
		// remove listeners and callbacks here
		painting.pausePainting();
	}
}

@Override
public void onDestroy() {
	super.onDestroy();
	// remove listeners and callbacks here
	painting.stopPainting();
}
@Override
public void onSurfaceChanged(SurfaceHolder holder, int format, int width, int height) {
	super.onSurfaceChanged(holder, format, width, height);
	painting.setSurfaceSize(width, height);
	Log.d("Clock", "Changed");
}

@Override
public void onSurfaceCreated(SurfaceHolder holder) {
	super.onSurfaceCreated(holder);
	painting.start();
}

@Override
public void onSurfaceDestroyed(SurfaceHolder holder) {
	super.onSurfaceDestroyed(holder);
	boolean retry = true;
	painting.stopPainting();
	while (retry) {
		try {
			painting.join();
			retry = false;
		} catch (InterruptedException e) {}
	}
}
Саму отрисовку мы реализуем в отдельном потоке, чтобы реакции на пользовательские действия были своевременными и плавными. Для этого создадим еще одни класс-наследник Thread. Объект painting в примере выше и является этим потоком:
public ClockWallpaperPainting(SurfaceHolder surfaceHolder, Context context, int fontColor, int backgroundColor) {
	this.surfaceHolder = surfaceHolder;
	this.context_ = context;

	clockFont_ = Typeface.createFromAsset(context.getAssets(), "digital_font.ttf");

	textPainter_.setTypeface(clockFont_);
	textPainter_.setTextSize(30);
	setPreferences(fontColor, backgroundColor);

	this.wait_ = true;
}

@Override
public void run() {
	this.run_ = true;
	Canvas c = null;
	while (run_) {
		try {
			c = this.surfaceHolder.lockCanvas(null);
			synchronized (this.surfaceHolder) {
				doDraw( c );
			}
		} finally {
			if (c != null) {
				this.surfaceHolder.unlockCanvasAndPost( c );
			}
		}
		// pause if no need to animate
		synchronized (this) {
			if (wait_) {
				try {
					wait();
				} catch (Exception e) {}
			}
		}
	}
}

public void pausePainting() {
	this.wait_ = true;
	synchronized(this) {
		this.notify();
	}
}

public void resumePainting() {
	this.wait_ = false;
	synchronized(this) {
		this.notify();
	}
}

public void stopPainting() {
	this.run_ = false;
	synchronized(this) {
		this.notify();
	}
}
Как видно, мы просто бесконечно выполняем метод doDraw(), периодически ставя его на паузу, когда рабочий стол не виден.
Сам метод выглядит примерно так:
private void doDraw(Canvas canvas) {
	Date currentTime = new Date();

	//Create text for clock
	String clockText;
	if (DateFormat.is24HourFormat(context_)) {
		if (currentTime.getSeconds()%2 == 0)
			clockText = DateFormat.format("kk:mm", currentTime).toString();
		else
			clockText = DateFormat.format("kk mm", currentTime).toString();
	} else {
		if (currentTime.getSeconds()%2 == 0)
			clockText = DateFormat.format("h:mmaa", currentTime).toString();
		else
			clockText = DateFormat.format("h mmaa", currentTime).toString();
	}

	int textSize = (int)textPainter_.getTextSize();
	//Erase Background
	canvas.drawRect(0, 0, width_, height_, backgroundPainter_);

	int stepX = (width_ - textSize) / (CLOCKS_COUNT + 1);
	int stepY = (height_ - textSize*CLOCKS_COUNT) / (CLOCKS_COUNT + 1);

	for (int i=1; i <= CLOCKS_COUNT; ++i)
		canvas.drawText(clockText,
				stepX/2 + stepX * (i-1) - absoluteOffset_,
				height_/20 + stepY * i + textSize*(i-1),
				textPainter_);
}
В сервисе мы переопределим еще один метод, чтобы обои реагировали на смену рабочих столов:
@Override
public void onOffsetsChanged(float xOffset, float yOffset, float xStep, float yStep, int xPixels, int yPixels) {
	painting.setOffset(xOffset);
	Log.d("Clock", String.format("off:%f-%f step:%f - %f px: %d - %d", xOffset, yOffset, xStep, yStep, xPixels, yPixels));
}
Как сделать отрисовку в отдельном потоке, отлично расписано в этом примере.
И, наконец, настройки. Делаются они несложно, так же как и настройки любых других андроид приложений. В xml файле нужно прописать настраиваемые параметры и диапазоны значений, которые они могут принимать. В нашем случае позволим пользователю выбирать цвет текста и фона.
<PreferenceScreen
	xmlns:android="http://schemas.android.com/apk/res/android"
    android:title="@string/settings_title">

    <ListPreference
	    android:key="preference_font_color"
	    android:title="@string/preference_font_color_title"
	    android:summary="@string/preference_font_color_summary"
	    android:entries="@array/color_names"
	    android:entryValues="@array/color_values" />

    <ListPreference
	    android:key="preference_background_color"
	    android:title="@string/preference_background_color_title"
	    android:summary="@string/preference_background_color_summary"
	    android:entries="@array/color_names"
	    android:entryValues="@array/color_values" />

</PreferenceScreen>
Вот так это выглядит в итоге:
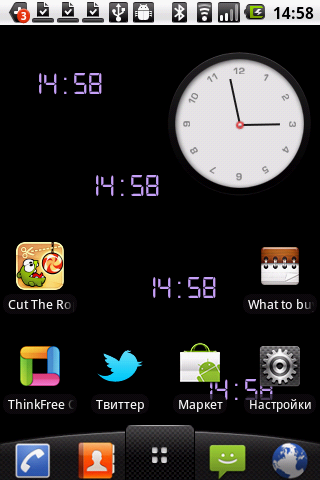
Скачать можно тут.
Чтобы написать свои обои, начать можно отсюда

