
Kubernetes быстро стал стандартом для поставок и масштабирования контейнерных приложений и управления ими. Это очень гибкое и универсальное решение с открытым исходным кодом. У него обширная документация, и в ней не всегда легко найти нужный раздел. Поэтому Kubernetes так непросто освоить. После планирования кластера его еще нужно установить, а тут тоже не все гладко. Поэтому и существуют инструменты развертывания, вроде Kubespray, которые упрощают работу. Я расскажу об автоматическом развертывании кластера Kubernetes с помощью Kubespray в облаке OpenStack (Open Telekom Cloud).
Для автоматического развертывания Kubernetes Kubespray использует инструмент инициализации, конфигурации и поставки приложений Ansible. А еще Kubespray предоставляет библиотеку для инициализации ресурсов на разных облачных платформах. Для этого используется инструмент «инфраструктура как код» Terraform. Сейчас проект Kubespray поддерживает Terraform для облаков AWS, OpenStack и Packet. Этот инструмент используется вместе с библиотекой OpenStack, чтобы обеспечивать инфраструктуру в этом сценарии.
Требования
Сначала давайте рассмотрим предварительные требования для развертывания. Они разделены на две категории: требования для Kubespray и требования для библиотеки поставщика.
Для Kubespray нужны следующие компоненты:
- Python 2.7 (или выше)
- Ansible 2.7 (или выше)
- Jinja 2.9 (или выше)
Требования библиотеки поставщика OpenStack:
- Terraform 0.11 (или выше)
Для установки Terraform нужно загрузить подходящий пакет с сайта Hashicorp и распаковать его. Затем путь к распакованному файлу нужно сохранить в переменной PATH. С помощью команды terraform можно проверить, все ли установилось. Узнать больше можно здесь.
В зависимости от операционной системы Ansible можно установить парой команд. См. документацию по Ansible. Здесь я использую Ubuntu и устанавливаю Ansible следующим образом.
sudo apt update
sudo apt install ansible
Затем нужно установить зависимости Kubespray. Это делается следующей командой. Но сначала нужно клонировать репозиторий.
git clone https://github.com/kubernetes-sigs/kubespray
sudo pip install -r requirements.txt
Чтобы использовать Open Telekom Cloud, настройте данные для доступа с помощью .ostackrc в корневом каталоге и загрузите переменные среды.
Планирование кластера
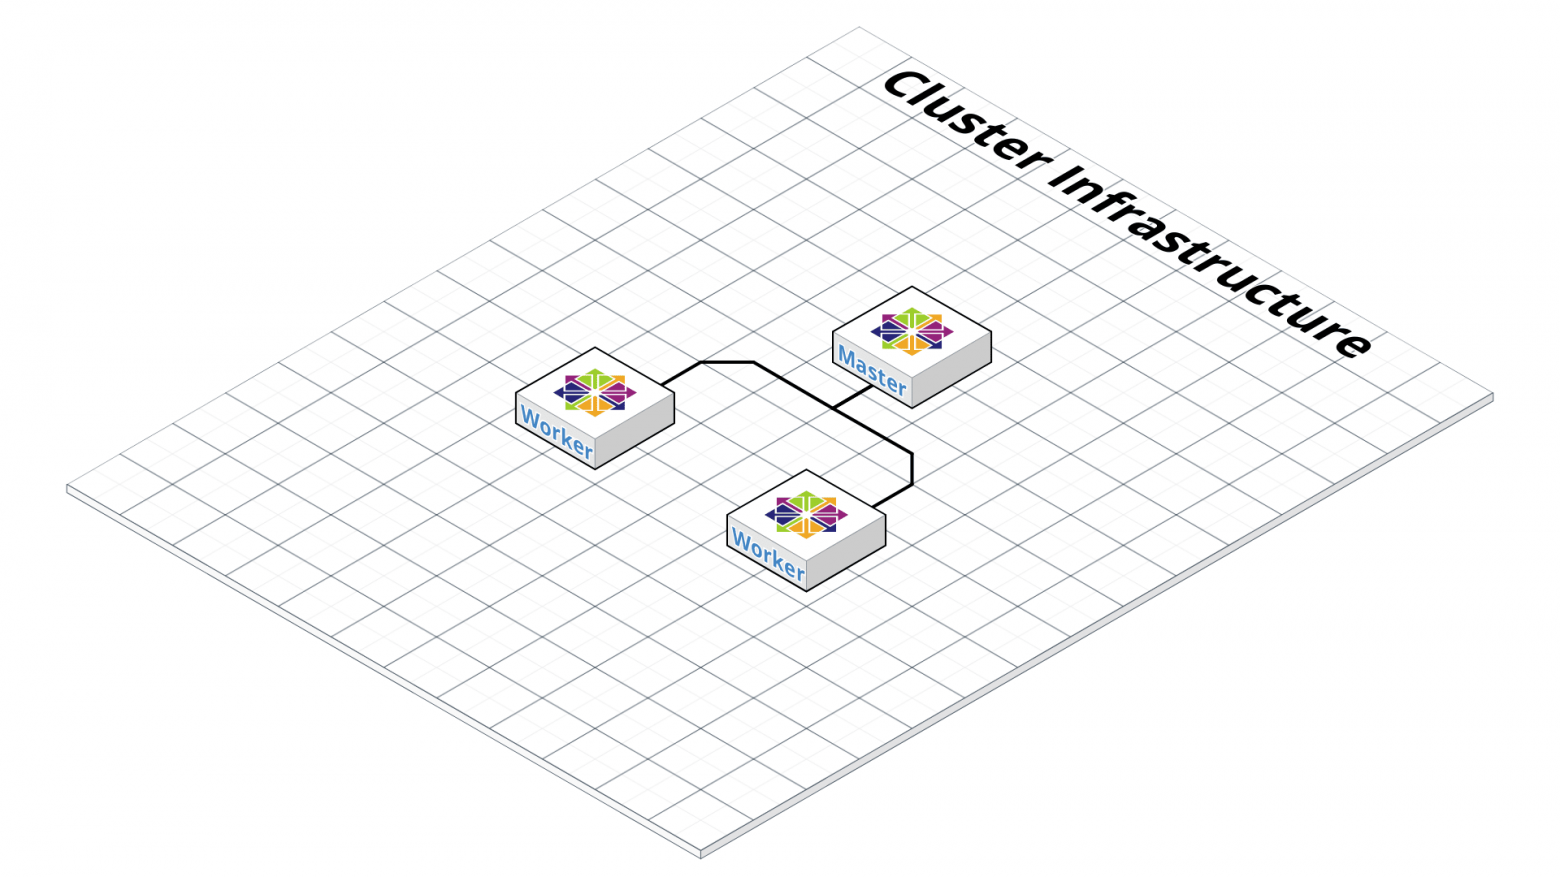
Kubernetes очень гибкий, поэтому кластер можно адаптировать к вашим потребностям. Здесь мы не будем рассматривать разные варианты кластеров. Об этом можно почитать в документации Kubernetes в разделе Создание кастомного кластера с нуля. Для примера мы создадим кластер из мастера с etcd и двух рабочих узлов. У кластера не будет плавающего IP, поэтому из интернета он будет недоступен.
Еще нам нужно выбрать CNI (Container Network Interface). Вариантов несколько (cilium, calico, flannel, weave net и т. д.), но мы возьмем flannel, который не нужно настраивать. Calico тоже подойдет, но нужно будет настроить порты OpenStack Neutron для подсетей сервисов и pod’ов.
Чтобы управлять кластерами на панели мониторинга Kubernetes после развертывания, нам нужно установить эту панель.
Настройка конфигурации кластера
Выполните следующие команды в каталоге репозитория, указав нужное имя в переменной $CLUSTER.
cp -LRp contrib/terraform/openstack/sample-inventory \
inventory/$CLUSTER
cd inventory/$CLUSTER
ln -s ../../contrib/terraform/openstack/hosts
ln -s ../../contrib
После выполнения команд отредактируйте файл inventory/$CLUSTER/cluster.tf.
# your Kubernetes cluster name here

cluster_name = "k8s-test-cluster"
az_list=["eu-de-01", "eu-de-02"]
dns_nameservers=["100.125.4.25", "8.8.8.8"]

# SSH key to use for access to nodes
public_key_path = "~/.ssh/id_rsa.pub"

# image to use for bastion, masters, standalone etcd instances, and nodes
image = "Standard_CentOS_7_latest"

# user on the node (ex. core on Container Linux, ubuntu on Ubuntu, etc.)
ssh_user = "linux"

# 0|1 bastion nodes
number_of_bastions = 0
flavor_bastion = "s2.xlarge.4"

# standalone etcds
number_of_etcd = 0
flavor_etcd = "s2.xlarge.4"

# masters
number_of_k8s_masters = 0
number_of_k8s_masters_no_etcd = 0
number_of_k8s_masters_no_floating_ip = 1
number_of_k8s_masters_no_floating_ip_no_etcd = 0
flavor_k8s_master = "s2.xlarge.4"

# nodes
number_of_k8s_nodes = 0
number_of_k8s_nodes_no_floating_ip = 2
flavor_k8s_node = "s2.xlarge.4"

# GlusterFS
# either 0 or more than one
#number_of_gfs_nodes_no_floating_ip = 1
#gfs_volume_size_in_gb = 150
# Container Linux does not support GlusterFS
image_gfs = "Standard_CentOS_7_latest"
# May be different from other nodes
#ssh_user_gfs = "linux"
#flavor_gfs_node = "s2.xlarge.4"

# networking
network_name = "k8s-test-network"
external_net = "Externel_Network_ID"
subnet_cidr = "192.168.100.0/24"
floatingip_pool = "admin_external_net"
bastion_allowed_remote_ips = ["0.0.0.0/0"]
Описание переменных читайте здесь. В этом примере мы создадим кластер с одним мастером и двумя рабочими узлами Kubernetes на основе последней версии CentOS 7 и s2.xlarge.4. etcd тоже установим на мастере.
Развертывание инфраструктуры
Теперь мы готовы развернуть инфраструктуру кластера с помощью Terraform. На рисунке видно, как выглядит инфраструктура после развертывания. Подробности ниже.
Чтобы запустить развертывание Terraform, перейдите в каталог inventory/$CLUSTER/ и выполните следующие команды. Сначала установим нужные плагины. Для этого нам нужен аргумент init и путь к плагинам.
terraform init ../../contrib/terraform/openstack
Эта операция выполняется очень быстро. Сейчас Terraform готов к развертыванию инфраструктуры с помощью аргумента apply.
terraform apply -var-file=cluster.tf ../../contrib/terraform/openstack
Через несколько секунд Terraform должен показать подобный результат, и экземпляры будут доступны для работы.
Apply complete! Resources: 3 added, 0 changed, 0 destroyed.
Чтобы проверить доступность серверов, выполните следующую команду Ansible, а потом мы перейдем в корневую папку репозитория.
$ ansible -i inventory/$CLUSTER/hosts -m ping all
example-k8s_node-1 | SUCCESS => {
    "changed": false,
    "ping": "pong"
}
example-etcd-1 | SUCCESS => {
    "changed": false,
    "ping": "pong"
}
example-k8s-master-1 | SUCCESS => {
    "changed": false,
    "ping": "pong"
}
Развертывание кластера Kubernetes
Инфраструктура развернута, теперь нужно установить кластер Kubernetes. Сначала настроим переменные кластера в файле inventory/$CLUSTER/group_vars/all/all.yml. Здесь нужно установить для cloud_provider значение openstack, а для bin_dir — путь, где будут установлены файлы. В нашем примере мы используем следующую конфигурацию.
## Directory where etcd data stored
etcd_data_dir: /var/lib/etcd

## Directory where the binaries will be installed
bin_dir: /usr/local/bin

## The access_ip variable is used to define how other nodes should access
## the node.  This is used in flannel to allow other flannel nodes to see
## this node for example.  The access_ip is really useful AWS and Google
## environments where the nodes are accessed remotely by the "public" ip,
## but don't know about that address themselves.
#access_ip: 1.1.1.1

## External LB example config
## apiserver_loadbalancer_domain_name: "elb.some.domain"
#loadbalancer_apiserver:
#  address: 1.2.3.4
#  port: 1234

## Internal loadbalancers for apiservers
#loadbalancer_apiserver_localhost: true

## Local loadbalancer should use this port instead, if defined.
## Defaults to kube_apiserver_port (6443)
#nginx_kube_apiserver_port: 8443

### OTHER OPTIONAL VARIABLES
## For some things, kubelet needs to load kernel modules.  For example, dynamic kernel services are needed
## for mounting persistent volumes into containers.  These may not be loaded by preinstall kubernetes
## processes.  For example, ceph and rbd backed volumes.  Set to true to allow kubelet to load kernel
## modules.
#kubelet_load_modules: false

## Upstream dns servers used by dnsmasq
#upstream_dns_servers:
#  - 8.8.8.8
#  - 8.8.4.4

## There are some changes specific to the cloud providers
## for instance we need to encapsulate packets with some network plugins
## If set the possible values are either 'gce', 'aws', 'azure', 'openstack', 'vsphere', 'oci', or 'external'
## When openstack is used make sure to source in the openstack credentials
## like you would do when using nova-client before starting the playbook.
## Note: The 'external' cloud provider is not supported.
## TODO(riverzhang): https://kubernetes.io/docs/tasks/administer-cluster/running-cloud-controller/#running-cloud-controller-manager
cloud_provider: openstack

## Set these proxy values in order to update package manager and docker daemon to use proxies
#http_proxy: ""
#https_proxy: ""

## Refer to roles/kubespray-defaults/defaults/main.yml before modifying no_proxy
#no_proxy: ""

## Some problems may occur when downloading files over https proxy due to ansible bug
## https://github.com/ansible/ansible/issues/32750. Set this variable to False to disable
## SSL validation of get_url module. Note that kubespray will still be performing checksum validation.
#download_validate_certs: False

## If you need exclude all cluster nodes from proxy and other resources, add other resources here.
#additional_no_proxy: ""

## Certificate Management
## This setting determines whether certs are generated via scripts.
## Chose 'none' if you provide your own certificates.
## Option is  "script", "none"
## note: vault is removed
#cert_management: script

## Set to true to allow pre-checks to fail and continue deployment
#ignore_assert_errors: false

## The read-only port for the Kubelet to serve on with no authentication/authorization. Uncomment to enable.
#kube_read_only_port: 10255

## Set true to download and cache container
download_container: false

## Deploy container engine
# Set false if you want to deploy container engine manually.
#deploy_container_engine: true

## Set Pypi repo and cert accordingly
#pyrepo_index: https://pypi.example.com/simple
#pyrepo_cert: /etc/ssl/certs/ca-certificates.crt
Теперь настроим файл inventory/$CLUSTER/group_vars/k8s-cluster/k8s-cluster.yml. Для переменной kube_network_plugin установите flannel или calico (нужна настройка портов OpenStack Neutron). У нас это будет flannel, который не нужно настраивать. Для переменной resolvconf_mode установим docker_dns. Это значение велит Kubespray установить параметры Docker-демона. Ниже вы видите пример конфигурации для нашего кластера.
# Kubernetes configuration dirs and system namespace.
# Those are where all the additional config stuff goes
# the kubernetes normally puts in /srv/kubernetes.
# This puts them in a sane location and namespace.
# Editing those values will almost surely break something.
kube_config_dir: /etc/kubernetes
kube_script_dir: "{{ bin_dir }}/kubernetes-scripts"
kube_manifest_dir: "{{ kube_config_dir }}/manifests"

# This is where all the cert scripts and certs will be located
kube_cert_dir: "{{ kube_config_dir }}/ssl"

# This is where all of the bearer tokens will be stored
kube_token_dir: "{{ kube_config_dir }}/tokens"

# This is where to save basic auth file
kube_users_dir: "{{ kube_config_dir }}/users"

kube_api_anonymous_auth: true

## Change this to use another Kubernetes version, e.g. a current beta release
kube_version: v1.13.3

# kubernetes image repo define
kube_image_repo: "gcr.io/google-containers"

# Where the binaries will be downloaded.
# Note: ensure that you've enough disk space (about 1G)
local_release_dir: "/tmp/releases"
# Random shifts for retrying failed ops like pushing/downloading
retry_stagger: 5

# This is the group that the cert creation scripts chgrp the
# cert files to. Not really changeable...
kube_cert_group: kube-cert

# Cluster Loglevel configuration
kube_log_level: 2

# Directory where credentials will be stored
credentials_dir: "{{ inventory_dir }}/credentials"

# Users to create for basic auth in Kubernetes API via HTTP
# Optionally add groups for user
kube_api_pwd: "{{ lookup('password', credentials_dir + '/kube_user.creds length=15 chars=ascii_letters,digits') }}"
kube_users:
  kube:
    pass: "{{kube_api_pwd}}"
    role: admin
    groups:
      - system:masters

## It is possible to activate / deactivate selected authentication methods (basic auth, static token auth)
#kube_oidc_auth: false
#kube_basic_auth: false
#kube_token_auth: false

## Variables for OpenID Connect Configuration https://kubernetes.io/docs/admin/authentication/
## To use OpenID you have to deploy additional an OpenID Provider (e.g Dex, Keycloak, ...)

# kube_oidc_url: https:// ...
# kube_oidc_client_id: kubernetes
## Optional settings for OIDC
# kube_oidc_ca_file: "{{ kube_cert_dir }}/ca.pem"
# kube_oidc_username_claim: sub
# kube_oidc_username_prefix: oidc:
# kube_oidc_groups_claim: groups
# kube_oidc_groups_prefix: oidc:

# Choose network plugin (cilium, calico, contiv, weave or flannel)
# Can also be set to 'cloud', which lets the cloud provider setup appropriate routing
kube_network_plugin: flannel

# Setting multi_networking to true will install Multus: https://github.com/intel/multus-cni
kube_network_plugin_multus: false

# Kubernetes internal network for services, unused block of space.
kube_service_addresses: 10.233.0.0/18

# internal network. When used, it will assign IP
# addresses from this range to individual pods.
# This network must be unused in your network infrastructure!
kube_pods_subnet: 10.233.64.0/18

# internal network node size allocation (optional). This is the size allocated
# to each node on your network.  With these defaults you should have
# room for 4096 nodes with 254 pods per node.
kube_network_node_prefix: 24

# The port the API Server will be listening on.
kube_apiserver_ip: "{{ kube_service_addresses|ipaddr('net')|ipaddr(1)|ipaddr('address') }}"
kube_apiserver_port: 6443 # (https)
#kube_apiserver_insecure_port: 8080 # (http)
# Set to 0 to disable insecure port - Requires RBAC in authorization_modes and kube_api_anonymous_auth: true
kube_apiserver_insecure_port: 0 # (disabled)

# Kube-proxy proxyMode configuration.
# Can be ipvs, iptables
kube_proxy_mode: ipvs

# A string slice of values which specify the addresses to use for NodePorts.
# Values may be valid IP blocks (e.g. 1.2.3.0/24, 1.2.3.4/32).
# The default empty string slice ([]) means to use all local addresses.
# kube_proxy_nodeport_addresses_cidr is retained for legacy config
kube_proxy_nodeport_addresses: >-
  {%- if kube_proxy_nodeport_addresses_cidr is defined -%}
  [{{ kube_proxy_nodeport_addresses_cidr }}]
  {%- else -%}
  []
  {%- endif -%}
# If non-empty, will use this string as identification instead of the actual hostname
#kube_override_hostname: >-
#  {%- if cloud_provider is defined and cloud_provider in [ 'aws' ] -%}
#  {%- else -%}
#  {{ inventory_hostname }}
#  {%- endif -%}

## Encrypting Secret Data at Rest (experimental)
kube_encrypt_secret_data: false

# DNS configuration.
# Kubernetes cluster name, also will be used as DNS domain
cluster_name: cluster.local
# Subdomains of DNS domain to be resolved via /etc/resolv.conf for hostnet pods
ndots: 2
# Can be dnsmasq_kubedns, kubedns, coredns, coredns_dual, manual or none
dns_mode: coredns
# Set manual server if using a custom cluster DNS server
#manual_dns_server: 10.x.x.x
# Enable nodelocal dns cache
enable_nodelocaldns: False
nodelocaldns_ip: 169.254.25.10

# Can be docker_dns, host_resolvconf or none
resolvconf_mode: docker_dns
# Deploy netchecker app to verify DNS resolve as an HTTP service
deploy_netchecker: false
# Ip address of the kubernetes skydns service
skydns_server: "{{ kube_service_addresses|ipaddr('net')|ipaddr(3)|ipaddr('address') }}"
skydns_server_secondary: "{{ kube_service_addresses|ipaddr('net')|ipaddr(4)|ipaddr('address') }}"
dnsmasq_dns_server: "{{ kube_service_addresses|ipaddr('net')|ipaddr(2)|ipaddr('address') }}"
dns_domain: "{{ cluster_name }}"

## Container runtime
## docker for docker and crio for cri-o.
container_manager: docker

## Settings for containerized control plane (etcd/kubelet/secrets)
etcd_deployment_type: docker
kubelet_deployment_type: host
helm_deployment_type: host

# K8s image pull policy (imagePullPolicy)
k8s_image_pull_policy: IfNotPresent

# audit log for kubernetes
kubernetes_audit: false

# dynamic kubelet configuration
dynamic_kubelet_configuration: false

# define kubelet config dir for dynamic kubelet
#kubelet_config_dir:
default_kubelet_config_dir: "{{ kube_config_dir }}/dynamic_kubelet_dir"
dynamic_kubelet_configuration_dir: "{{ kubelet_config_dir | default(default_kubelet_config_dir) }}"

# pod security policy (RBAC must be enabled either by having 'RBAC' in authorization_modes or kubeadm enabled)
podsecuritypolicy_enabled: false

# Make a copy of kubeconfig on the host that runs Ansible in {{ inventory_dir }}/artifacts
# kubeconfig_localhost: false
# Download kubectl onto the host that runs Ansible in {{ bin_dir }}
# kubectl_localhost: false

# dnsmasq
# dnsmasq_upstream_dns_servers:
#  - /resolvethiszone.with/10.0.4.250
#  - 8.8.8.8

#  Enable creation of QoS cgroup hierarchy, if true top level QoS and pod cgroups are created. (default true)
# kubelet_cgroups_per_qos: true

# A comma separated list of levels of node allocatable enforcement to be enforced by kubelet.
# Acceptable options are 'pods', 'system-reserved', 'kube-reserved' and ''. Default is "".
# kubelet_enforce_node_allocatable: pods

## Supplementary addresses that can be added in kubernetes ssl keys.
## That can be useful for example to setup a keepalived virtual IP
# supplementary_addresses_in_ssl_keys: [10.0.0.1, 10.0.0.2, 10.0.0.3]

## Running on top of openstack vms with cinder enabled may lead to unschedulable pods due to NoVolumeZoneConflict restriction in kube-scheduler.
## See https://github.com/kubernetes-sigs/kubespray/issues/2141
## Set this variable to true to get rid of this issue
volume_cross_zone_attachment: false
# Add Persistent Volumes Storage Class for corresponding cloud provider ( OpenStack is only supported now )
persistent_volumes_enabled: false

## Container Engine Acceleration
## Enable container acceleration feature, for example use gpu acceleration in containers
# nvidia_accelerator_enabled: true
## Nvidia GPU driver install. Install will by done by a (init) pod running as a daemonset.
## Important: if you use Ubuntu then you should set in all.yml 'docker_storage_options: -s overlay2'
## Array with nvida_gpu_nodes, leave empty or comment if you dont't want to install drivers.
## Labels and taints won't be set to nodes if they are not in the array.
# nvidia_gpu_nodes:
#   - kube-gpu-001
# nvidia_driver_version: "384.111"
## flavor can be tesla or gtx
# nvidia_gpu_flavor: gtx
Наконец, отредактируем файл inventory/$CLUSTER/group_vars/k8s-cluster/addons.yml и зададим для dashboard_enabled значение true, чтобы установить панель мониторинга. Пример конфигурации:
# Kubernetes dashboard
# RBAC required. see docs/getting-started.md for access details.
dashboard_enabled: true

# Helm deployment
helm_enabled: false

# Registry deployment
registry_enabled: false
# registry_namespace: kube-system
# registry_storage_class: ""
# registry_disk_size: "10Gi"

# Metrics Server deployment
metrics_server_enabled: false
# metrics_server_kubelet_insecure_tls: true
# metrics_server_metric_resolution: 60s
# metrics_server_kubelet_preferred_address_types: "InternalIP"

# Local volume provisioner deployment
local_volume_provisioner_enabled: false
# local_volume_provisioner_namespace: kube-system
# local_volume_provisioner_storage_classes:
#   local-storage:
#     host_dir: /mnt/disks
#     mount_dir: /mnt/disks
#   fast-disks:
#     host_dir: /mnt/fast-disks
#     mount_dir: /mnt/fast-disks
#     block_cleaner_command:
#       - "/scripts/shred.sh"
#       - "2"
#     volume_mode: Filesystem
#     fs_type: ext4

# CephFS provisioner deployment
cephfs_provisioner_enabled: false
# cephfs_provisioner_namespace: "cephfs-provisioner"
# cephfs_provisioner_cluster: ceph
# cephfs_provisioner_monitors: "172.24.0.1:6789,172.24.0.2:6789,172.24.0.3:6789"
# cephfs_provisioner_admin_id: admin
# cephfs_provisioner_secret: secret
# cephfs_provisioner_storage_class: cephfs
# cephfs_provisioner_reclaim_policy: Delete
# cephfs_provisioner_claim_root: /volumes
# cephfs_provisioner_deterministic_names: true

# Nginx ingress controller deployment
ingress_nginx_enabled: false
# ingress_nginx_host_network: false
# ingress_nginx_nodeselector:
#   node.kubernetes.io/node: ""
# ingress_nginx_tolerations:
#   - key: "node.kubernetes.io/master"
#     operator: "Equal"
#     value: ""
#     effect: "NoSchedule"
# ingress_nginx_namespace: "ingress-nginx"
# ingress_nginx_insecure_port: 80
# ingress_nginx_secure_port: 443
# ingress_nginx_configmap:
#   map-hash-bucket-size: "128"
#   ssl-protocols: "SSLv2"
# ingress_nginx_configmap_tcp_services:
#   9000: "default/example-go:8080"
# ingress_nginx_configmap_udp_services:
#   53: "kube-system/kube-dns:53"

# Cert manager deployment
cert_manager_enabled: false
# cert_manager_namespace: "cert-manager"
Изменив конфигурацию, запустим ansible-playbook с нашей конфигурацией, выполнив следующую команду.
ansible-playbook --become -i inventory/$CLUSTER/hosts cluster.yml
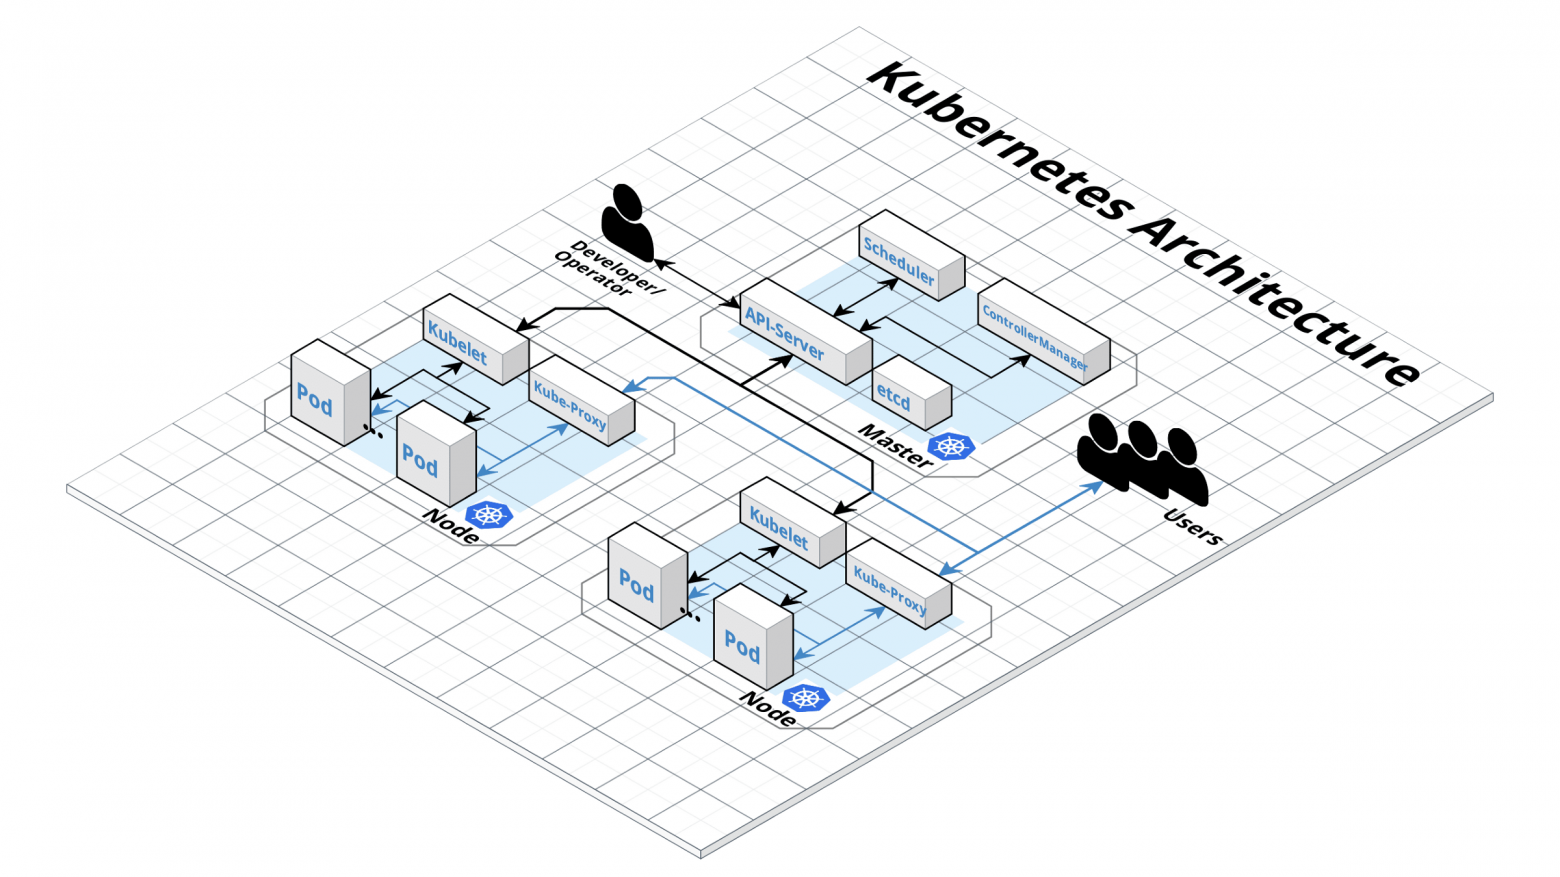
Ansible выполняет несколько операций, и если все они завершаются успешно, кластер будет выглядеть, как на этом рисунке.
Тестирование
Для тестирования кластера войдите в мастер, переключитесь на root-пользователя и в kubectl выполните команду kubectl cluster-info, чтобы получить сведения о кластере. Вы увидите сведения о конечной точке мастера и сервисов в кластере. Если с кластером все нормально, создайте пользователя панели мониторинга Kubernetes с помощью следующих команд.
# Create service account
kubectl create serviceaccount cluster-admin-dashboard-sa

# Bind ClusterAdmin role to the service account
kubectl create clusterrolebinding cluster-admin-dashboard-sa \
  --clusterrole=cluster-admin \
  --serviceaccount=default:cluster-admin-dashboard-sa

# Parse the token
kubectl describe secret $(kubectl -n kube-system get secret | awk '/^cluster-admin-dashboard-sa-token-/{print $1}') | awk '$1=="token:"{print $2}'
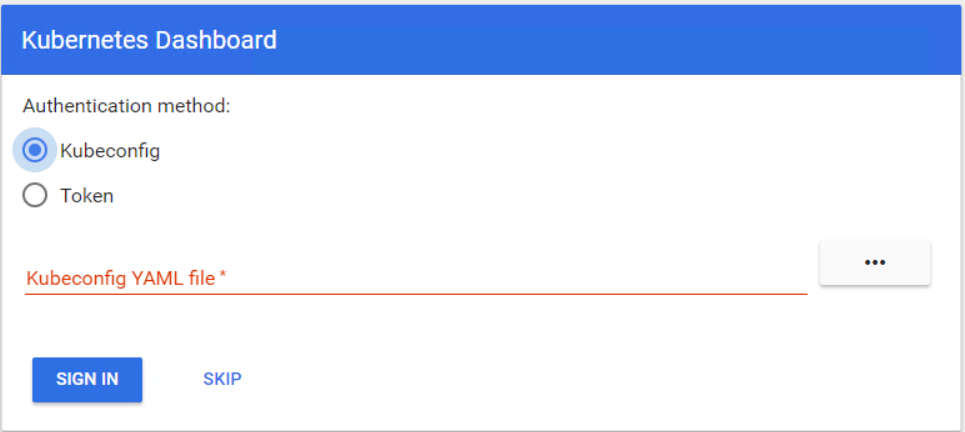
Теперь можно войти на панель мониторинга с помощью токена. Сначала нужно создать туннель к мастеру Kubernetes, потому что панель мониторинга все еще открыта для localhost на порте 8001. После этого можно получить доступ к панели по URL localhost:8001. Теперь выберите Token, введите токен и войдите.
Вы готовы начать работу в кластере Kubernetes. В этой статье вы увидели, как просто развернуть и настроить кластер Kubernetes в облаке OpenStack.

