Building on the momentum from the recently announced Developer PowerShell, we are excited to share the first preview of the new Visual Studio terminal. This new preview experience is part of Visual Studio version 16.3 Preview 3.

Rather than build everything from scratch, the Visual Studio terminal shares most of its core with the Windows Terminal. For you, that translates into a more robust terminal experience, and faster adoption of new functionality.
This article in our blog.
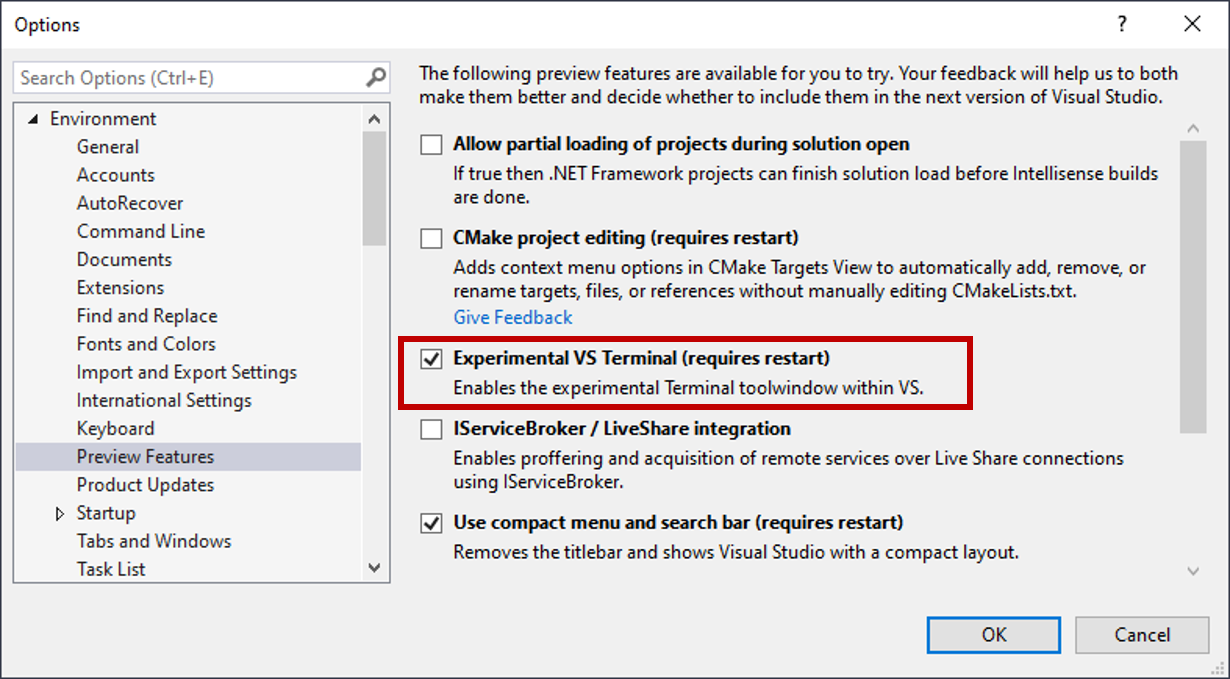
To try the terminal preview, you’ll first need to enable it by visiting the Preview Features page. Go to Tools > Options > Preview Features, enable the Experimental VS Terminal option and restart Visual Studio.

Once enabled, you can invoke it via the View > Terminal Window menu entry or via the search.

Launching the terminal automatically opens an integrated PowerShell instance. However, you can customize the startup experience by using shell profiles.
With shell profiles, you can target different types of shells, invoke them using unique arguments, or even set a default shell that better fits your needs.
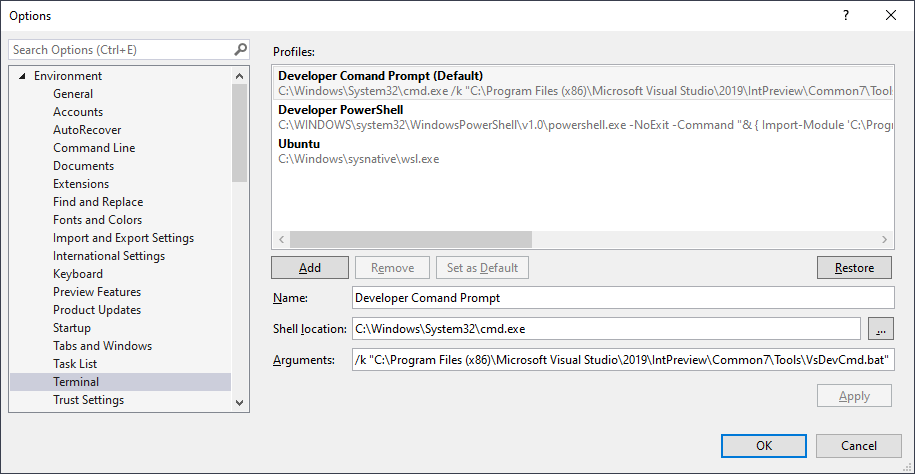
In future updates, we plan to optimize the experience by pre-populating the terminal with a few basic profiles. In the meantime, you can manually add additional profiles on the terminal’s Options page.

As an example, here’s how you can set profiles for some popular options:
Shell location:
Arguments:
Shell location:
Arguments:
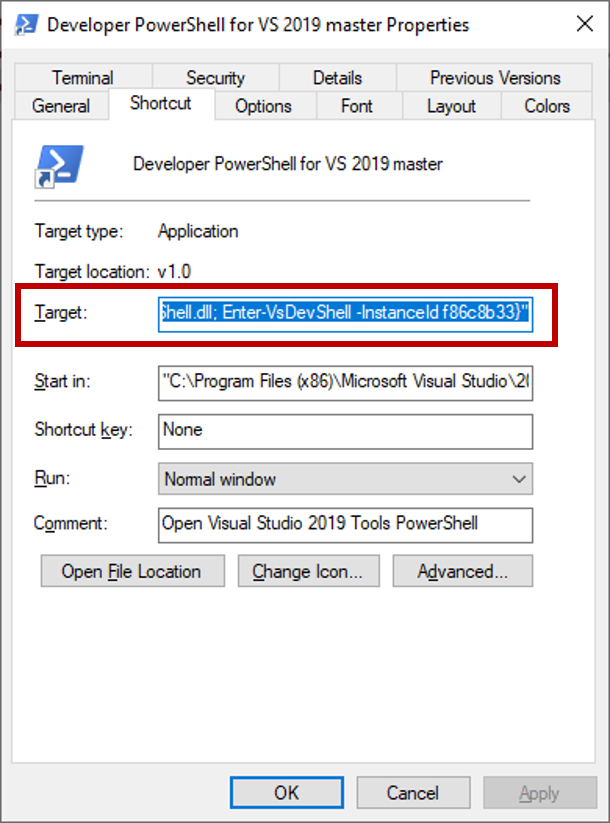
Note: You’ll need to update the above argument to match your specific configuration. You can extract the argument information by looking into the Target string for the Developer PowerShell shortcut.

Shell location:
While we are excited to share this preview, we want to ensure a solid experience before we enable this experience in the release version of Visual Studio. As a result, the terminal will initially only be available in the preview versions of Visual Studio 2019.
As next steps, we’ll look to deliver improvements around rendering (the terminal currently needs to be resized to render correctly), accessibility and theming. We’ll also add new productivity boosters such as multiple terminal instances and deeper integration with Visual Studio.
We’d love to know how it fits your workflow and how we could further improve your terminal experience. Send us your feedback via the Developer Community portal, or via the Help > Send Feedback feature inside Visual Studio.

Rather than build everything from scratch, the Visual Studio terminal shares most of its core with the Windows Terminal. For you, that translates into a more robust terminal experience, and faster adoption of new functionality.
This article in our blog.
Enabling the new Visual Studio terminal
To try the terminal preview, you’ll first need to enable it by visiting the Preview Features page. Go to Tools > Options > Preview Features, enable the Experimental VS Terminal option and restart Visual Studio.

Once enabled, you can invoke it via the View > Terminal Window menu entry or via the search.

Creating Terminal profiles
Launching the terminal automatically opens an integrated PowerShell instance. However, you can customize the startup experience by using shell profiles.
With shell profiles, you can target different types of shells, invoke them using unique arguments, or even set a default shell that better fits your needs.
In future updates, we plan to optimize the experience by pre-populating the terminal with a few basic profiles. In the meantime, you can manually add additional profiles on the terminal’s Options page.

As an example, here’s how you can set profiles for some popular options:
Developer Command Prompt
Shell location:
C:\Windows\System32\cmd.exeArguments:
/k "C:\Program Files (x86)\Microsoft Visual Studio\2019\IntPreview\Common7\Tools\VsDevCmd.bat"Developer PowerShell
Shell location:
C:\WINDOWS\system32\WindowsPowerShell\v1.0\powershell.exeArguments:
-NoExit -Command "& { Import-Module 'C:\Program Files (x86)\Microsoft Visual Studio\2019\Preview_master\Common7\Tools\vsdevshell\Microsoft.VisualStudio.DevShell.dll'; Enter-VsDevShell -InstanceId f86c8b33}"Note: You’ll need to update the above argument to match your specific configuration. You can extract the argument information by looking into the Target string for the Developer PowerShell shortcut.

WSL
Shell location:
C:\WINDOWS\sysnative\wsl.exeTry it out and let us know what you think!
While we are excited to share this preview, we want to ensure a solid experience before we enable this experience in the release version of Visual Studio. As a result, the terminal will initially only be available in the preview versions of Visual Studio 2019.
As next steps, we’ll look to deliver improvements around rendering (the terminal currently needs to be resized to render correctly), accessibility and theming. We’ll also add new productivity boosters such as multiple terminal instances and deeper integration with Visual Studio.
We’d love to know how it fits your workflow and how we could further improve your terminal experience. Send us your feedback via the Developer Community portal, or via the Help > Send Feedback feature inside Visual Studio.
