To 'adequately' debug Celery under Windows, there are several ways such as:
But in fact for normal development, you need a Unix system. If you do not have the opportunity to use it as a native, then it is worth considering...) Well, to be honest, there is always a way out and this is Docker and WSL. If you use such “cool” IDEs like PyCharm, then everything becomes more complicated, because using the WSL interpreter, installing the package with pip, you will have to manually update the project skeleton due to indexing problems.
But with Docker everything is different. For cool management we need Windows 10 Pro, since the Home version doesn't support virtualization.
Now install and check Docker. After the corresponding icon will appear in the tray.

Next, we create and run the project on Django. Here I am using version 2.2. There will be a structure similar to this:

Next install Celery and Redis as a broker.
Add some Code to check yourself:
Create new django app which contains tasks and add new file:
Next create Dockerfile and docker-compose.yml in project root:
And start it!
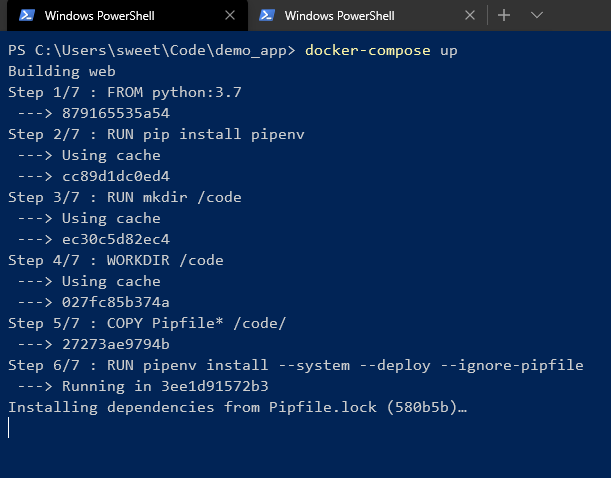
Wait for dependencies install in pipenv and U'll see in the end:

It means all is cool! U can control it with command line:


As we can see, different images from the same Dockerfile have the similar ID.
And U can manage containers with GUI:


We can easily turn of/on, reload, delete the container or group of containers.

> celery worker --app=demo_app.core --pool=solo --loglevel=INFO
But in fact for normal development, you need a Unix system. If you do not have the opportunity to use it as a native, then it is worth considering...) Well, to be honest, there is always a way out and this is Docker and WSL. If you use such “cool” IDEs like PyCharm, then everything becomes more complicated, because using the WSL interpreter, installing the package with pip, you will have to manually update the project skeleton due to indexing problems.
But with Docker everything is different. For cool management we need Windows 10 Pro, since the Home version doesn't support virtualization.
Now install and check Docker. After the corresponding icon will appear in the tray.
Next, we create and run the project on Django. Here I am using version 2.2. There will be a structure similar to this:
Next install Celery and Redis as a broker.
Add some Code to check yourself:
# core/settings.py
CELERY_BROKER_URL = 'redis://demo_app_redis:6379'
CELERY_ACCEPT_CONTENT = ['json']
CELERY_TASK_SERIALIZER = 'json'
# core/celery.py
from __future__ import absolute_import, unicode_literals
import os
from celery import Celery

os.environ.setdefault('DJANGO_SETTINGS_MODULE', 'core.settings')
app = Celery('core')
app.config_from_object('django.conf:settings', namespace='CELERY')
app.autodiscover_tasks()
# core/__init__.py
from __future__ import absolute_import, unicode_literals
from .celery import app as celery_app

__all__ = ('celery_app',)
Create new django app which contains tasks and add new file:
# app/tasks.py
from celery.task import periodic_task
from datetime import timedelta

@periodic_task(run_every=(timedelta(seconds=5)), name='hello')
def hello():
    print("Hello there")
Next create Dockerfile and docker-compose.yml in project root:
# Dockerfile
FROM python:3.7
RUN pip install pipenv
RUN mkdir /code
WORKDIR /code
COPY Pipfile* /code/
RUN pipenv install --system --deploy --ignore-pipfile
ADD core /code/
# docker-compose.yml
version: '3'

services:
  redis:
    image: redis
    restart: always
    container_name: 'demo_app_redis'
    command: redis-server
    ports:
      - '6379:6379'
  web:
    build: .
    restart: always
    container_name: 'demo_app_django'
    command: python manage.py runserver 0.0.0.0:8000
    volumes:
      - .:/code
    ports:
      - '8000:8000'
  celery:
    build: .
    container_name: 'demo_app_celery'
    command: celery -A core worker -B
    volumes:
      - .:/code
    links:
      - redis
    depends_on:
      - web
      - redis
And start it!
Wait for dependencies install in pipenv and U'll see in the end:
It means all is cool! U can control it with command line:
As we can see, different images from the same Dockerfile have the similar ID.
And U can manage containers with GUI:
We can easily turn of/on, reload, delete the container or group of containers.

