Intro
There probably is no way one who stores some crucial data (in particular, using SQL databases) can possibly dodge from the thoughts of building some kind of safe cluster, distant guardian to protect consistency and availability at all times. Even if the main server with all the precious data gets knocked out deadly - the show must go on, right? This basically means the database must still be available and data be up-to-date with the one on the failed server.
As you might have noticed, there are dozens of ways to go and Patroni is just one of them. There is plenty of articles providing a more or less detailed comparison of the options available, so I assume I'm free to skip the part of luring you into Patroni's side. Let's start off from the point where among others you are already leaning towards Patroni and are willing to try that out in a more or less real-case setup.
As for myself, I did try a couple of other solutions and in one of them (won't name it) my issue seems to be still hanging open and not answered on their GitHub even though months have passed.
Btw, I am not a DevOps engineer originally so when the need for the high-availability cluster arose and I went on I would hit my bones against the bottom of every single bump and every single post and rock down the road. Hope this tutorial will help you out to get the job done with as little pain as it is possible.
If you don't want any more explanations and lead-ins, jump right in.
Otherwise, you might want to read some more notes on the setup I went on with.
One more Patroni tut, huh?
Do we need one more Patroni tut?
Let's face it, there are quite enough tutorials published on how to set up the Patroni cluster. This one is covering deployment in a docker swarm with Zookeeper as a DCS. So why zookeeper and why docker swarm?
Why Zookeeper?
Actually, it's something you might want to consider seriously choosing a Patroni setup for your production.
The thing is that Patroni uses third-party services basically to establish and maintain communication among its nodes, the so-called DCS (Dynamic Configuration Storage).
If you have already studied tutorials on Patroni you probably noticed that the most common case is to implement communication through the 'etcd' cluster.
The notable thing about etcd is here (from its faq page):
Since etcd writes data to disk, its performance strongly depends on disk
performance. For this reason, SSD is highly recommended.
If you don't have SSD on each machine you are planning to run your etcd cluster, it's probably not a good idea to choose it as a DCS for Patroni. In a real production scenario, it is possible that you simply overwhelm your etcd cluster, which might lead to IO errors. Doesn't sound good, right?
So here comes Zookeeper which stores all its data in memory and might actually come in handy if your servers lack SDDs but have got plenty of RAM.
Why docker swarm?
In my situation, I had no other choice as it was one of the business requirements to set it up in a docker swarm. So if by circumstances it's your case as well, you're exactly in the right spot!
But for the rest of the readers with the "testing and trying" purposes, it comes across as quite a distant choice too as you don't need to install/prepare any third-party services (except for docker of course) or place on your machine dozens of dependencies.
Guess it's not far from the truth that we all have Docker engine installed and set up everywhere anyway and it's convenient to keep everything in containers. With one-command tuning, docker is good enough to run your first Patroni cluster locally without virtual machines, Kubernetes, and such.
So if you don't want to dig into other tools and want to accomplish everything neat and clean in a well-known docker environment this tutorial could be the right way to go.
Some extra
In this tutorial, I'm also planning to show various ways to check on the cluster stats (to be concrete will cover all 3 of them) and provide a simple script and strategy for a test run.
Suppose it's enough of talking, let's go ahead and start practicing.
Docker swarm
For a quick test of deployment in the docker swarm, we don't really need multiple nodes in our cluster. As we are able to scale our services at our needs (imitating failing nodes), we are going to be fine with just one node working in a swarm mode.
I come from the notion that you already have the Docker engine installed and running. From this point all you need is to run this command:
docker swarm init
//now check your single-node cluster
docker node ls
ID                            HOSTNAME       STATUS       AVAILABILITY
a9ej2flnv11ka1hencoc1mer2 *   floitet        Ready          Active
The most important feature of the docker swarm is that we are now able to manipulate not just simple containers, but services. Services are basically abstractions on top of containers. Referring to the OOP paradigm, docker service would be a class, storing a set of rules and container would be an object of this class. Rules for services are defined in docker-compose files.
Notice your node's hostname, we're going to make use of it quite soon.
Well, as a matter of fact, that's pretty much it for the docker swarm setup.
Seem like we're doing fine so far, let's keep up!
Zookeeper
Before we start deploying Patroni services we need to set up DCS first which is Zookeeper in our case. I'm gonna go for the 3.4 version. From my experience, it works just fine.
Below are the full docker-compose config and some notes on details I find that it'd be reasonable to say a few words about.
docker-compose-zookeeper.yml
version: '3.7'

services:
  zoo1:
    image: zookeeper:3.4
    hostname: zoo1
    ports:
      - 2191:2181
    networks:
      - patroni
    environment:
      ZOO_MY_ID: 1
      ZOO_SERVERS: server.1=0.0.0.0:2888:3888 server.2=zoo2:2888:3888 server.3=zoo3:2888:3888
    deploy:
      replicas: 1
      placement:
        constraints:
          - node.hostname == floitet
      restart_policy:
        condition: any

  zoo2:
    image: zookeeper:3.4
    hostname: zoo2
    networks:
      - patroni
    ports:
      - 2192:2181
    environment:
      ZOO_MY_ID: 2
      ZOO_SERVERS: server.1=zoo1:2888:3888 server.2=0.0.0.0:2888:3888 server.3=zoo3:2888:3888
    deploy:
      replicas: 1
      placement:
        constraints:
          - node.hostname == floitet
      restart_policy:
        condition: any

  zoo3:
    image: zookeeper:3.4
    hostname: zoo3
    networks:
      - patroni
    ports:
      - 2193:2181
    environment:
      ZOO_MY_ID: 3
      ZOO_SERVERS: server.1=zoo1:2888:3888 server.2=zoo2:2888:3888 server.3=0.0.0.0:2888:3888
    deploy:
      replicas: 1
      placement:
        constraints:
          - node.hostname == floitet
      restart_policy:
        condition: any

networks:
  patroni:
    driver: overlay
    attachable: true
Details
The important thing of course is to give every node its unique service name and published port. The hostname is preferably be set to the same as the service name.
zoo1:
    image: zookeeper:3.4
    hostname: zoo1
    ports:
      - 2191:2181
Notice how we list servers in this line, changing the service we bind depending on the service number. So for the first (zoo1) service server.1 is bound to 0.0.0.0, but for zoo2 it will be the server.2 accordingly.
ZOO_SERVERS: server.1=0.0.0.0:2888:3888 server.2=zoo2:2888:3888 server.3=zoo3:2888:3888
This is how we control the deployment among nodes. As we have only one node, we set a constraint to this node for all services. When you have multiple nodes in your docker swarm cluster and want to spread services among all nodes - just replace node.hostname with the name of the desirable node (use 'docker node ls' command).
      placement:
        constraints:
          - node.hostname == floitet
And the final thing we need to take care of is the network. We're going to deploy Zookeeper and Patroni clusters in one overlay network so that they could communicate with each other in an isolated environment using the service names.
networks:
  patroni:
    driver: overlay
// we need to mark this network as attachable
// so that to be able to connect patroni services to this network later on
    attachable: true
Guess it's time to deploy the thing!
sudo docker stack deploy --compose-file docker-compose-zookeeper.yml patroni
Now let's check if the job is done right. The first step to take is this:
sudo docker service ls
gxfj9rs3po7z        patroni_zoo1        replicated          1/1                 zookeeper:3.4         *:2191->2181/tcp
ibp0mevmiflw        patroni_zoo2        replicated          1/1                 zookeeper:3.4         *:2192->2181/tcp
srucfm8jrt57        patroni_zoo3        replicated          1/1                 zookeeper:3.4         *:2193->2181/tcp
And the second step is to actually ping the zookeeper service with the special Four-Letter-Command:
echo mntr | nc localhost 2191
// with the output being smth like this
zk_version	3.4.14-4c25d480e66aadd371de8bd2fd8da255ac140bcf, built on 03/06/2019 16:18 GMT
zk_avg_latency	6
zk_max_latency	205
zk_min_latency	0
zk_packets_received	1745
zk_packets_sent	1755
zk_num_alive_connections	3
zk_outstanding_requests	0
zk_server_state	follower
zk_znode_count	16
zk_watch_count	9
zk_ephemerals_count	4
zk_approximate_data_size	1370
zk_open_file_descriptor_count	34
zk_max_file_descriptor_count	1048576
zk_fsync_threshold_exceed_count	0
Which means that the zookeeper node is responding and doing its job. You could also check the zookeeper service logs if you wish
docker service logs $zookeeper-service-id
// service-id comes from 'docker service ls' command.
// in my case it could be
docker service logs gxfj9rs3po7z
Okay, great! Now we have the Zookeeper cluster running. Thus it's time to move on and finally, get to the Patroni itself.
Patroni
And here we are down to the main part of the tutorial where we handle the Patroni cluster deployment. The first thing I need to mention is that we actually need to build a Patroni image before we move forward. I'll try to be as detailed and precise as possible showing the most important parts we need to be aware of managing this task.
We're going to need multiple files to get the job done so you might want to keep them together. Let's create a 'patroni-test' directory and cd to it. Below we are going to discuss the files that we need to create there.
patroni.yml
This is the main config file. The thing about Patroni is that we are able to set parameters from different places and here is one of them. This file gets copied into our custom docker image and thus updating it requires rebuilding the image. I personally prefer to store here parameters that I see as 'stable', 'permanent'. The ones I'm not planning to change a lot. Below I provide the very basic config. You might want to configure more parameters for a PostgreSQL engine, for example (i.e. max_connections, etc). But for the test deployment, I think this one should be fine.
patroni.yml
scope: patroni
namespace: /service/

bootstrap:
    dcs:
        ttl: 30
        loop_wait: 10
        retry_timeout: 10
        maximum_lag_on_failover: 1048576
        postgresql:
            use_pg_rewind: true

    postgresql:
      use_pg_rewind: true

    initdb:
    - encoding: UTF8
    - data-checksums

    pg_hba:
    - host replication all all md5
    - host all all all md5

zookeeper:
  hosts:
      - zoo1:2181
      - zoo2:2181
      - zoo3:2181

postgresql:
    data_dir: /data/patroni
    bin_dir: /usr/lib/postgresql/11/bin
    pgpass: /tmp/pgpass
    parameters:
        unix_socket_directories: '.'

tags:
    nofailover: false
    noloadbalance: false
    clonefrom: false
    nosync: false
Details
What we should be aware of is that we need to specify 'bin_dir' correctly for Patroni to find Postgres binaries. In my use case, I have Postgres 11 so my directory looks like this: '/usr/lib/postgresql/11/bin'. This is the directory Patroni is going to be looking for an inside container. And 'data_dir' is where the data will be stored inside the container. Later on, we'll bind it to the actual volume on our drive so that not to lose all the data if the Patroni cluster for some reason fails.
postgresql:
    data_dir: /data/patroni
    bin_dir: /usr/lib/postgresql/11/bin
I also list all the zookeeper servers here to feed them to patronictl later. Note that, If you don't specify it here we'll end up with a broken patroni command tool (patronictl). Also, I'd like to point out that we don't use IPs to locate zookeeper servers, but we feed Patroni with 'service names' instead. It's a feature of a docker swarm we are taking advantage of.
zookeeper:
  hosts:
      - zoo1:2181
      - zoo2:2181
      - zoo3:2181
patroni_entrypoint.sh
The next one is where most settings come from in my setup. It's a script that will be executed after the docker container is started.
patroni_entrypoint.sh
#!/bin/sh

readonly CONTAINER_IP=$(hostname --ip-address)
readonly CONTAINER_API_ADDR="${CONTAINER_IP}:${PATRONI_API_CONNECT_PORT}"
readonly CONTAINER_POSTGRE_ADDR="${CONTAINER_IP}:5432"

export PATRONI_NAME="${PATRONI_NAME:-$(hostname)}"
export PATRONI_RESTAPI_CONNECT_ADDRESS="$CONTAINER_API_ADDR"
export PATRONI_RESTAPI_LISTEN="$CONTAINER_API_ADDR"
export PATRONI_POSTGRESQL_CONNECT_ADDRESS="$CONTAINER_POSTGRE_ADDR"
export PATRONI_POSTGRESQL_LISTEN="$CONTAINER_POSTGRE_ADDR"
export PATRONI_REPLICATION_USERNAME="$REPLICATION_NAME"
export PATRONI_REPLICATION_PASSWORD="$REPLICATION_PASS"
export PATRONI_SUPERUSER_USERNAME="$SU_NAME"
export PATRONI_SUPERUSER_PASSWORD="$SU_PASS"
export PATRONI_approle_PASSWORD="$POSTGRES_APP_ROLE_PASS"
export PATRONI_approle_OPTIONS="${PATRONI_admin_OPTIONS:-createdb, createrole}"

exec /usr/local/bin/patroni /etc/patroni.yml
Details: Important!
Actually, the main point of even having this patroni_entrypoint.sh is that Patroni won't simply start without knowing the IP address of its host. And for the host being a docker container we are in a situation where we somehow need to first get to know which IP was granted to the container and only then execute the Patroni start-up command. This indeed crucial task is handled here
readonly CONTAINER_IP=$(hostname --ip-address)
readonly CONTAINER_API_ADDR="${CONTAINER_IP}:${PATRONI_API_CONNECT_PORT}"
readonly CONTAINER_POSTGRE_ADDR="${CONTAINER_IP}:5432"
...
export PATRONI_RESTAPI_CONNECT_ADDRESS="$CONTAINER_API_ADDR"
export PATRONI_RESTAPI_LISTEN="$CONTAINER_API_ADDR"
export PATRONI_POSTGRESQL_CONNECT_ADDRESS="$CONTAINER_POSTGRE_ADDR"
As you can see, in this script, we take advantage of the 'Environment configuration' available for Patroni. It's another way aside from the patroni.yml config file, where we can set the parameters. 'PATRONI_RESTAPI_CONNECTADDRESS', 'PATRONI_RESTAPI_LISTEN', 'PATRONI_POSTGRESQLCONNECT_ADDRESS' are those environment variables Patroni knows of and is applying automatically as setup parameters. And btw, they overwrite the ones set locally in patroni.yml
And here is another thing. Patroni docs do not recommend using superuser to connect your apps to the database. So we are going to this another user for connection which can be created with the lines below. It is also set through special env variables Patroni is aware of. Just replace 'approle' with the name you like to create the user with any name of your preference.
export PATRONI_approle_PASSWORD="$POSTGRES_APP_ROLE_PASS"
export PATRONI_approle_OPTIONS="${PATRONI_admin_OPTIONS:-createdb, createrole}"
And with this last line, where everything is ready for the start we execute Patroni with a link to patroni.yml
exec /usr/local/bin/patroni /etc/patroni.yml
Dockerfile
As for the Dockerfile I decided to keep it as simple as possible. Let's see what we've got here.
Dockerfile
FROM postgres:11

RUN apt-get update -y\
    && apt-get install python3 python3-pip -y\
    && pip3 install --upgrade setuptools\
    && pip3 install psycopg2-binary \
    && pip3 install patroni[zookeeper] \
    && mkdir /data/patroni -p \
    && chown postgres:postgres /data/patroni \
    && chmod 700 /data/patroni

COPY patroni.yml /etc/patroni.yml
COPY patroni_entrypoint.sh ./entrypoint.sh
USER postgres

ENTRYPOINT ["bin/sh", "/entrypoint.sh"]
Details
The most important thing here is the directory we will be creating inside the container and its owner. Later, when we mount it to a volume on our hard drive, we're gonna need to take care of it the same way we do it here in Dockerfile.
    // the owner should be 'postgres' and the mode is 700

    mkdir /data/patroni -p \
    chown postgres:postgres /data/patroni \
    chmod 700 /data/patroni
    ...
    // we set active user inside container to postgres
    USER postgres
The files we created earlier are copied here:
COPY patroni.yml /etc/patroni.yml
COPY patroni_entrypoint.sh ./entrypoint.sh
And like it was mentioned above at the start we want to execute our entry point script:
ENTRYPOINT ["bin/sh", "/entrypoint.sh"]
That's it for handling the pre-requisites. Now we can finally build our patroni image. Let's give it a sound name 'patroni-test':
docker build -t patroni-test .
When the image is ready we can discuss the last but not least file we're gonna need here and it's the compose file, of course.
docker-compose-patroni.yml
A well-configured compose file is something really crucial in this scenario, so let's pinpoint what we should take care of and which details we need to keep in mind.
docker-compose-patroni.yml
version: "3.4"

networks:
    patroni_patroni:
        external: true
services:
    patroni1:
        image: patroni-test
        networks: [ patroni_patroni ]
        ports:
            - 5441:5432
            - 8091:8091
        hostname: patroni1
        volumes:
          - /patroni1:/data/patroni
        environment:
            PATRONI_API_CONNECT_PORT: 8091
            REPLICATION_NAME: replicator
            REPLICATION_PASS: replpass
            SU_NAME: postgres
            SU_PASS: supass
            POSTGRES_APP_ROLE_PASS: appass
        deploy:
          replicas: 1
          placement:
            constraints: [node.hostname == floitet]

    patroni2:
        image: patroni-test
        networks: [ patroni_patroni ]
        ports:
            - 5442:5432
            - 8092:8091
        hostname: patroni2
        volumes:
          - /patroni2:/data/patroni
        environment:
            PATRONI_API_CONNECT_PORT: 8091
            REPLICATION_NAME: replicator
            REPLICATION_PASS: replpass
            SU_NAME: postgres
            SU_PASS: supass
            POSTGRES_APP_ROLE_PASS: appass
        deploy:
          replicas: 1
          placement:
            constraints: [node.hostname == floitet]


    patroni3:
        image: patroni-test
        networks: [ patroni_patroni ]
        ports:
            - 5443:5432
            - 8093:8091
        hostname: patroni3
        volumes:
          - /patroni3:/data/patroni
        environment:
            PATRONI_API_CONNECT_PORT: 8091
            REPLICATION_NAME: replicator
            REPLICATION_PASS: replpass
            SU_NAME: postgres
            SU_PASS: supass
            POSTGRES_APP_ROLE_PASS: appass
        deploy:
          replicas: 1
          placement:
            constraints: [node.hostname == floitet]
Details. also important
The first detail that pops-up is the network thing we talked about earlier. We want to deploy the Patroni services in the same network as the Zookeeper services. This way 'zoo1', 'zoo2', 'zoo3' names we listed in patroni.yml providing zookeeper servers are going to work out for us.
networks:
    patroni_patroni:
        external: true
As for the ports, we have a database and API and both of them require its pair of ports.
ports:
    - 5441:5432
    - 8091:8091
...

environment:
    PATRONI_API_CONNECT_PORT: 8091

// we need to make sure that we set Patroni API connect port
// the same with the one that is set as a target port for docker service
Of course, we also need to provide all the rest of the environment variables we kind of promised to provide configuring our entry point script for Patroni, but that's not it. There is an issue with a mount directory we need to take care of.
volumes:
   - /patroni3:/data/patroni
As you can see '/data/patroni' we create in Dockerfile is mounted to a local folder we actually need to create. And not only create but also set the proper use and access mode just like in this example:
sudo mkdir /patroni3
sudo chown 999:999 /patroni3
sudo chmod 700 /patroni3

// 999 is the default uid for postgres user
// repeat these steps for each patroni service mount dir
With all these steps being done properly we are ready to deploy patroni cluster at last:
sudo docker stack deploy --compose-file docker-compose-patroni.yml patroni
After the deployment has been finished in the service logs we should see something like this indicating that the cluster is doing well:
INFO: Lock owner: patroni3; I am patroni1
INFO: does not have lock
INFO: no action.  i am a secondary and i am following a leader
But it would be painful if we had no choice but to read through the logs every time we want to check on the cluster health, so let's dig into patronictl. What we need to do is to get the id of the actual container that is running any of the Patroni services:
sudo docker ps
CONTAINER ID        IMAGE                 COMMAND                  CREATED             STATUS              PORTS                          NAMES
a0090ce33a05        patroni-test:latest   "bin/sh /entrypoint.…"   3 hours ago         Up 3 hours          5432/tcp                       patroni_patroni1.1.tgjzpjyuip6ge8szz5lsf8kcq
...
And simply exec into this container with the following command:
sudo docker exec -ti a0090ce33a05 /bin/bash
// inside container
// we need to specify cluster name to list its memebers
// it is 'scope' parameter in patroni.yml ('patroni' in our case)
patronictl list patroni
// and oops
Error: 'Can not find suitable configuration of distributed configuration store\nAvailable implementations: exhibitor, kubernetes, zookeeper'
The thing is that patronictl requires patroni.yml to retrieve the info of zookeeper servers. And it doesn't know where did we put our config so we need to explicitly specify its path like so:
patronictl -c /etc/patroni.yml list patroni
// and here is the nice output with the current states
+ Cluster: patroni (6893104757524385823) --+----+-----------+
| Member   | Host      | Role    | State   | TL | Lag in MB |
+----------+-----------+---------+---------+----+-----------+
| patroni1 | 10.0.1.93 | Replica | running |  8 |         0 |
| patroni2 | 10.0.1.91 | Replica | running |  8 |         0 |
| patroni3 | 10.0.1.92 | Leader  | running |  8 |           |
+----------+-----------+---------+---------+----+-----------+
HA Proxy
Now everything seems to be set the way we wanted and we can easily access PostgreSQL on the leader service and perform operations we are meant to. But there is this last problem we should get rid of and this being: how do we know where is that leader at the runtime? Do we get to check every time and manually switch to another node when the leader crashes? That'd be extremely unpleasant, no doubt. No worries, this is the job for HA Proxy. Just like we did with Patroni we might want to create a separate folder for all the build/deploy files and then create the following files there:
haproxy.cfg
The config file we're gonna need to copy into our custom haproxy image.
haproxy.cfg
global
    maxconn 100
    stats socket /run/haproxy/haproxy.sock
    stats timeout 2m # Wait up to 2 minutes for input

defaults
    log global
    mode tcp
    retries 2
    timeout client 30m
    timeout connect 4s
    timeout server 30m
    timeout check 5s

listen stats
    mode http
    bind *:7000
    stats enable
    stats uri /

listen postgres
    bind *:5000
    option httpchk
    http-check expect status 200
    default-server inter 3s fall 3 rise 2 on-marked-down shutdown-sessions
    server patroni1 patroni1:5432 maxconn 100 check port 8091
    server patroni2 patroni2:5432 maxconn 100 check port 8091
    server patroni3 patroni3:5432 maxconn 100 check port 8091
Details
Here we specify ports we want to access the service from:
// one is for stats
listen stats
    mode http
    bind *:7000
// the second one for connection to postgres
listen postgres
    bind *:5000
And simply list all the patroni services we have created earlier:
server patroni1 patroni1:5432 maxconn 100 check port 8091
server patroni2 patroni2:5432 maxconn 100 check port 8091
server patroni3 patroni3:5432 maxconn 100 check port 8091
And the last thing. This line showed below we need if we want to check our Patroni cluster stats from the Haproxy stats tool in the terminal from within a docker container:
stats socket /run/haproxy/haproxy.sock
Dockerfile
In the Dockerfile it's not much to explain, I guess it's pretty self-explanatory.
Dockerfile
FROM haproxy:1.7
COPY haproxy.cfg /usr/local/etc/haproxy/haproxy.cfg
RUN mkdir /run/haproxy &&\
    apt-get update -y &&\
    apt-get install -y hatop &&\
    apt-get clean
docker-compose-haproxy.yml
And the compose file for HaProxy looks this way and it's also quite an easy shot comparing to other services we've already covered:
docker-compose-haproxy.yml
version: "3.7"

networks:
  patroni_patroni:
    external: true

services:
 haproxy:
    image: haproxy-patroni
    networks:
      - patroni_patroni
    ports:
      - 5000:5000
      - 7000:7000
    hostname: haproxy
    deploy:
      mode: replicated
      replicas: 1
      placement:
        constraints: [node.hostname == floitet]
After we have all the files created, let's build the image and deploy it :
// build
docker build -t haproxy-patroni
// deploy
docker stack deploy --compose-file docker-compose-haproxy.yml
When we got Haproxy up running we can exec into its container and check the Patroni cluster stats from there. It's done with the following commands:
sudo docker ps | grep haproxy
sudo docker exec -ti $container_id /bin/bash
hatop -s /var/run/haproxy/haproxy.sock
And with this command we'll get the output of this kind:
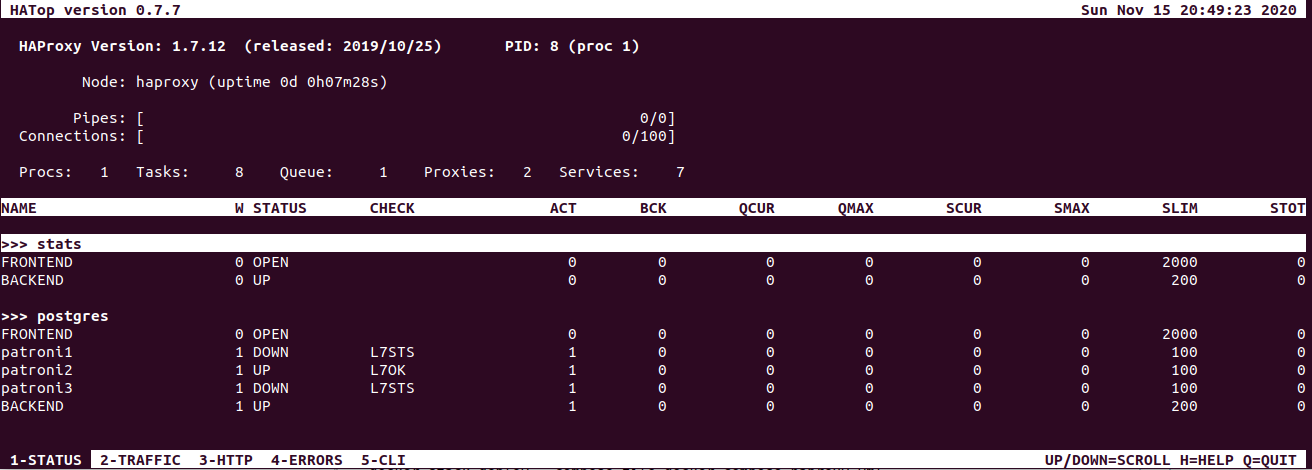
To be honest, I personally prefer to check the status with patronictl but HaProxy is another option which is also nice to have in the administrating toolset. In the very beginning, I promised to show 3 ways to access cluster stats. So the third way of doing it is to use Patroni API directly, which is a cool way as It provides expanded, ample info.
Patroni API
Full detailed overview of its options you can find in Patroni docs and here I'm gonna quickly show the most common ones I use and how to use 'em in our docker swarm setup.
We won't be able to access any of the Patroni services APIs from outside of the 'patroni_patroni' network we created to keep all our services together. So what we can do is to build a simple custom curl image to retrieve info in a human-readable format.
Dockerfile
FROM alpine:3.10

RUN apk add --no-cache curl jq bash

CMD ["/bin/sh"]
And then run a container with this image connected to the 'patroni_patroni' network.
docker run --rm -ti --network=patroni_patroni curl-jq
Now we can call Patroni nodes by their names and get stats like so:
Node stats
curl -s patroni1:8091/patroni | jq
{
  "patroni": {
    "scope": "patroni",
    "version": "2.0.1"
  },
  "database_system_identifier": "6893104757524385823",
  "postmaster_start_time": "2020-11-15 19:47:33.917 UTC",
  "timeline": 10,
  "xlog": {
    "received_location": 100904544,
    "replayed_timestamp": null,
    "replayed_location": 100904544,
    "paused": false
  },
  "role": "replica",
  "cluster_unlocked": false,
  "state": "running",
  "server_version": 110009
}
Cluster stats
curl -s patroni1:8091/cluster | jq
{
  "members": [
    {
      "port": 5432,
      "host": "10.0.1.5",
      "timeline": 10,
      "lag": 0,
      "role": "replica",
      "name": "patroni1",
      "state": "running",
      "api_url": "http://10.0.1.5:8091/patroni"
    },
    {
      "port": 5432,
      "host": "10.0.1.4",
      "timeline": 10,
      "role": "leader",
      "name": "patroni2",
      "state": "running",
      "api_url": "http://10.0.1.4:8091/patroni"
    },
    {
      "port": 5432,
      "host": "10.0.1.3",
      "lag": "unknown",
      "role": "replica",
      "name": "patroni3",
      "state": "running",
      "api_url": "http://10.0.1.3:8091/patroni"
    }
  ]
}
Pretty much everything we can do with the Patroni cluster can be done through Patroni API, so if you want to get to know better the options available feel free to read official docs on this topic.
PostgreSQL Connection
The same thing here: first run a container with the Postgres instance and then from within this container get connected.
docker run --rm -ti --network=patroni_patroni postgres:11 /bin/bash
// access to the concrete patroni node
psql --host patroni1 --port 5432 -U approle -d postgres
// access to the leader with haproxy
psql --host haproxy --port 5000 -U approle -d postgres
// user 'approle' doesn't have a default database
// so we need to specify one with the '-d' flag
Wrap-up
Now we can experiment with the Patroni cluster as if it was an actual 3-node setup by simply scaling services. In my case when patroni3 happened to be the leader, I can go ahead and do this:
docker service scale patroni_patroni3=0
This command will disable the Patroni service by killing its only running container. Now I can make sure that failover has happened and the leader role moved to another service:
postgres@patroni1:/$ patronictl -c /etc/patroni.yml list patroni
+ Cluster: patroni (6893104757524385823) --+----+-----------+
| Member   | Host      | Role    | State   | TL | Lag in MB |
+----------+-----------+---------+---------+----+-----------+
| patroni1 | 10.0.1.93 | Leader  | running |  9 |           |
| patroni2 | 10.0.1.91 | Replica | running |  9 |         0 |
+----------+-----------+---------+---------+----+-----------+
After I scale it back to "1", I'll get my 3-node cluster with patroni3, the former leader, back in shape but in a replica mode.
From this point, you are able to run your experiments with the Patroni cluster and see for yourself how it handles critical situations.
Outroduction
As I promised, I'm going to provide a sample test script and instructions on how to approach it. So if you need something for a quick test-run, you are more than welcomed to read under a spoiler section. If you already have your own test scenarios in mind and don't need any pre-made solutions, just skip it without any worries.
Patroni cluster test
So for the readers who want to put their hands-on testing the Patroni cluster right away with something pre-made, I created this script. It's super simple and I believe you won't have problems getting a grasp of it. Basically, it just writes the current time in the database through the haproxy gateway each second. Below I'm going to show step by step how to approach it and what was the outcome from the test-run on my local stand.
Step 1.
Assume you've already downloaded the script from the link and put it somewhere on your machine. If not, do this preparation and follow up. From here we'll move on and create a docker container from an official Microsoft SDK image like so:
docker run --rm -ti --network=patroni_patroni -v /home/floitet/Documents/patroni-test-script:/home mcr.microsoft.com/dotnet/sdk /bin/bash
The important thing is that we get connected to the 'patroni_patroni' network. And another crucial detail is that we want to mount this container to a directory where you've put the script. This way you can easily access it from within a container in the '/home' directory.
Step2.
Now we need to take care of getting the only dll we are going to need for our script to compile. Standing in the '/home' directory let's create a new folder for the console app. I'm gonna call it 'patroni-test'. Then cd to this directory and run the following command:
dotnet new console

// and the output be like:

Processing post-creation actions...
Running 'dotnet restore' on /home/patroni-test/patroni-test.csproj...
  Determining projects to restore...
  Restored /home/patroni-test/patroni-test.csproj (in 61 ms).
Restore succeeded.
And from here we can add the package we'll be using as a dependency for our script:
dotnet add package npgsql
And after that simply pack the project:
dotnet pack
If everything went as expected you'll get 'Ngsql.dll' sitting here:
'patroni-test/bin/Debug/net5.0/Npgsql.dll'.
It is exactly the path we reference in our script so if yours differs from mine, you're gonna need to change it in the script.
And what we do next is just run the script:
dotnet fsi /home/patroni-test.fsx

// and get the output like this:

11/18/2020 22:29:32 +00:00
11/18/2020 22:29:33 +00:00
11/18/2020 22:29:34 +00:00
Make sure you keep the terminal with the running script open
Step 3.
Let's check the Patroni cluster to see where is the leader using patronictl, PatroniAPI, or HaProxy, either way, is fine. In my case the leader status was on 'patroni2':
+ Cluster: patroni (6893104757524385823) --+----+-----------+
| Member   | Host      | Role    | State   | TL | Lag in MB |
+----------+-----------+---------+---------+----+-----------+
| patroni1 | 10.0.1.18 | Replica | running | 21 |         0 |
| patroni2 | 10.0.1.22 | Leader  | running | 21 |           |
| patroni3 | 10.0.1.24 | Replica | running | 21 |         0 |
+----------+-----------+---------+---------+----+-----------+
So what we need to get done at this point is to open another terminal and fail the leader node:
docker service ls | grep patroni
docker service scale $patroni2-id=0
After some time in the terminal with the script we'll see logs throwing error:
// let's memorize the time we got the last successfull insert

11/18/2020 22:33:06 +00:00
Error
Error
Error
If we check the Patroni cluster stats at this time we might see some delay though and patroni2 still indicating a healthy state running as a leader. But after some time it's going to fail and cluster, through a short stage of the leadership elections, will come to the following state:
+ Cluster: patroni (6893104757524385823) --+----+-----------+
| Member   | Host      | Role    | State   | TL | Lag in MB |
+----------+-----------+---------+---------+----+-----------+
| patroni1 | 10.0.1.18 | Replica | running | 21 |         0 |
| patroni3 | 10.0.1.24 | Leader  | running | 21 |           |
+----------+-----------+---------+---------+----+-----------+
If we go back to our script output we should notice that the connection has finally recovered and the logs are as follows:
Error
Error
Error
11/18/2020 22:33:48 +00:00
11/18/2020 22:33:49 +00:00
11/18/2020 22:33:50 +00:00
11/18/2020 22:33:51 +00:00
Step 4.
Let's go ahead and check if the database is in a proper state after a failover:
docker run --rm -ti --network=patroni_patroni postgres:11 /bin/bash
psql --host haproxy --port 5000 -U approle -d postgres
postgres=> \c patronitestdb
You are now connected to database "patronitestdb" as user "approle".
// I set the time a little earlier than the crash happened
patronitestdb=> select * from records where time > '22:33:04' limit 15;
time
-----------------
 22:33:04.171641
 22:33:05.205022
 22:33:06.231735
 // as we can see  in my case it required around 42 seconds
 // for connection to recover
 22:33:48.345111
 22:33:49.36756
 22:33:50.374771
 22:33:51.383118
 22:33:52.391474
 22:33:53.399774
 22:33:54.408107
 22:33:55.416225
 22:33:56.424595
 22:33:57.432954
 22:33:58.441262
 22:33:59.449541
Summary
From this little experiment, we can conclude that Patroni managed to serve its purpose. After the failure occurred and the leader was re-elected we managed to reconnect and keep working with the database. And the previous data is all present on the leader node which is what we expected. Maybe it could have switched to another node a little faster than in 42 seconds, but at the end of the day, it's not that critical.
I suppose we should consider our work with this tutorial finished. Hope it helped you figure out the basics of a Patroni cluster setup and hopefully it was useful. Thanks for your attention and let the Patroni guardian keep you and your data safe at all times!

