This is a slightly adapted (I've checked new prices for components) translation of an article I wrote 5 years ago. Currently I’m experimenting with LLM usage in robotics projects and will post a few findings soon. I will reference this article. So… here it is.
Let’s clarify right away — we’re not aiming to make this super cheap. I’d rather not lose brain cells trying to build makeshift encoders for motors, and I want to simplify creating a 3D model needed for ROS control (link to the finished model — further below).
At the time of writing, the approximate total cost of the project is ~70,000 RUB. If you already have a 3D printer, you can safely subtract 20,000 RUB. If not — getting one will be a nice bonus. I’ll list all expenses assuming you have nothing but money.
Here's what the result looks like:
It's also worth mentioning that to program the arm, you'll need a computer running Linux (I use Ubuntu) and the ROS framework.
You might ask, "Why is 70K RUB considered cheap?"
Here’s the answer. Originally, I didn’t plan on building a robotic arm from scratch. I just wanted to buy something simple yet functional.
What were my criteria for functionality and baseline simplicity (i.e., why AliExpress manipulators don’t cut it) — let’s leave that for the comments section, so as not to bore those who find it obvious or irrelevant.
Competing products on the market
Let me briefly outline what I considered available on the market:
https://d-bot.ru/magician?ysclid=md63aud31r922974554 270,000 RUB. You can find the DOBOT elsewhere. Maybe you’ll get lucky and find it cheaper — but still much pricier than 70K.
https://arvengo.ru/robototehnika-i-konstruktory/professionalnye-roboty/roboty-manipulyatory/robot-manipulyator-widowx-robotic-arm-mark-ii 280,000 RUB. Even more expensive. TrossenRobotics arms are actually reasonably priced directly from the manufacturer — but sadly, they don’t ship to Russia (where I lived when wrote this article).
Spoiler alert: we’re going to build a clone of the PhantomX Pincher Robot Arm Kit Mark II, manufactured by TrossenRobotics.
So 70,000 RUB doesn’t seem so expensive anymore.
What do we need to buy?
Prices listed as of July 2020: 1 6 x DYNAMIXEL AX-12A motors

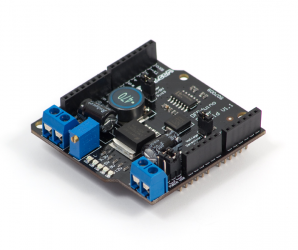
I paid 7,200 RUB per unit, but with some luck, you might find them for 6,000. Let's assume you’re unlucky too: Total: 43,200 RUB 2 3D Printer Any basic one will do, around 20,000 RUB. 3 Arduino Uno + Power Shield

Cost: ~4,000 RUB 4 Optional (but highly recommended): Lab Power Supply

Cost: ~3,500 RUB
Assembly
Great! We've got everything we need (most likely waited weeks for those motors — I know I did). What’s next? 1 Print the manipulator parts using a 3D printer. Download STL files from here 2 Assemble the arm with the motors. It’s pretty straightforward, but if issues arise, this guide will help: assembly instructions
Creating the 3D model
Nice! We’ve got the physical arm — now we need a way to control it. Let's not reinvent the wheel and just install ROS. To use the manipulator fully within ROS, we need a URDF model. This is essential for using MoveIT! to control the robot arm. At the time of writing, the latest stable MoveIt build supports Melodic/Ubuntu 18.04, hence my choice of OS and framework. Building a URDF model is arguably the most tedious (and boring) part of the project. You’ll need to polish the STL parts and stitch them together in an XML-like file, manually adjusting offset values to align parts correctly. If you're into that — go for it. Everyone else, save your sanity and just use my finished model:
https://github.com/vladmiron85/armbot/blob/master/catkin_ws/src/armbot_description/urdf/base.urdf
This model doesn’t include a gripper, but hey — we’re far from picking up real-world objects. For everything else, it’s enough.
It looks like this:
Using the URDF, we’ll generate a MoveIt config that lets us simulate movement and send real commands to the physical arm. For that, there’s a great tutorial (link) To save you time again, here’s my prebuilt config:
https://github.com/vladmiron85/armbot/tree/master/catkin_ws/src/armbot_moveit_config
You can download and launch it with:
roslaunch armbot_moveit_config demo.launch
That’s how you’ll control the real arm in rviz once it’s connected to ROS:
What about the real arm?
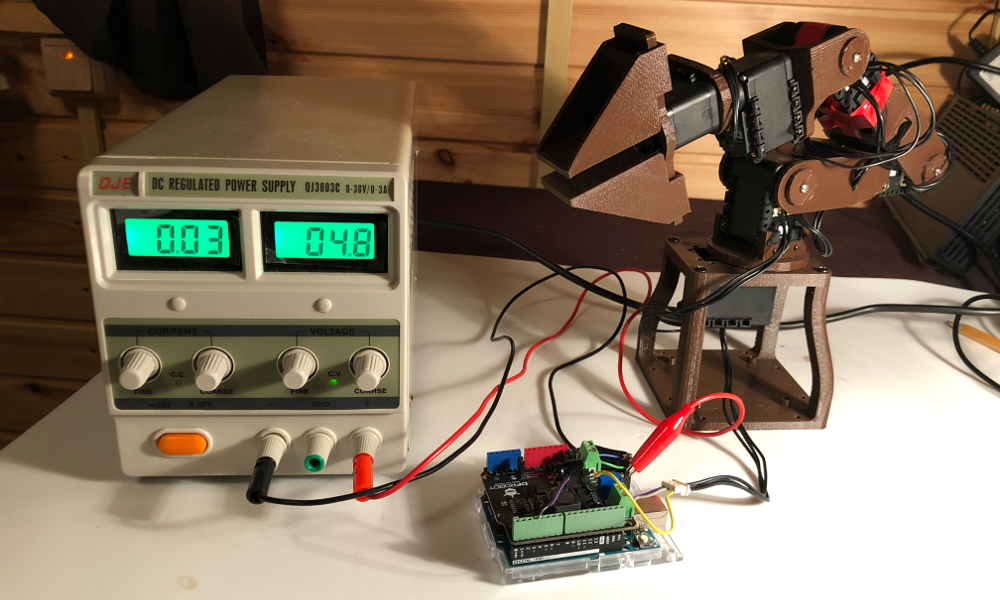
Let’s switch from the virtual world to reality. We’ve got the assembled manipulator. Let’s make it move — using Arduino UNO and the Power Shield. Connect the first motor (the bottom one) to the Power Shield and PSU like this:
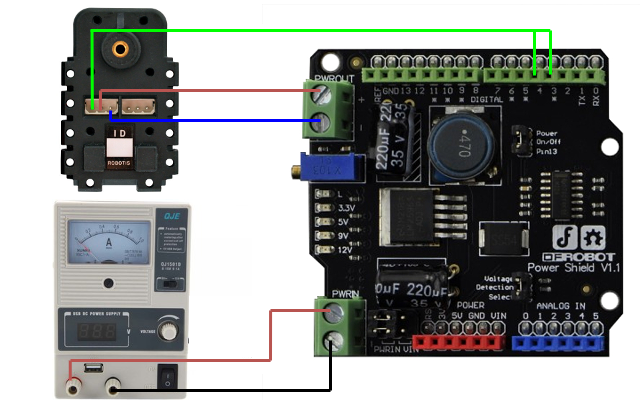
Yes, we’re connecting the motor's data pin to both pin 3 and 4 on Arduino. Curious readers of the Dynamixel manual (here) may notice that the motor uses Half Duplex Asynchronous Serial Communication — meaning the data pin is used both to send and receive commands.
Arduino only supports Full Duplex UART natively. The workaround is to use the Software Serial library — which we’ll do. That’s why we wire the data pin to both 3 and 4.
Besides that, working with Dynamixel motors via Arduino has a few more quirks. Let’s cover them all.
How to make the arm move?
Download the required library: it’s called ardyno. Available via Arduino Library Manager or here: (link)
Dynamixel AX-12A defaults to 1,000,000 baud. But Software Serial can’t handle that. Set it to 57,600.
Here’s the start of your sketch:
#include "DynamixelMotor.h"
// communication baudrate

const long unsigned int baudrate = 57600;
SoftwareDynamixelInterface interface(3, 4);
The motors are daisy-chained. To talk to each one, you need its ID. When initializing a DynamixelMotor object, provide the shared interface and the unique motor ID:
DynamixelMotor motor(interface, id);
You’ll have to assign IDs manually. Each motor has ID=1 by default, so plug each one in separately and run the following sketch:
const long unsigned int baudrate = 57600;
const uint8_t id=1;
SoftwareDynamixelInterface interface(3, 4);
DynamixelMotor motor(interface, id);
void setup()

{

  interface.begin(baudrate);
  delay(100);
  uint8_t status=motor.init();
  if(status!=DYN_STATUS_OK)

  {

      pinMode(LED_BUILTIN, OUTPUT);
      digitalWrite(LED_BUILTIN, HIGH);
      while(1);

  }
  motor.changeId(NEW_ID);

}

void loop()
{}
As you see, we specify the initial ID as 1:
const uint8_t id=1;
Replace NEW_ID with a number from 1 to 6 (you can skip changing the first one). Assign IDs from bottom to top.
Hooray! We’ve got a working robotic arm and a 3D model. Time to hook up ROS and start building something awesome. But that’s a topic for another article (or several). That’s all for now — thanks for reading!
