Do you like GitLab and don't like bugs? Do you want to improve the quality of your source code? Then you've come to the right place. Today we will tell you how to configure the PVS-Studio C# analyzer for checking merge requests. Enjoy the reading and have a nice unicorn mood.
PVS-Studio is a tool designed to detect errors and potential vulnerabilities in the source code of programs, written in C, C++, C#, and Java. Works in 64-bit systems on Windows, Linux and macOS. Can analyze the code meant for 32-bit, 64-bit and embedded ARM platforms.
By the way, we've released PVS-Studio 7.08, which was full of new sapid features. For example:
- C# analyzer under Linux and macOS;
- plugin for Rider;
- new mode for checking a list of files.
Mode of checking a list of files
Previously, in order to check certain files, one had to pass .xml to the analyzer with a list of files. But since this is not very convenient, we have added the ability to pass .txt, which makes life much simpler.
To check certain files, specify the --sourceFiles (-f) flag and pass .txt with the list of files. It looks like this:
pvs-studio-dotnet -t path/to/solution.sln -f fileList.txt -o project.jsonIf you are interested in configuring checks of commits or pull requests, you can also do this using this mode. The difference will be in getting a list of files for analysis and will depend on which systems you are using.
Principle of checking merge requests
The main point of checking is to make sure that problems detected by the analyzer do not make it into the master branch when merging. We also don't want to analyze the entire project every time. Moreover, when merging branches, we have a list of changed files. Therefore, I suggest adding a merge request check.
This is how a merge request looks like before introducing a static analyzer:

In other words, all errors in the changes branch will get to the master branch. Since we wouldn't like this, we add the analysis, and now the scheme looks as follows:

We analyze changes2 and, if there are no errors, we accept the merge request, otherwise reject it.
By the way, if you are interested in analyzing commits and pull requests for C/C++, you are welcome to read about it here.
GitLab
GitLab is an open source DevOps lifecycle web tool that provides a code repository management system for Git with its own wiki, bug tracking system, CI/CD pipeline, and other features.
Before you start implementing the merge request analysis, you need to register and upload your project. If you do not know how to do this, then I suggest an article by my colleague.
Note. One of the possible ways to configure the environment is described below. The point is to show the steps for configuring the environment needed for analyzing and running the analyzer. In your case, it may be better to separate the stages of environment preparation (adding repositories, installing the analyzer) and analysis. For example, preparing Docker instances with the necessary environment and their usage, or some other method.
In order to get a better understanding of what is going to happen next, I suggest taking a look at the following scheme:

The analyzer needs .NET Core SDK 3 for proper operation from which the necessary dependencies for the analyzer will be installed. Adding Microsoft repositories for various Linux distributions is described in the relevant document.
To install PVS-Studio via the package manager, you will also need to add PVS-Studio repositories. Adding repositories for various distributions is described in more detail in the relevant section of the documentation.
The analyzer needs a license key to operate. You can get a trial license on the analyzer download page.
Note. Please note that the described operating mode (merge requests analysis) requires an Enterprise license. Therefore, if you would like to try this mode of operation, don't forget to specify that you need an Enterprise license in the "Message" field.
If a merge request occurs, we only need to analyze the list of changed files, otherwise we analyze all files. After the analysis, we need to convert the logs to the format we need.
Now, with the algorithm in front of your eyes, you can proceed to writing the script. To do this, we need to change the .gitlab-ci.yml file or, if there is no such file, create one. To create it, click on the name of your project -> Set up CI/CD.

Now we are ready to write the script. Let's first write the code that will install the analyzer and enter the license:
before_script:
  - apt-get update && apt-get -y install wget gnupg

  - apt-get -y install git
  - wget https://packages.microsoft.com/config/debian/10/
packages-microsoft-prod.deb -O packages-microsoft-prod.deb
  - dpkg -i packages-microsoft-prod.deb
  - apt-get update
  - apt-get install apt-transport-https
  - apt-get update

  - wget -q -O - https://files.viva64.com/etc/pubkey.txt | apt-key add -
  - wget -O /etc/apt/sources.list.d/viva64.list
https://files.viva64.com/etc/viva64.list
  - apt-get update
  - apt-get -y install pvs-studio-dotnet

  - pvs-studio-analyzer credentials $PVS_NAME $PVS_KEY
  - dotnet restore "$CI_PROJECT_DIR"/Test/Test.sln
Since installation and activation must occur before all other scripts, we use a special before_script label. Let me be clear on this fragment.
Preparation for the analyzer installation:
  - wget https://packages.microsoft.com/config/debian/10/
packages-microsoft-prod.deb -O packages-microsoft-prod.deb
  - dpkg -i packages-microsoft-prod.deb
  - apt-get update
  - apt-get install apt-transport-https
  - apt-get update
Adding PVS-Studio repositories and the analyzer:
  - wget -q -O - https://files.viva64.com/etc/pubkey.txt | apt-key add -
  - wget -O /etc/apt/sources.list.d/viva64.list
https://files.viva64.com/etc/viva64.list
  - apt-get update
  - apt-get -y install pvs-studio-dotnet
License activation:
- pvs-studio-analyzer credentials $PVS_NAME $PVS_KEY$PVS_NAME — user name.
$PVS_KEY — product key.
Restoration of project dependencies, where $CI_PROJECT_DIR is the full path to the project directory:
- dotnet restore "$CI_PROJECT_DIR"/Path/To/Solution.slnFor correct analysis, the project must be successfully built, and its dependencies must be restored (for example, the necessary NuGet packages must be loaded).
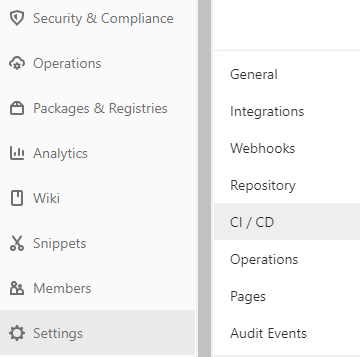
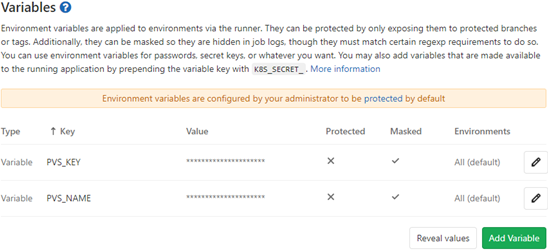
You can set environment variables containing license information by clicking on Setting, and then on CI / CD.

In the opening window, find the item Variables, click Expand on the right and add variables. The result should be the following:

Now we can proceed to the analysis. First, we will add a script for full analysis. In the -t flag, we pass the path to solution, and in the -o flag, we write the path to the file where the analysis results will be written. Also the return code is of interest for us here. In this case, we'd like the analysis to continue when an exit code signals that warnings were issued during the analysis. Here's how this fragment looks like:
job:
  script:
  - exit_code=0
  - pvs-studio-dotnet -t "$CI_PROJECT_DIR"/Test/Test.sln -o
PVS-Studio.json || exit_code=$?
  - exit_code=$((($exit_code & 8)/8))
  - if [[ $exit_code == 1 ]]; then exit 1; else exit 0; fi
Exit codes work as bit masks. For example, if warnings were issued as a result of the analysis, the exit code will be equal to 8. If the license expires within a month, the exit code will be 4. If errors were found during the analysis, and the license expires within a month, both values will be written to the exit code: the numbers add up and we get the final exit code — 8+4=12. Thus, by checking the corresponding bits, you can get information about various states during analysis. Exit codes are described in more detail in the section "Pvs-studio-dotnet exit codes (Linux / macOS)"of the document "Analyzing Visual Studio / MSBuild / .NET Core projects from the command line using PVS-Studio".
In this case, we are interested in all exit codes where 8 appears.
- exit_code=$((($exit_code & 8)/8))We get 1 when the exit code has the bit we are interested in set, otherwise we get 0.
Now it is time to add the analysis of the merge request. Before doing this, let's get some space for the script. We want it to be executed only when a merge request occurs. This looks as follows:
merge:
  script:
  only:
  - merge_requests
Let's move on to the script itself. I stumbled upon the issue that the virtual machine knows nothing about origin/master. So we'll lend it a hand:
- git fetch originNow we get the difference between branches and save the result to a txt file:
- git diff --name-only origin/master $CI_COMMIT_SHA > pvs-fl.txtWhere $CI_COMMIT_SHA is the hash of the last commit.
Next, we run analysis of the list of files by using the -f flag. We pass the previously received .txt file to it. By analogy with the full analysis, we check out the exit codes:
  - exit_code=0
  - pvs-studio-dotnet -t "$CI_PROJECT_DIR"/Test/Test.sln -f
pvs-fl.txt -o PVS-Studio.json || exit_code=$?
  - exit_code=$((($exit_code & 8)/8))
  - if [[ $exit_code == 1 ]]; then exit 1; else exit 0; fi
Full script for checking merge request will look like this:
merge:
  script:
  - git fetch origin
  - git diff --name-only origin/master $CI_COMMIT_SHA > pvs-fl.txt
  - exit_code=0
  - pvs-studio-dotnet -t "$CI_PROJECT_DIR"/Test/Test.sln -f
pvs-fl.txt -o PVS-Studio.json || exit_code=$?
  - exit_code=$((($exit_code & 8)/8))
  - if [[ $exit_code == 1 ]]; then exit 1; else exit 0; fi
  only:
  - merge_requests
It only remains to add the log conversion after all the scripts have worked. We use the after_script label and the plog-converter utility:
after_script:
  - plog-converter -t html -o eLog ./PVS-Studio.json
The plog-converter utility is an open source project that is used to convert the analyzer error report into various forms, such as HTML. For a more detailed description of the utility, see the section "Plog Converter Utility" in the relevant documentation section.
By the way, if you'd like to conveniently work with a .json report locally from the IDE, then I recommend our plugin for IDE Rider. For more information about its use, see the special document.
For convenience, here is the entire.gitlab-ci.yml:
image: debian

before_script:
  - apt-get update && apt-get -y install wget gnupg

  - apt-get -y install git
  - wget https://packages.microsoft.com/config/debian/10/
packages-microsoft-prod.deb -O packages-microsoft-prod.deb
  - dpkg -i packages-microsoft-prod.deb
  - apt-get update
  - apt-get install apt-transport-https
  - apt-get update

  - wget -q -O - https://files.viva64.com/etc/pubkey.txt | apt-key add -
  - wget -O /etc/apt/sources.list.d/viva64.list
https://files.viva64.com/etc/viva64.list
  - apt-get update
  - apt-get -y install pvs-studio-dotnet

  - pvs-studio-analyzer credentials $PVS_NAME $PVS_KEY
  - dotnet restore "$CI_PROJECT_DIR"/Test/Test.sln

merge:
  script:
  - git fetch origin
  - git diff --name-only origin/master $CI_COMMIT_SHA > pvs-fl.txt
  - exit_code=0
  - pvs-studio-dotnet -t "$CI_PROJECT_DIR"/Test/Test.sln -f
pvs-fl.txt -o PVS-Studio.json || exit_code=$?
  - exit_code=$((($exit_code & 8)/8))
  - if [[ $exit_code == 1 ]]; then exit 1; else exit 0; fi
  only:
  - merge_requests

job:
  script:
  - exit_code=0
  - pvs-studio-dotnet -t "$CI_PROJECT_DIR"/Test/Test.sln -o
PVS-Studio.json || exit_code=$?
  - exit_code=$((($exit_code & 8)/8))
  - if [[ $exit_code == 1 ]]; then exit 1; else exit 0; fi

after_script:
  - plog-converter -t html -o eLog ./PVS-Studio.json
As soon as we've added everything to the file, click on Commit changes. To make sure that everything is correct, go to CI/CD — > Pipelines -> Running. It opens the virtual machine window at the end of which should be the following:

Once you get Job succeeded — it's ok, profit. Now you can test what you've done.
Examples of working
As an example, we will create a simple project (in master) that will contain several files. After that, we will change only one file in another branch and try to make a merge request.
Let's look at two cases: when the modified file contains an error, and when it doesn't. First, we'll consider an example with an error.
Let's say there is a Program.cs file in the master branch that doesn't contain errors, and in another branch the developer added erroneous code and wants to make a merge request. What kind of mistake they made is not so important, the main thing is that it is there. For example, they forgot the throw operator (yes, people make such mistakes):
void MyAwesomeMethod(String name)
{
  if (name == null)
    new ArgumentNullException(....);
  // do something
  ....
}
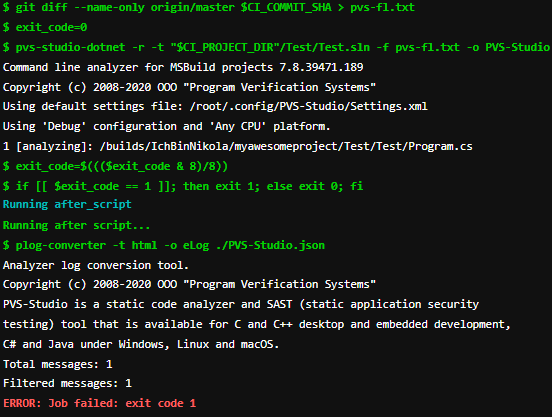
Let's look at the analysis result for the example with an error. Also, to make sure that only one file was analyzed, I added the -r flag to the pvs-studio-dotnet command line:

As we can see, the analyzer found an error and didn't allow merging branches.
Now let's check the example without an error. Fixed code:
void MyAwesomeMethod(String name)
{
  if (name == null)
    throw new ArgumentNullException(....);
  // do something
  ....
}
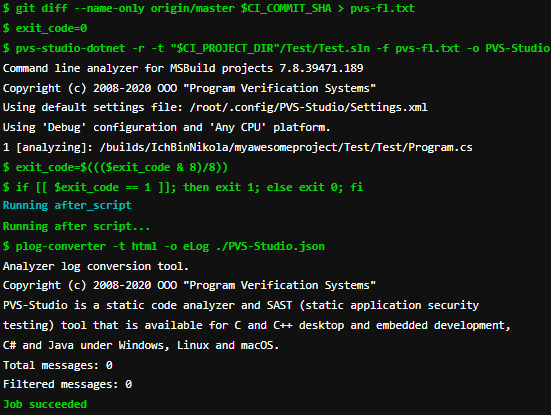
Analysis results of merge request:

As we can see, no errors were found, and the task was completed successfully, which is what we wanted to check.
Conclusion
Filtering out bad code before merging branches is very convenient and pleasant. So if you are using CI/CD, try embedding a static analyzer to check it. Especially since it can be done very simply.
Thank you for your attention.