It hasn't been that long since my last cheat sheet was published and this is the day for the new one. This time I got a task to find a solution for backing up Kafka to S3 bucket, following the terms:
Kafka is running in on-prem k8s cluster;
No managed services;
Use Strimzi Kafka Operator;
All components of the solution are distributing under Apache license;
Sounds cool, right? I think so, too! So what's the problem, you ask? As every time before - no comprehensive manual. All articles are outdated, links are broken and solving the task was kind of solving puzzle. So the only way for me to keep it stuck together, is to write it down and to share with you.
Prerequisites:
2 k8s clusters: one for a source Kafka, another one for a target
S3 bucket
Private Docker registry with permissions for pushing and pulling images
Helm installed
The plan:
Install Strimzi Kafka Operator and cluster on both k8s clusters
Create topic, send and receive message there
Install Kafka Connect
Install Apache Camel plugin connectors: for S3 sink on source Kafka and S3 source on target Kafka
Actually, most of the article will be code snippets, so let's go to copy-paste!
Strimzi Kafka Operator and cluster
Process is straightforward: create namespace, add repo to Helm, install.
Namespace:
kubectl create ns kafka
Add repo to Helm and check it added successfully:
helm repo add strimzi https://strimzi.io/charts/
helm search repo strimzi
Output of the search through repo strimzi should be like this:
~$ helm search repo strimzi
NAME                            CHART VERSION   APP VERSION     DESCRIPTION
strimzi/strimzi-drain-cleaner   0.4.2           0.4.2           Utility which helps with moving the Apache Kafk...
strimzi/strimzi-kafka-operator  0.35.1          0.35.1          Strimzi: Apache Kafka running on Kubernetes
Installing Srimzi Kafka Operator in kafka namespace:
helm install strimzi-kafka-operator strimzi/strimzi-kafka-operator -n kafka
Checking what's up after install:
kubectl get pods -n kafka
Output of the command should be like this:
~$ kubectl get pods -n kafka
NAME                                       READY   STATUS    RESTARTS   AGE
strimzi-cluster-operator-xxxxxxxxx-xxxxx   1/1     Running   0          1m
Operator implements a whole bunch of CRDs, so let's utilize some. Create manifest named kafka.yaml:
apiVersion: kafka.strimzi.io/v1beta2
kind: Kafka
metadata:
  name: kafka-test-cluster
spec:
  kafka:
    version: 3.4.0
    replicas: 1
    listeners:
      - name: plain
        port: 9092
        type: internal
        tls: false
      - name: tls
        port: 9093
        type: internal
        tls: true
    config:
      offsets.topic.replication.factor: 1
      transaction.state.log.replication.factor: 1
      transaction.state.log.min.isr: 1
      default.replication.factor: 1
      min.insync.replicas: 1
      inter.broker.protocol.version: "3.4"
    storage:
      type: jbod
      volumes:
      - id: 0
        type: persistent-claim
        size: 5Gi
        deleteClaim: false
  zookeeper:
    replicas: 1
    storage:
      type: persistent-claim
      size: 5Gi
      deleteClaim: false
  entityOperator:
    topicOperator: {}
    userOperator: {}
After you kubectl apply this manifest, operator will create 1 replica of ZooKeeper and 1 replica of Kafka Cluster. Both are with 5Gb persistent storage. Cluster will be named kafka-test-cluster:
kubectl apply -f kafka.yaml -n kafka
Take a look at the result:
~$ kubectl get pods -n kafka
NAME                                       READY   STATUS    RESTARTS   AGE
NAME                                                  READY   STATUS    RESTARTS   AGE
kafka-test-cluster-entity-operator-xxxxxxxxxx-xxxxx   3/3     Running   0          115s
kafka-test-cluster-kafka-0                            1/1     Running   0          2m18s
kafka-test-cluster-zookeeper-0                        1/1     Running   0          2m42s
strimzi-cluster-operator-xxxxxxxxx-xxxxx              1/1     Running   0          5m
I assume all is up and running, so move next. Let's create topic and check message flow.
Create topic, send and receive message
Create test-topic.yaml:
apiVersion: kafka.strimzi.io/v1beta2
kind: KafkaTopic
metadata:
  generation: 1
  labels:
    strimzi.io/cluster: kafka-test-cluster
  name: ips
spec:
  config: {}
  partitions: 1
  replicas: 1
And apply it:
kubectl apply -f test-topic.yaml -n kafka
Check if topic is in place:
kubectl get kafkatopic -n kafka
Output be like:
~$ kubectl get kafkatopic -n kafka
NAME    CLUSTER                 PARTITIONS   REPLICATION FACTOR   READY
test    kafka-test-cluster      1            1                    True
Let's check how messages flow. But first we need to know Kafka bootstrap's IP in the cluster:
kubectl get svc -n kafka
Output:
~$ kubectl get svc -n kafka
NAME                                  TYPE        CLUSTER-IP      EXTERNAL-IP   PORT(S)                               AGE
kafka-test-cluster-kafka-bootstrap    ClusterIP   10.104.63.229   <none>        9091/TCP,9092/TCP,9093/TCP            15m
kafka-test-cluster-kafka-brokers      ClusterIP   None            <none>        9090/TCP,9091/TCP,9092/TCP,9093/TCP   15m
kafka-test-cluster-zookeeper-client   ClusterIP   10.108.31.185   <none>        2181/TCP                              16m
kafka-test-cluster-zookeeper-nodes    ClusterIP   None            <none>        2181/TCP,2888/TCP,3888/TCP            16m
kubernetes                            ClusterIP   10.96.0.1       <none>        443/TCP                               20h
Okay, we will aim to 10.104.63.229. Exec interactive terminal with bash in kafka-test-cluster-kafka-0 node:
kubectl exec -it -n kafka kafka-test-cluster-kafka-0 -- bash
As we are in, change directory to /opt/kafka/bin/ and run kafka-console-producer script as follows:
cd /opt/kafka/bin/
./kafka-console-producer.sh --broker-list 10.104.63.229:9092 --topic test
Now type in a message and send it by pressing enter:
[kafka@strimzi-kafka-cluster-kafka-0 bin]$ ./kafka-console-producer.sh --bootstrap-server 10.104.63.229:9092 --topic test
>Test footsteps in the darkness of the console!
>
Let's check if it's there. Ctrl+C to leave producer's console and run consumer's one with a command:
./kafka-console-consumer.sh --bootstrap-server 10.104.63.229:9092 --topic test --from-beginning
Hold on for a couple of seconds and the result:
[kafka@strimzi-kafka-cluster-kafka-0 bin]$ ./kafka-console-consumer.sh --bootstrap-server 10.104.63.229:9092 --topic test --from-beginning
Test footsteps in the darkness of the console!
Kafka Connect
Create kafka-connect.yaml:
apiVersion: kafka.strimzi.io/v1beta2
kind: KafkaConnect
metadata:
  name: kafka-connect-cluster
  annotations:
    strimzi.io/use-connector-resources: "true"
spec:
  replicas: 1
  authentication:
    type: tls
    certificateAndKey:
      certificate: kafka-test-cluster-kafka-0.crt
      key: kafka-test-cluster-kafka-0.key
      secretName: kafka-test-cluster-kafka-brokers
  bootstrapServers: kafka-test-cluster-kafka-bootstrap:9093
  tls:
    trustedCertificates:
      - secretName: kafka-test-cluster-cluster-ca-cert
        certificate: ca.crt
  config:
    group.id: kafka-connect-cluster
    offset.storage.topic: kafka-connect-cluster-offsets
    config.storage.topic: kafka-connect-cluster-configs
    status.storage.topic: kafka-connect-cluster-status
    key.converter: org.apache.kafka.connect.json.JsonConverter
    value.converter: org.apache.kafka.connect.json.JsonConverter
    key.converter.schemas.enable: true
    value.converter.schemas.enable: true
    config.storage.replication.factor: 1
    offset.storage.replication.factor: 1
    status.storage.replication.factor: 1
  build:
    output:
      type: docker
      image: <AWS-ACCOUNT-ID>.dkr.ecr.<AWS-ECR-REGION>.amazonaws.com/strimzi-kafkaconnect-plugins:s3-sink
      pushSecret: ecr-secret
    plugins:
      - name: camel-aws-s3-sink-kafka-connector
        artifacts:
          - type: tgz
            url: https://repo.maven.apache.org/maven2/org/apache/camel/kafkaconnector/camel-aws-s3-sink-kafka-connector/3.18.2/camel-aws-s3-sink-kafka-connector-3.18.2-package.tar.gz
  externalConfiguration:
    env:
      - name: AWS_ACCESS_KEY_ID
        valueFrom:
          secretKeyRef:
            name: aws-creds
            key: AWS_ACCESS_KEY_ID
      - name: AWS_SECRET_ACCESS_KEY
        valueFrom:
          secretKeyRef:
            name: aws-creds
            key: AWS_SECRET_ACCESS_KEY
As it follows from the manifest above we need two secrets to add: one for S3 named aws-creds and one for docker registry named ecr-secret.
Add secret ecr-secret for private registry. In my case it's ECR one, located in the region <AWS-ECR-REGION> of the account <AWS-ACCOUNT-ID>, so my username is AWS and password is generated by aws cli:
kubectl create secret docker-registry ecr-secret \
        --docker-server=<AWS-ACCOUNT-ID>.dkr.ecr.<AWS-ECR-REGION>.amazonaws.com \
		--docker-username=AWS \
		--docker-password=$(aws ecr get-login-password) \
		-n kafka
If you don't use ECR
Change the values of the flags above in accordance with your needs.
Add secret aws-creds. Base64 encode AWS Access Key and Secret and create aws-creds.yaml:
apiVersion: v1
kind: Secret
metadata:
  name: aws-creds
type: Opaque
data:
  AWS_ACCESS_KEY_ID: <Base64-encoded-Key>
  AWS_SECRET_ACCESS_KEY: <Base64-encoded-Secret>
Now apply aws-creds.yaml and check if all the secrets are in place:
kubectl apply -f aws-creds.yaml -n kafka
kubectl get secret -n kafka
Output be like:
~$ kubectl get secret -n kafka
NAME                                                TYPE                             DATA   AGE
aws-creds                                           Opaque                           2      2m
ecr-secret                                          kubernetes.io/dockerconfigjson   1      3m
Now it's time for Kafka Connect itself. Apply kafka-connect.yaml:
kubectl apply -f kafka-connect.yaml -n kafka
Let's check how that works:
kubectl get pods -n kafka
~$ kubectl get pods
NAME                                                  READY   STATUS    RESTARTS   AGE
kafka-connect-cluster-connect-build                   1/1     Running   0          77s
kafka-test-cluster-entity-operator-xxxxxxxxxx-xxxxx   3/3     Running   0          70m
kafka-test-cluster-kafka-0                            1/1     Running   0          70m
kafka-test-cluster-zookeeper-0                        1/1     Running   0          71m
strimzi-cluster-operator-xxxxxxxxx-xxxxx              1/1     Running   0          21h
As we can see, Kafka Connect started pod kafka-connect-cluster-connect-build which builds image with configuration we set up.
After a while checking again:
~$ kubectl get pods
NAME                                                  READY   STATUS             RESTARTS   AGE
kafka-connect-cluster-connect-xxxxxxxxx-xxxxx         1/1     Running            0          100s
kafka-test-cluster-entity-operator-xxxxxxxxxx-xxxxx   3/3     Running            0          72m
kafka-test-cluster-kafka-0                            1/1     Running            0          72m
kafka-test-cluster-zookeeper-0                        1/1     Running            0          73m
strimzi-cluster-operator-xxxxxxxxx-xxxxx              1/1     Running            0          21h
What if STATUS of the pod is ImagePullBackOff
For reasons which are not clear for me, resourceKafkaConnect doesn't put imagePullSecrets into spec section of deployment of the kind strimzi.io/kind: KafkaConnect.
You can fix it easily by editing the deployment in-place:
kubectl edit deploy kafka-connect-cluster-connect -n kafka
And adding imagePullSecrets in spec section right between affinity and containers (and not to forget about correct indentation):
Save and exit.
I may also patch deployment in-place:
kubectl patch kafka-connect-cluster-connect -p '{"spec":{"template":{"spec":{"imagePullSecrets":[{"name":"ecr-secret"}]}}}}'
Check the result:
ubuntu@ip-10-200-50-148:~$ kubectl get pods
NAME                                                  READY   STATUS              RESTARTS   AGE
kafka-connect-cluster-connect-yyyyyyyyy-yyyyyy        0/1     ContainerCreating   0          3s
kafka-connect-cluster-connect-xxxxxxxxx-xxxxx         0/1     ImagePullBackOff    0          19m
kafka-test-cluster-entity-operator-xxxxxxxxxx-xxxxx   3/3     Running             0          90m
kafka-test-cluster-kafka-0                            1/1     Running             0          90m
kafka-test-cluster-zookeeper-0                        1/1     Running             0          90m
strimzi-cluster-operator-xxxxxxxxx-xxxxx              1/1     Running             0          21h
Container is successfully pulled
Okay. That's fun, so let's double it and repeat all the steps above for the target cluster. :-D
When you're ready with the target one, it's a time for connectors and actual backup and restore.
Install Apache Camel plugin connectors
Create s3-sink.yaml for the source cluster:
apiVersion: kafka.strimzi.io/v1beta2
kind: KafkaConnector
metadata:
  name: s3-sink-connector
  labels:
    strimzi.io/cluster: kafka-connect-cluster
spec:
  class: org.apache.camel.kafkaconnector.awss3sink.CamelAwss3sinkSinkConnector
  tasksMax: 1
  config:
    key.converter: org.apache.kafka.connect.storage.StringConverter
    value.converter: org.apache.kafka.connect.storage.StringConverter
    topics: ips
    camel.kamelet.aws-s3-sink.bucketNameOrArn: "arn:aws:s3:::ARN-OF-YOUR-BUCKET"
    camel.kamelet.aws-s3-sink.accessKey: "<AWS-ACCESS-KEY>"
    camel.kamelet.aws-s3-sink.secretKey: "<AWS-SECRET-KEY>"
    camel.kamelet.aws-s3-sink.region: "<AWS-S3-REGION>"
    camel.kamelet.aws-s3-sink.keyName: "test"
Please notice values for
spec.config.key.converterandspec.config.value.converter. For the sake of simplicity in the article I want to save messages as plain-text objects in S3 bucket and this is why is useorg.apache.kafka.connect.storage.StringConverterhere.
Apply yaml and send message to the test topic as we did it before:
kubectl apply -f s3-sink.yaml -n kafka
Exec bash in interactive terminal again and send message which we are going to catch on the other side:
kubectl exec -it -n kafka kafka-test-cluster-kafka-0 -- bash
cd /opt/kafka/bin/
./kafka-console-producer.sh --broker-list 10.104.63.229:9092 --topic test
[kafka@strimzi-kafka-cluster-kafka-0 bin]$ ./kafka-console-producer.sh --bootstrap-server 10.104.63.229:9092 --topic test
>Wait for me and I shall come!
>
Let's take a look at the bucket:
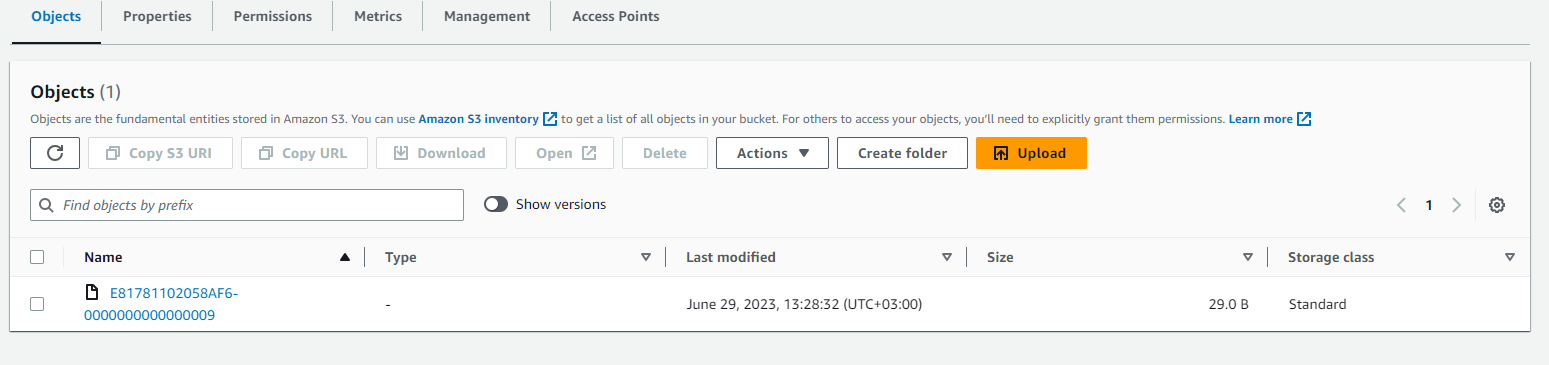
Object's in place.
Let's take a look what's inside:
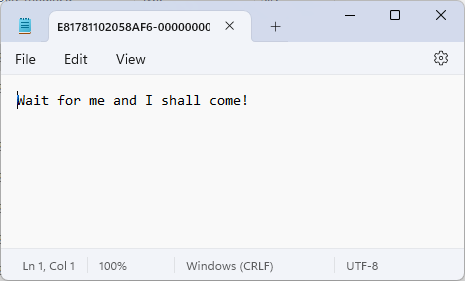
Okay. Backup is working.
Let's set up restore.
Create s3-source.yaml for the target cluster:
apiVersion: kafka.strimzi.io/v1beta2
kind: KafkaConnector
metadata:
  name: s3-source-connector
  labels:
    strimzi.io/cluster: kafka-connect-cluster
spec:
  class: org.apache.camel.kafkaconnector.awss3source.CamelAwss3sourceSourceConnector
  tasksMax: 1
  config:
    key.converter: org.apache.kafka.connect.storage.StringConverter
    value.converter: org.apache.kafka.connect.converters.ByteArrayConverter
    topics: test
    camel.kamelet.aws-s3-source.bucketNameOrArn: "arn:aws:s3:::ARN-OF-YOUR-BUCKET"
    camel.kamelet.aws-s3-source.deleteAfterRead: "false"
    camel.kamelet.aws-s3-source.accessKey: "<AWS-ACCESS-KEY>"
    camel.kamelet.aws-s3-source.secretKey: "<AWS-SECRET-KEY>"
    camel.kamelet.aws-s3-source.region: "<AWS-S3-REGION>"
And again, please notice values for
spec.config.key.converterandspec.config.value.converter. Since connector gets byte stream from S3 we need to useorg.apache.kafka.connect.converters.ByteArrayConverter.Also please take a look at the parameter
camel.kamelet.aws-s3-source.deleteAfterReadand it's valuefalse. If you change it totrueyou'll lose all your backed up messages as soon as connector read them.
Apply s3-source.yaml and let's see what we received:
kubectl apply -f s3-source.yaml -n kafka
Exec bash in the interactive terminal again and run consumer:
kubectl exec -it -n kafka kafka-test-cluster-kafka-0 -- bash
cd /opt/kafka/bin/
./kafka-console-consumer.sh --bootstrap-server 10.87.163.29:9092 --topic test --from-beginning
And the output:
[kafka@kafka-test-cluster-kafka-0 bin]$ ./kafka-console-consumer.sh --bootstrap-server 10.87.163.29:9092 --topic test --from-beginning
Wait for me and I shall come!
Wait for me and I shall come!
Wait for me and I shall come!
Wait for me and I shall come!
Wait for me and I shall come!
Wait for me and I shall come!
Wait for me and I shall come!
Wait for me and I shall come!
Wait for me and I shall come!
Wait for me and I shall come!
Wait for me and I shall come!
Wait for me and I shall come!
Wait for me and I shall come!
Wait for me and I shall come!
Wait for me and I shall come!
Wait for me and I shall come!
Wait for me and I shall come!
Wait for me and I shall come!
Wait for me and I shall come!
Wait for me and I shall come!
Wait for me and I shall come!
Wait for me and I shall come!
Wait for me and I shall come!
Message has come.
But why so many times, you ask? Because of camel.kamelet.aws-s3-source.deleteAfterRead: "false" and camel.kamelet.aws-s3-source.delay parameter which we were not set and which default value is 500ms.
I hope this article will ease you start in setting up Kafka backup and restore. Happy playing!

List of used resources:
