Let’s imagine you need access to the real-time data of some smart contracts on Ethereum (or Polygon, BSC, etc.) like Uniswap or even PEPE coin to analyze its data using the standard data scientist/analyst tools: Python, Pandas, Matplotlib, etc. In this tutorial, I’ll show you more sophisticated data access tools that are more like a surgical scalpel (The Graph subgraphs) than a well-known Swiss knife (RPC node access) or hammer (ready-to-use APIs). I hope my metaphors don’t scare you ?.

There are some different methods how to access the data on Ethereum:
Using RPC-node commands like getBlockByNumber to get the low-level block information, then accessing smart contract data via libraries like web3.py. It allows you to get the data block by block and then collect it in your own database or CSV file. This way is not really fast, and parsing popular smart contract data using this way usually takes years.
Using some data analytics providers like Dune which can help you with some popular smart contract data, but it is not really real-time. The latency can be about several minutes.
Using some ready-to-use APIs like NFT API/Token API/DeFi API. And it can be an excellent option because usually, the latency is low. The only problem that you can face is that the data you need is not available. For instance, not all variables can be available as historical time series.
What if you still want to have real-time data of a smart contract, but are not satisfied by previous solutions, because you want all:
you want low-latency data (the data is always up-to-date right after a new block has been mined)
you need a custom slice of data that is not available on any ready-to-use API
you don’t want to hassle with manual processing data block by block along with processing block reorganizations
This is the best use case for subgraphs by The Graph. Essentially, The Graph is a decentralized network to access smart contract data in a decentralized way paying the price for requests in GRT tokens.
But the underlying technology called “subgraphs” allows you to transform your simple description of what variables need to be saved (for real-time access) into the production-grade ETL pipeline which
Extract data from the blockchain
Saves it into the database
Making this data accessible via GraphQL interface
Updates the data after each new block is mined on the network
Automatically process the chain reorganizations
This is a big deal. You don’t need to be a highly qualified data engineer experienced in EVM-compatible blockchains to set up the entire workflow.
But let’s start with something ready-to-use. What if somebody has already developed a subgraph that helps to access the data you need?
You can go to The Graph hosted service website, find the community subgraph section and try to get the existing subgraphs on the protocol you need. For instance, let’s find a subgraph to access Lido protocol (which allows users to stake their Ethers without limiting the minimum value of 32 ethers, as is usually the case, and apart from it getting the tokens that can be staked again, can you believe this??).
Lido protocol is currently top-1 in terms of TVL (Total Value Locked — a metric used to measure the total value of digital assets that are locked or staked in a particular DeFi platform or DApp) according to DeFiLlama.

And there it is! The subgraph made by Lido team is here.

Let’s go to the subgraph details page.

What can we see here?
The IPFS CID of this subgraph — it is an internal unique identifier of this subgraph pointing to the manifest of this subgraph on the IPFS (peer-to-peer protocol to find a file by hash — this is a critically simplified explanation, but you can figure out how it works for yourself).
Query URL — this is an actual endpoint that we will use in our Python code to access smart contract data.
The indicator of a subgraph sync status. When the subgraph is up-to-date you can query the data, but you should understand that deploying a new subgraph you must wait for a while to sync it. During this process, it will show the number of current block under processing.
The GraphQL query. Each subgraph has its own data structure (the list of tables with data) that need to be considered when creating a GraphQL query. Generally, GraphQL is pretty easy to learn, but if you are struggling with it you can ask ChatGPT to help with it ?. Here is an example at the end of the article.
The button which runs the query.
The output window. As you can see the GraphQL response is JSON-like structure.
A switch that allows you to see the data structure of this subgraph.
Let’s get down to business (Let’s uncover our jupyter notebooks?).
Getting raw data:
import pandas as pd
import requests

def run_query(uri, query):
    request = requests.post(uri, json={'query': query}, headers={"Content-Type": "application/json"})
    if request.status_code == 200:
        return request.json()
    else:
        raise Exception(f"Unexpected status code returned: {request.status_code}")

url = "https://api.thegraph.com/subgraphs/name/lidofinance/lido"
query = """{
  lidoTransfers(first: 50) {
    from
    to
    value
    block
    blockTime
    transactionHash
  }
}"""

result = run_query(url, query)
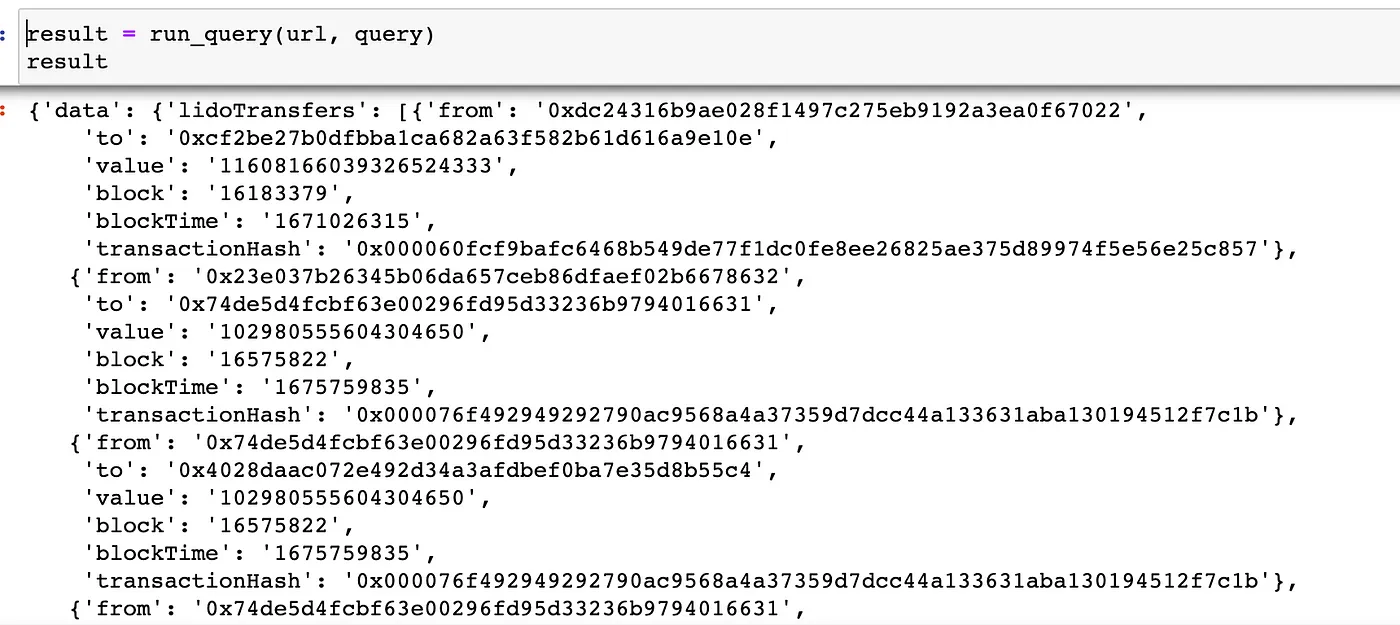
The result variable looks like this:

And the last transformation (which is only valid for flat JSON response) creates a dataframe:
df = pd.DataFrame(result['data']['lidoTransfers'])
df.head()

But how to download all data from the table? With GraphQL there are different options on it, and I am picking the following one. Considering that the blocks are ascending let’s scan from the first block querying by 1000 entities each time (1000 is the limit for the graph-node).
query = """{
  lidoTransfers(orderBy: block, orderDirection: asc, first: 1) {
     block
  }
}"""
# here we get the first block number to start with
first_block = int(run_query(url, query)['data']['lidoTransfers'][0]['block'])
current_last_block = 17379510

#query template to make consecutive queries
query_template = """{{
  lidoTransfers(where: {{block_gte: {block_x} }}, orderBy: block, orderDirection: asc, first: 1000) {{
    from
    to
    value
    block
    blockTime
    transactionHash
  }}
}}"""

result = [] # storing the response
offset = first_block # starting from the first found block

while True:
    query = query_template.format(block_x=offset) # generate the query
    sub_result = run_query(url, query)['data']['lidoTransfers'] # get the data
    if len(sub_result)<=1: # break if finished
        break
    sh = int(sub_result[-1]['block']) - offset # calculate the shift
    offset = int(sub_result[-1]['block']) # calculate the new shift
    result.extend(sub_result) # append
    print(f"{(offset-first_block)/(current_last_block - first_block)* 100:.1f}%, got {len(sub_result)} lines, block shift {sh}" ) #show the log

# convert to the dataframe
df = pd.DataFrame(result)
Bear in mind that we do overlapping queries because each time we use the last block number from the query to start the next one with. We do this to avoid missing records due to the possible multiple transactions per block.

As we see each query returns 1000 lines, but the block number is shifting by several tens of thousands. It means that not every block contains at least one Lido transaction. An important step here is to get rid of the duplicates that we collected avoiding missing records:

As we see, there are 9k+ duplicated lines in the dataframe.
Now let’s do some simple EDA.
col = "from"
df.groupby(col, as_index=False)\
    .agg({'transactionHash': 'count'})\
    .sort_values('transactionHash', ascending=False)\
    .head(5)

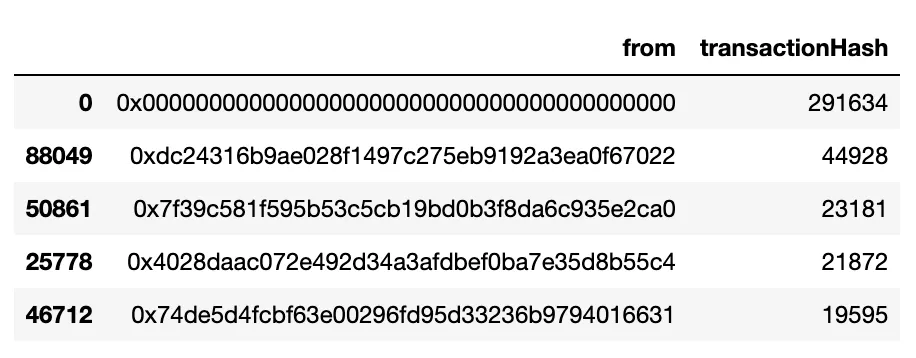
If we check the most frequent addresses in the field “from” we find “0x0000000000000000000000000000000000000000” address. Usually, it means the issue of new tokens, so we can find a transaction in Etherscan and check:
(df[df['from']=='0x0000000000000000000000000000000000000000'].iloc[1000].to,\
df[df['from']=='0x0000000000000000000000000000000000000000'].iloc[1000].transactionHash,
df[df['from']=='0x0000000000000000000000000000000000000000'].iloc[1000].value,)

We will see the transaction that has the same “value”:

Also, it is interesting to check the most frequent receiver of funds (by the field called “to”):
col = "to"
df.groupby(col, as_index=False)\
    .agg({'transactionHash': 'count'})\
    .sort_values('transactionHash', ascending=False)\
    .head(5)

The address “0x7f39c581f595b53c5cb19bd0b3f8da6c935e2ca0” can be found on the Etherscan as Lido: wrapped stETH Token.

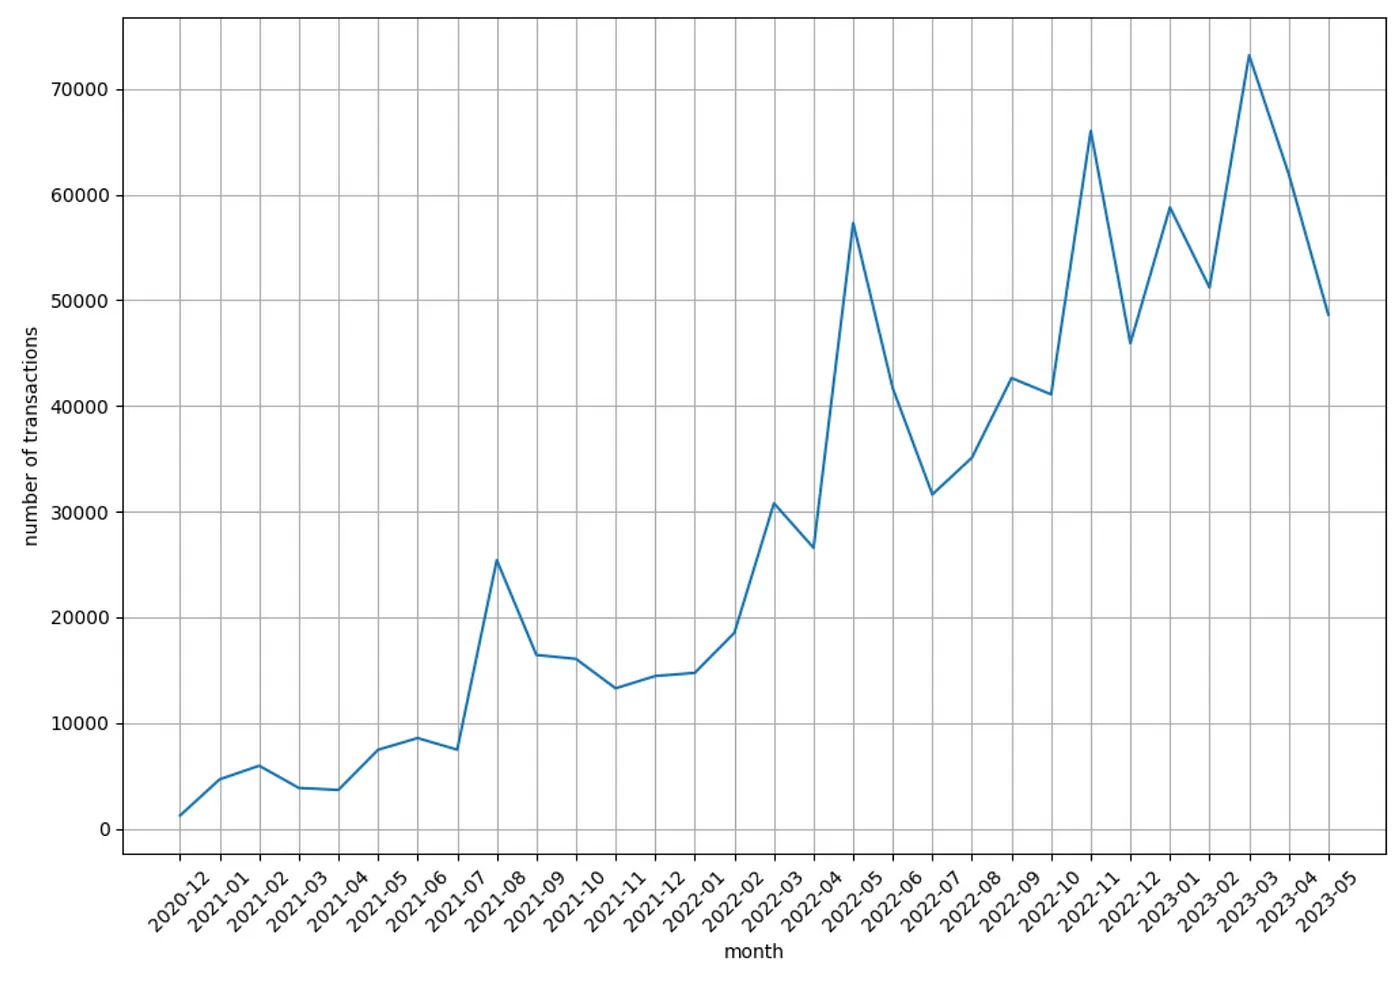
Now let’s see the number of transactions per month:
import datetime
import matplotlib.pyplot as plt

df["blockTime_"] = df["blockTime"].apply(lambda x: datetime.datetime.fromtimestamp(int(x)))
df['ym'] = df['blockTime_'].dt.strftime("%Y-%m")
df_time = df.groupby('ym', as_index=False).agg({'transactionHash': 'count'}).sort_values('ym')

fig, ax = plt.subplots(figsize=(12,8))
ax.plot(df_time['ym'].iloc[:-1], df_time['transactionHash'].iloc[:-1])
plt.xticks(rotation=45)
plt.xlabel('month')
plt.ylabel('number of transactions')
plt.grid()
plt.show()

The number of transactions per month is growing over the years constantly!
You can continue your investigation going forward with the other fields or make other queries to different tables on the same subgraph:

What else you can do with subgraphs
Firstly, if you need to access the data of any other smart contract that has no subgraph yet (or the data is not enough) you can easily write your own subgraph using these tutorials:
How to access the Tornado Cash data easily using The Graph’s subgraphs
How to access transactions of PEPE ($PEPE) coin using The Graph subgraphs and ChatGPT prompts
Secodly, if you want to become an advanced subgraphs developer, consider these deep-diving tutorials:
Thirdly, if you are going to use subgraphs real-time data in your production application, you can deploy your subgraph into the Chainstack Subgraphs hosted service which is multiple times faster and 99.9% reliable.
Then, to write a subgraph is not straightforward for the beginners. So, SubgraphGPT telegram-bot can be helpful to get the ChatGPT-powered answers according to the related The Graph knowledge-base.
Additionally, you can find it helpful to look at all subgraphs resources collected in the awesome-subgraphs GitHub repository.
Finally, if you still don’t feel comfortable with subgraphs do not hesitate to ask any questions in the telegram chat “Subgraphs Experience Sharing”.
—
Kirill Balakhonov — Product Lead @ chainstack.com — Twitter Telegram