
Earlier, I have introduced the Ontology Smart Contract in
Part 1: Blockchain & Block API and
Part 2: Storage API
Part 3: Runtime API
Today, let’s talk about how to invoke an Ontology native smart contract through the Native API. One of the most typical functions of invoking native contract is asset transfer.
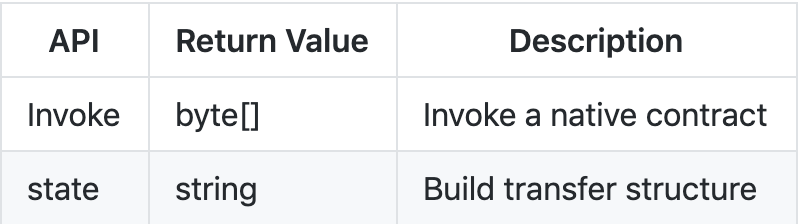
Introduction
The Native API has only one API. When you use the Invoke function, you need to use the built-in state function to help you encapsulate the parameters. See below to learn how to use the functions.
Now let’s go into more detail about how to use these 2 APIs. Before that, you can create a new contract in the Ontology smart contract development tool SmartX and follow the instructions below. As usual, at the end of the article, I will provide a link to the source code.
How to Use Native API
As usual, you need to import the 2 functions as follows before using them.
from ontology.interop.Ontology.Native import Invoke
from ontology.builtins import state
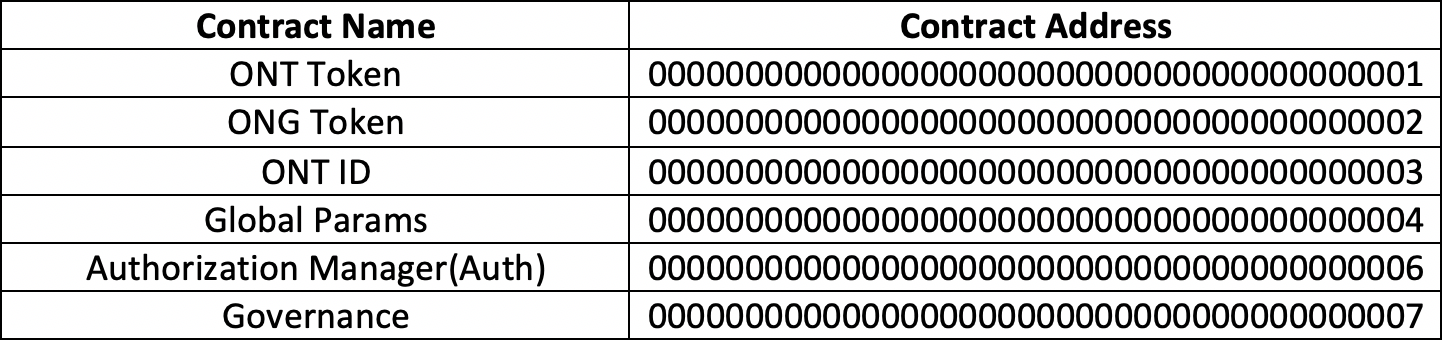
List of Ontology Native Contract
There are currently 6 Ontology native contracts available for developers. Below is the list of the 6 native contracts that can be invoked by the Native API.
In the contract, you only need to convert the contract address into a bytearray format and invoke it.
For example, when you need to call an ONT Token contract, you can first convert the address of the ONT Token contract into bytearray format, and then call the Invoke function. When calling the Invoke function, the imported parameters are the version number, the contract address, the contract method invoked, and the transfer-related parameters encapsulated by the state function.
One particular point to note here is that when making a contract transfer for ONG, the quantity filled is 10⁹ times the actual quantity. That is, if you need to transfer 10 ONG, the quantity needs to be filled in is 10¹⁰. When using a wallet, such as ONTO or Cyano to transfer, the quantity you enter is the transfer amount.
contract_address_ONT = bytearray(b'\x00\x00\x00\x00\x00\x00\x00\x00\x00\x00\x00\x00\x00\x00\x00\x00\x00\x00\x00\x01')
param = state(from_acct, to_acct, ont_amount)
res = Invoke(1, contract_address_ONT, 'transfer', [param])
Transfer Contract Code
Below we give a detailed example of how to use Python to transfer ONT and ONG. In the code below, the parameter type of the imported sending account and receiving address is a string. In addition, it can also be delivered with an account parameter type of address, thereby saving the Gas fee for invoking the contract. The process is as follows:
- Define the contract address variables contract_address_ONT and contract_address_ONG;
- Convert the sending and receiving address from base58 format to bytearray format;
- Verify the signature and confirm that the sending address is the same as the contract invoke address;
- The state function encapsulates the transfer related parameters;
- The Invoke function calls the ONT Token and ONG Token native contract for transfer;
- Determine whether the transfer was successful by returning res. If the return value is b’\x01', then the transfer is successful and the event “transfer succeed” will be pushed out.
from ontology.interop.System.Runtime import Notify, CheckWitness
from ontology.interop.Ontology.Runtime import Base58ToAddress
from ontology.interop.Ontology.Native import Invoke
from ontology.builtins import state
# contract address
contract_address_ONT = bytearray(b'\x00\x00\x00\x00\x00\x00\x00\x00\x00\x00\x00\x00\x00\x00\x00\x00\x00\x00\x00\x01')
contract_address_ONG = bytearray(b'\x00\x00\x00\x00\x00\x00\x00\x00\x00\x00\x00\x00\x00\x00\x00\x00\x00\x00\x00\x02')
def Main(operation, args):
    if operation == 'transfer':
        from_acct = args[0]
        to_acct = args[1]
        ont_amount = args[2]
        ong_amount = args[3]
        return transfer(from_acct,to_acct,ont_amount,ong_amount)

    return False
def transfer(from_acct, to_acct, ont_amount, ong_amount):
    # convert base58 address to address in the form of byte array
    from_acct=Base58ToAddress(from_acct)
    to_acct=Base58ToAddress(to_acct)
    # check whether the sender is the payer
    if CheckWitness(from_acct):
        # transfer ONT
        if ont_amount > 0:
            param = state(from_acct, to_acct, ont_amount)
            res = Invoke(1, contract_address_ONT, 'transfer', [param])
            if res and res == b'\x01':
                Notify('transfer succeeded')
            else:
                Notify('transfer failed')
        # transfer ONG
        if ong_amount > 0:
            param = state(from_acct, to_acct, ong_amount)
            res = Invoke(1, contract_address_ONG, 'transfer', [param])
            if res and res == b'\x01':
                Notify('transfer succeeded')
            else:
                Notify('transfer failed')
        else:
            Notify('CheckWitness failed')
Practice on SmartX
You can also compile and run the code sample above on SmarX following the steps below:
- Compile the contract. First, create a project on SmartX and compile the code in this project.

- Deploy the contract. If you need a test token to deploy the contract, apply here. The deployment result is as follows:

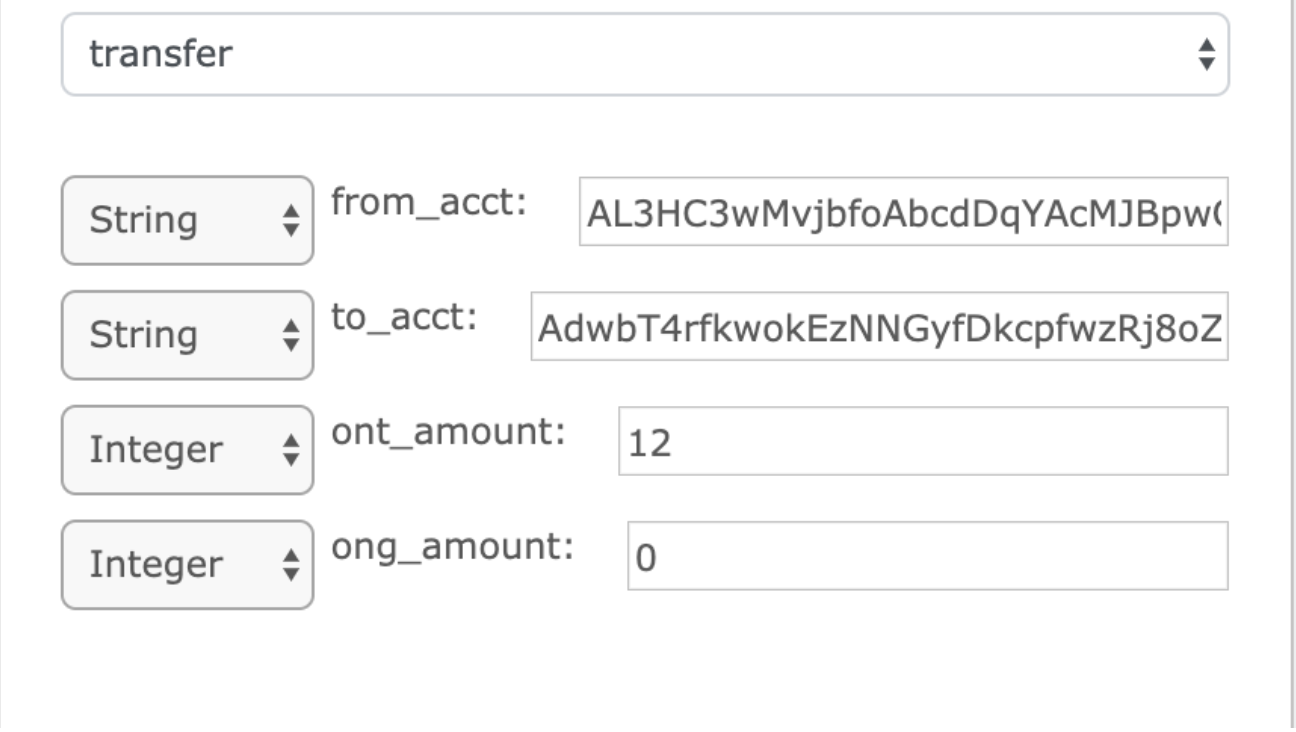
- Run the transfer function. Before running the transfer function, you need to configure the parameters as required. In the example below, you need to input the sending address, receiving address, and transferred ONT and ONG amount:
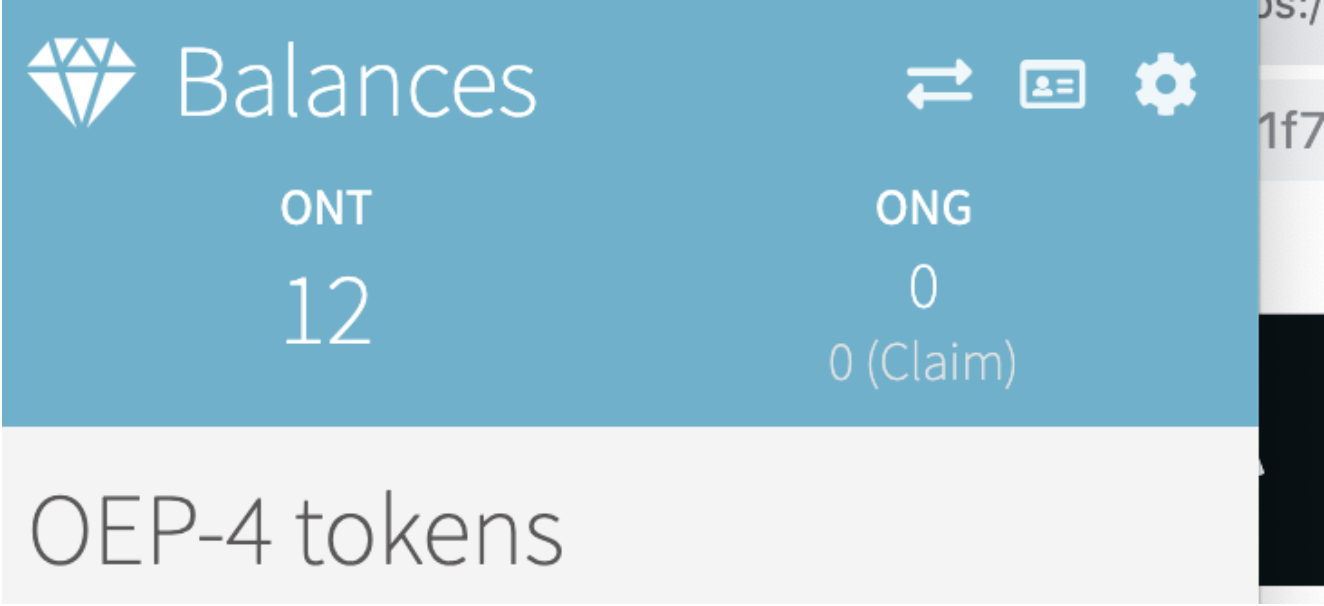
- Transfer succeeded. After you have configured the parameters properly, the transfer will be successful when running the transfer function. The transferred token will be displayed in the receiving address above:
Summary
In this article, we introduced the Native API of the Ontology blockchain. Developers can use this API to invoke Ontology native contracts. In the next article, we will introduce the Upgrade API to explore how to upgrade contract in Ontology smart contracts.
Find the tutorial on GitHub here.
This is an official tutorial published earlier on Ontology Medium blogAre you a developer? Make sure you have joined our tech community on Discord. Also, take a look at the Developer Center on our website, there you can find developer tools, documentation, and more.
Find Ontology elsewhere
Ontology website
GitHub / Discord
Telegram English / Russian
Twitter / Reddit
