Are you looking for a solution to recover data from a hard disk within a network storage system like SAN or NAS? If you need to recover lost data from partitions using such file systems as NTFS, FAT, exFAT, ReFS, HFS+, Ext2/3/4, ReiserFS – try Hetman Partition Recovery. It will quickly scan your disk and display the available data on the screen, so you will only have to select the elements you need and recover them.
Regardless of how much storage space our computers have, we always need more. The issue of storing data is always relevant, for example, if you do some video editing, photography or other work that requires large volumes to store your data, or if you need to create a network-attached storage for a small office.
A viable solution to the problem of storing data for home\office use could be a network-attached storage system, NAS or SAN, depending on the user’s circumstances and needs.
Storing data requires special attention because in case of any hardware issue, error or accidental deletion, you can lose important information, and the recovery process may take quite a long time and not always be successful.
Before you can make your choice, let’s have a closer look at the differences between the two and at how they work.
Further in this tutorial for configuration of a network storage and recovery options, we will find out how NAS (Network Attached Storage) differs from SAN (Storage Area Network).
Also, we will throw some light on how to connect it to a network, configure network access, create a network drive, explore the opportunities provided by iSCSI initiator and how to configure it, and finally, we’ll also cover the procedure for lost data recovery from a SAN/NAS drive.
A Network-Attached Storage (NAS) is a device or server with an array of disks, which is connected to a network. All members of such network can use the data stored on such device.
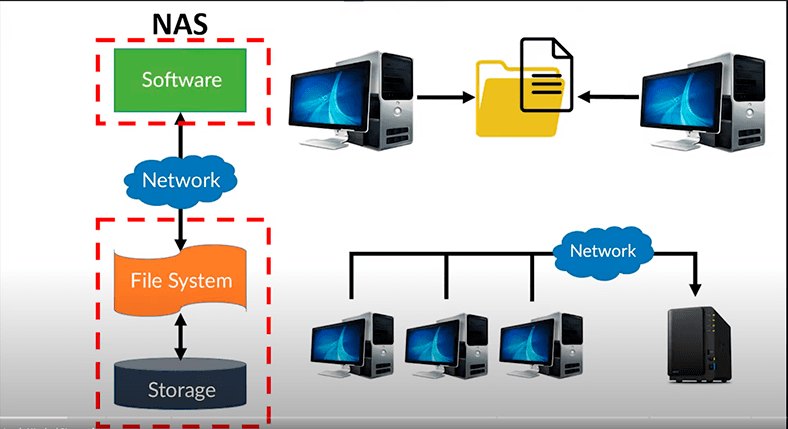
The main difference from a conventional storage device which is connected directly to a computer is that in the case of NAS, the operating system and other software is designed for the only purpose – storing data.
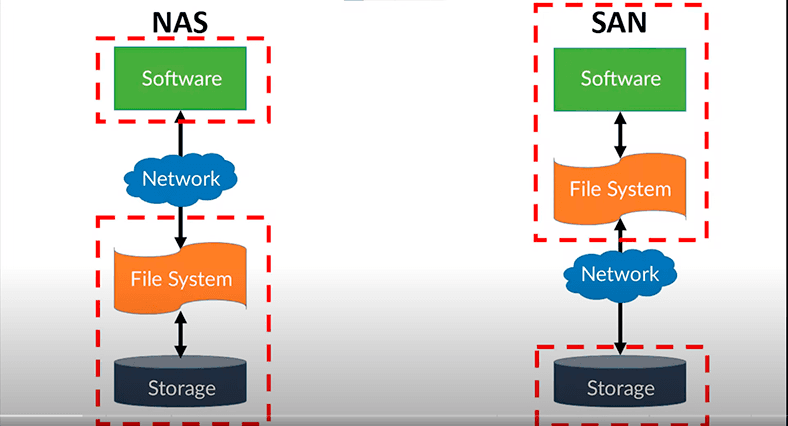
A Storage Area Network (SAN) is an architectural solution to enable external storage devices to be connected to servers in such a way that the operating system can recognize the connected network drives as local disks.
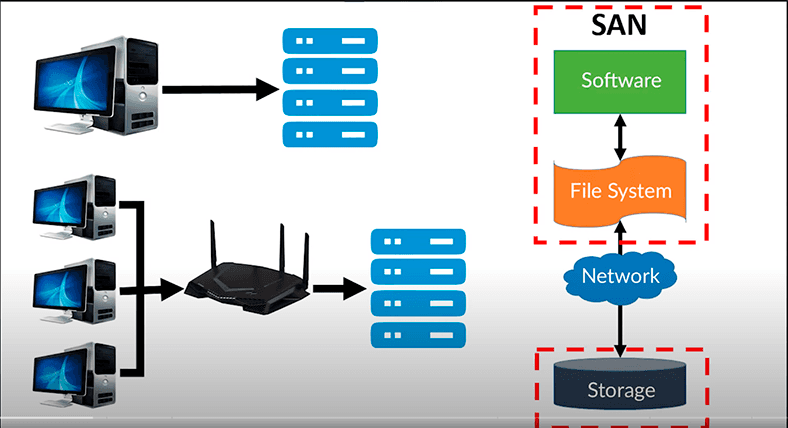
SAN is a network designed to ensure connecting equipment and software to servers. It can transfer information from one storage device to another, and help different servers to exchange information, which accelerates data backup and recovery processes.
SAN accesses data at the block level. Its main input-output protocol is iSCSI (Small Computer System Interface). A computer “sees” such storage as its own local disk.
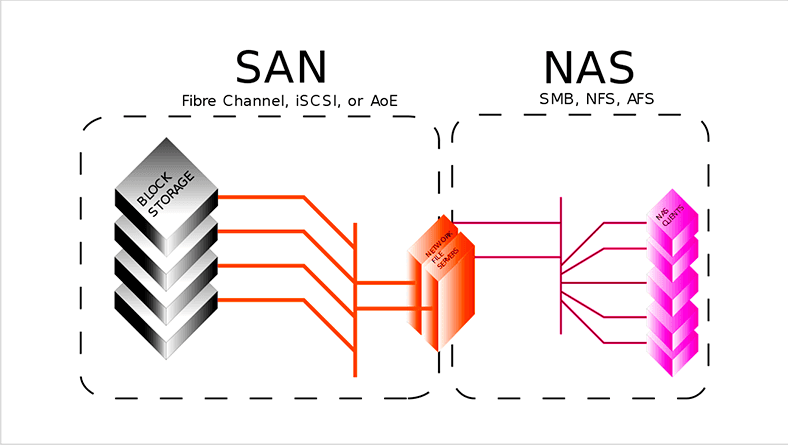
iSCSI is a network protocol for working with data storage systems, and it lets them interact with computers within a network.
Such storage system can be organized with almost any operating system, because it is built on the logical level and doesn’t require any special hardware for handling data (such as disks or disk controllers). This feature is included into most operating systems and can be enabled easily.
Windows is no exception, and it includes iSCSI components as extra elements.
So what’s the difference between the two approaches? In plain English, SAN is a network drive which enables data exchange in blocks, just as it happens in local disks.
Meanwhile, NAS is a network file system, and a resource with shared access. It is a kind of a file server which can be access through your home network.
SAN is a block-based device delivered over the network. and NAS is a file system delivered over the network.
In fact, NAS provides both a storage and a file system. It is often contrary to SAN, which only provides block-based storage and leaves any file system issues on the side of the “client”. Typical SAN protocols include Fibre Channel, iSCSI, ATA over Ethernet (AoE) and HyperSCSI.
What is inside the block-based concept of SAN? A block is a contiguous set of bits or bytes that forms an identifiable unit of data. This term is used in database management, word processing, and network communications.
So which way of storing data should you choose: NAS or SAN? The answer depends on your needs and opportunities, because these are two different configurations designed for different tasks. Access to files and shared use of information for apps on various server platforms within a local network – choose NAS. High-speed block access to data bases, consolidated storage with improved effectiveness and efficiency – go for SAN.
Despite their differences, SAN and NAS are not mutually exclusive and can be united into a hybrid SAN-NAS system, a combination of file-level protocols (NAS) and block-based protocols (SAN) within one configuration. The file system of a shared drive can also be run over SAN to provide file system services.
The shared use of a storage usually simplifies the task of its administration and adds more flexibility, because for moving the storage from one server to another you don’t have to physically move cables and storage devices around.
In what follows you will learn how to assemble and configure a SAN storage based on D-Link DSN-1100-10 supporting RAID 0, 1, 1+0 and 5.
First of all, assemble the storage, fix the drives in the bays.
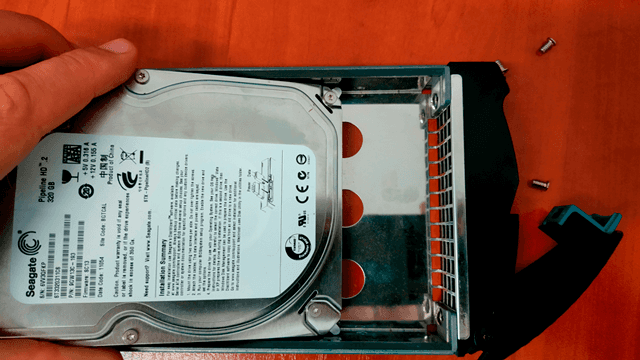
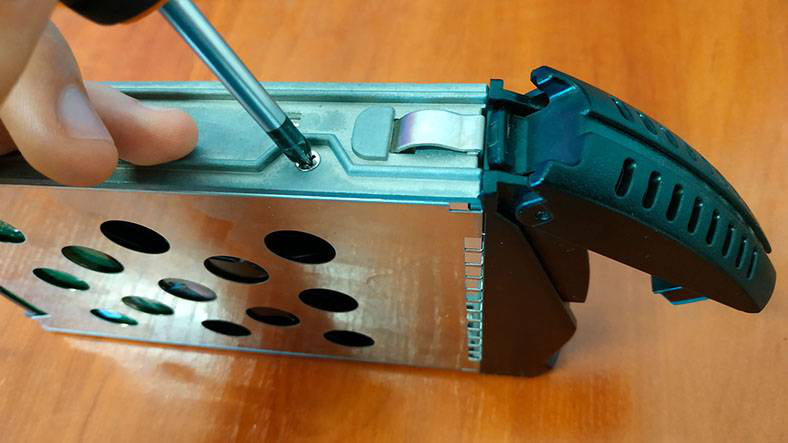
Then slide them into the corresponding slots of the main case.
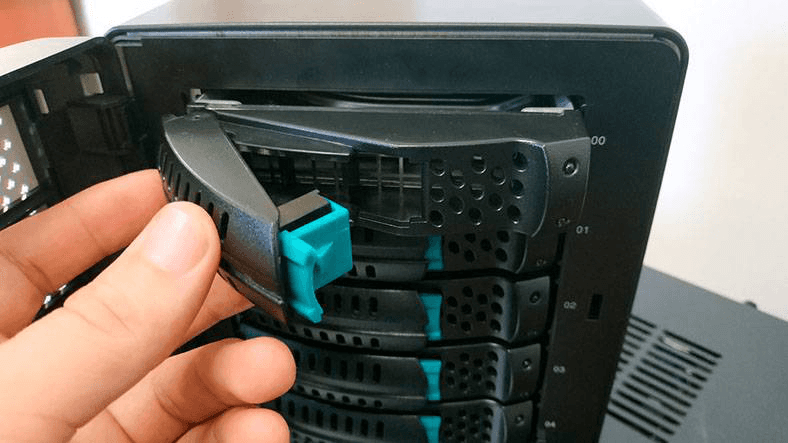
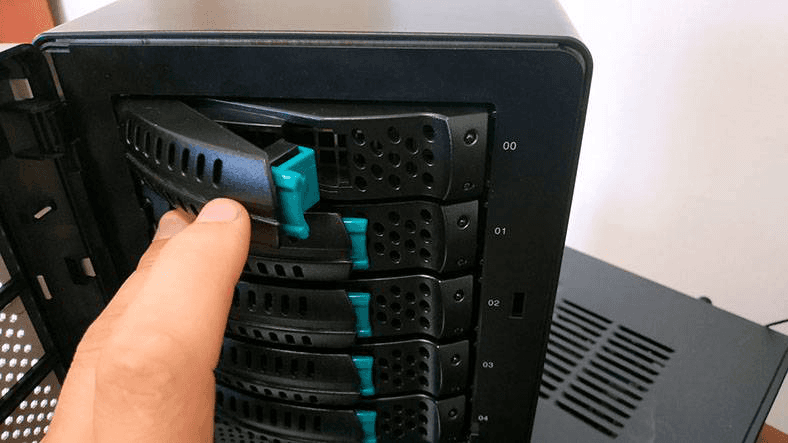
That’s actually all you need to do in terms of assembly. The final step is to connect it to a power outlet and to the network.
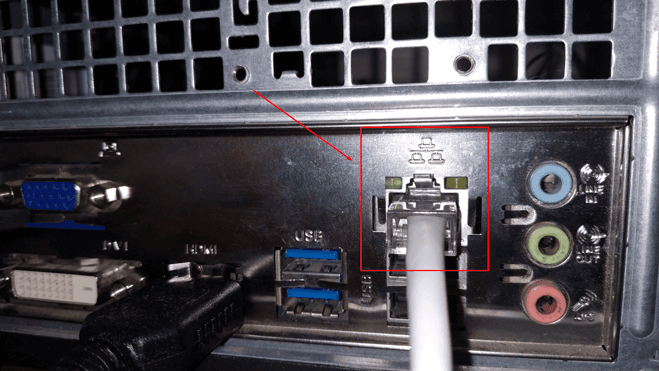
To configure the SAN storage, you need to connect it to the network, or directly to a computer, with the help of a network cable. Plug one end of the cable into the Management Port of the storage,
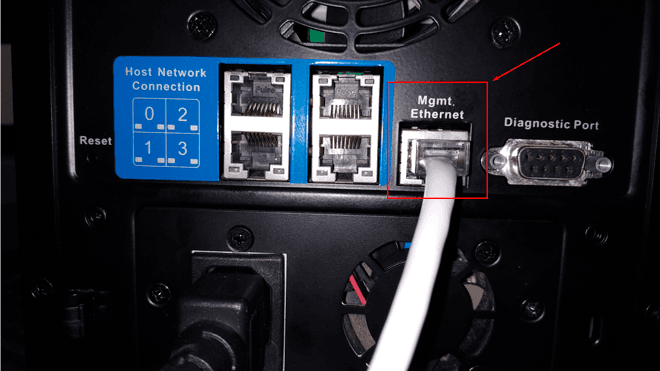
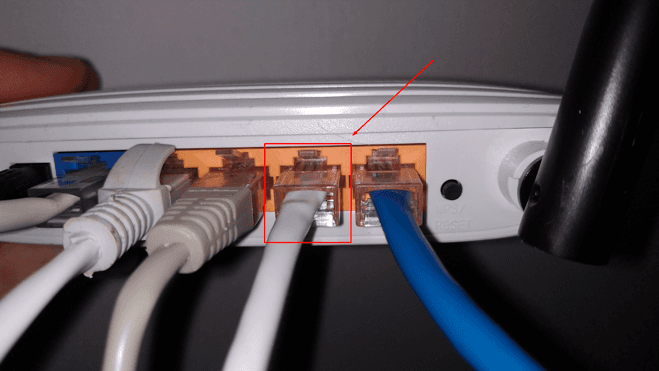
and the other – into the LAN port of the router.
Plug in the power cable and connect it to the power outlet.
If you choose to connect the storage directly to the computer, you’ll need a network cable of a special type, known as crossover cable.
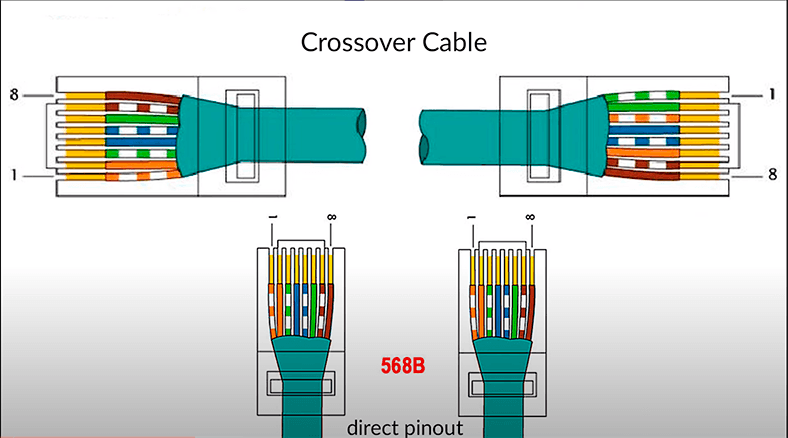
For such connection type, you plug the other end of the network cable into the LAN port of your computer instead of the router.
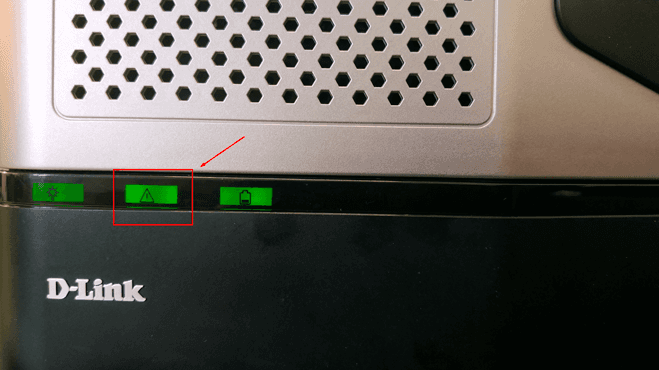
Turn on the storage system and wait until a LED light appears on the front panel – it means the server has booted.
For initial configuration of the storage, you should open a browser on your computer which is connected either to the network or directly to the storage. Type the network storage address in the corresponding line – this address is specified in the user’s manual or other documents that come supplied with the storage. After that, the web assistant will start looking for it.

When it’s ready, let’s get down to configuring. Accept the license agreement and set the administrator password.
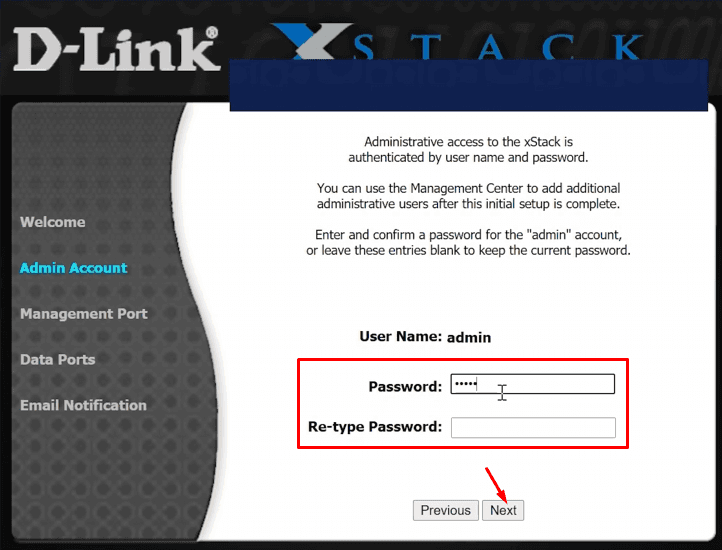
Enter IP address, subnet and gateway for the Management Port if the latter has to be modified, then click Next.
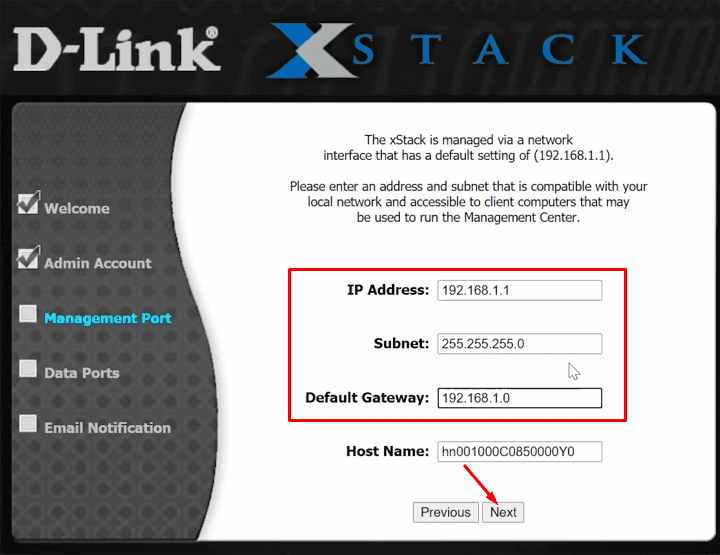
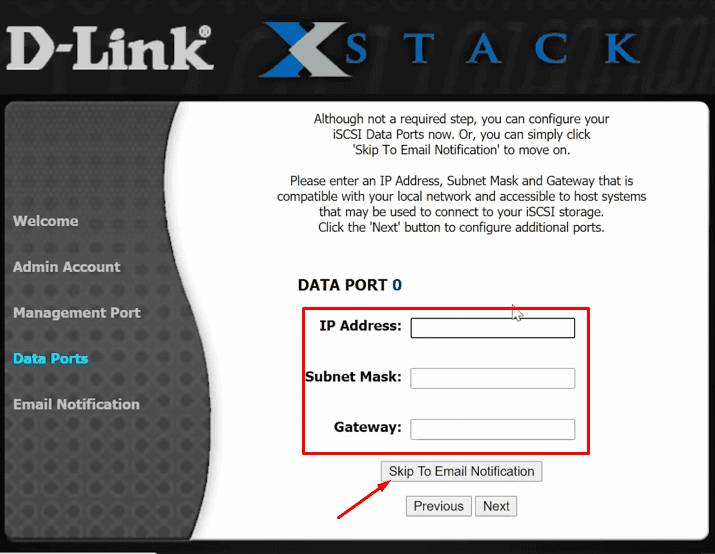
Now you need to enter Data Port settings for the iSCSI connection. Alternatively, you can choose to specify them later and click Skip to Email Notification.
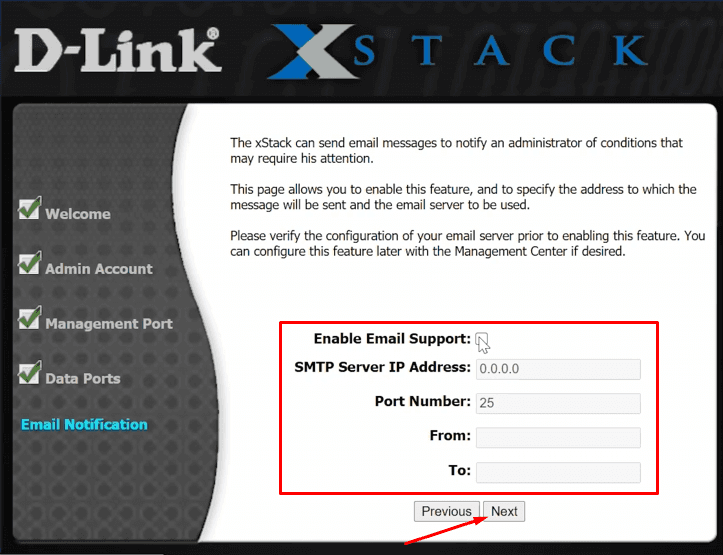
In the next tab, you can enable and set up Email Support. When it’s configured, the application will send you notifications about the storage status, errors and failures.
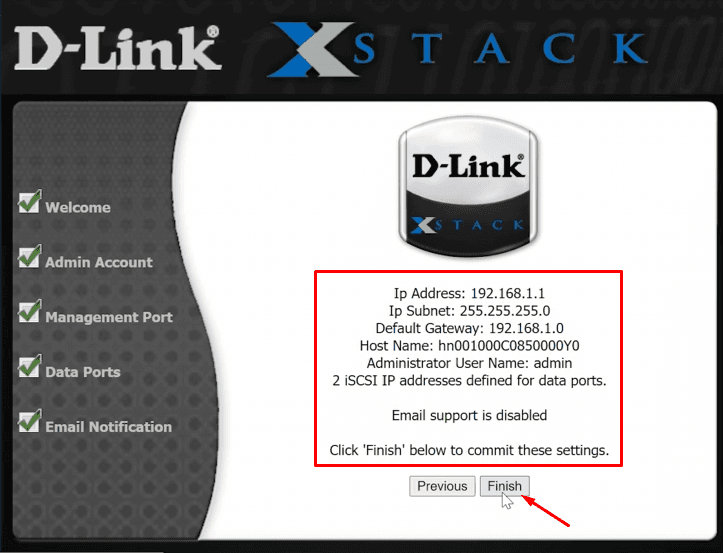
Review the settings, and if everything is correct, click Finish.
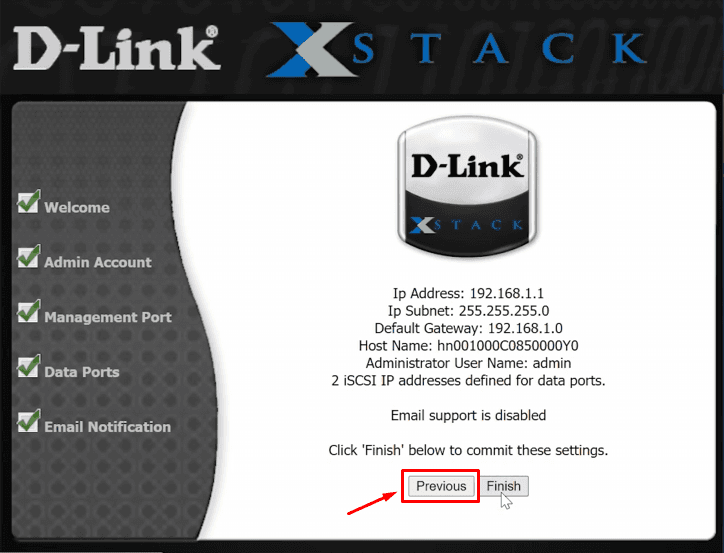
If you need to change anything, just return to the previous window and edit the settings.
That’s all about primary configuration.
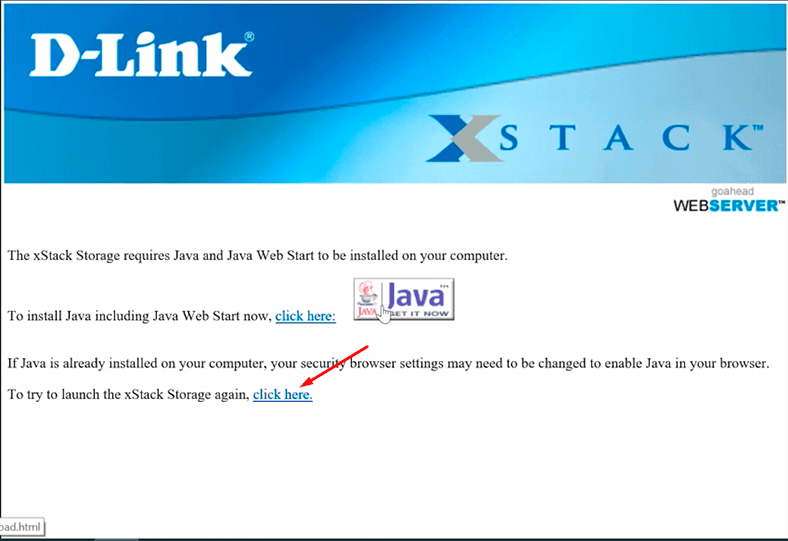
In the next window, you’ll be suggested to download and install Java. It is required for xStack Storage to work normally, and we’re using this specific application to manage the storage. An Internet connection is required for the installation, so just click on this link and install the package.

If your computer already has Java installed, click on the link below to download xStack Storage app.
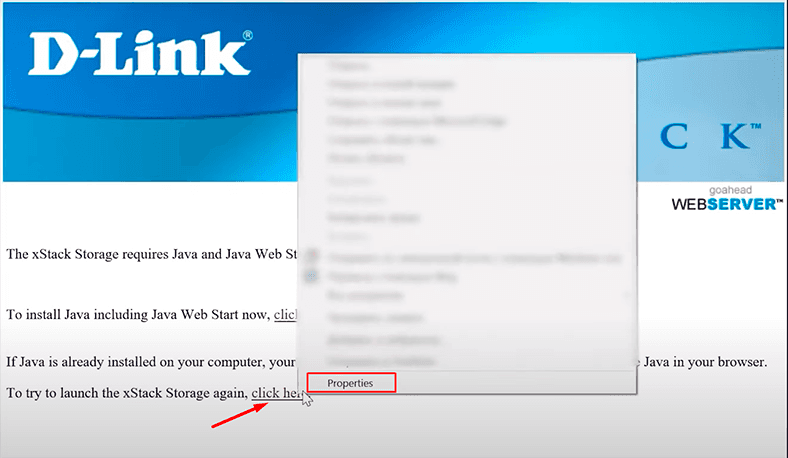
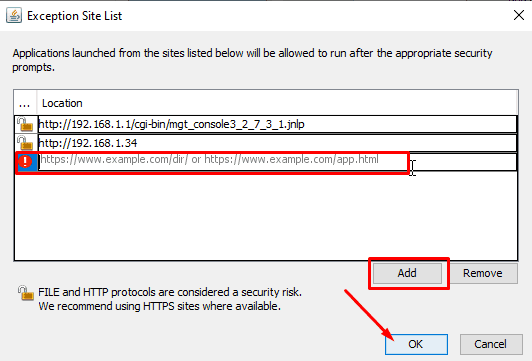
Add the application to exceptions because Java may block it.
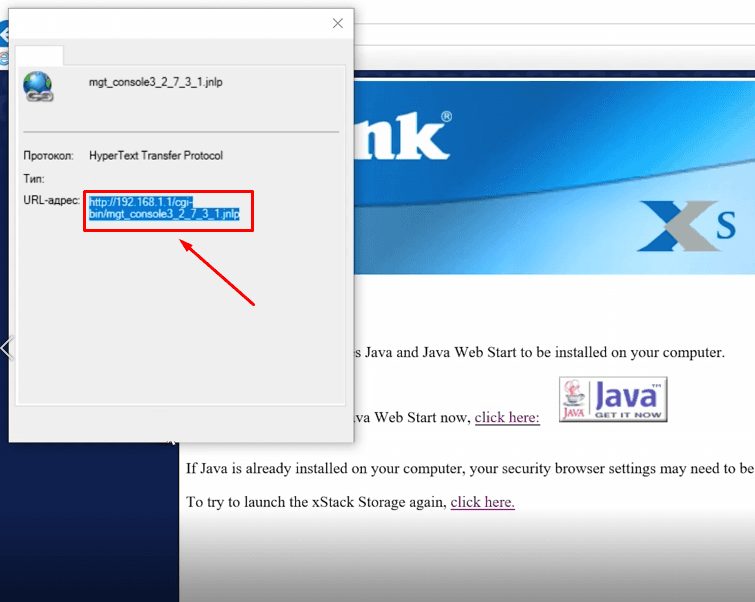
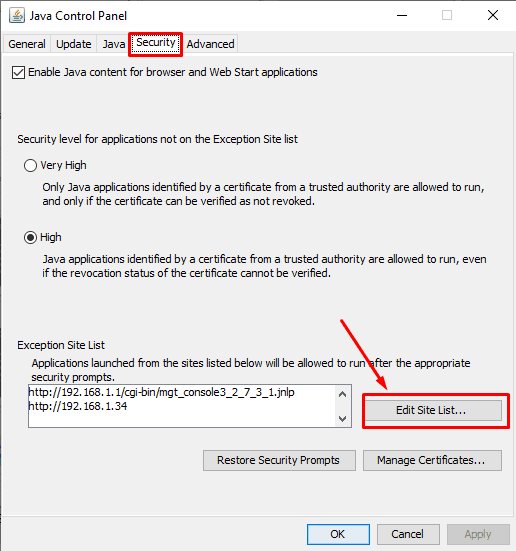
Open the Start menu, and find the line Configure Java. Jump to the Security tab and add the address.
Confirm that you agree to run the application by checking this box.
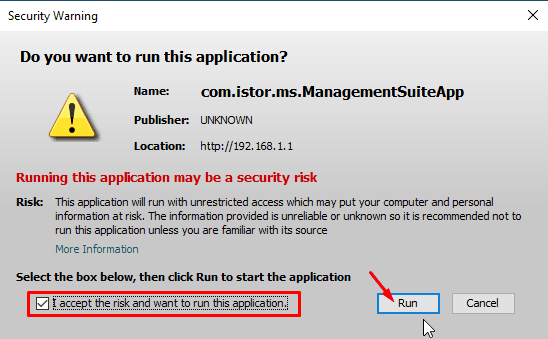
Allow Java access in the firewall. After that, the xStack Storage application will start.
To access the storage information and settings, enter the registration data – username and password.
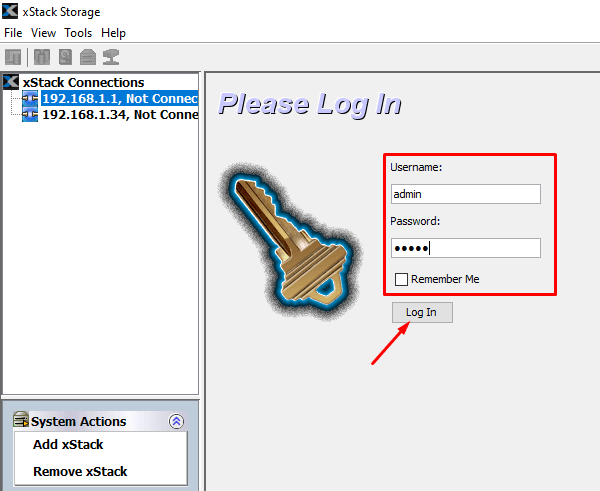
As you do that, connection with the storage will be established.
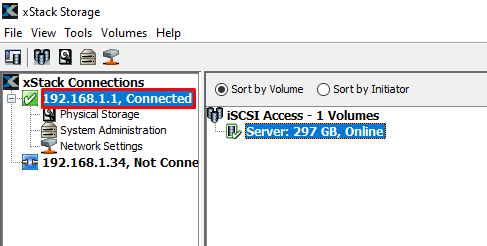
Now you need to create a disk and configure network access for it.
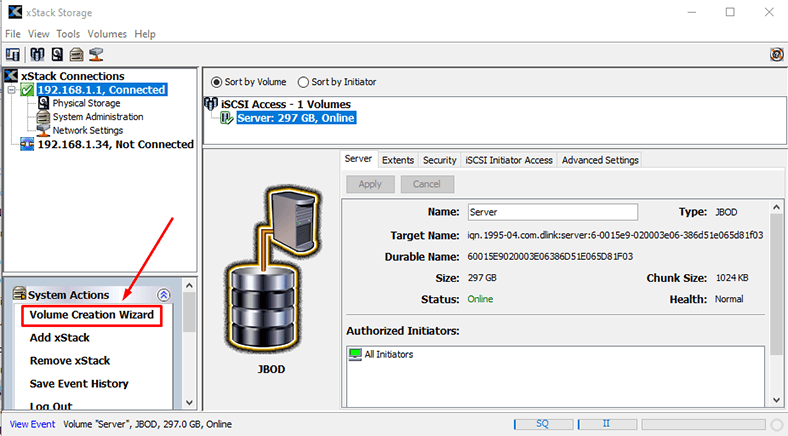
Open Volume Creation Wizard.
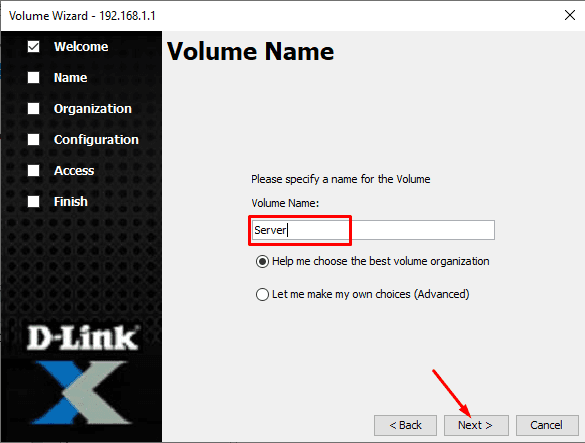
Give the volume name here and select advanced settings.
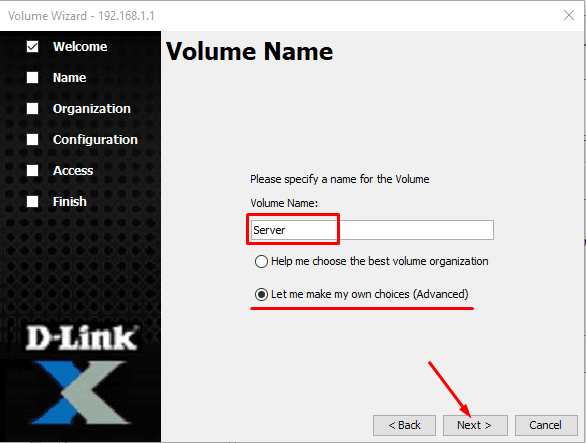
If you need help in choosing the best way to organize your storage, check the first option. But if you know the exact details, select the second option and click Next.
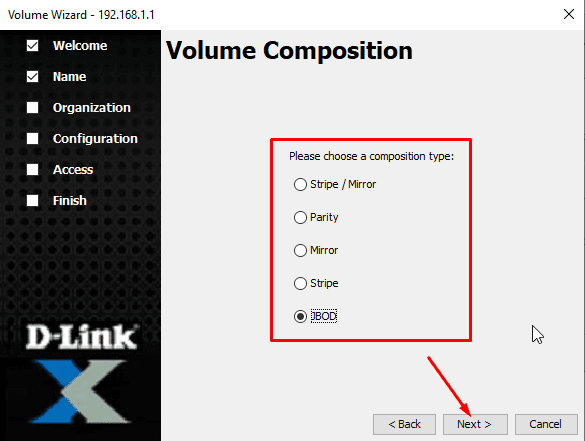
Choose a composition type (i.e. the type of disk array).
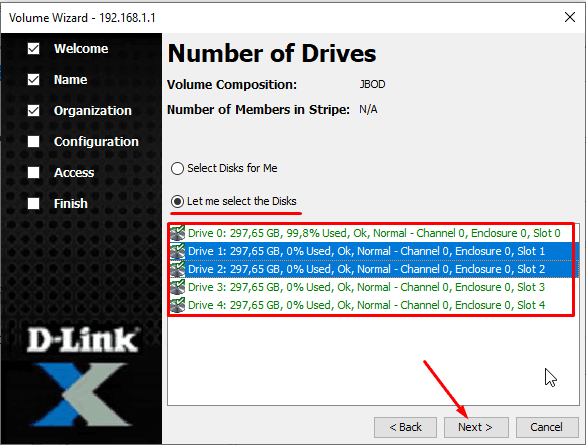
If you need to select specific disks, choose the second option here and find the disks you need in the list.
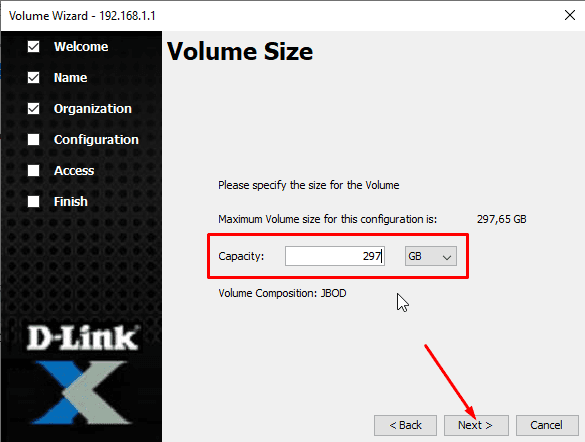
Specify the size for the volume you are going to create.
Finally, choose the corresponding iSCSI network access type.
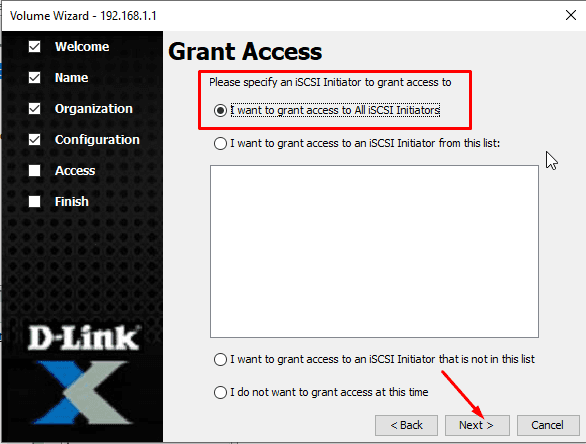
To all initiators, to an initiator from the list, to an initiator which is not on the list, no access at all, Next, and Finish.
See the full article with all additional video tutorials. Also visit our Youtube channel, there are over 400 video tutorials.

Introduction
Regardless of how much storage space our computers have, we always need more. The issue of storing data is always relevant, for example, if you do some video editing, photography or other work that requires large volumes to store your data, or if you need to create a network-attached storage for a small office.
A viable solution to the problem of storing data for home\office use could be a network-attached storage system, NAS or SAN, depending on the user’s circumstances and needs.
Storing data requires special attention because in case of any hardware issue, error or accidental deletion, you can lose important information, and the recovery process may take quite a long time and not always be successful.
Before you can make your choice, let’s have a closer look at the differences between the two and at how they work.
Further in this tutorial for configuration of a network storage and recovery options, we will find out how NAS (Network Attached Storage) differs from SAN (Storage Area Network).
Also, we will throw some light on how to connect it to a network, configure network access, create a network drive, explore the opportunities provided by iSCSI initiator and how to configure it, and finally, we’ll also cover the procedure for lost data recovery from a SAN/NAS drive.
Network Attached Storage
A Network-Attached Storage (NAS) is a device or server with an array of disks, which is connected to a network. All members of such network can use the data stored on such device.

The main difference from a conventional storage device which is connected directly to a computer is that in the case of NAS, the operating system and other software is designed for the only purpose – storing data.

A Storage Area Network (SAN) is an architectural solution to enable external storage devices to be connected to servers in such a way that the operating system can recognize the connected network drives as local disks.

SAN is a network designed to ensure connecting equipment and software to servers. It can transfer information from one storage device to another, and help different servers to exchange information, which accelerates data backup and recovery processes.
SAN accesses data at the block level. Its main input-output protocol is iSCSI (Small Computer System Interface). A computer “sees” such storage as its own local disk.

iSCSI is a network protocol for working with data storage systems, and it lets them interact with computers within a network.
Such storage system can be organized with almost any operating system, because it is built on the logical level and doesn’t require any special hardware for handling data (such as disks or disk controllers). This feature is included into most operating systems and can be enabled easily.
Windows is no exception, and it includes iSCSI components as extra elements.
So what’s the difference between the two approaches? In plain English, SAN is a network drive which enables data exchange in blocks, just as it happens in local disks.
Meanwhile, NAS is a network file system, and a resource with shared access. It is a kind of a file server which can be access through your home network.
SAN is a block-based device delivered over the network. and NAS is a file system delivered over the network.
In fact, NAS provides both a storage and a file system. It is often contrary to SAN, which only provides block-based storage and leaves any file system issues on the side of the “client”. Typical SAN protocols include Fibre Channel, iSCSI, ATA over Ethernet (AoE) and HyperSCSI.
What is inside the block-based concept of SAN? A block is a contiguous set of bits or bytes that forms an identifiable unit of data. This term is used in database management, word processing, and network communications.
So which way of storing data should you choose: NAS or SAN? The answer depends on your needs and opportunities, because these are two different configurations designed for different tasks. Access to files and shared use of information for apps on various server platforms within a local network – choose NAS. High-speed block access to data bases, consolidated storage with improved effectiveness and efficiency – go for SAN.
Despite their differences, SAN and NAS are not mutually exclusive and can be united into a hybrid SAN-NAS system, a combination of file-level protocols (NAS) and block-based protocols (SAN) within one configuration. The file system of a shared drive can also be run over SAN to provide file system services.
The shared use of a storage usually simplifies the task of its administration and adds more flexibility, because for moving the storage from one server to another you don’t have to physically move cables and storage devices around.
How to connect an SAN storage to a network
In what follows you will learn how to assemble and configure a SAN storage based on D-Link DSN-1100-10 supporting RAID 0, 1, 1+0 and 5.
First of all, assemble the storage, fix the drives in the bays.


Then slide them into the corresponding slots of the main case.


That’s actually all you need to do in terms of assembly. The final step is to connect it to a power outlet and to the network.
To configure the SAN storage, you need to connect it to the network, or directly to a computer, with the help of a network cable. Plug one end of the cable into the Management Port of the storage,

and the other – into the LAN port of the router.

Plug in the power cable and connect it to the power outlet.
If you choose to connect the storage directly to the computer, you’ll need a network cable of a special type, known as crossover cable.

For such connection type, you plug the other end of the network cable into the LAN port of your computer instead of the router.

Turn on the storage system and wait until a LED light appears on the front panel – it means the server has booted.

Initial configuration of the network storage
For initial configuration of the storage, you should open a browser on your computer which is connected either to the network or directly to the storage. Type the network storage address in the corresponding line – this address is specified in the user’s manual or other documents that come supplied with the storage. After that, the web assistant will start looking for it.

When it’s ready, let’s get down to configuring. Accept the license agreement and set the administrator password.

Enter IP address, subnet and gateway for the Management Port if the latter has to be modified, then click Next.

Now you need to enter Data Port settings for the iSCSI connection. Alternatively, you can choose to specify them later and click Skip to Email Notification.

In the next tab, you can enable and set up Email Support. When it’s configured, the application will send you notifications about the storage status, errors and failures.

Review the settings, and if everything is correct, click Finish.

If you need to change anything, just return to the previous window and edit the settings.

That’s all about primary configuration.
Installing and configuring Java
In the next window, you’ll be suggested to download and install Java. It is required for xStack Storage to work normally, and we’re using this specific application to manage the storage. An Internet connection is required for the installation, so just click on this link and install the package.

If your computer already has Java installed, click on the link below to download xStack Storage app.

Add the application to exceptions because Java may block it.


Open the Start menu, and find the line Configure Java. Jump to the Security tab and add the address.


Confirm that you agree to run the application by checking this box.

Allow Java access in the firewall. After that, the xStack Storage application will start.
How to create and configure a network drive
To access the storage information and settings, enter the registration data – username and password.

As you do that, connection with the storage will be established.

Now you need to create a disk and configure network access for it.
Open Volume Creation Wizard.

Give the volume name here and select advanced settings.

If you need help in choosing the best way to organize your storage, check the first option. But if you know the exact details, select the second option and click Next.

Choose a composition type (i.e. the type of disk array).

If you need to select specific disks, choose the second option here and find the disks you need in the list.

Specify the size for the volume you are going to create.

Finally, choose the corresponding iSCSI network access type.

To all initiators, to an initiator from the list, to an initiator which is not on the list, no access at all, Next, and Finish.
See the full article with all additional video tutorials. Also visit our Youtube channel, there are over 400 video tutorials.