From this article, you will learn how to recover data from DVR and NVR video recorders. We will explore the peculiarities of how they store video files, why such files can be lost, and how they can be recovered. In the process, we’ll be using a IP network video recorder Hikvision DS-7104NI-Q1/4P.
Video surveillance systems are becoming the standard option for stores and offices, for monitoring the situation around your house, apartment, or in the street. Not so long ago, surveillance systems tended to be based on personal computers, but these days, the most widespread option is autonomous NVR and DVR devices which no longer need a PC nearby.
An accidental failure or a commonplace scenario with deleting a video file accidentally may have disastrous consequences if the file in question was very important. Recorders keep their videos in a special format so extracting the data is not so easy as it seems. You will need specialized software provided by the device manufacturer, and if the file is deleted – a special program capable of finding the lost data and displaying it. Let’s start by analyzing the reasons causing data loss for video recorders, and then find out how to recover data from the hard disk.
Today’s market offers a wide range of devices with lots of various functions. They can save recorded vide files to the single hard disk, or several disks – both individual drives or drives combined into a unified logical space. Various recorders can use unique algorithms to compress video streams, and premium models offer password protection and even encryption for all video files. With all of these options, if the internal hard disk ever fails or there is an unexpected system error, the task of recovering data into a regular video format seems quite a challenge.
Most of the time, video files are lost as a result of:
When the hard disk breaks down, there is no way to recover the lost data on your own, and you’ll have to find a data recovery specialist to deal with the problem.
If the video recorder is out of order, there is nothing to be recovered because all the data is still there, on the hard disk inside the device. However, if you connect the disk to the computer, don’t expect to see anything; what is more, the Disk Management will suggest initializing it. For cases like this, what you need is a special software tool provided by the recorder manufacturer which can help you see the video files. But what if you don’t have such software? Try finding another video recorder of the same model – or use a data recovery tool.
This recorder, Hikvision DS-7104NI-Q1/4P, supports third-party cameras and lets you connect as many as four IP cameras. An effective video compression system helps the device to use less space for storing videos.

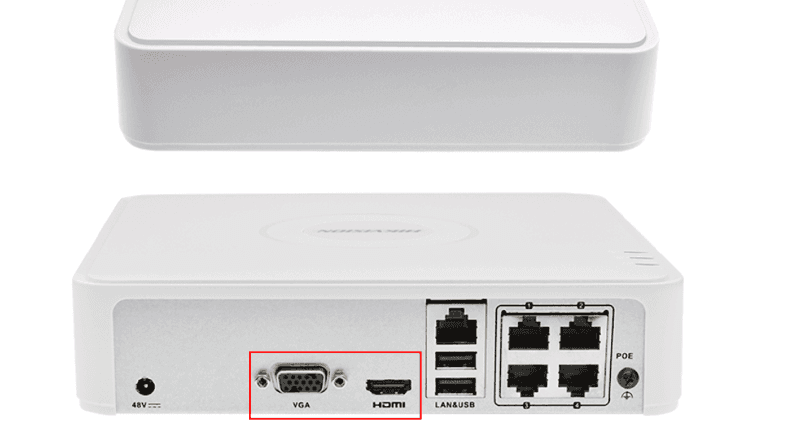
In the back panel, there are two video output channels – HDMI and VGA, a 100 Mbit Ethernet port, two USB ports, and 4 independent Power over Ethernet (PoE) ports, and of course, a power connector.
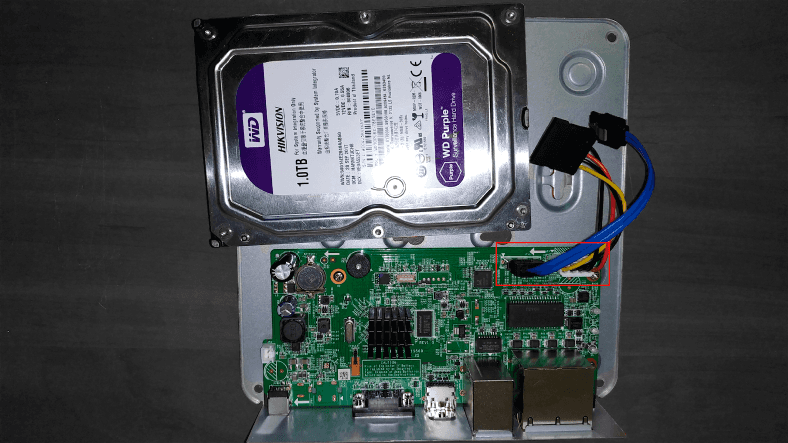
Inside, there is a slot for one hard disk and a connector supporting disks up to 6 TB.
If you need to recover an old video, you should remember that any video recorder has to work with a limited memory capacity, regardless of the model. Depending on the quality of the picture and the number of cameras, it can record video files for a certain period of time, and then it will overwrite older data with new files. If a new record cycle has already begun, it’s unlikely that older videos can be recovered.
In general, before doing anything to the information which you think is important – formatting, deleting, partitioning and so on – always remember to back up your stuff. Most recorder models let you configure the backup process.
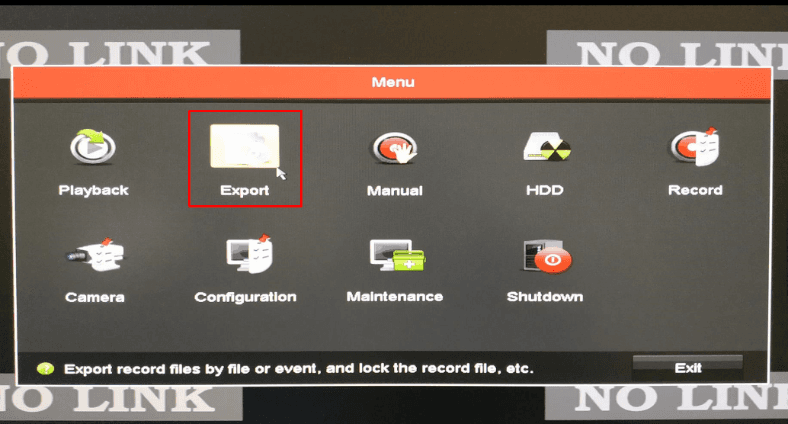
In this menu, you can schedule backups, specify what cameras should be connected, select the video format and change other settings.
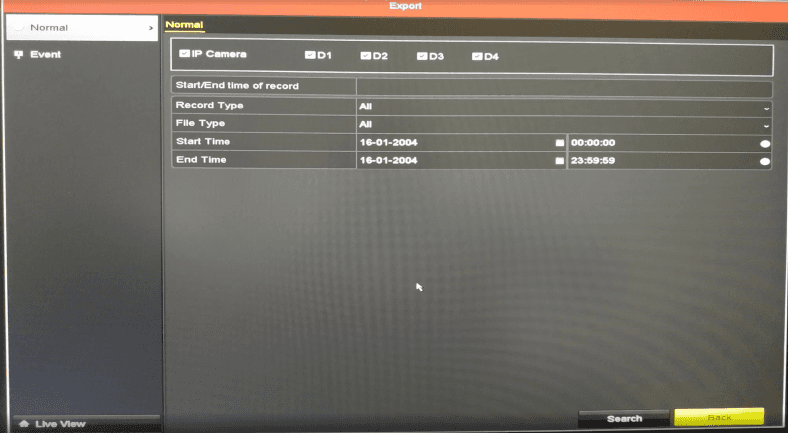
In case you forgot to back up important files, you can still find a solution and use a special data recovery tool, Hetman Partition Recovery.
Start by taking the recorder apart, disconnecting the hard disk, and connecting it to a Windows computer.
Many video recorders have file systems which are not typically used with computer operating systems. That is why you can’t download or save any data from the disk you have connected to the computer. To have the video files recovered you will need either specialized equipment or dedicated software provided by the vendor of your surveillance system. This way or another, it suggests more expenses, and sometimes it just means there is no way to recover anything on your own.
At the same time, most video recorders use compatible files systems – and this is also the case with the device we are testing. Therefore, the process of saving information is very simple – just connect the hard disk to the computer and save the data.
Take out the screws and open the cover.
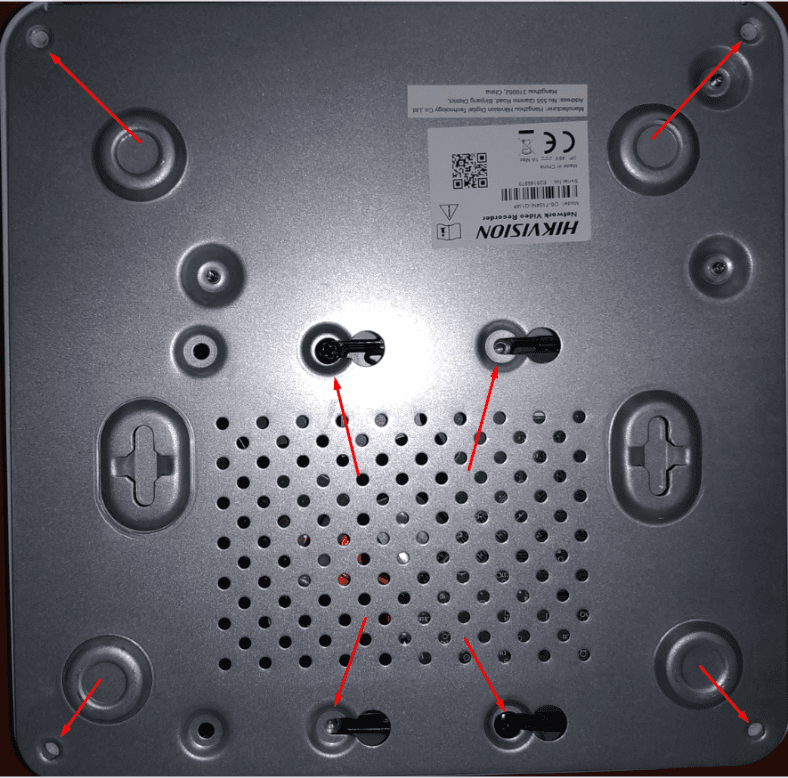
Take out the hard disk, disconnect it from the recorder, and connect the disk to the computer.
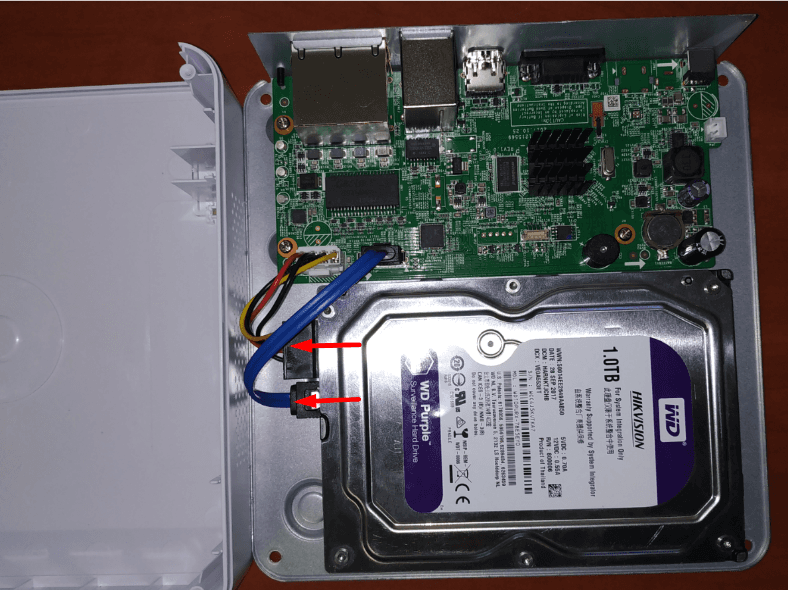
When connected, the disk is not displayed in the Windows Explorer, and the operating system suggests to initialize it – but it’s not necessary now, so just hit Cancel.

As we know, initialization will erase all the data which is still on the disk, and any recovery operations you conduct later can hardly be successful.
Hetman Partition Recovery can recognize the disk, and it detect its file system as hikvision.

Right-click on the disk and open it.
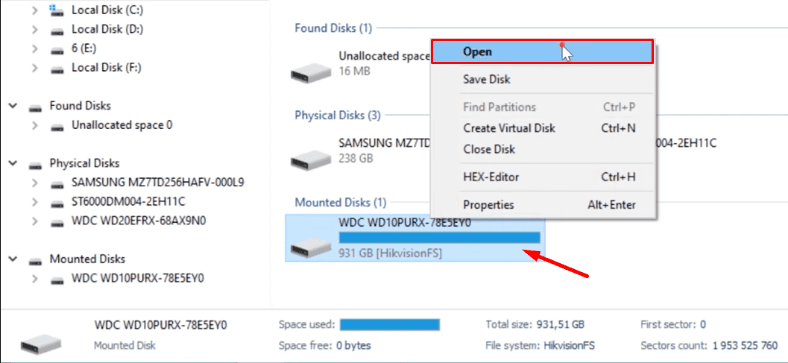
Select Fast scan and wait until the process is complete.
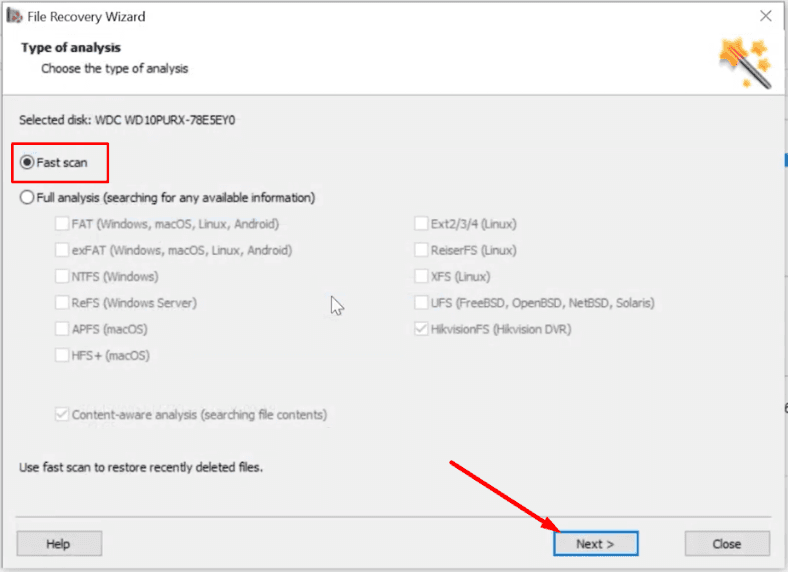
If the Fast scan result is unsatisfactory, try a Full analysis instead.
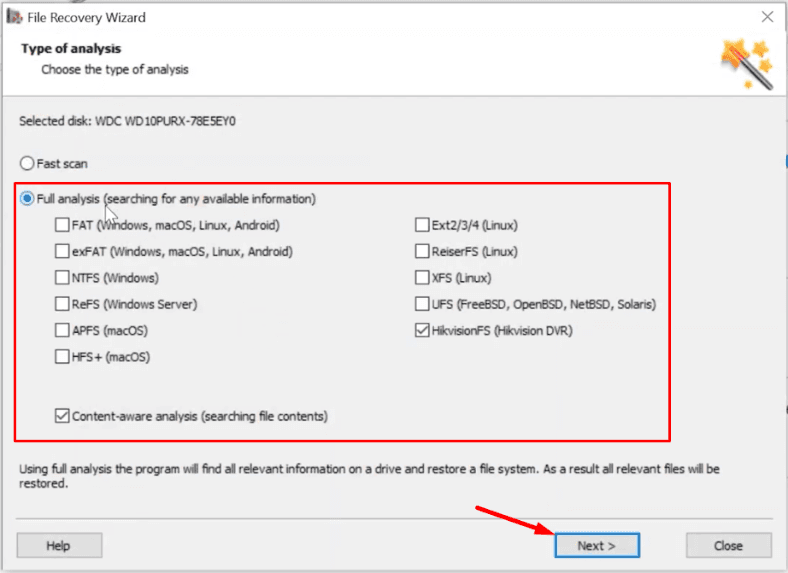
The program has found the remaining data like a charm.
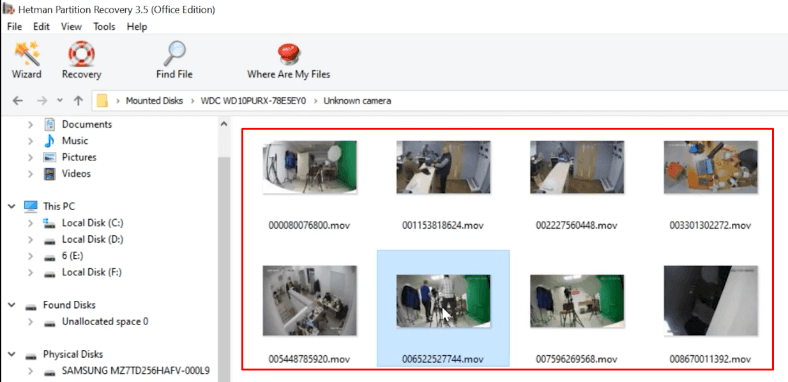
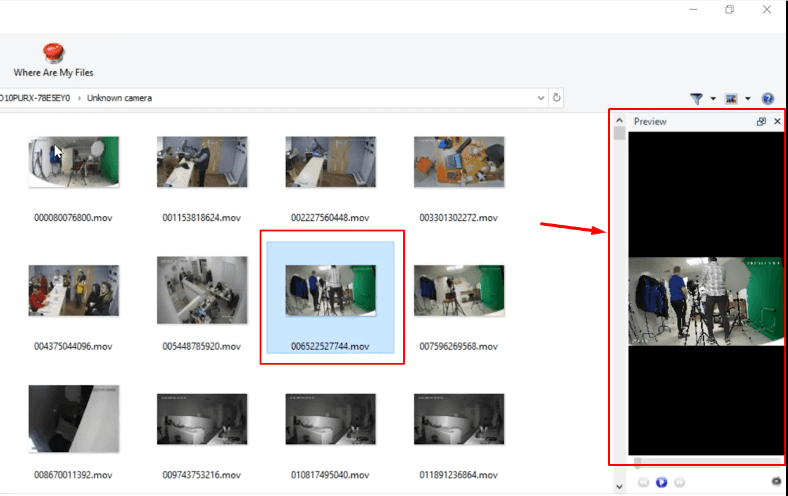
Most video recorders assign same-type names to their files, and such names are not too informative for us, humans. To find a specific video, use the preview function.
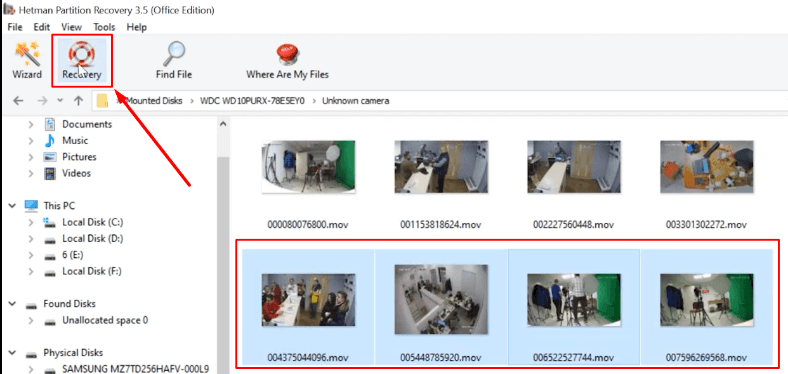
Select the video files you need to extract from the disk and click Recovery,
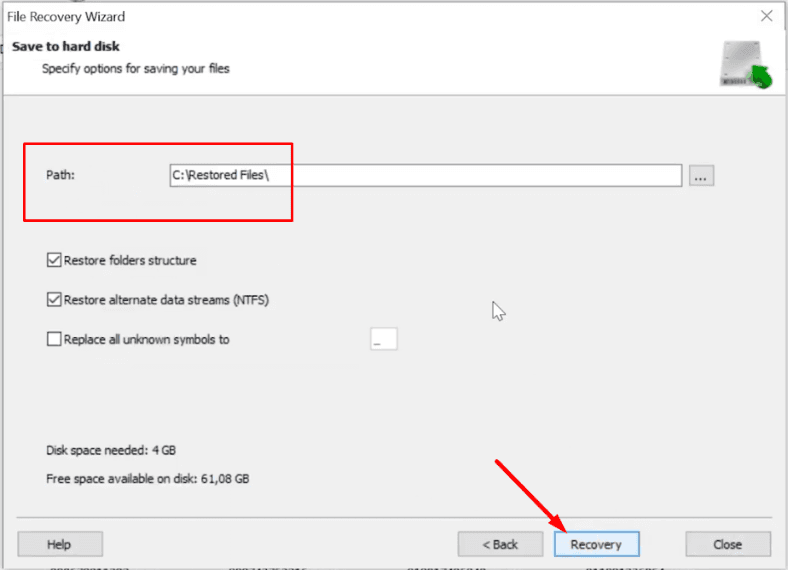
Specify the directory where you’d like to save the information and click Recovery.
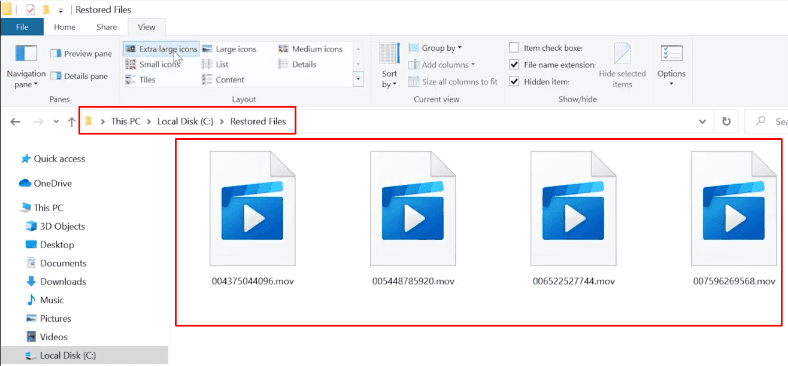
When the process is over, you will find the recovered files in the folder you have selected.
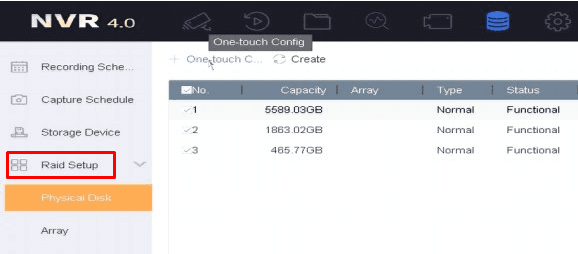
Also, there are premium recorders or full-featured professional models that save recorded videos to a RAID array. Depending on the RAID type, recorders can gain an extra bonus in:
Significantly higher read/write speed,
Ample storage space,
Improved resilience,
Automatic backup features and other things.
As video surveillance systems typically work round the clock, they are overwriting data on the disk all the time. With such intense workloads, 24/7 operation results in physical wear of the hard disk. That is why even in premium systems (for example, server-based ones) hard disks tend to be rather short-lived.
In order to secure your system against data loss issues, you should consider the hard disk excessive wear factor and make sure that HDDs you are using are replaced every two or three years. Another method is using recorders with RAID storage systems. It can extend the lifespan of the hard disks by a few years due to employing higher number of drives. In addition, you’ll be secured against loss of data even if one or two drives fail at the same time.
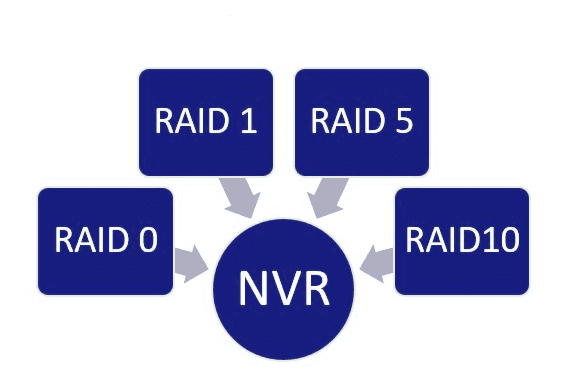
It is recommended to build an array on the basis of a high-quality RAID controller. With the help of standard controller software, you’ll be able to configure and maintain the array on your own. Even if one of the drives fails, this software will help you identify the faulty disk, find out what happened and decide if it needs to be replaced.
If you want to recover information from a RAID array, use Hetman RAID Recovery. It will identify its properties automatically and rebuild the damaged RAID array, so that you can copy the important data to a safer location.
See the full article with all additional video tutorials.

Video surveillance systems are becoming the standard option for stores and offices, for monitoring the situation around your house, apartment, or in the street. Not so long ago, surveillance systems tended to be based on personal computers, but these days, the most widespread option is autonomous NVR and DVR devices which no longer need a PC nearby.
An accidental failure or a commonplace scenario with deleting a video file accidentally may have disastrous consequences if the file in question was very important. Recorders keep their videos in a special format so extracting the data is not so easy as it seems. You will need specialized software provided by the device manufacturer, and if the file is deleted – a special program capable of finding the lost data and displaying it. Let’s start by analyzing the reasons causing data loss for video recorders, and then find out how to recover data from the hard disk.
What causes DVR data loss
Today’s market offers a wide range of devices with lots of various functions. They can save recorded vide files to the single hard disk, or several disks – both individual drives or drives combined into a unified logical space. Various recorders can use unique algorithms to compress video streams, and premium models offer password protection and even encryption for all video files. With all of these options, if the internal hard disk ever fails or there is an unexpected system error, the task of recovering data into a regular video format seems quite a challenge.
Most of the time, video files are lost as a result of:
- Recorder hardware issues;
- Software errors;
- Removing the files accidentally by the user, or because of creating a faulty video recording;
- Formatting the internal memory;
- Physical damage or file system errors.
When the hard disk breaks down, there is no way to recover the lost data on your own, and you’ll have to find a data recovery specialist to deal with the problem.
If the recorder breaks down
If the video recorder is out of order, there is nothing to be recovered because all the data is still there, on the hard disk inside the device. However, if you connect the disk to the computer, don’t expect to see anything; what is more, the Disk Management will suggest initializing it. For cases like this, what you need is a special software tool provided by the recorder manufacturer which can help you see the video files. But what if you don’t have such software? Try finding another video recorder of the same model – or use a data recovery tool.
Recorder specifications
This recorder, Hikvision DS-7104NI-Q1/4P, supports third-party cameras and lets you connect as many as four IP cameras. An effective video compression system helps the device to use less space for storing videos.

In the back panel, there are two video output channels – HDMI and VGA, a 100 Mbit Ethernet port, two USB ports, and 4 independent Power over Ethernet (PoE) ports, and of course, a power connector.

Inside, there is a slot for one hard disk and a connector supporting disks up to 6 TB.

Backup settings
If you need to recover an old video, you should remember that any video recorder has to work with a limited memory capacity, regardless of the model. Depending on the quality of the picture and the number of cameras, it can record video files for a certain period of time, and then it will overwrite older data with new files. If a new record cycle has already begun, it’s unlikely that older videos can be recovered.
In general, before doing anything to the information which you think is important – formatting, deleting, partitioning and so on – always remember to back up your stuff. Most recorder models let you configure the backup process.

In this menu, you can schedule backups, specify what cameras should be connected, select the video format and change other settings.

In case you forgot to back up important files, you can still find a solution and use a special data recovery tool, Hetman Partition Recovery.
Recovering erased video files
Start by taking the recorder apart, disconnecting the hard disk, and connecting it to a Windows computer.
Many video recorders have file systems which are not typically used with computer operating systems. That is why you can’t download or save any data from the disk you have connected to the computer. To have the video files recovered you will need either specialized equipment or dedicated software provided by the vendor of your surveillance system. This way or another, it suggests more expenses, and sometimes it just means there is no way to recover anything on your own.
At the same time, most video recorders use compatible files systems – and this is also the case with the device we are testing. Therefore, the process of saving information is very simple – just connect the hard disk to the computer and save the data.
Take out the screws and open the cover.

Take out the hard disk, disconnect it from the recorder, and connect the disk to the computer.

When connected, the disk is not displayed in the Windows Explorer, and the operating system suggests to initialize it – but it’s not necessary now, so just hit Cancel.

As we know, initialization will erase all the data which is still on the disk, and any recovery operations you conduct later can hardly be successful.
Hetman Partition Recovery can recognize the disk, and it detect its file system as hikvision.

Right-click on the disk and open it.

Select Fast scan and wait until the process is complete.

If the Fast scan result is unsatisfactory, try a Full analysis instead.

The program has found the remaining data like a charm.

Most video recorders assign same-type names to their files, and such names are not too informative for us, humans. To find a specific video, use the preview function.

Select the video files you need to extract from the disk and click Recovery,

Specify the directory where you’d like to save the information and click Recovery.

When the process is over, you will find the recovered files in the folder you have selected.

Recorders with RAID support
Also, there are premium recorders or full-featured professional models that save recorded videos to a RAID array. Depending on the RAID type, recorders can gain an extra bonus in:
Significantly higher read/write speed,
Ample storage space,
Improved resilience,
Automatic backup features and other things.

As video surveillance systems typically work round the clock, they are overwriting data on the disk all the time. With such intense workloads, 24/7 operation results in physical wear of the hard disk. That is why even in premium systems (for example, server-based ones) hard disks tend to be rather short-lived.
In order to secure your system against data loss issues, you should consider the hard disk excessive wear factor and make sure that HDDs you are using are replaced every two or three years. Another method is using recorders with RAID storage systems. It can extend the lifespan of the hard disks by a few years due to employing higher number of drives. In addition, you’ll be secured against loss of data even if one or two drives fail at the same time.

It is recommended to build an array on the basis of a high-quality RAID controller. With the help of standard controller software, you’ll be able to configure and maintain the array on your own. Even if one of the drives fails, this software will help you identify the faulty disk, find out what happened and decide if it needs to be replaced.
If you want to recover information from a RAID array, use Hetman RAID Recovery. It will identify its properties automatically and rebuild the damaged RAID array, so that you can copy the important data to a safer location.
See the full article with all additional video tutorials.