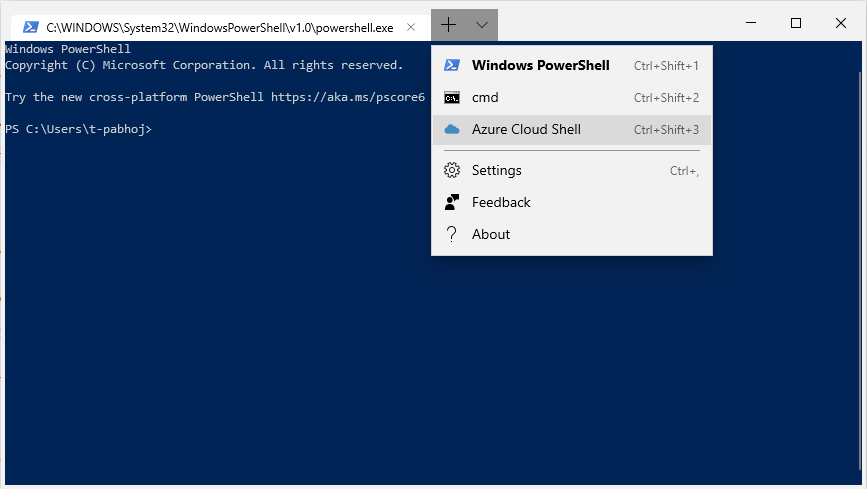
The Windows Terminal can now connect you to the Azure Cloud Shell!

We have a new default profile – the Azure Cloud Shell, which will allow you to access your Azure directories/tenants through the Windows Terminal app itself.
This article in our blog.
Your settings will not automatically update with the new default profile (since the file does not regenerate every time you open up Windows Terminal), so here’s how you can manually add it in.
Once you’ve done this, you will see a new tab option for the Azure Cloud Shell.
Here’s what the full login output looks like: (I hit ‘0’ for the tenant number and ‘y’ for the choice on saving connection settings).

Now that I have saved my connection settings, here’s what the login process looks like the next time (I hit ‘0’ to access my saved connection settings).

It’s also possible to sign in with a different account/tenant by hitting ‘n’ or removing the saved connections by hitting ‘r’. These settings will persist across sessions, so even if you start up the Terminal a few days later you will still be able to log in with your saved connection settings without needing to open up a browser.
And past that, its all you! Hope you enjoy being able to access your Azure assets through the Windows Terminal. As always, please report any bugs/issues to our Github repository.

We have a new default profile – the Azure Cloud Shell, which will allow you to access your Azure directories/tenants through the Windows Terminal app itself.
This article in our blog.
If you already have Windows Terminal installed
Your settings will not automatically update with the new default profile (since the file does not regenerate every time you open up Windows Terminal), so here’s how you can manually add it in.
- Start Windows Terminal
- Open up settings (using the dropdown)
- Add this profile to your list of profiles:
    {"acrylicOpacity" : 0.6,
    "closeOnExit" : false,
    "colorScheme" : "Vintage",
    "commandline" : "Azure",
    "connectionType" : "{d9fcfdfa-a479-412c-83b7-c5640e61cd62}",
    "cursorColor" : "#FFFFFF",
    "cursorShape" : "bar",
    "fontFace" : "Consolas",
    "fontSize" : 10,
    "guid" : "{b453ae62-4e3d-5e58-b989-0a998ec441b8}",
    "historySize" : 9001,
    "icon" : "ms-appx:///ProfileIcons/{b453ae62-4e3d-5e58-b989-0a998ec441b8}.png",
    "name" : "Azure Cloud Shell",
    "padding" : "0, 0, 0, 0",
    "snapOnInput" : true,
    "startingDirectory" : "%USERPROFILE%",
    "useAcrylic" : true}
Once you’ve done this, you will see a new tab option for the Azure Cloud Shell.
How to use the connector
- Open up the «Azure Cloud Shell» tab.
- You will be prompted to go to «microsoft.com/devicelogin» and enter the code displayed.
- Once you enter the code in your browser, you will need to login with your account – make sure you log in with an account that has an active Azure directory/tenant.
- Switch back to Terminal and within a few seconds you will see an «Authenticated» message.
- Some cases only: if you have multiple tenants in your account, you will be prompted to choose one of them. Simply enter the tenant number of the one you wish to connect to.
- You will then be asked if you want to save these connection settings. Saving your connection settings will allow you to login without going through steps 1-5 in the future.
- The app will then start to establish a connection with the cloud shell (this could take a while, just be patient!)
- You are now connected to you Azure Cloud Shell!
Here’s what the full login output looks like: (I hit ‘0’ for the tenant number and ‘y’ for the choice on saving connection settings).

Now that I have saved my connection settings, here’s what the login process looks like the next time (I hit ‘0’ to access my saved connection settings).

It’s also possible to sign in with a different account/tenant by hitting ‘n’ or removing the saved connections by hitting ‘r’. These settings will persist across sessions, so even if you start up the Terminal a few days later you will still be able to log in with your saved connection settings without needing to open up a browser.
And past that, its all you! Hope you enjoy being able to access your Azure assets through the Windows Terminal. As always, please report any bugs/issues to our Github repository.