
The popularity of online education is increasing every month. And since there is an increase in popularity, there is an increase in competition and an improvement in quality: many authors of online schools realized that nowadays it's not enough to just make something mediocre using the frontal camera of the iPhone 4. You need to work on the quality of the picture, sound, presentation of material, etc. Not only did the pandemic prove that you can teach salsa and even crochet online, so it also gave an excellent push to improve the materials taught + diversity in the labor market. Moms on maternity leave can rejoice - now you can truly earn a hundred thousand million per second, sitting at home.
In the last article, we talked about new professions generated by lockdown and tools for their work, and also, with just 70 lines of code, we created the skeleton of a multi-point conference with recording and screen-sharing.
Screen-sharing is generally a common thing, especially in modern realities, when different self-development courses are at the peak of fashion. Do you want to lose weight, get fat, earn millions, change your profession, raise children correctly, achieve enlightenment, achieve blackout or clean up with Feng Shui techniques? There's a mentor online you need, and not even in a single copy. The main tool of such trainers is creating webinars, most often paid. And if you start developing your own webinar system, then several questions immediately appear:
Where to place it?
How to make it work?
How to restrict access?
How to select a server and where to place it?
To launch a streaming initiative, you should first assess the scope of the system.
number of streamers;
number of incoming streams;
number of subscribers;
number of outgoing streams;
video streams' parameters;
timeframes;
locations of servers and subscribers.
Based on that information you can choose the appropriate configuration of physical servers and virtual instances.
Here are standard requirements for server specs for common tasks:
Number of subscribers | CPUs | RAM, GB | Traffic, TB | Possible application |
|---|---|---|---|---|
up to 20 | 4 | 8 | 5 | Security monitoring |
up to 500 | 8 | 16 | 6 | Webinars |
up to 1000 | 16 | 64 | 9 | Video chats |
up to 2000 | 20 | 96 | 10 | HD video streams |
If you plan to have a high subscriber count, there's no need to have one upgraded server, because it'll simply make it a singular failure point. In this case you should use the CDN technology, at a rate of 1 Edge server for 2000 subscribers. Thanks to scaling, geographical and logical separation (with dedicated transcoding and content-delivery functions) you can flexibly set the required load for every server. Server load should not exceed 80%. If that's the case, the video quality shall be decent for all the subscribers.
Quite often, CDNs are used even for streams to a small number of users, if the traffic volume is estimated to be high. The ratio is simple: 1 stream takes about 1 Mbps of traffic, so 1000 streams would take 1000 Mbps. Getting a server with a 10 Gbps bandwidth is not always an option, whether technologically or financially. The majority of Internet service providers don't offer bandwidth exceeding 400 Mbps, so it would take three servers to broadcast at 1000 Mbps.
Let's take a look at several WCS settings that directly impact the number of viewers and the stream quality.
Port settings
By default, WebRTC allows only 499 ports. This cap is set in the following file: flashphoner.properties. It's possible to increase the number of ports through these strings
media_port_from = 31001
media_port_to = 32000
Attentive readers may, of course, notice that the specified range has 999 ports. That much is true, but media traffic is only transmitted via ports with the even number, so initial default number of available ports is only 499.
When expanding the range of media ports, check that the range does not overlap with other ports that are used by the server and with the Linux dynamix ports range (you can change it, should you need to)
Please note, that the media ports are used only for WebRTC connections. That means that if you're streaming via WebRTC to viewers watching via HLS on their iPhones, the issue of free ports disappears.
Configuring the Garbage Collector
The process of streaming involves creation and deletion of many objects with data. These objects are stored in a Java heap, except when it comes to transcoding, where the images are stored in the physical memory of the server.
Heap is a fundamental memory segment, where the objects are stored by Java VM. When you try creating a new object with the heap being full, JVM performs a so-called garbage collection, by searching for all unnecessary objects and deleting them. Executing garbage collection puts a stop on all other JVM processes. So, for the purposes of streaming it is vital that that pause takes the least possible amount of time. To that end, Java developed a new feature — "Z Garbage Collector" (ZGC), which allows for low-latency garbage collection without stops of over 10 ms, even when dealing with very large heaps.
It is recommended to allocate at least half of the server's physical memory for Java memory heap. For example, for servers with 32 Gb of RAM, it is recommended to allocate 16 Gb. The size of the Java memory heap is indicated in the following file: wcs-core.properties, see the following string
### JVM OPTIONS ###
-Xmx1024M
Default value is 1024 Mb. To allocate 16 Gb for Java memory heap, enter:
-Xmx16g
-Xms16g
Now let's install Z Garbage Collector into OpenJDK 12.
1.Download the latest version of OpenJDK 12 here http://jdk.java.net/12/:
wget https://download.java.net/java/GA/jdk12.0.2/e482c34c86bd4bf8b56c0b35558996b9/10/GPL/openjdk-12.0.2_linux-x64_bin.tar.gz2.Unzip the file and move it to the work directory:
tar xvf openjdk-12.0.2_linux-x64_bin.tar.gz
mv jdk-12.0.2 /usr/java/jdk-12.0.2
3.Create token links to OpenJDK 12:
ln -sfn /usr/java/jdk-12.0.2 /usr/java/default
ln -sfn /usr/java/default/bin/java /usr/bin/java
ln -sfn /usr/java/default/bin/jstack /usr/bin/jstack
ln -sfn /usr/java/default/bin/jcmd /usr/bin/jcmd
ln -sfn /usr/java/default/bin/jmap /usr/bin/jmap
4.If WCS has already been installed, amend or delete the following strings in wcs-core.properties
-XX:+UseConcMarkSweepGC
-XX:+UseCMSInitiatingOccupancyOnly
-XX:CMSInitiatingOccupancyFraction=70
-XX:+PrintGCDateStamps
-XX:+PrintGCDetails
replace the string
-Xloggc:/usr/local/FlashphonerWebCallServer/logs/gc-core-with
-Xlog:gc*:/usr/local/FlashphonerWebCallServer/logs/gc-core-:time5.Add settings for ZGC and logging:
# ZGC
-XX:+UnlockExperimentalVMOptions -XX:+UseZGC -Xms24g -Xmx24g -XX:+UseLargePages -XX:ZPath=/hugepages

# Log
-Xlog:gc*:/usr/local/FlashphonerWebCallServer/logs/gc-core.log
-XX:ErrorFile=/usr/local/FlashphonerWebCallServer/logs/error%p.log
These changes are usually enough to boost the server efficiency and are sufficient for big viewer numbers.
Now that we've decided on servers and virtual instances for WCS, let's move on to coding the screen sharing function that we plan to add to the site
Programming
Preparing for development
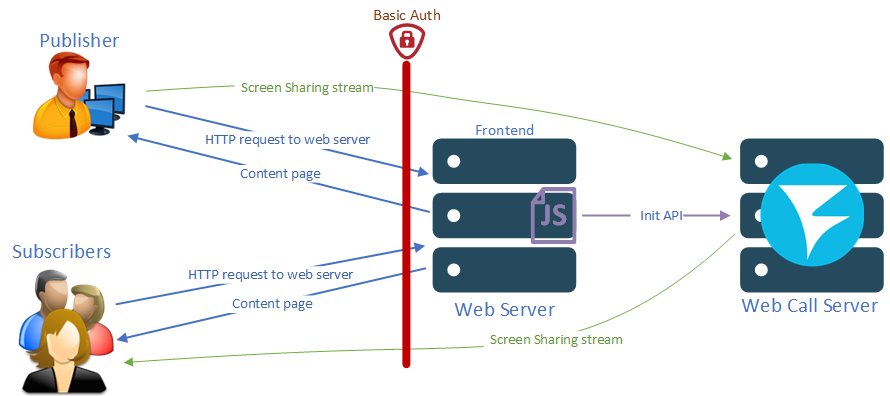
Solution architecture for this article:
Front-end Web server provides the interface for the streamer and the viewers.
WCS processes the incoming video stream and directs in to the viewers.
The deployment begins with installing WCS. Follow this guide or launch a virtual instance on Amazon, Google Cloud or DigitalOcean. WCS could also be launched as a container in Docker. Configure the server as described in the previous article and according to the guide on production preparations.
Now launch the server. For the purposes of this article we use Nginx on CentOS 7. Configuration for Apache would be similar to that. IF you already have a web site to which you want to add the screen sharing function, you don't need to prepare a dedicated web server. You could also deploy a web server on the same machine that operates WCS.
Create two files on the server: a page for a future screen sharing interface and a script that will run it. In our case these are "screen-sharing-min.html" and "screen-sharing-min.js". Next to them, place the script for the main API - "flashphoner.js", which you can download here. Or simply link to the file, if the server is on the same machine as the WCS.
Coding
Let's begin by preparing a HTML page with all the necessary elements. Enable the scripts:
<script type="text/javascript" src="flashphoner.js"></script>
<script type="text/javascript" src="screen-sharing-min.js"></script>
Add the API launch function to the string on loading the page's body:
<body onload="init_api()">Add a div-element to enable screen sharing preview and a launch button:
<div id="screen-sharing" style="width:320px;height:240px;border: solid 1px"></div>
<input type="button" onclick="connect()" value="Share Screen"/>
There isn't much code for the HTML page itself:
<!DOCTYPE html>
<html lang="en">
<head>
   <script type="text/javascript" src="flashphoner.js"></script>
   <script type="text/javascript" src="screen-sharing-min.js"></script>
</head>
<body onload="init_api()">
    <div id="screen-sharing" style="width:320px;height:240px;border: solid 1px"></div>
    <input type="button" onclick="connect()" value="Share Screen"/>
</body>
</html>
Now we move to creating a Js script for screen sharing.
The function called upon loading the HTML page, "init_api()", is the one that initializes the main API
function init_api() {
    Flashphoner.init({});
}
Pressing the "Share Screen" button triggers consecutive launch of the two functions of our script: "connect()" function, which shall establish a connection to WCS via WebSocket
function connect() {
    session = Flashphoner.createSession({
        urlServer: "wss://demo.flashphoner.com"
    }).on(SESSION_STATUS.ESTABLISHED, function(session) {
        startStreaming(session);
    });
}
and "startStreaming()" function, which forms and sends the screen sharing stream to WCS
function startStreaming(session) {
    var constraints = {
        video: {}
    };
    constraints.video.type = "screen";
    constraints.video.withoutExtension = true;
    session.createStream({
        name: "mystream",
        display: document.getElementById("screensharing"),
        constraints: constraints
    }).publish();
}
Importantly, unlike with the web cam streaming, to enable screen capture instead of cam feed capture, you must specify two parameters under constraints:
constraints.video.type = "screen";
constraints.video.withoutExtension = true;
The script file is also pretty concise: only 34 lines with comments.
//Status constants
var SESSION_STATUS = Flashphoner.constants.SESSION_STATUS;
var STREAM_STATUS = Flashphoner.constants.STREAM_STATUS;

//Websocket session
var session;

//Init Flashphoner API on page load
function init_api() {
    Flashphoner.init({});
}

//Connect to WCS server over websockets
function connect() {
    session = Flashphoner.createSession({
        urlServer: "wss://demo.flashphoner.com"
    }).on(SESSION_STATUS.ESTABLISHED, function(session) {
        startStreaming(session);
    });
}

//Publishing Share Screen
function startStreaming(session) {
    var constraints = {
        video: {}
    };
    constraints.video.type = "screen";
    constraints.video.withoutExtension = true;
    session.createStream({
        name: "mystream",
        display: document.getElementById("screensharing"),
        constraints: constraints
    }).publish();
}
Now, save, launch and check if it works.
Testing
Press "Share Screen" button and let the browser know what we're going to share: the whole screen, an app, or a specific browser tab. The screen sharing preview will be displayed in the div-element on the HTML page.

The name for stream has been hardcoded. In this case, we used "mystream"
session.createStream({
        name: "mystream",
Later, the stream can be recorded, played back, transcoded or republished via any WCS-supported technology.

All right, everything works perfectly. Now let's take a look at a possible protection measure: providing stream access with Basic Auth.
Defending
Here's how to set up Basic Auth on your web server.
Create file .htpasswd:
sudo yum install apache2-utils
sudo htpasswd -c /etc/nginx/conf.d/.htpasswd admin
The first command will create a plugin for generating the .htpasswd file in the system. The second one will create a file at the specified path and will request password from "admin". The "-c" is necessary only upon the initial file generation and not necessary when adding other accounts to the .htpasswd file.
Now let's look at Nginx configurations. Since we didn't make the web site's settings into a separate configuration, we shall use the main config file /etc/nginx/nginx.conf for adjusting settings.
Add the following strings to the http sections:
auth_basic "Enter password";
auth_basic_user_file /etc/nginx/.htpasswd;
The first string is a greeting string, the second one is the path to .htpasswd
At this point, you can reload Nginx and see if the password request comes through upon opening the web interface.

Then let's configure the web server to work according to the HTTPS protocol. Add the following strings to the "Server" section in the nginx.conf file
listen 443 ssl;
    ssl_certificate /etc/pki/tls/yourdomain/yourdomain.crt;
    ssl_certificate_key /etc/pki/tls/yourdomain/yourdomain.key;
    server_name wcs.yourdomain.com;
    server_tokens off;
    client_max_body_size 500m;
    proxy_read_timeout 10m;
Set up a reverse proxy to the WebSocket port of WCS
location /wss {
    proxy_set_header Host $host;
    proxy_pass http://IP:8080;
    proxy_http_version 1.1;
    proxy_set_header Upgrade $http_upgrade;
    proxy_set_header Connection "upgrade";
    proxy_read_timeout 86400;
}
Reopen Nginx once again. Now let's modify the code from the previous article to relay the login and password. In the "urlServer" parameter of the "Connect" function, set the server access as "wss://login:password@wcs.yourdomain.com:443/wss"
function connect() {
    session = Flashphoner.createSession({
        urlServer: "wss://login:password@wcs.yourdomain.com:443/wss"
    }).on(SESSION_STATUS.ESTABLISHED, function(session) {
        startStreaming(session);
    });
}
Now upon accessing the HTML page "screen-sharing-min.html" the browser will request login and password. Further access to the WCS server via the WebSocket protocol will also use login and password we specified in the code.
Thus we have successfully deployed and tested a screen sharing method with added authorization via Basic Auth. It's 2020, why bother making and licensing Google Chrome extensions and why bedevil your customers by asking them to download extra elements, when everything could be set up to work straight out of the box.
May your screen sharing be successful!
Links
WebRTC broadcast screen sharing technology (Screen Sharing)
Settings file flashphoner.properties
Settings file wcs-core.properties
