Privet, comrads!
In this article i’ll show how easy it is to setup Spring Java app with Kafka message brocker. We will use docker containers for kafka zookeeper/brocker apps and configure plaintext authorization for access from both local and external net.
Final project link to github can be picked up at the end of the article

Apache Kafka + Zookeeper docker image selection
First, you have to decide on the vendor of the Apache Kafka image for container. The requirements of each specific project differ in the level of security and reliability of the solution, in some cases, of course, you will have to build your own image, but for most projects it will be reasonable to choose one from docker hub. For 2020, there are three main popular image vendors kafka + zookeper:
images from confluent [subjectively, a big plus — they are supplied by the developers of Apache Kafka itself and are the most reliable in terms of information security]
images from bitnami [in comparison with confluent, the images need minimal configuration and start out of the box]
images from wurstmeister [in this example I will use them because the project has the most active community on github and hub.docker, as well as excellent documentation]
Installing Docker-compose
Docker-compose is a tool to run and configure multi-container applications . It is a greate choice for Kafka setup because the minimum kafka configuration consist of zookeeper and at least one broker.
Docker-compose comes bundled with Docker app for mac and windows, so you only need to to download and install the Docker app from https://docs.docker.com/engine/install/.
Linux users required to install it compose and docker as separate tools. For a guide to installing docker + compose, it’s best to refer to the official documentation https://docs.docker.com/compose/install/.
Writing a yaml file for compose
The general scheme of our cluster with clients and containers will be as follows:
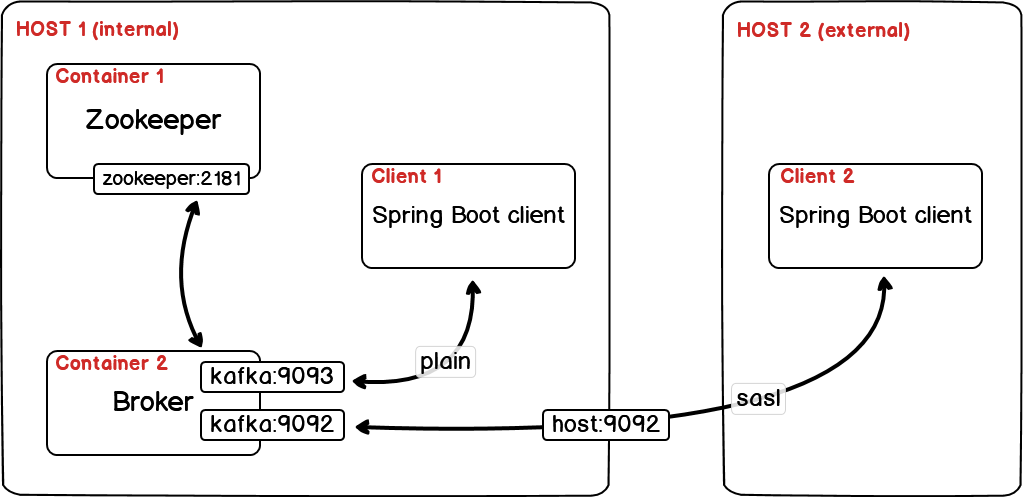
One broker will connect to one coordinator with open ports 9093 for localhost connections and 9092 for external connections.For access from external networks, authorization is enabled via login password without ssl. To work through ssl, you need to issue your own keys and sign certificates, the whole process is well described in the official documentation.
As a result, the file will look like this (the <your public IP here> address needs to be replaced with your public IP to be able to access from other networks):
Client authorization
In order to enable authorization, you need to transfer the kafkaserverjaas.conf file to kafka. In the folder with the compose yaml file, create kafkaserverjaas.conf and add one admin user with the admin-secret password:
This file will be transferred to the image with the kafka broker via:
specifying the path to the file in the kafka config directly
KAFKA_OPTS: "-Djava.security.auth.login.config=/etc/kafka/kafka_server_jaas.conf"mapping local directory containig file to /etc/kafka image directory
volumes: - ./:/etc/kafka
Launching containers
As a result we should get 2 files, which are located in the same directory:
docker-compose.yml
kafka_server_jaas.conf
In that directory call:
$ docker-compose up -d
The -d flag allows you to start in detached mode and close the console if necessary without turning off the containers.
Spring Boot Java client
Let’s write a minimalistic client to publish/consume messages from kafka. To do this, we will create a new project through Spring Initializr or any other tool you are used to. It will be enough to connect one dependency:

I prefer to configure Spring Boot applications via yaml config files with minimal Java configurations. Due to the built-in structuring in Yaml-format, these files are much more human-readable than .properties files and allow you to group settings by modules. The only drawback of the .yml configuration is that it is not supported in tests, but it is easily bypassed by the built-in Spring Boot tools.
I highly recommend to try and check how your perception of the old .properties file changes (especially for large projects) if you rewrite it in yaml. This can be done in a couple of clicks at https://www.toyaml.com/index.html.
In project resources create an application.yml file with the following content:
This setup works for sequentially reading one message at a time (max-poll-records: 1) by one listener (concurrency: 1) and requires manual confirmation of message processing in listener (ack-mode: manual_immediate).
Add producer and consumer classes
The listener receives the message and logs all available information about it to the console.
Let’s start adding messages to the queue every 3 seconds
to enable the scheduler, we need to add the @EnableScheduling annotation to our spring application
Voilà! the application is ready to run. You can run the dev-option with a local client and local kafka, and you can also access kafka from other networks if you open port 9092 and specify the host address in application.yml.
The finished project available in the repository - https://github.com/layonez/kafka-example
