Introduction
Данная статья, вторая и заключительная статья из серии «Разбираем iPhone Core Data Recipes». Первую часть статьи, вы можете прочитать тут. Цель серии статей — помочь начинающему iOS разработчику, понять, как правильно работать с SQLite базой данных используя Core Data на примере iPhone Core Data Recipes. В заключительной статье мы рассмотрим функционал добавления, редактирования и удаления записей из базы данных.
Prerequisites
Для самостоятельного изучения исходных текстов данного приложения, вам необходим стандартный набор инструментов:
- Mac OS X
- Xcode
Данный набор позволит вам просмотреть, изменить и запустить приложение на симуляторе. В случае же, если вы захотите попробовать запустить его на настоящем iPhone, требуется участие в iOS Developer Program.
А также, что немало важно, нужно базовое понимание структуры языка Objective-C и приложения.
Ссылки на используемые материалы и инструменты предоставлены в разделе References.
How To Create a New Recipe
Итак, первое что нам необходимо — это создать новый рецепт. За создание нового рецепта, в данном проекте, отвечает view controller — RecipeAddViewController. Рассмотрим его содержимое.
RecipeAddViewController.h
@protocol RecipeAddDelegate;
@class Recipe;

@interface RecipeAddViewController : UIViewController <UITextFieldDelegate> {
    @private
        //Объект Recipe, уже привязанный managedObjectContext
        Recipe *recipe;
        //Поле для ввода названия рецепта
        UITextField *nameTextField;
        id <RecipeAddDelegate> delegate;
}

@property(nonatomic, retain) Recipe *recipe;
@property(nonatomic, retain) IBOutlet UITextField *nameTextField;
@property(nonatomic, assign) id <RecipeAddDelegate> delegate;

//Сохраняем новый рецепт
- (void)save;
//Отменяем создание нового рецепта
- (void)cancel;

@end

@protocol RecipeAddDelegate <NSObject>
// recipe == nil on cancel
- (void)recipeAddViewController:(RecipeAddViewController *)recipeAddViewController didAddRecipe:(Recipe *)recipe;
@end
RecipeAddViewController.m
#import "RecipeAddViewController.h"
#import "Recipe.h"

@implementation RecipeAddViewController

@synthesize recipe;
@synthesize nameTextField;
@synthesize delegate;


- (void)viewDidLoad {

    // Конфигурируем navigation bar
    self.navigationItem.title = @"Add Recipe";

    //Создаем кнопку Cancel и привязываем ее к действию  cancel
    UIBarButtonItem *cancelButtonItem = [[UIBarButtonItem alloc] initWithTitle:@"Cancel" style:UIBarButtonItemStyleBordered target:self action:@selector(cancel)];
    self.navigationItem.leftBarButtonItem = cancelButtonItem;
    [cancelButtonItem release];

    //Создаем кнопку Save и привязываем ее к действию save
    UIBarButtonItem *saveButtonItem = [[UIBarButtonItem alloc] initWithTitle:@"Save" style:UIBarButtonItemStyleDone target:self action:@selector(save)];
    self.navigationItem.rightBarButtonItem = saveButtonItem;
    [saveButtonItem release];

	[nameTextField becomeFirstResponder];
}
...
//Сохраняем новый рецепт
- (void)save {

    recipe.name = nameTextField.text;

	NSError *error = nil;
	if (![recipe.managedObjectContext save:&error]) {
		NSLog(@"Unresolved error %@, %@", error, [error userInfo]);
		abort();
	}

	[self.delegate recipeAddViewController:self didAddRecipe:recipe];
}

//Отменяем создание нового рецепта
- (void)cancel {

	[recipe.managedObjectContext deleteObject:recipe];

	NSError *error = nil;
	if (![recipe.managedObjectContext save:&error]) {
		NSLog(@"Unresolved error %@, %@", error, [error userInfo]);
		abort();
	}

    [self.delegate recipeAddViewController:self didAddRecipe:nil];
}

//Т.к. проект не использует ARC, необходимо подчистить память
- (void)dealloc {
    [recipe release];
    [nameTextField release];
    [super dealloc];
}

@end
В итоге, форма добавления нового рецепта, выглядит следующим образом
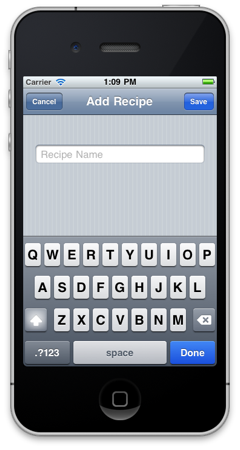
Детальное рассмотрение действий save & cancel будет ниже.
Открываем форму создания нового рецепта

Кнопка для создания нового рецепта расположена в главном окне нашего приложения (см. скриншот выше). Рассмотрим её более делатьно.
Данная кнопка создается в методе viewDidLoad контроллера RecipeListTableViewController.
UIBarButtonItem *addButtonItem = [[UIBarButtonItem alloc] initWithBarButtonSystemItem:UIBarButtonSystemItemAdd target:self action:@selector(add:)];
    self.navigationItem.rightBarButtonItem = addButtonItem;
    [addButtonItem release];
К данной кнопке привязано действие add, которое также находится в контроллере RecipeListTableViewController (см. комментарии в исходном коде).
- (void)add:(id)sender {
   //Создаем контроллер RecipeAddViewController который мы рассматривали выше
    RecipeAddViewController *addController = [[RecipeAddViewController alloc] initWithNibName:@"RecipeAddView" bundle:nil];

    //Связываем его с RecipeListTableViewController
    addController.delegate = self;

	//В managedObjectContext создаем объект Recipe с помощью NSEntityDescription, другими словами - создаем новую запись в таблице Recipe
	Recipe *newRecipe = [NSEntityDescription insertNewObjectForEntityForName:@"Recipe" inManagedObjectContext:self.managedObjectContext];

        //Передаем новый объект Recipe контроллеру RecipeAddViewController
	addController.recipe = newRecipe;

    //Модально оторбажаем контроллер RecipeAddViewController
    UINavigationController *navigationController = [[UINavigationController alloc] initWithRootViewController:addController];
    [self presentModalViewController:navigationController animated:YES];

    [navigationController release];
    [addController release];
}
После выполнения данного действия, откроется форма добавления нового рецепта рассмотренная выше. На этой форме, для пользователя доступно два действия — Save & Cancel.
Сохраняем новый рецепт
- (void)save {
    //Свойству name объекта Recipe устанавливаем значение из поля
    recipe.name = nameTextField.text;

	NSError *error = nil;
        //Сохраняем новую запись
	if (![recipe.managedObjectContext save:&error]) {
		NSLog(@"Unresolved error %@, %@", error, [error userInfo]);
		abort();
	}
        //Отображаем созданный рецепт с помощью RecipeDetailViewController (исходный текст для этого действия см. ниже в секции "Отображаем созданный рецепт")
	[self.delegate recipeAddViewController:self didAddRecipe:recipe];
}
Отменяем сохранение нового рецепта
- (void)cancel {
        //Удаляем ранее созданный объект Recipe, другими словами, удаляем ране�� созданную запись в базе данных
	[recipe.managedObjectContext deleteObject:recipe];

	NSError *error = nil;
	if (![recipe.managedObjectContext save:&error]) {
		NSLog(@"Unresolved error %@, %@", error, [error userInfo]);
		abort();
	}
    //Отображаем список рецептов
    [self.delegate recipeAddViewController:self didAddRecipe:nil];
}
Отображаем созданный рецепт
- (void)recipeAddViewController:(RecipeAddViewController *)recipeAddViewController didAddRecipe:(Recipe *)recipe {
    if (recipe) {
        // Если объект Recipe не равняется nil - тогда отображаем его
        [self showRecipe:recipe animated:NO];
    }
    [self dismissModalViewControllerAnimated:YES];
}
- (void)showRecipe:(Recipe *)recipe animated:(BOOL)animated {
    // Создаем контроллер который отображает детальную информацию о рецепте, передаем в него рецепт и отображаем
    RecipeDetailViewController *detailViewController = [[RecipeDetailViewController alloc] initWithStyle:UITableViewStyleGrouped];
    detailViewController.recipe = recipe;

    [self.navigationController pushViewController:detailViewController animated:animated];
    [detailViewController release];
}
How To Create a New Ingredient

Как вы можете видеть на скриншоте выше, при просмотре детальной информации о рецепте, в режиме редактирования, доступна ссылка «Add Ingredient». Создается она в методе
- (UITableViewCell *)tableView:(UITableView *)tableView cellForRowAtIndexPath:(NSIndexPath *)indexPath
контроллера RecipeDetailViewController.
static NSString *AddIngredientCellIdentifier = @"AddIngredientCell";

			cell = [tableView dequeueReusableCellWithIdentifier:AddIngredientCellIdentifier];
			if (cell == nil) {
				 // Create a cell to display "Add Ingredient".
				cell = [[[UITableViewCell alloc] initWithStyle:UITableViewCellStyleDefault reuseIdentifier:AddIngredientCellIdentifier] autorelease];
				cell.accessoryType = UITableViewCellAccessoryDisclosureIndicator;
			}
            cell.textLabel.text = @"Add Ingredient";
За добавление и редактирование ингредиентов отвечает контроллер IngredientDetailViewController.
IngredientDetailViewController.h
@class Recipe, Ingredient, EditingTableViewCell;

@interface IngredientDetailViewController : UITableViewController {
    @private
        Recipe *recipe;
        Ingredient *ingredient;

        EditingTableViewCell *editingTableViewCell;
}

@property (nonatomic, retain) Recipe *recipe;
@property (nonatomic, retain) Ingredient *ingredient;

@property (nonatomic, assign) IBOutlet EditingTableViewCell *editingTableViewCell;

@end
IngredientDetailViewController.m
...
- (id)initWithStyle:(UITableViewStyle)style {
    if (self = [super initWithStyle:style]) {
        UINavigationItem *navigationItem = self.navigationItem;
        navigationItem.title = @"Ingredient";

        UIBarButtonItem *cancelButton = [[UIBarButtonItem alloc] initWithBarButtonSystemItem:UIBarButtonSystemItemCancel target:self action:@selector(cancel:)];
        self.navigationItem.leftBarButtonItem = cancelButton;
        [cancelButton release];

        UIBarButtonItem *saveButton = [[UIBarButtonItem alloc] initWithBarButtonSystemItem:UIBarButtonSystemItemSave target:self action:@selector(save:)];
        self.navigationItem.rightBarButtonItem = saveButton;
        [saveButton release];
    }
    return self;
}
...
- (BOOL)shouldAutorotateToInterfaceOrientation:(UIInterfaceOrientation)interfaceOrientation {
    return (interfaceOrientation != UIInterfaceOrientationPortraitUpsideDown);
}
...
- (NSInteger)tableView:(UITableView *)tableView numberOfRowsInSection:(NSInteger)section {
    //Отображаем только две строки, название и количество
    return 2;
}

//Создаем поля для отображения и редактирования
- (UITableViewCell *)tableView:(UITableView *)tableView cellForRowAtIndexPath:(NSIndexPath *)indexPath {
    static NSString *IngredientsCellIdentifier = @"IngredientsCell";

    EditingTableViewCell *cell = (EditingTableViewCell *)[tableView dequeueReusableCellWithIdentifier:IngredientsCellIdentifier];
    if (cell == nil) {
		[[NSBundle mainBundle] loadNibNamed:@"EditingTableViewCell" owner:self options:nil];
        cell = editingTableViewCell;
		self.editingTableViewCell = nil;
    }

    if (indexPath.row == 0) {
        cell.label.text = @"Ingredient";
        cell.textField.text = ingredient.name;
        cell.textField.placeholder = @"Name";
    }
	else if (indexPath.row == 1) {
        cell.label.text = @"Amount";
        cell.textField.text = ingredient.amount;
        cell.textField.placeholder = @"Amount";
    }

    return cell;
}
...

- (void)save:(id)sender {

	NSManagedObjectContext *context = [recipe managedObjectContext];

	/*
        Если объект ингредиента не создан - создаем и конфигурируем его
	 */
    if (!ingredient) {
        self.ingredient = [NSEntityDescription insertNewObjectForEntityForName:@"Ingredient" inManagedObjectContext:context];
        [recipe addIngredientsObject:ingredient];
		ingredient.displayOrder = [NSNumber numberWithInteger:[recipe.ingredients count]];
    }

	/*
          Обновляем объект ингредиента значениями из текстовых полей
	 */
    EditingTableViewCell *cell;

    cell = (EditingTableViewCell *)[self.tableView cellForRowAtIndexPath:[NSIndexPath indexPathForRow:0 inSection:0]];
    ingredient.name = cell.textField.text;

    cell = (EditingTableViewCell *)[self.tableView cellForRowAtIndexPath:[NSIndexPath indexPathForRow:1 inSection:0]];
    ingredient.amount = cell.textField.text;

	/*
	 Сохраняем изменения
	 */
	NSError *error = nil;
	if (![context save:&error]) {
		NSLog(@"Unresolved error %@, %@", error, [error userInfo]);
		abort();
	}

    [self.navigationController popViewControllerAnimated:YES];
}
...
@end
Форма добавления ингредиента выглядит следующим образом
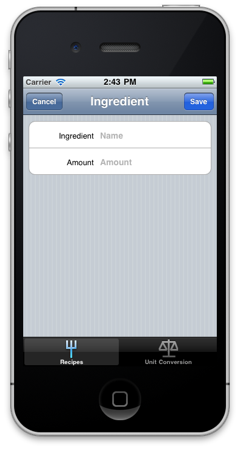
При нажатии на кнопку Save ингредиент будет сохранен в базе данных и отображен в списке. При нажатии на кнопку Cancel новый ингредиент сохранен не будет.
How To Remove an Existing Recipe
Контроллер RecipeListTableViewController содержит следующий код для поддержки удаления рецепта
- (void)viewDidLoad {
...
    //Создаем кнопку Edit
    self.navigationItem.leftBarButtonItem = self.editButtonItem;
...
}
...
// Включаем поддержку редактирования в UITableView
- (void)tableView:(UITableView *)tableView commitEditingStyle:(UITableViewCellEditingStyle)editingStyle forRowAtIndexPath:(NSIndexPath *)indexPath {
    if (editingStyle == UITableViewCellEditingStyleDelete) {
        // Удалем выделенный рецепт
		NSManagedObjectContext *context = [fetchedResultsController managedObjectContext];
		[context deleteObject:[fetchedResultsController objectAtIndexPath:indexPath]];

		// Сохраняем изменения
		NSError *error;
		if (![context save:&error]) {
			NSLog(@"Unresolved error %@, %@", error, [error userInfo]);
			abort();
		}
	}
}
Теперь, при нажатии на кнопку Edit или выполнение жеста над UITableViewCell, UITableView перейдет в режим редактирования, что позволит вам удалить рецепт (см. скриншоты ниже).

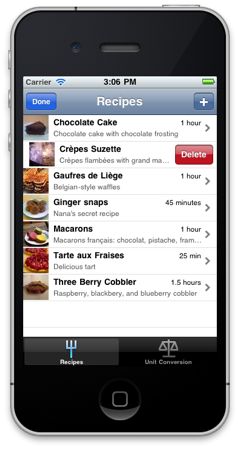
При удалении рецепта, все связанные объекты (ингредиенты и картинка) в базе данных будут также удалены.
How To Remove an Existing Ingredient
В контроллере RecipeDetailViewController, все устроено аналогичным образом, за исключением добавления картинки (рассмотрено не будет).
- (UITableViewCellEditingStyle)tableView:(UITableView *)tableView editingStyleForRowAtIndexPath:(NSIndexPath *)indexPath {
	UITableViewCellEditingStyle style = UITableViewCellEditingStyleNone;
    // Only allow editing in the ingredients section.
    // В секции отображения ингредиентов, последняя строка добавляется автоматически (см. tableView:cellForRowAtIndexPath:), она требуется для добавления нового ингредиента, таким образом в списке ингредиентов включаем стиль удаления, а в последнем элементе стиль добавления
    if (indexPath.section == INGREDIENTS_SECTION) {
        if (indexPath.row == [recipe.ingredients count]) {
            style = UITableViewCellEditingStyleInsert;
        }
        else {
            style = UITableViewCellEditingStyleDelete;
        }
    }

    return style;
}


- (void)tableView:(UITableView *)tableView commitEditingStyle:(UITableViewCellEditingStyle)editingStyle forRowAtIndexPath:(NSIndexPath *)indexPath {

    // Только удаление и только в списке ингредиентов
    if ((editingStyle == UITableViewCellEditingStyleDelete) && (indexPath.section == INGREDIENTS_SECTION)) {
        // Удаляем ингредиент
        Ingredient *ingredient = [ingredients objectAtIndex:indexPath.row];
        [recipe removeIngredientsObject:ingredient];
        [ingredients removeObject:ingredient];

        NSManagedObjectContext *context = ingredient.managedObjectContext;
        [context deleteObject:ingredient];

        [self.tableView deleteRowsAtIndexPaths:[NSArray arrayWithObject:indexPath] withRowAnimation:UITableViewRowAnimationTop];
    }
}
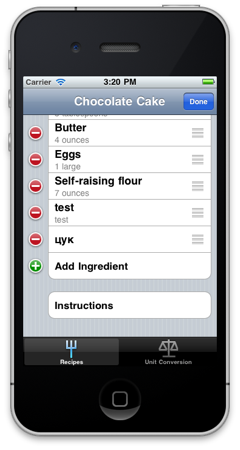
Форма добавления и удаления ингредиентов выглядит следующим образом
Conclusion
В данной статье, я специально не рассматривал создание картинки для рецепта — предполагая самостоятельное изучение читателем, данной функциональности (см. метод photoTapped контроллера RecipeDetailViewController). Приведенные примеры исходного кода, являются выдержками, изучить исходный код полностью, можно скачав проект (см. раздел References). Я надеюсь, что проделанная мной работа, по написанию этой серии статей, оказалась полезна для тебя — дорогой читатель! Всем спасибо за внимание и за проявленое терпение.

