We continue telling you about our cooperation with Innopolis University guys to develop Active Restore technology. It will allow users to start working as soon as possible after a failure. Today, we will talk about Native Windows applications, including details on their development and launch. Under the cut, you will find some information about our project, and a hands-on guide on developing native apps.

In previous posts, we have already written about Active Restore, and how Innopolis students develop the service. Today I would like to focus on native apps. We want to «bury» our active restoration service to their layer. If we succeed, we can:
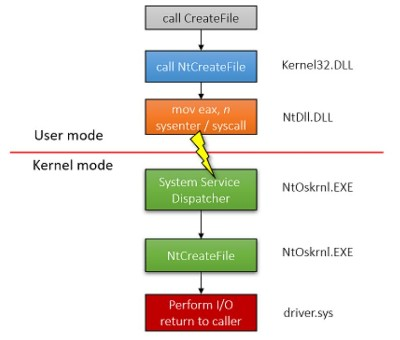
To answer this question, let us look at the call stack, e. g. when someone tries to create a file.
Pavel Yosifovich — Windows Kernel Programming (2019)
A programmer uses the function CreateFile declared in fileapi.h header file and implemented in Kernel32.dll. However, the function itself does not create a file. It just checks input arguments and calls NtCreateFile function (prefix Nt shows that this function is native). This function is declared in winternl.h header file and implemented in ntdll.dll. It prepares the jump into the kernel space and then makes a system call to create a file. In this case, Kernel32 is just a shell for Ntdll. One of the reasons for this is that this way Microsoft can change native functions without affecting standard interfaces. Microsoft does not recommend calling native functions directly and does not document most of them. However, undocumented functions can be found here.
The main advantage of native apps is that ntdll is uploaded to the system much earlier than kernel32. This makes sense because kernel32 requires ntdll to operate. As a result, apps that use native functions can start working much earlier.
Therefore, Windows Native Applications are programs that can be launched early in the Windows boot process. They use functions ONLY from ntdll. An example of such an application: autochk, which runs chkdisk utility to check disk errors before the main services are launched. This is the layer where we want Active Restore to be.
Let us practice and write a simple example app that:
In native applications, the entry point is not main or winmain. We have to implement the NtProcessStartup function because we start the new process directly in the system.
Let us start by displaying a message. To do that we have a native function, NtDisplayString, which accepts a pointer to UNICODE_STRING object as an argument. We will use RtlInitUnicodeString to initialize it. As a result, to display the text, we can write a tiny function:
Remember that we have access to functions only from ntdll. There are simply no other libraries loaded in the memory, so we will have problems with memory allocation. The “new” operator does not exist yet (it is from the way-too-high C++ world), there is also no malloc function (it needs runtime C libraries). Of course, we can use a stack. However, if we want to allocate the memory dynamically, we will need a heap. Let us create a heap to allocate memory from there wherever we need it.
We are going to use the RtlCreateHeap function. Then we will use RtlAllocateHeap and RtlFreeHeap to allocate and free the memory.
Implementation of keyboard input wait.
All we need is to use NtReadFile on the opened device, and wait for the keyboard to return a keystroke. We keep working until the ESC button is not pressed. To open the device, we have to call NtCreateFile (we will need to open \Device\KeyboardClass0). Calling NtCreateEvent function will initialize the wait object. We declare KEYBOARD_INPUT_DATA structure that provides keyboard data.
The native apps end with a call NtTerminateProcess, because we simply kill our process.
The whole code of our tiny app:
PS: We can easily use DbgBreakPoint() to break in a debugger. It is better to connect WinDbg to the virtual machine for kernel debugging. The guide on how to do it is here. Alternatively, we can use VirtualKD.
The easiest way to build a native app is to use a DDK (Driver Development Kit). We need an «ancient» version 7.1 because newer versions have a different approach and work closely with Visual Studio. In the case of DDK, our project will only need Makefile and sources.
Your Makefile will be the same. Let us take a closer look at sources. This file contains sources of your program (.c files), build options and other parameters.
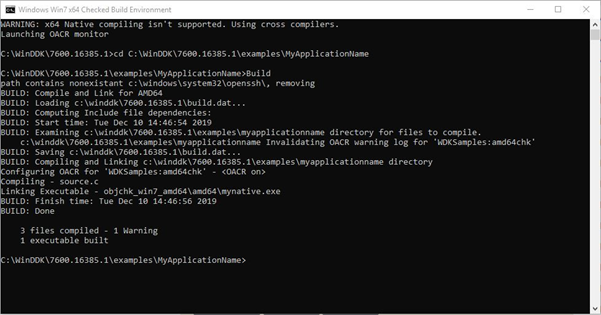
So, for the build we need to launch x86 (or x64) Checked Build, change the working directory to the project folder, and run Build. The screenshot shows that we built one executable file.
Unfortunately, you cannot just run this file. The system argues and tells us to go and think about behavior with the following error:

When the autochk is running, the program boot sequence is set by the registry key:
The session manager executes programs from this list in a predefined sequence. The manager looks for executable files in system32. The registry key has the following format:
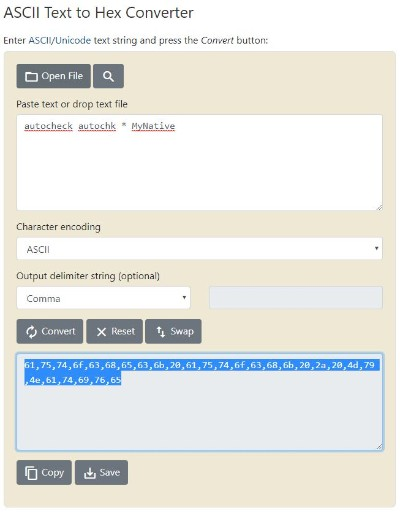
The value must be hexadecimal, not the regular ASCII, so the above key will have the following value:
To convert the name, you can use any online services (e.g. this).
So, to launch a native app we have to:
UPD: or check this out, it may help to run native apps at host machine even later than at boot time: link.
To make your life easier, here is a script to install a native application:
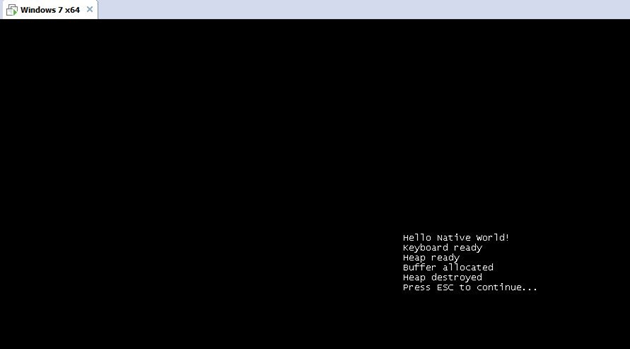
After installation and reboot, even before choosing users, we get the following:
The example of this tiny app showed us that it is possible to launch an app as Windows Native. Next, we and the guys from Innopolis University will continue building the service that will initiate driver interaction much earlier than the previous version of the project. When the Win32 shell will be loaded by the system, it makes sense to transfer the control to a fully working service that has already been developed (more about this here).
In the next post, we will get to another Active Restore component, the UEFI driver. Subscribe to our blog to make sure you see the next post.

In previous posts, we have already written about Active Restore, and how Innopolis students develop the service. Today I would like to focus on native apps. We want to «bury» our active restoration service to their layer. If we succeed, we can:
- Launch the service much earlier
- Connect with a cloud containing a backup a bit earlier
- Identify system boot mode, normal or safe, much earlier
- Restore much fewer files in advance
- Allow a user to start work even faster.
What is a Windows Native app?
To answer this question, let us look at the call stack, e. g. when someone tries to create a file.

Pavel Yosifovich — Windows Kernel Programming (2019)
A programmer uses the function CreateFile declared in fileapi.h header file and implemented in Kernel32.dll. However, the function itself does not create a file. It just checks input arguments and calls NtCreateFile function (prefix Nt shows that this function is native). This function is declared in winternl.h header file and implemented in ntdll.dll. It prepares the jump into the kernel space and then makes a system call to create a file. In this case, Kernel32 is just a shell for Ntdll. One of the reasons for this is that this way Microsoft can change native functions without affecting standard interfaces. Microsoft does not recommend calling native functions directly and does not document most of them. However, undocumented functions can be found here.
The main advantage of native apps is that ntdll is uploaded to the system much earlier than kernel32. This makes sense because kernel32 requires ntdll to operate. As a result, apps that use native functions can start working much earlier.
Therefore, Windows Native Applications are programs that can be launched early in the Windows boot process. They use functions ONLY from ntdll. An example of such an application: autochk, which runs chkdisk utility to check disk errors before the main services are launched. This is the layer where we want Active Restore to be.
What will we need?
- DDK (Driver Development Kit) currently known as WDK 7 (Windows Driver Kit).
- A virtual machine (e. g. Windows 7 x64)
- It is not required, but header files could be helpful. Download them here.
What about the code?
Let us practice and write a simple example app that:
- Displays a message
- Allocates some memory
- Waits for keyboard input
- Frees allocated memory
In native applications, the entry point is not main or winmain. We have to implement the NtProcessStartup function because we start the new process directly in the system.
Let us start by displaying a message. To do that we have a native function, NtDisplayString, which accepts a pointer to UNICODE_STRING object as an argument. We will use RtlInitUnicodeString to initialize it. As a result, to display the text, we can write a tiny function:
//usage: WriteLn(L"Here is my text\n");
void WriteLn(LPWSTR Message)
{
    UNICODE_STRING string;
    RtlInitUnicodeString(&string, Message);
    NtDisplayString(&string);
}
Remember that we have access to functions only from ntdll. There are simply no other libraries loaded in the memory, so we will have problems with memory allocation. The “new” operator does not exist yet (it is from the way-too-high C++ world), there is also no malloc function (it needs runtime C libraries). Of course, we can use a stack. However, if we want to allocate the memory dynamically, we will need a heap. Let us create a heap to allocate memory from there wherever we need it.
We are going to use the RtlCreateHeap function. Then we will use RtlAllocateHeap and RtlFreeHeap to allocate and free the memory.
PVOID memory = NULL;
PVOID buffer = NULL;
ULONG bufferSize = 42;

// create heap in order to allocate memory later
memory = RtlCreateHeap(
  HEAP_GROWABLE,
  NULL,
  1000,
  0, NULL, NULL
);

// allocate buffer of size bufferSize
buffer = RtlAllocateHeap(
  memory,
  HEAP_ZERO_MEMORY,
  bufferSize
);

// free buffer (actually not needed because we destroy heap in next step)
RtlFreeHeap(memory, 0, buffer);

RtlDestroyHeap(memory);
Implementation of keyboard input wait.
// https://docs.microsoft.com/en-us/windows/win32/api/ntddkbd/ns-ntddkbd-keyboard_input_data
typedef struct _KEYBOARD_INPUT_DATA {
  USHORT UnitId;
  USHORT MakeCode;
  USHORT Flags;
  USHORT Reserved;
  ULONG  ExtraInformation;
} KEYBOARD_INPUT_DATA, *PKEYBOARD_INPUT_DATA;

//...

HANDLE hKeyBoard, hEvent;
UNICODE_STRING skull, keyboard;
OBJECT_ATTRIBUTES ObjectAttributes;
IO_STATUS_BLOCK Iosb;
LARGE_INTEGER ByteOffset;
KEYBOARD_INPUT_DATA kbData;

// inialize variables
RtlInitUnicodeString(&keyboard, L"\\Device\\KeyboardClass0");
InitializeObjectAttributes(&ObjectAttributes, &keyboard, OBJ_CASE_INSENSITIVE, NULL, NULL);

// open keyboard device
NtCreateFile(&hKeyBoard,
                       SYNCHRONIZE | GENERIC_READ | FILE_READ_ATTRIBUTES,
                       &ObjectAttributes,
                       &Iosb,
                       NULL,
                       FILE_ATTRIBUTE_NORMAL,
                       0,
                       FILE_OPEN,FILE_DIRECTORY_FILE,
                       NULL, 0);

// create event to wait on
InitializeObjectAttributes(&ObjectAttributes, NULL, 0, NULL, NULL);
NtCreateEvent(&hEvent, EVENT_ALL_ACCESS, &ObjectAttributes, 1, 0);

while (TRUE)
{
        NtReadFile(hKeyBoard, hEvent, NULL, NULL, &Iosb, &kbData, sizeof(KEYBOARD_INPUT_DATA), &ByteOffset, NULL);
        NtWaitForSingleObject(hEvent, TRUE, NULL);

        if (kbData.MakeCode == 0x01)    // if ESC pressed
        {
                       break;
        }
}
All we need is to use NtReadFile on the opened device, and wait for the keyboard to return a keystroke. We keep working until the ESC button is not pressed. To open the device, we have to call NtCreateFile (we will need to open \Device\KeyboardClass0). Calling NtCreateEvent function will initialize the wait object. We declare KEYBOARD_INPUT_DATA structure that provides keyboard data.
The native apps end with a call NtTerminateProcess, because we simply kill our process.
The whole code of our tiny app:
#include "ntifs.h" // \WinDDK\7600.16385.1\inc\ddk
#include "ntdef.h"

//------------------------------------
// Following function definitions can be found in native development kit
// but I am too lazy to include `em so I declare it here
//------------------------------------

NTSYSAPI
NTSTATUS
NTAPI
NtTerminateProcess(
  IN HANDLE               ProcessHandle OPTIONAL,
  IN NTSTATUS             ExitStatus
);

NTSYSAPI
NTSTATUS
NTAPI
NtDisplayString(
        IN PUNICODE_STRING String
);

NTSTATUS
NtWaitForSingleObject(
  IN HANDLE         Handle,
  IN BOOLEAN        Alertable,
  IN PLARGE_INTEGER Timeout
);

NTSYSAPI
NTSTATUS
NTAPI
NtCreateEvent(
    OUT PHANDLE             EventHandle,
    IN ACCESS_MASK          DesiredAccess,
    IN POBJECT_ATTRIBUTES   ObjectAttributes OPTIONAL,
    IN EVENT_TYPE           EventType,
    IN BOOLEAN              InitialState
);


// https://docs.microsoft.com/en-us/windows/win32/api/ntddkbd/ns-ntddkbd-keyboard_input_data
typedef struct _KEYBOARD_INPUT_DATA {
  USHORT UnitId;
  USHORT MakeCode;
  USHORT Flags;
  USHORT Reserved;
  ULONG  ExtraInformation;
} KEYBOARD_INPUT_DATA, *PKEYBOARD_INPUT_DATA;

//----------------------------------------------------------
// Our code goes here
//----------------------------------------------------------

// usage: WriteLn(L"Hello Native World!\n");
void WriteLn(LPWSTR Message)
{
    UNICODE_STRING string;
    RtlInitUnicodeString(&string, Message);
    NtDisplayString(&string);
}

void NtProcessStartup(void* StartupArgument)
{
        // it is important to declare all variables at the beginning
        HANDLE hKeyBoard, hEvent;
        UNICODE_STRING skull, keyboard;
        OBJECT_ATTRIBUTES ObjectAttributes;
        IO_STATUS_BLOCK Iosb;
        LARGE_INTEGER ByteOffset;
        KEYBOARD_INPUT_DATA kbData;

        PVOID memory = NULL;
        PVOID buffer = NULL;
        ULONG bufferSize = 42;

        //use it if debugger connected to break
        //DbgBreakPoint();

        WriteLn(L"Hello Native World!\n");

        // inialize variables
        RtlInitUnicodeString(&keyboard, L"\\Device\\KeyboardClass0");
InitializeObjectAttributes(&ObjectAttributes, &keyboard, OBJ_CASE_INSENSITIVE, NULL, NULL);

        // open keyboard device
        NtCreateFile(&hKeyBoard,
                               SYNCHRONIZE | GENERIC_READ | FILE_READ_ATTRIBUTES,
                               &ObjectAttributes,
                               &Iosb,
                               NULL,
                               FILE_ATTRIBUTE_NORMAL,
                               0,
                               FILE_OPEN,FILE_DIRECTORY_FILE,
                               NULL, 0);

        // create event to wait on
InitializeObjectAttributes(&ObjectAttributes, NULL, 0, NULL, NULL);
        NtCreateEvent(&hEvent, EVENT_ALL_ACCESS, &ObjectAttributes, 1, 0);

        WriteLn(L"Keyboard ready\n");

        // create heap in order to allocate memory later
        memory = RtlCreateHeap(
          HEAP_GROWABLE,
          NULL,
          1000,
          0, NULL, NULL
        );

        WriteLn(L"Heap ready\n");

        // allocate buffer of size bufferSize
        buffer = RtlAllocateHeap(
          memory,
          HEAP_ZERO_MEMORY,
          bufferSize
        );

        WriteLn(L"Buffer allocated\n");

        // free buffer (actually not needed because we destroy heap in next step)
        RtlFreeHeap(memory, 0, buffer);

        RtlDestroyHeap(memory);

        WriteLn(L"Heap destroyed\n");

        WriteLn(L"Press ESC to continue...\n");

        while (TRUE)
        {
               NtReadFile(hKeyBoard, hEvent, NULL, NULL, &Iosb, &kbData, sizeof(KEYBOARD_INPUT_DATA), &ByteOffset, NULL);
                NtWaitForSingleObject(hEvent, TRUE, NULL);

               if (kbData.MakeCode == 0x01)    // if ESC pressed
               {
                               break;
               }
        }

      NtTerminateProcess(NtCurrentProcess(), 0);
}
PS: We can easily use DbgBreakPoint() to break in a debugger. It is better to connect WinDbg to the virtual machine for kernel debugging. The guide on how to do it is here. Alternatively, we can use VirtualKD.
Compilation and build
The easiest way to build a native app is to use a DDK (Driver Development Kit). We need an «ancient» version 7.1 because newer versions have a different approach and work closely with Visual Studio. In the case of DDK, our project will only need Makefile and sources.
Makefile
!INCLUDE $(NTMAKEENV)\makefile.def

sources:
TARGETNAME                     = MyNative
TARGETTYPE                     = PROGRAM
UMTYPE                         = nt
BUFFER_OVERFLOW_CHECKS                = 0
MINWIN_SDK_LIB_PATH            = $(SDK_LIB_PATH)
SOURCES                        = source.c

INCLUDES                       = $(DDK_INC_PATH); \
                                 C:\WinDDK\7600.16385.1\ndk;

TARGETLIBS                     = $(DDK_LIB_PATH)\ntdll.lib\
                                 $(DDK_LIB_PATH)\nt.lib

USE_NTDLL                      = 1
Your Makefile will be the same. Let us take a closer look at sources. This file contains sources of your program (.c files), build options and other parameters.
- TARGETNAME is the name of the output executable file.
- TARGETTYPE is an executable file type. It can be a driver (.sys), then the field value should be DRIVER, or the library (.lib) and then the value should be LIBRARY. We need an executable file (.exe), so we set PROGRAM value.
- UMTYPE. Possible values: console for console application, windows for window mode. However, we need to set nt to get a native app.
- BUFFER_OVERFLOW_CHECKS is checking the stack for buffer overflow. Unfortunately, this is not our case, it is too early to check it in the system, so we turn it off.
- MINWIN_SDK_LIB_PATH. This value refers to the SDK_LIB_PATH variable. Don't worry that this system variable is not declared. When we run a checked build script from DDK, this variable will be declared and will reveal the required libraries.
- SOURCES is the list of your program's sources.
- INCLUDES is the header files required for the build. Here we usually state the path to the files that are part of DDK, but you can set any additional files.
- TARGETLIBS is a list of libraries to be linked.
- USE_NTDLL is a required field that must be set to position 1. This is quite obvious.
- USER_C_FLAGS means any flags that you can use in preprocessor directives when preparing application code.
So, for the build we need to launch x86 (or x64) Checked Build, change the working directory to the project folder, and run Build. The screenshot shows that we built one executable file.

Unfortunately, you cannot just run this file. The system argues and tells us to go and think about behavior with the following error:

How to launch a native app?
When the autochk is running, the program boot sequence is set by the registry key:
HKLM\System\CurrentControlSet\Control\Session Manager\BootExecute
The session manager executes programs from this list in a predefined sequence. The manager looks for executable files in system32. The registry key has the following format:
autocheck autochk *MyNativeThe value must be hexadecimal, not the regular ASCII, so the above key will have the following value:
61,75,74,6f,63,68,65,63,6b,20,61,75,74,6f,63,68,6b,20,2a,00,4d,79,4e,61,74,69,76,65,00,00To convert the name, you can use any online services (e.g. this).

So, to launch a native app we have to:
- Copy an executable file to system32
- Add a key to the registry
- Reboot the machine
UPD: or check this out, it may help to run native apps at host machine even later than at boot time: link.
To make your life easier, here is a script to install a native application:
install.bat
@echo off
copy MyNative.exe %systemroot%\system32\.
regedit /s add.reg
echo Native Example Installed
pause
add.reg
REGEDIT4
[HKEY_LOCAL_MACHINE\SYSTEM\CurrentControlSet\Control\Session Manager]
"BootExecute"=hex(7):61,75,74,6f,63,68,65,63,6b,20,61,75,74,6f,63,68,6b,20,2a,00,4d,79,4e,61,74,69,76,65,00,00
After installation and reboot, even before choosing users, we get the following:

Conclusion
The example of this tiny app showed us that it is possible to launch an app as Windows Native. Next, we and the guys from Innopolis University will continue building the service that will initiate driver interaction much earlier than the previous version of the project. When the Win32 shell will be loaded by the system, it makes sense to transfer the control to a fully working service that has already been developed (more about this here).
In the next post, we will get to another Active Restore component, the UEFI driver. Subscribe to our blog to make sure you see the next post.