Do you remember how, even before the pandemic set in, companies were striving to provide secure perimeter access for their telecommuters? Especially if super sensitive data was involved such as accounting information or corporate documents. The solutions were complex, bulky and expensive. Can you imagine just how critical it has become now?!
My name is Sergey Yakovlev, and I'm the head of the Kaspersky Thin Client project based on our proprietary operating system, KasperskyOS. A thin client is one of the main components of a virtual desktop infrastructure, which is a remote desktop access system. In this article, I will use such a client as an example of how you can build a secure (yet commercially viable!) product. I will cover the stages, the stumbling blocks, the problems and solutions. Let's go!
Physically, Kaspersky Thin Client is a small box, a mini computer with our KasperskyOS-based software product installed. It allows you to connect to server-based remote desktops running Windows or Linux – operating systems users are familiar with. Inside Kaspersky Thin Client there's the KasperskyOS microkernel and the security module KSS, to which we added the necessary drivers, services, a pretty UI, and applications.

An important competitive feature of our thin client is that, thanks to KasperskyOS, it has the property of Cyber Immunity – built-in protection against most cyberattack types out there. That is, it needs no extra superimposed security products, such as antivirus.
Cyber Immunity is achieved by splitting the IT system into isolated parts and controlling the interactions between them. One of these key components is the application I want to tell you about: the RDP client. Why did we choose RDP? It allows users to connect to remote desktops via Remote Desktop Protocol by Microsoft. This protocol is popular and well-known. It also has an open source implementation.
To come up with a product, first we need to build a prototype to figure how much demand there is going to be, and whether it will run on our OS. With that in mind, we took an open source version of RDP – FreeRDP library. It has a client part and a server part; we needed the client part.
We ported the library to KasperskyOS and added the components we needed to reconcile it with the hardware, plus Qt for UI design. That got us a small prototype.
FreeRDP is a fairly large library with over 400,000 lines of code. So, porting seemed difficult.
But first, it was designed as a cross-platform library. And second, the source code is available, as «open source» implies.
So, that's what we did.
We got around 30 minor commits. Looks like an easy and simple porting to me.
To make the solution more attractive for business, we added one more library – PCSC. It allows the transfer of smart cards and tokens to a remote work session.
This enables the user – by connecting a token to a hardware system with our product on board – to use the token on a remote desktop as if it were connected directly to it, for example, to sign documents.
PCSC turned out even simpler to port than FreeRDP. Strictly speaking, PCSC is not actually a library. Rather, it is a component assembled into a Linux daemon and a client library built into a specific application.
The daemon and the library communicate via API based on Unix sockets. The daemon itself interacts with the USB subsystem: as soon as a smart card or token is connected to Kaspersky Thin Client, the daemon begins to operate, and the application gets the info it needs.
How we did the porting.
It took almost no time at all, we hardly had to modify any code. We were doing assembly script updates most of the time.

RDP client's prototype architecture
The central component is the RDP client with built-in RDP and PCSC libraries. The client communicates with Wayland Compositor, whose function is to take the UI and application windows to the monitor.
The client also communicates with the USB subsystem. The latter, in turn, communicates with memory sticks, smart cards, mouse, keyboard, and so forth.
PCSCD is our daemon that is connected to USB and other entities. Lastly, there is the big entity known as VFS (virtual file system). It enables the use of files and network.
Let me point out the fact that our client communicates with PCSC via socket API, that is via VFS (dashed arrow).
Not yet.
Why not?
To create a Cyber Immune solution a special development methodology has to be followed. It uses a specific algorithm and comprises several required stages.
Firstly, security objectives and assumptions need to be formulated. Objectives are requirements that must be satisfied in any Cyber Immune system's work scenarios, given the security assumptions. In our thin client, we will provide the following:
Security assumptions are extra restrictions imposed on the operating conditions, which can either make it easier or more difficult to achieve the security objectives. These are formulated based on research, contacts with business, project and product teams. In our case, we found that it was needless to protect the gateway from physical access attacks, because the client will be installed within a protected contour: security guards will simply not allow the attacker to enter. We also assume the hardware platform to be a trusted one.
Based on security objectives, we develop the architecture of the solution: a list and content of security domains and interplay between them are being defined.
Next, we build a threat model and define security risks. That done, we draw up a threat mitigation plan. Through research we find that – given our security objectives and assumptions – the following threats have the most relevance.
The main feature of Cyber Immunity is that it follows the principle of secure by design. Our objective is not just to mitigate specific risks by using superimposed security products (antivirus, firewalls, DPI/DLP, and so on), but to build a solution architecture that would inherently prevent the attacker from disrupting the security objectives.
It is not a matter of which exact vulnerability may allow the attack to succeed: progress never stops, and shortly after a release new exploits may emerge.
Therefore, we should take a critical look at our architecture and correct it as needed. What are our unsafe spots? What can go wrong if that component is hacked? What do we need to change in the architecture to avoid the whole device being hacked?
Now we've got an MVP we obtained by porting FreeRDP and basic components to KasperskyOS. Following the first iteration of the Cyber Immunization process, we discovered the following architecture-related issues.
To fix these issues, the following two architectural patterns can be used that KasperskyOS offers to developers:

Separating data flows to keep files separate from sockets
VFS separation creates a new entity – Net VFS. Plus two entities for file use: one for the RDP client and one for the PCSCD (see diagram). If someone else uses the files, this data flow also needs to be separated and passed through an additional file VFS.
However, the problem is still there: the PCSCD and the RDP client communicate through the Net VFS entity. The same entity faces the outside. That is, the data flows from internal and external networking are mixed together.
As it turned out, we have no out-of-the-box solution to separate the networking data flows. But we are programmers, aren't we?! We can write code (yes, it’s true). So we generated a solution.

Separating the data flows by splitting the network into «internal» and «external»
The sockets used for communication with the external network are regular. But the Unix sockets used to interact with the PCSCD library have a specific attribute to them. That’s what we used.

Data flows are separated
We added a small layer to separate the sockets and the data flows. When creating a socket, we check what type it is and redirect all requests to the right entity. If it is a Unix socket, the requests go to Internal Net VFS; if it’s a regular one – to External Net VFS. These two VFS entities implement the network stack, and the only difference between them is that Internal Net VFS has no network driver.
We have now separated the file and network stacks between different entities. The data are not mixed together, which means that if a more vulnerable and more attackable external networking flow is hacked, it will not affect the internal one, and vice versa.
The next pattern we are going to use is TLS terminator. It is basically a small entity encapsulating the encryption of the network's data transmission channel. It will afford us protection against man-in-the-middle attacks and prevent the spread of attacks from the network side. And since it is small and simple, its trusted status is easy to prove.
We now have an RDP client and a network entity, and we need to install a TLS terminator in between. We tried it once, but nothing worked.

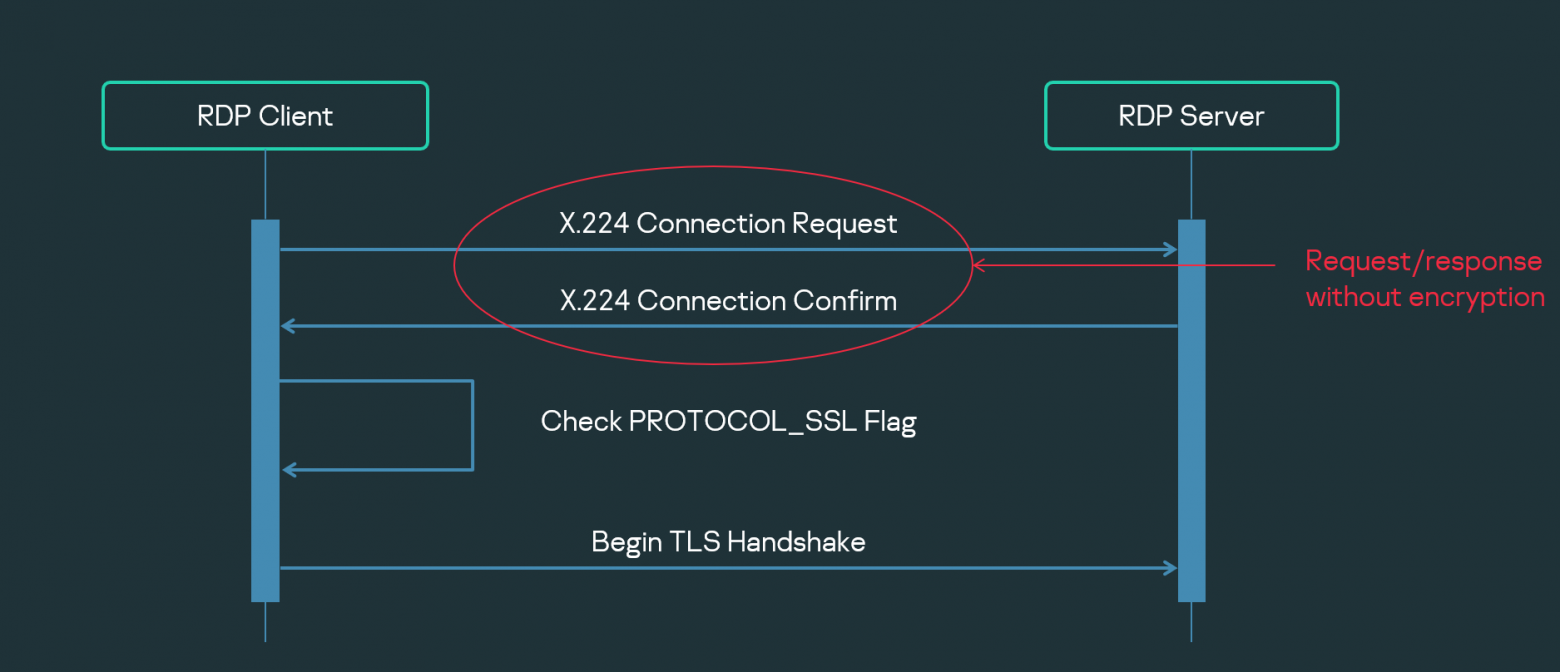
Request-response between RDP client and server
To understand why, let's take a look at how the RDP protocol works. As you can see in the diagram, the first request-response pair between the client and the server – Connection Request – is basically an exchange of supported properties, that is, the client and server agree on the protocol features to be used. This request-response pair must not be encrypted. Yet the TLS terminator, if built in as is, starts encrypting the channel from the very beginning. That is the problem.
Here again we remember that we’re programmers and proceed to modify the TLS terminator for it to skip the first request-response pair. The first request contains information on what modes our client supports. As always, our response to that is that only the TLS mode is supported. The server responds by naming the modes it supports. So if the server does not support TLS, the connection will be terminated with an error. In addition, since the TLS layer is separated from the RDP client, any attempt by the RDP client to use an insecure channel will be cut short by the TLS terminator, as the latter will try to establish an encrypted connection.
Controlling transmitted parameters also means data parsing, which could potentially be used for an attack. Therefore, to make sure the related code is secure, in addition to unit tests we also develop fuzzing tests, and persistently test such places in our product.
After that, an encrypted connection is established, which gives us an encrypted channel we use for further communication.

RDP request-response with a TLS terminator installed
The solution has a minor drawback: it makes the TLS terminator more complex. This needs to be balanced with additional tests.

Final RDP client architecture
The resulting architecture appears as shown in the diagram. We have separated the data flows and added a TLS terminator. There is now a mysterious entity called Cert Storage – a storage for trusted certificates the TLS terminator uses for server validation. Its description falls outside the scope of this article.
In KasperskyOS, the correctness of all IPC messages and interactions between entities are checked in a special subsystem of Kaspersky Security System. Therefore, guided by the principle of least privilege, now we need to write down permissions for interactions between our entities, the so-called KSS policy.
We will illustrate setting a KSS policy using the following two interactions as an example:
Let me remind you that, in terms of networking, PCSCD is a server. And the RDP client is (all of a sudden) a client. The difference between their policies is simple: the PCSCD entity is allowed to call the server API Internal Net VFS, like Listen, Accept, Bind. Whereas the RDP client is not. We also ban the client from using API Internal Net VFS to work with files.

Description of KSS policies
We have reworked the architecture and written a KSS policy. Are we protected from the threats named in the beginning of the article (other than physical access)? Let's see.
Cyber Immunity comes at a price, and I want to point out two aspects that bear relation to the case.

My name is Sergey Yakovlev, and I'm the head of the Kaspersky Thin Client project based on our proprietary operating system, KasperskyOS. A thin client is one of the main components of a virtual desktop infrastructure, which is a remote desktop access system. In this article, I will use such a client as an example of how you can build a secure (yet commercially viable!) product. I will cover the stages, the stumbling blocks, the problems and solutions. Let's go!
What Kaspersky Thin Client is like inside (and where the RDP client comes in)
Physically, Kaspersky Thin Client is a small box, a mini computer with our KasperskyOS-based software product installed. It allows you to connect to server-based remote desktops running Windows or Linux – operating systems users are familiar with. Inside Kaspersky Thin Client there's the KasperskyOS microkernel and the security module KSS, to which we added the necessary drivers, services, a pretty UI, and applications.

An important competitive feature of our thin client is that, thanks to KasperskyOS, it has the property of Cyber Immunity – built-in protection against most cyberattack types out there. That is, it needs no extra superimposed security products, such as antivirus.
Cyber Immunity is achieved by splitting the IT system into isolated parts and controlling the interactions between them. One of these key components is the application I want to tell you about: the RDP client. Why did we choose RDP? It allows users to connect to remote desktops via Remote Desktop Protocol by Microsoft. This protocol is popular and well-known. It also has an open source implementation.
FreeRDP
To come up with a product, first we need to build a prototype to figure how much demand there is going to be, and whether it will run on our OS. With that in mind, we took an open source version of RDP – FreeRDP library. It has a client part and a server part; we needed the client part.
We ported the library to KasperskyOS and added the components we needed to reconcile it with the hardware, plus Qt for UI design. That got us a small prototype.
Porting FreeRDP to KasperskyOS
FreeRDP is a fairly large library with over 400,000 lines of code. So, porting seemed difficult.
But first, it was designed as a cross-platform library. And second, the source code is available, as «open source» implies.
So, that's what we did.
- We added the new platform (KasperskyOS) where necessary. We supplied our operating system's definition for correct compilation.
- We added some things our platform was lacking: functions and some data types. The result was a porting layer.
- We removed some things not supported by KasperskyOS, like the fork() function.
- Defects were spotted and fixed. We tested nearly all the functions in an attempt to cover 75% of branches.
We got around 30 minor commits. Looks like an easy and simple porting to me.
PCSC
To make the solution more attractive for business, we added one more library – PCSC. It allows the transfer of smart cards and tokens to a remote work session.
This enables the user – by connecting a token to a hardware system with our product on board – to use the token on a remote desktop as if it were connected directly to it, for example, to sign documents.
Porting PCSC to KasperskyOS
PCSC turned out even simpler to port than FreeRDP. Strictly speaking, PCSC is not actually a library. Rather, it is a component assembled into a Linux daemon and a client library built into a specific application.
The daemon and the library communicate via API based on Unix sockets. The daemon itself interacts with the USB subsystem: as soon as a smart card or token is connected to Kaspersky Thin Client, the daemon begins to operate, and the application gets the info it needs.
How we did the porting.
- We took the daemon and turned it into an entity within KasperskyOS.
- The API based on Unix sockets was left intact.
It took almost no time at all, we hardly had to modify any code. We were doing assembly script updates most of the time.
RDP client's prototype architecture

RDP client's prototype architecture
The central component is the RDP client with built-in RDP and PCSC libraries. The client communicates with Wayland Compositor, whose function is to take the UI and application windows to the monitor.
The client also communicates with the USB subsystem. The latter, in turn, communicates with memory sticks, smart cards, mouse, keyboard, and so forth.
PCSCD is our daemon that is connected to USB and other entities. Lastly, there is the big entity known as VFS (virtual file system). It enables the use of files and network.
Let me point out the fact that our client communicates with PCSC via socket API, that is via VFS (dashed arrow).
Is our solution Cyber Immune?
Not yet.
Why not?
To create a Cyber Immune solution a special development methodology has to be followed. It uses a specific algorithm and comprises several required stages.
Firstly, security objectives and assumptions need to be formulated. Objectives are requirements that must be satisfied in any Cyber Immune system's work scenarios, given the security assumptions. In our thin client, we will provide the following:
- Integrity of data received from the device's direct user.
- Confidentiality and integrity of data communicated between the RDP client and remote desktop.
- Firmware updates for the thin client only via the centralized management console Kaspersky Security Center.
Security assumptions are extra restrictions imposed on the operating conditions, which can either make it easier or more difficult to achieve the security objectives. These are formulated based on research, contacts with business, project and product teams. In our case, we found that it was needless to protect the gateway from physical access attacks, because the client will be installed within a protected contour: security guards will simply not allow the attacker to enter. We also assume the hardware platform to be a trusted one.
Based on security objectives, we develop the architecture of the solution: a list and content of security domains and interplay between them are being defined.
Next, we build a threat model and define security risks. That done, we draw up a threat mitigation plan. Through research we find that – given our security objectives and assumptions – the following threats have the most relevance.
- Man-in-the-middle. The attacker slips in between the client and the server and gains full access to what the user is doing.
- RDP server replacement. The user connects to the attacker's desktop instead of his own. This can result, for example, in a stolen user account.
- RCE (code embedding and execution). Broad spectrum of action: data theft, first step in other attacks, and so on.
- Physical access to the thin client bypassing the operating system. For example, the attacker plugs in a memory stick with Linux, starts the computer and gains access to the hard drive.
Secure by design: security begins with architecture
The main feature of Cyber Immunity is that it follows the principle of secure by design. Our objective is not just to mitigate specific risks by using superimposed security products (antivirus, firewalls, DPI/DLP, and so on), but to build a solution architecture that would inherently prevent the attacker from disrupting the security objectives.
It is not a matter of which exact vulnerability may allow the attack to succeed: progress never stops, and shortly after a release new exploits may emerge.
Therefore, we should take a critical look at our architecture and correct it as needed. What are our unsafe spots? What can go wrong if that component is hacked? What do we need to change in the architecture to avoid the whole device being hacked?
Now we've got an MVP we obtained by porting FreeRDP and basic components to KasperskyOS. Following the first iteration of the Cyber Immunization process, we discovered the following architecture-related issues.
- The VFS entity combines both the network and file stacks. If all data flows are processed by the same entity, its compromise will also compromise all the data. Basically, the whole system will thus be jeopardized. The attacker will be able to develop the attack in any direction from there, with all the consequences that come with it. The entity that processes a data flow coming from an external network is close to the perimeter and, therefore, very likely to be attacked. Besides, there is also the network stack, which is quite a complex thing and likely to contain issues that must not affect our security objectives.
- The communication between the RDP client and the PCSC entity also takes place through this large entity. If VFS is compromised, the data passing through it will be compromised as well.
- The channel's TLS encryption is integrated directly into the RDP client. This is not good: critical components must be isolated within separate security domains and have as little code as possible to be trusted. Besides, making TLS into a separate entity has allowed us to use the library mbetTLS – a much lighter one than OpenSSL and less riddled with holes.
To fix these issues, the following two architectural patterns can be used that KasperskyOS offers to developers:
- VFS separation (data flow separation)
- TLS terminator
Using VFS separation

Separating data flows to keep files separate from sockets
VFS separation creates a new entity – Net VFS. Plus two entities for file use: one for the RDP client and one for the PCSCD (see diagram). If someone else uses the files, this data flow also needs to be separated and passed through an additional file VFS.
However, the problem is still there: the PCSCD and the RDP client communicate through the Net VFS entity. The same entity faces the outside. That is, the data flows from internal and external networking are mixed together.
As it turned out, we have no out-of-the-box solution to separate the networking data flows. But we are programmers, aren't we?! We can write code (yes, it’s true). So we generated a solution.

Separating the data flows by splitting the network into «internal» and «external»
The sockets used for communication with the external network are regular. But the Unix sockets used to interact with the PCSCD library have a specific attribute to them. That’s what we used.

Data flows are separated
We added a small layer to separate the sockets and the data flows. When creating a socket, we check what type it is and redirect all requests to the right entity. If it is a Unix socket, the requests go to Internal Net VFS; if it’s a regular one – to External Net VFS. These two VFS entities implement the network stack, and the only difference between them is that Internal Net VFS has no network driver.
We have now separated the file and network stacks between different entities. The data are not mixed together, which means that if a more vulnerable and more attackable external networking flow is hacked, it will not affect the internal one, and vice versa.
Using a TLS terminator
The next pattern we are going to use is TLS terminator. It is basically a small entity encapsulating the encryption of the network's data transmission channel. It will afford us protection against man-in-the-middle attacks and prevent the spread of attacks from the network side. And since it is small and simple, its trusted status is easy to prove.
Why didn't it work straight away?
We now have an RDP client and a network entity, and we need to install a TLS terminator in between. We tried it once, but nothing worked.

Request-response between RDP client and server
To understand why, let's take a look at how the RDP protocol works. As you can see in the diagram, the first request-response pair between the client and the server – Connection Request – is basically an exchange of supported properties, that is, the client and server agree on the protocol features to be used. This request-response pair must not be encrypted. Yet the TLS terminator, if built in as is, starts encrypting the channel from the very beginning. That is the problem.

Here again we remember that we’re programmers and proceed to modify the TLS terminator for it to skip the first request-response pair. The first request contains information on what modes our client supports. As always, our response to that is that only the TLS mode is supported. The server responds by naming the modes it supports. So if the server does not support TLS, the connection will be terminated with an error. In addition, since the TLS layer is separated from the RDP client, any attempt by the RDP client to use an insecure channel will be cut short by the TLS terminator, as the latter will try to establish an encrypted connection.
Controlling transmitted parameters also means data parsing, which could potentially be used for an attack. Therefore, to make sure the related code is secure, in addition to unit tests we also develop fuzzing tests, and persistently test such places in our product.
After that, an encrypted connection is established, which gives us an encrypted channel we use for further communication.

RDP request-response with a TLS terminator installed
The solution has a minor drawback: it makes the TLS terminator more complex. This needs to be balanced with additional tests.
A look at the final architecture

Final RDP client architecture
The resulting architecture appears as shown in the diagram. We have separated the data flows and added a TLS terminator. There is now a mysterious entity called Cert Storage – a storage for trusted certificates the TLS terminator uses for server validation. Its description falls outside the scope of this article.
In KasperskyOS, the correctness of all IPC messages and interactions between entities are checked in a special subsystem of Kaspersky Security System. Therefore, guided by the principle of least privilege, now we need to write down permissions for interactions between our entities, the so-called KSS policy.
Adding a KSS policy
We will illustrate setting a KSS policy using the following two interactions as an example:
- Between PCSCD and Internal Net VFS.
- Between the RDP client and again Internal Net VFS.
Let me remind you that, in terms of networking, PCSCD is a server. And the RDP client is (all of a sudden) a client. The difference between their policies is simple: the PCSCD entity is allowed to call the server API Internal Net VFS, like Listen, Accept, Bind. Whereas the RDP client is not. We also ban the client from using API Internal Net VFS to work with files.

Description of KSS policies
Testing the solution for Cyber Immunity
We have reworked the architecture and written a KSS policy. Are we protected from the threats named in the beginning of the article (other than physical access)? Let's see.
- Man-in-the-middle. Protected: we use only encrypted connections and only trusted certificates, plus there is a TLS terminator.
- RDP server replacement. Protected: same as previous.
- RCE (code embedding and execution). Nominally protected: the architecture has become more immune, we have specified the rules for interaction between entities, separated data flows. RCE is still possible, for example, in External Net VFS. It accommodates the network stack and driver and enables networking with the outside world. But it is almost impossible to spread this attack beyond External Net VFS: the TLS terminator is behind it.
Cheat sheet: how we achieve Cyber Immunity
- We describe security objectives and assumptions.
- We follow the principle of secure by design: starting with the development of architecture requirements, we identify the areas to be protected. Simply put, we build an inherently secure system.
- We use KasperskyOS as a platform engineered to facilitate the creation of Cyber Immune solutions.
- We employ SDL practices: secure code review, static and dynamic analysis, and others.
- We perform fuzzing tests. We put special emphasis on components that need to become more trusted, and those in which data parsing takes place, such as External Net VFS. Thus, we make sure that the components will respond to any input data in a predictable and stable manner.
- We do pentesting: we search out and close vulnerabilities preventively before releasing the product.
The price of Cyber Immunity
Cyber Immunity comes at a price, and I want to point out two aspects that bear relation to the case.
- SDL practices are required. This translates to more procedures, more attention to code quality and so forth, which generally increases the cost of development. But that's what it takes to create a secure product. For Kaspersky this consideration is not so relevant, because SDL is standard for all our releases by default. But for our less mature partners this may come as a surprise. Generally, I recommend using SDL practices in the development of any products – together we will make this world safer.
- Remote desktop image is delivered to the user about 30% slower. But we have compensated for this with optimizations elsewhere, not related to the RDP client, we gave it more CPU resources, and the loss is now imperceptible.
Conclusions
- If you use KasperskyOS, it is easy to take an open source library and build a Cyber Immune solution based on it.
- KasperskyOS is already provided with the components and patterns needed to create Cyber Immune solutions – and we put those to good use. If something is missing, it is easy to expand or customize the functionality as needed. And our insights can later be used in future products.
- Cyber Immunity comes at a price. In our case, it affected the remote desktop image delivery speed.
- The result is a secure solution that will protect users and business from cyberthreats.
