Introduction
This tutorial is aimed to help Django beginners who want to run a project on Heroku while storing static files on AWS S3. While being a major help for web developers, both services can be hard for beginners to set up correctly. I’ll admit these topics can be found covered separately elsewhere, but there are also some unaccountable nuances if you are trying to make both work in a single project.
Personally I couldn’t find a source which would not only cover Heroku deployment or S3 usage, but would address those nuances as well. Reading the manuals trying to figure out what do you have to do to deploy a project correctly might be an important part of learning, but it can also make you lose focus on what you are currently trying to study or, even worse, discourage you altogether. If this is your story, look no further. I hope instructions below will help you to deploy your project in a single track without having to consult with other resources.
The text is broken down into 3 logically distinct chapters: prerequisites for local Django app (a mini-chapter), integrating AWS S3 into your app for storing static files, and finally deploying to Heroku. You might not want to go through the entire process in one sitting. In the beginning of each chapter an approximate time required to complete chapter’s instructions will be noted so it is possible for the reader to plan ahead. I would advise not to break down a single chapter into multiple sittings, but if it is not possible, at least try to complete all work covered by a single sub-chapter section in a single go.
Links to official documentation will be provided in text in case you might need extra details on particular actions.
Strings starting with 'YOUR' in all uppercase letters in code, files and commands needs to be replaced in accordance with your settings/paths/accounts.
I. Local Django app
Chapter completion estimate: 5 minutes
Prerequisites
A Django app running locally on a dev server which is using some local DB and local filesystem for media/static storage
This tutorial is not meant to help you with developing the app. If this is what you need, Django’s official documentation is one of the best and most comprehensive ones out there. It contains a tutorial that is lengthy but will get you comfortable with the framework, and if you follow it you will have a working web-app by the time you finish.
My assumptions are that your Django project is finished and can be run locally using the built in Django web server. I hope all sensitive keys, like Django secret-key and such are not hard-coded and are set up in settings.py via importing environmental variables. If this is not the case, chapter II has a section on using environmental variables to store such data so you can use it as a reference. I assume you are using some sort of virtualenv, though strictly speaking it is not a must for this tutorial. Git repo will be used to deploy to Heroku. If you are already using git for version control, this is great, but don’t panic if you’re not, since setting up a local git repo for the task is also covered in an appropriate section below.
Before we continue, let’s pause and reflect on why might Heroku not be enough on its own for deployment? Well, while your Heroku app can store long-term data to a DB, Heroku’s dynos are “stateless”. You can’t save say media files the way you did on your local machine. It is also somewhat more convenient to store static files outside your main repo. This is where S3 storage comes in. We’ll use it to store and serve media and static files.
II. Set up AWS S3 upload/download for media files
Chapter completion estimate: just under 2 hours
Prerequisites
An AWS account
Skip this part if you already have an account. Go to https://aws.amazon.com/. Click on the “Create an AWS account” button and follow the wizard. This will be your root account. It will be used to manage your resources via AWS dashboards and consoles.
An S3 bucket
Skip this part if you already have an S3 bucket you want to use for this project. Login into AWS Management Console and use “find service” bar to locate ‘S3’ service. Once you are in S3 console click the “+ Create bucket” Button. Follow the bucket creation wizard, the only field you have to fill in right now is the bucket name, leave everything else at default settings, we will deal with this later on.
AWS S3 side
You can use your root AWS account to upload/download files from your bucket via browser, but we need an “IAM” type user for programmatic access.
Create a new IAM Group
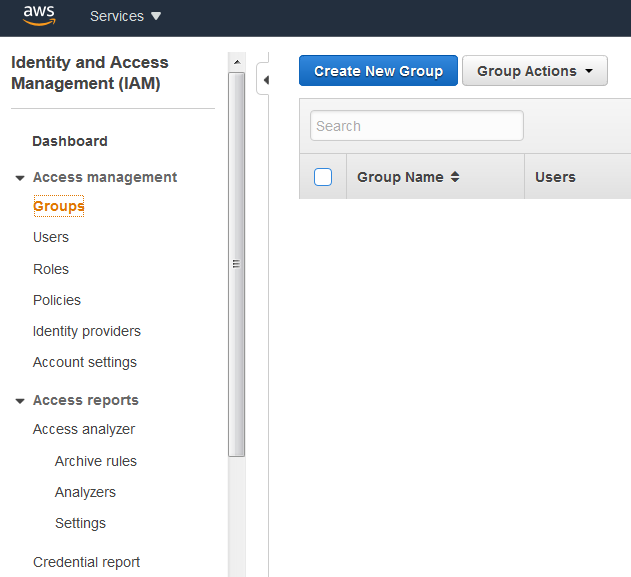
Go to the IAM dashboard, select “groups” from the menu and follow the wizard after clicking the “Create New Group” button. Official documentation on this topic can be found at this link. Just pick a name and skip adding policies, we will set it up in just a second. When you have created a group, we need to create a policy as explained below.
Set up a policy for the group to access the bucket
Select “Policies” section in the menu and click the “Create policy” button. We’ll need to set up permissions with this JSON which allows listing, uploading, downloading and deleting (documentation on this part is available here.):
{
    "Version": "2012-10-17",
    "Statement": [
        {
            "Effect": "Allow",
            "Action": [
                "s3:ListBucket"
            ],
            "Resource": [
                "arn:aws:s3:::YOUR-BUCKET-NAME"
            ]
        },
        {
            "Effect": "Allow",
            "Action": [
                "s3:PutObject",
                "s3:GetObject",
                "s3:DeleteObject"
            ],
            "Resource": [
                "arn:aws:s3:::YOUR-BUCKET-NAME/*"
            ]
        }
    ]
}
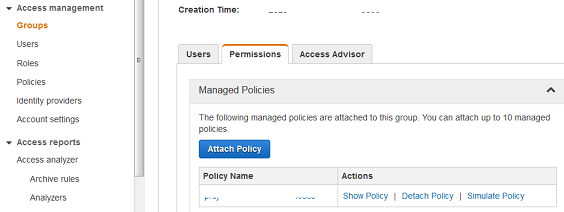
Now just add a name and a description so you don’t get confused in a week or two. Return to your “groups”, select the group you’ve created at previous step and attach the created policy via the “Attach policy” wizard in “Permissions” tab.
Create an IAM user for programmatic access and add it to said group
To create a user follow the “Create User” wizard in “Users” section of the dashboard. Make sure to tick the “Programmatic access” check box!
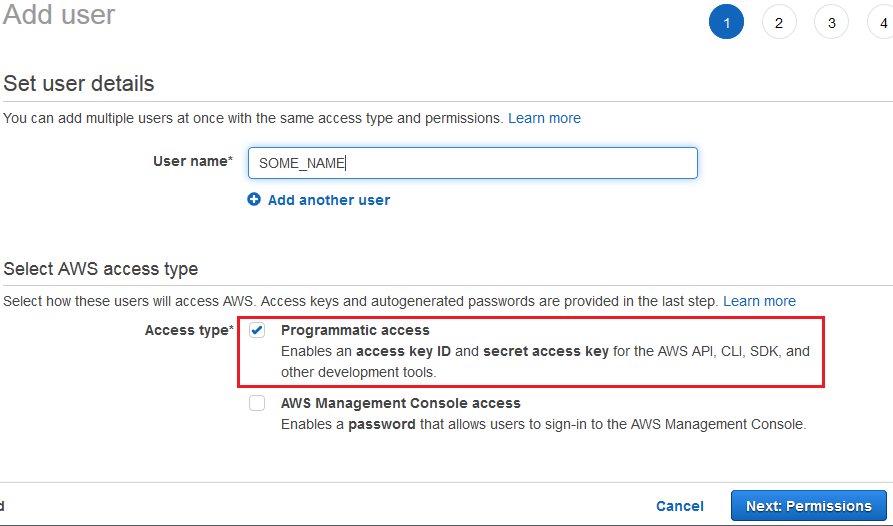
At “permissions” step select the group created at the previous stage of this tutorial. Other options, such as tags, are optional.
Django / Local Machine
Now we are ready to start making changes to your project and testing out programmatic access.
Install django-storages and boto3
We’ll need to install two packages we will be using to communicate with S3: “Django-storages” and “boto3”. Heroku will also need to know which packages need to be installed. This can be done with a “requirements.txt” file and chapter III covers this topic. It’s better to actually install the upper mentioned packages at this point instead of just adding them to “requirements.txt” for Heroku. That way we can test our S3 IAM account access to the bucket. Chances are you’ll have no issues installing packages to your environment with a tool of your choosing be it pip or pipenv, but here is a “pip” example just for completeness’ sake:
pip install boto3 django-storages
Setup ENV variables for S3 access
It’s a bad idea to hardcode stuff like secret keys in your source code. We’ll be using environmental variables to let your Django project know the confidential information required to connect to your S3 bucket. Go to your IAM AWS console, select your user and go to the “Security Credentials” tab. Click on “Create access key” button. When you are creating an access key, a secret access key is generated as well. Later on you can’t look it up; you can only create a new access key. So store it somewhere secure until you don’t need it anymore. Then again, when using a user for this single project there is almost no hassle in creating a new access key if you need it, so don’t worry too much. Below are all environmental variables we’ll need to set up.
AWS_ACCESS_KEY_ID='YOUR-IAM-USER-ACCESS-KEY'
AWS_SECRET_ACCESS_KEY='YOUR-IAM-USER-SECRET-ACCESS-KEY'
AWS_STORAGE_BUCKET_NAME=’YOUR-BUCKET-NAME’
AWS_URL='https://YOUR-BUCKET-NAME.s3.amazonaws.com/'
You can also setup Django secret key in a same manner if you haven’t done so already. While the actual names of the variables are not important at the final stages, we will be running a test scenario in the next section, and this is where the naming will matter so it’s easiest to keep them as in the example above.
Let’s export the variables. Linux commands example below:
export AWS_ACCESS_KEY_ID
export AWS_SECRET_ACCESS_KEY
export AWS_STORAGE_BUCKET_NAME
export AWS_URL
Remember that variables are confined to a single bash session! If you run a script with the above lines, the session will be over as soon as the script finishes. So either run the tests described below in the same session, or run your script as
. variable_script.sh
Notice the dot!
Test access to bucket with a test boto3 script
Now it’s time to find out how we are doing so far. Prepare a local test file (referred to as “YOUR-LOCAL-FILE” below, we’ll use it to test uploads) and manually upload some other test file to your bucket via S3 dashboard using root account (referred to as “YOUR-MANUALLY-UPLOADED-FILE-NAME”, we’ll use it to test downloads).
Here is a small script to test programmatic access.
import boto3

# constants
BUCKET_NAME = 'YOUR-BUCKET-NAME’
S3_FILE = 'YOUR-MANUALLY-UPLOADED-FILE-NAME'
LOCAL_NAME = 'YOUR-LOCAL-NAME-FOR-THIS-FILE'

s3 = boto3.resource('s3')

# test listing
bucket = s3.Bucket(BUCKET_NAME)
for f in bucket.objects.all():
    print(f.key)

# test downloading
bucket.download_file(S3_FILE, LOCAL_NAME)

# test uploading
data = open('YOUR-LOCAL-FILE', 'rb')
bucket.put_object(Key='YOUR-FILE-NAME-ON-S3-FOR-THIS-FILE', Body=data)
Notice how we didn’t have to explicitly point out the access keys? Boto3 will look for appropriate env variables by itself. Check the output of bucket listing, check if “S3_FILE” was downloaded with “LOCAL_NAME” and if the “YOUR-LOCAL-FILE” was uploaded to S3 with “YOUR-FILE-NAME-ON-S3-FOR-THIS-FILE”. If something is not right go back to check if you haven’t missed something.
Modify settings.py
We’ll need to add the storages app to our Django project, and add relevant S3 variables and settings. Add the following lines in the top portion of setting.py (import os if it isn’t imported yet) after “BASE_DIR” and Django secret key declarations.
import os

# AWS S3 SETTINGS
AWS_ACCESS_KEY_ID = os.environ.get('AWS_ACCESS_KEY_ID')
AWS_SECRET_ACCESS_KEY = os.environ.get('AWS_SECRET_ACCESS_KEY')
AWS_STORAGE_BUCKET_NAME = os.environ.get('AWS_STORAGE_BUCKET_NAME')
AWS_URL = os.environ.get('AWS_URL')
AWS_DEFAULT_ACL = None
AWS_S3_REGION_NAME = 'us-east-2'
AWS_S3_SIGNATURE_VERSION = 's3v4'
You can see that there are some additional setting, like “AWS_DEFAULT_ACL” and “AWS_S3_REGION_NAME”. The later one is optional but others are necessary. It is out of the scope of this tutorial, but you can look up Django-storages documentation on what these are for.
We’ll also need to add ‘storages’ to INSTALLED_APPS list, like in the example below. I only have the default apps besides ‘storages’ in this example, your custom apps should be there as well of course.
INSTALLED_APPS = [
    'django.contrib.admin',
    'django.contrib.auth',
    'django.contrib.contenttypes',
    'django.contrib.sessions',
    'django.contrib.messages',
    'django.contrib.staticfiles',
    'storages',
]
To let Django know what are we using for media and static files storage, add this at the bottom section of your settings.py:
STATIC_URL = AWS_URL + '/static/'
STATICFILES_STORAGE = 'storages.backends.s3boto3.S3Boto3Storage'
MEDIA_URL = AWS_URL + '/media/'
DEFAULT_FILE_STORAGE = 'storages.backends.s3boto3.S3Boto3Storage'
Now comment out/delete lines with definitions of STATIC_ROOT and STATICFILES_DIRS.
Test media upload/download on dev server
This is the time to test how our Django settings are doing. Before we run a local test server we will need to run the collectstatic command, since our code will refer to a remote static storage location:
python manage.py collectstatic
Now we can run and test our app:
python manage.py runserver 0.0.0.0:8000
Go to your browser and type in the address of the test server in the address bar and test out if it’s working properly. You can use the ‘Network’ tab in the developer’s console of your browser to check if the static files are indeed downloaded from S3 (example with bootstrap stylesheet being downloaded from bootstrap domain is presented on a screenshot below). Just hover over the ‘File’ column on the appropriate static file, its URL should be referring to an S3 server. Don’t forget to check media uploading/downloading as well.

II. Prepare app and deploy to Heroku
Chapter completion estimate: 1 hour
Prerequisites
Heroku account
If you don’t have a Heroku account yet, sign up at heroku.com.
Git
It’s not surprising if you were already using some sort of version control software when developing your project. We will need git to upload your project to Heroku. If you have been using Git for your project and already have a git repo, you can skip to the next step; just make sure you are going to include all further changes in ‘master’ branch since we will push it to Heroku.
Install git if it’s not already installed on your system. This step is somewhat system dependent, but it is easy to figure out so we’ll leave it to you.
Switch to your project’s directory (the one that contains manage Django’s ‘manage.py’) in the command shell of your choosing (use “git bash” shell if you are running Windows) and create a git repo with ‘git init’ command. Your project directory might contain a lot of files that are not part of the project per se, local database, static files such as images, etc. Excluding files from your repo is done via ‘.gitignore’ file stored in the same directory where you had run ‘git init’. Open it in a text editor and add what you need to exclude.
There are a ton of great discussions on the web focused around best practices for ‘.gitignore’ when working on Django projects. In case you need a quick solution, here is what my test project’s ‘.gitignore’ looks like:
*.sqlite3
*.pyc
__pycache__
*.jpg
*.jpeg
*.png
db.sqlite3
Now we need to make a commit on master branch. Type the following commands in your command shell:
git add -A
git commit -m “YOUR SHORT DESCRIPTION FOR COMMIT HERE”
You can check on your commit with a
git status
Local machine
Install heroku-cli utility and log in
We’ll need to install heorku command line tool. This step is system dependent but pretty straightforward. I encourage you to visit heroku’s article for installation instructions. After you have finished installing heroku-cli utility you will need to login:
heroku login
This will open a browser window for you to enter your credentials.
Modify setting for Heroku
We need to modify ‘setting.py’ to prepare the project to run on Heroku. We’ll go for the easiest route in this tutorial and use ‘Django-Heroku’ python package.
pip install Django-heroku
Change your local development database settings in settings.py to the following:
ALLOWED_HOSTS = ['.herokuapp.com']
# heroku database settings
import dj_database_url
DATABASES = {}
DATABASES['default'] = dj_database_url.config(conn_max_age=600, ssl_require=True)
We will also need to add this at the very bottom:
import django_heroku
django_heroku.settigns(locals(), staticfiles=False)
This last line contains a crucial setting for this tutorial. You can find separate tutorials on how to set up Django projects to serve static files via AWS S3, as well as on how to set it up for Heroku, but you will be left wondering why S3 settings work on your local machine and… stop working as soon as you push it to Heroku. Well, this is why. The django_heroku.settigns() call will override all other settings and set them to what Heroku needs. The bad news is that it overrides settings including our AWS S3 static url settings! This is why we need to pass a keyword argument ‘staticfiles=False’ which will disable automatic configuration of static files.
Produce a ‘requirements.txt’ file
In this step we will create a file to let Heroku know which Python packages need to be installed for your project to run. Heroku understands both pip’s classic ‘requrements.txt’ and pipenv’s ‘pipfile’. Both can be edited manually but in this tutorial we will try to strand away from manual editing where it is possible to minimize possible errors.
It is not recommended to use Django development server as a production web-server. Running Django-projects via Gunicorn server is a popular solution to this problem. Now let’s install Gunicorn to your env so we can automatically get it in ‘requrements.txt’ later on:
pip install gunicorn
And now for ‘requirements.txt’ run this in your project directory (next to manage.py):
pip freeze > requirements.txt
The final content of ‘requirements.txt’ of course depends on what other packages you are using in your project.
Produce a ‘Procfile’
Heroku needs to know how you want it to run your application. A ‘Procfile’ is used for this. In your project’s directory create a file with a ‘Profile’ filename and add the following content:
release: python manage.py migrate
web: gunicorn YOUR-PROJECT-NAME.wsgi
This will let Heroku know that it needs to run two commands: apply migrations and run your project via gunicorn. As a side note, currently Heroku uses Python 3.6.12 by default. If you need a different version you can specify it by creating a ‘runtime.txt’ in your project’s directory right next to the ‘Procfile’. An example of ‘runtime.txt’ for Python 3.9.0 looks like this:
python-3.9.0
Make final commit and deploy to Heroku
Now that we have all we need, it’s time to make one final commit to master branch and push it to Heroku. If you already used git for version control before starting out with this tutorial just make sure ‘master’ branch includes all latest changes (as well as ‘requirements.txt’ and ‘Procfile’ files).
In case you initialized git for the first time during this tutorial, you just need to make a commit. In your project’s directory run:
git add -a
git commit -m “Heroku staging”
We are ready to deploy to Heroku. First create a Heroku app:
heroku create
This command should output the name of your app as well. Let’s tie a git remote with the correct url:
heroku git:remote –a YOUR-HEROKU-APP-NAME-FROM-PREVIOUS-STEP
And now we are ready to push our repo:
git push heroku master
We still need to set environmental variables that your project uses for Heroku before we run the app. Continue to the next section.
Heroku's side
Set up environmental variables
Now is the time we need the security information we used in “Setup ENV variables for S3 access” section of this tutorial. If you lost something just look it up in S3 consoles. In particular go to your IAM AWS console, select your IAM user and go to the “Security Credentials” tab for secret keys. You can’t look up the AWS_SECRET_ACCESS_KEY for your access key, but you can create a new access key and make sure you know the secret key this time. Setting up environmental variables for Heroku can be done from your Heroku dashboard in your internet browser or heroku-cli utility. Here is a set of commands to do it via cli utility:
heroku config:set AWS_ACCESS_KEY_ID='YOUR-IAM-USER-ACCESS-KEY'
heroku config:set AWS_SECRET_ACCESS_KEY='YOUR-IAM-USER-SECRET-ACCESS-KEY'
heroku config:set AWS_STORAGE_BUCKET_NAME=’YOUR-BUCKET-NAME’
heroku config:set AWS_URL='https://YOUR-BUCKET-NAME##.s3.amazonaws.com/'
You can check up on your config by typing this command:
heroku config
Launch the app
The final step. This can be done via Heroku dashboard or heroku-cli utility:
heroku ps:scale web=1
And finally you can visit the url of your app (you can always look it up in dashboard) or use the following cli shortcut:
heroku open
This is it! Now you can test your app out and make sure downloading/uploading static files from S3 works as intended.
