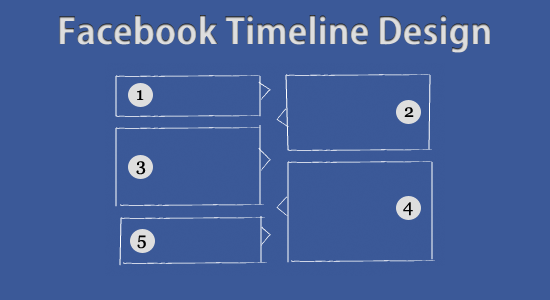
Facebook Timeline делает большую революцию в мире социальных сетей, придает новый вид для пользовательских профилей. Сегодня, посмотрим как просто можно реализовать этот проект с помощью jQuery и CSS.
Сначала создайте элемент DIV с id=«container». В нем создадим еще несколько элементов DIV с id=«item»
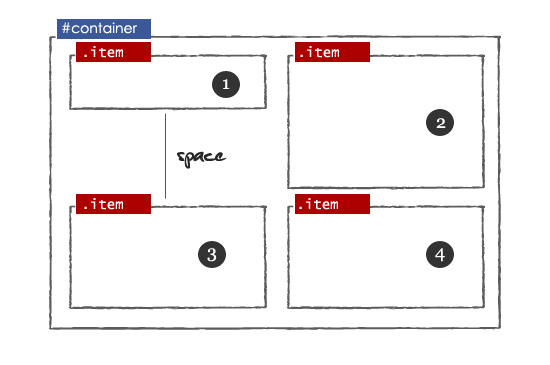
Немного простого CSS:
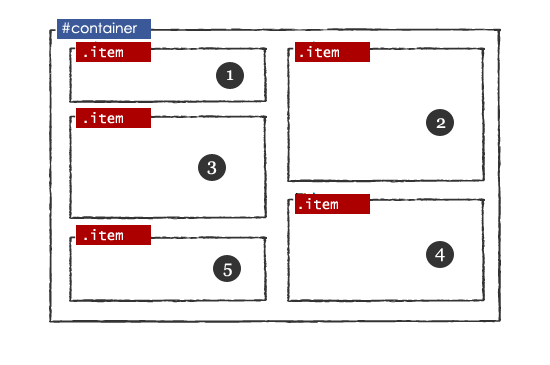
Используем плагин jQuery Masonry для настройки использования свободного пространства.
После применения плагина.
Теперь создадите DIV элемент — timeline_container в блоке container. Этот блок будет содержать два дива с ID timeline и plus.
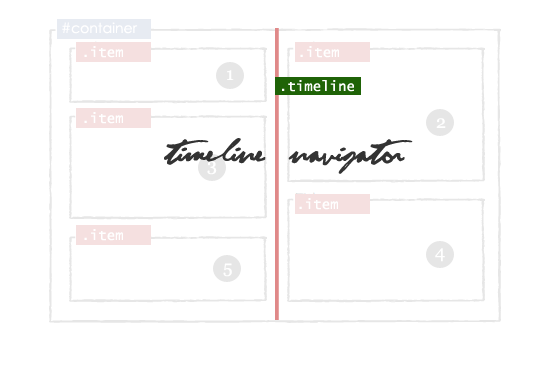
Для созданных блоков, добавим JavaScript и CSS.
Это самая интересная часть, $('#container').find('.item') — поиск блоков, нуждающихся в стрелках, если положение = 0px, то rightCorner, иначе leftCornet.
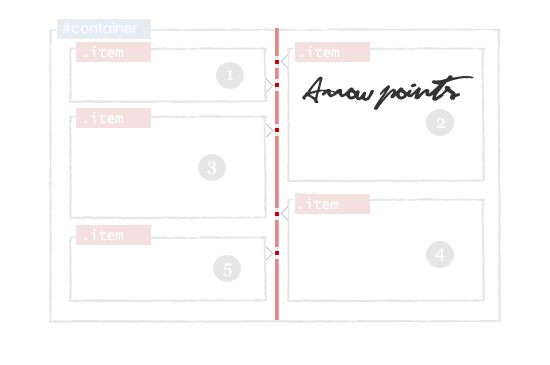
Теперь оформим, добавив CSS:
Теперь в каждый блок item, добавим тег с классом — deletebox
Теперь оживим удаление элеменов с помощью JavaScript.
Создадим элемент с id=«popup» внутри контейнера DIV. Этот слой содержит текстовое поле textarea с id=«update» и input с id=«update_button».
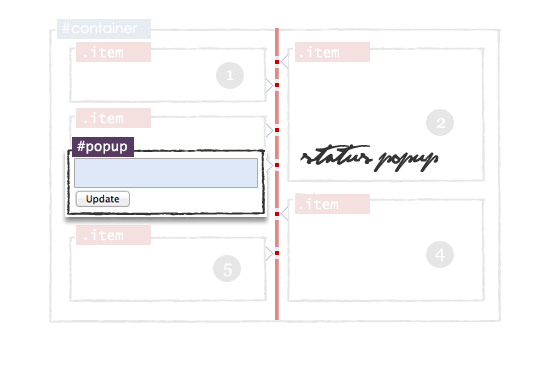
Оживляем:
Скачать
Демо

Шаг 1 — HTML макет
Сначала создайте элемент DIV с id=«container». В нем создадим еще несколько элементов DIV с id=«item»
<div id="container">

	<div class="item">1</div>
	<div class="item">2</div>
	<div class="item">3</div>
	<div class="item">4</div>

</div>

Немного простого CSS:
#container{
	width:860px;
	margin: 0 auto;
}
.item {
	width: 408px;
	margin: 20px 10px 10px 10px;
	float: left;
	background-color:#ffffff;
	border:solid 1px #B4BBCD;
	min-height:50px;
	text-align:justify;
	word-wrap:break-word;
}
Шаг 2 — Избегаем свободного пространства
Используем плагин jQuery Masonry для настройки использования свободного пространства.
<script type="text/javascript" src="http://ajax.googleapis.com/ajax/libs/jquery/1.5/jquery.min.js"></script>
<script type="text/javascript" src="jquery.masonry.min.js"/>
<script type="text/javascript" >
	$(function()
	{
		// вызов плагина masonry
		$('#container').masonry({itemSelector : '.item',});
	});
</script>
После применения плагина.

Шаг 3 — Timeline навигация
Теперь создадите DIV элемент — timeline_container в блоке container. Этот блок будет содержать два дива с ID timeline и plus.
<div id="container">
	// Timeline навигация
	<div class="timeline_container">
		<div class="timeline">
			<div class="plus"></div>
		</div>
	</div>

	<div class="item">1</div>
	--------
	--------
</div>

Для созданных блоков, добавим JavaScript и CSS.
$('.timeline_container').mousemove(function(e)
{
	// Определяем, где выводить плюсик (сверху)
	var topdiv=$("#containertop").height();
	var pag= e.pageY - topdiv-26;
	// Отображаем плюсик при наведении
	$('.plus').css({"top":pag +"px", "background":"url('images/plus.png')","margin-left":"1px"});
}).mouseout(function(){
	// Отведение - убираем плюсик
	$('.plus').css({"background":"url('')"});
});
.timeline_container{
	width: 16px;
	text-align: center;
	margin: 0 auto;
	cursor:pointer;
	display: block;
}
.timeline{
	margin: 0 auto;
	background-color:#e08989;
	display: block;
	float: left;
	height: 100%;
	left: 428px;
	margin-top: 10px;
	position: absolute;
	width: 4px;
}
.timeline:hover{
	cursor: pointer;
	margin: 0 auto;
}
.timeline div.plus{
	width: 14px;
	height: 14px;
	position: relative;
	left: -6px;
}
Шаг 4 — Отображаем стрелки
Это самая интересная часть, $('#container').find('.item') — поиск блоков, нуждающихся в стрелках, если положение = 0px, то rightCorner, иначе leftCornet.
function Arrow_Points()
{
	var s = $('#container').find('.item');
	$.each(s,function(i,obj){
		var posLeft = $(obj).css("left");
		$(obj).addClass('borderclass');
		if(posLeft == "0px")
		{
			html = "<span class='rightCorner'></span>";
			$(obj).prepend(html);

		} else {

			html = "<span class='leftCorner'></span>";
			$(obj).prepend(html);
		}
	});
}

Теперь оформим, добавив CSS:
.rightCorner {
	background-image: url("images/right.png");
	display: block;
	height: 15px;
	margin-left: 408px;
	margin-top: 8px;
	padding: 0;
	vertical-align: top;
	width: 13px;
	z-index:2;
	position: absolute;
}
.leftCorner{
	background-image: url("images/left.png");
	display: block;
	height: 15px;
	width: 13px;
	margin-left: -13px;
	margin-top: 8px;
	position: absolute;
	z-index:2;
}
Шаг 5 — Удаление блоков
Теперь в каждый блок item, добавим тег с классом — deletebox
<div id="container">

	<div class="item">
		<a href='#' class='deletebox'>X</a>
		1
	</div>
	<div class="item">
		<a href='#' class='deletebox'>X</a>
		2
	</div>
	-----------
	-----------
	-----------
</div>
Теперь оживим удаление элеменов с помощью JavaScript.
$(".deletebox").live('click',function()
{
	if(confirm("Are your sure?"))
	{
		$(this).parent().fadeOut('slow');
		// Удаление блока item
		$('#container').masonry( 'remove', $(this).parent() );
		// Перегрузка плагина masonry
		$('#container').masonry( 'reload' );
		// Скрываем стрелки
		$('.rightCorner').hide();
		$('.leftCorner').hide();
		// Ставим свежие стрелки
		Arrow_Points();
	}
	return false;
});
Шаг 6 — Добавление события
Создадим элемент с id=«popup» внутри контейнера DIV. Этот слой содержит текстовое поле textarea с id=«update» и input с id=«update_button».
<div id="container">

	<div class="item">1</div>
	--------
	--------

	<div id="popup" class='shade'>
		<div class="Popup_rightCorner" > </div>
		What's Up?
		<textarea id='update'></textarea>
		<input type='submit' value=' Update ' id='update_button'/>
	</div>

</div>

Оживляем:
// Событие клюка
$(".timeline_container").click(function(e)
{
	var topdiv=$("#containertop").height();
	// Текущая позиция
	$("#popup").css({'top':(e.pageY-topdiv-33)+'px'});
	$("#popup").fadeIn(); //Popup block show
	// Фокус текстового поля
	$("#update").focus();
});

// Событие наведения курсора мыши
$("#popup").mouseup(function() {return false});
$(document).mouseup(function(){$('#popup').hide();});

// Нажатие по кнопке Update
$("#update_button").live('click',function()
{
	// Значение текстового поля
	var x=$("#update").val();
	//Ajax часть
	$("#container").prepend('<div class="item"><a href="#" class="deletebox">X</a>'+x+'</div>');
	// Перегружаем masonry
	$('#container').masonry( 'reload' );
	// Скрытие существующих стрелок
	$('.rightCorner').hide();
	$('.leftCorner').hide();
	// Освежаем стрелки
	Arrow_Points();
	// Очищаем текстовое поле
	$("#update").val('');
	// Скрываем блок для добавления события
	$("#popup").hide();
	return false;
});
#popup{
	display: block;width: 408px;
	float: left;margin-top:10px;
	background-color:#ffffff;
	border:solid 1px #A9B6D2;
	min-height:60px;display:none;
	position:absolute;margin:10px;
}
Скачать
Демо