
In the previous article we refreshed our memory of WebRTC CDN and the ways this technology helps to minimize latency for WebRTC streams. We also discussed why load balancing and autoscaling wouldn't be amiss in CDNs. Here are the main points from the article:
When using a CDN, the low latency is ensured by the WebRTC technology, which is used to transfer the video stream from the Origin server to the Edge servers, that, in turn, make it possible for a great number of viewers to connect to the stream.
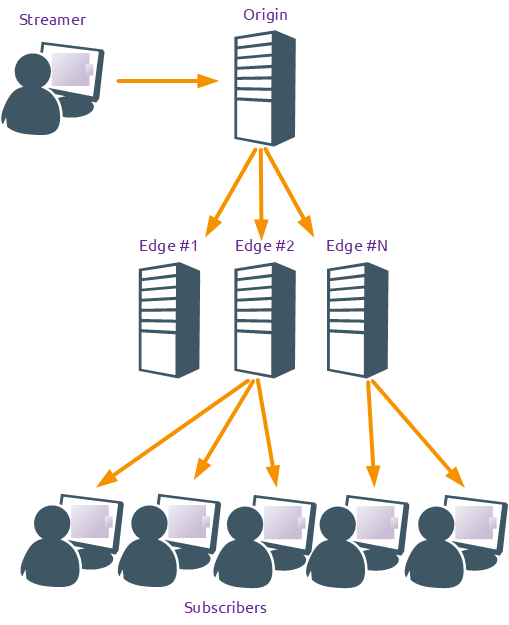
If servers are kept online indefinitely, in readiness for a great influx of viewers, then, in the periods the influx is not happening, the hosting fees are being wasted. The optimal way to handle this would involve launching additional Edge servers during spikes in viewership and disabling them when the viewer count goes down.
Google Cloud Platform is a suite of cloud computing services that runs on the same infrastructure that Google uses internally for its end-user products. This means that user apps launched within the Google Cloud Platform have access to the same server capacities and the "great and terrible" Google itself. Which is why it is safe to assume the server infrastructure will operate without issues.
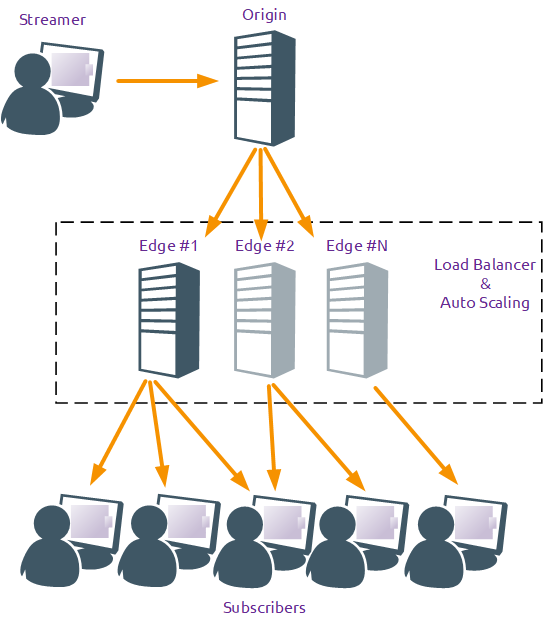
Just like in case with AWS, Google Cloud Platform infrastructure supports automatic scaling and load balancing, so you do not have to worry about unnecessary costs for virtual servers — you only pay for what you use.
At the time of writing, there was no image for quick deployment of WCS in the GCP Marketplace. But there is a possibility to automatically deploy WCS from a manually prepared virtual machine image. In this case, the standard monthly license is used for WCS.
Now let's look at how to deploy a WCS CDN with load balancer and autoscaling and the process of testing the deployed system.
Set up a WebRTC CDN with a load balancer and autoscaling on Google Cloud Platform
The CDN configuration will be as follows:
one Origin server;
one Edge server as part of the load balancer, which allows to increase the number of Edge servers to three during peak loads.
Configure the following components in the Google Cloud Platform console to deploy CDN:
global firewall at the Google Cloud project level;
virtual machines WCS CDN Origin and WCS CDN Edge;
deployment template based on the WCS CDN Edge disc image;
scaling group;
load balancer.
Let's get started.
Configure the global firewall at Google Cloud project level to allow WebRTC traffic
The firewall setting affects all servers running in your project, so let's start the deployment from there.
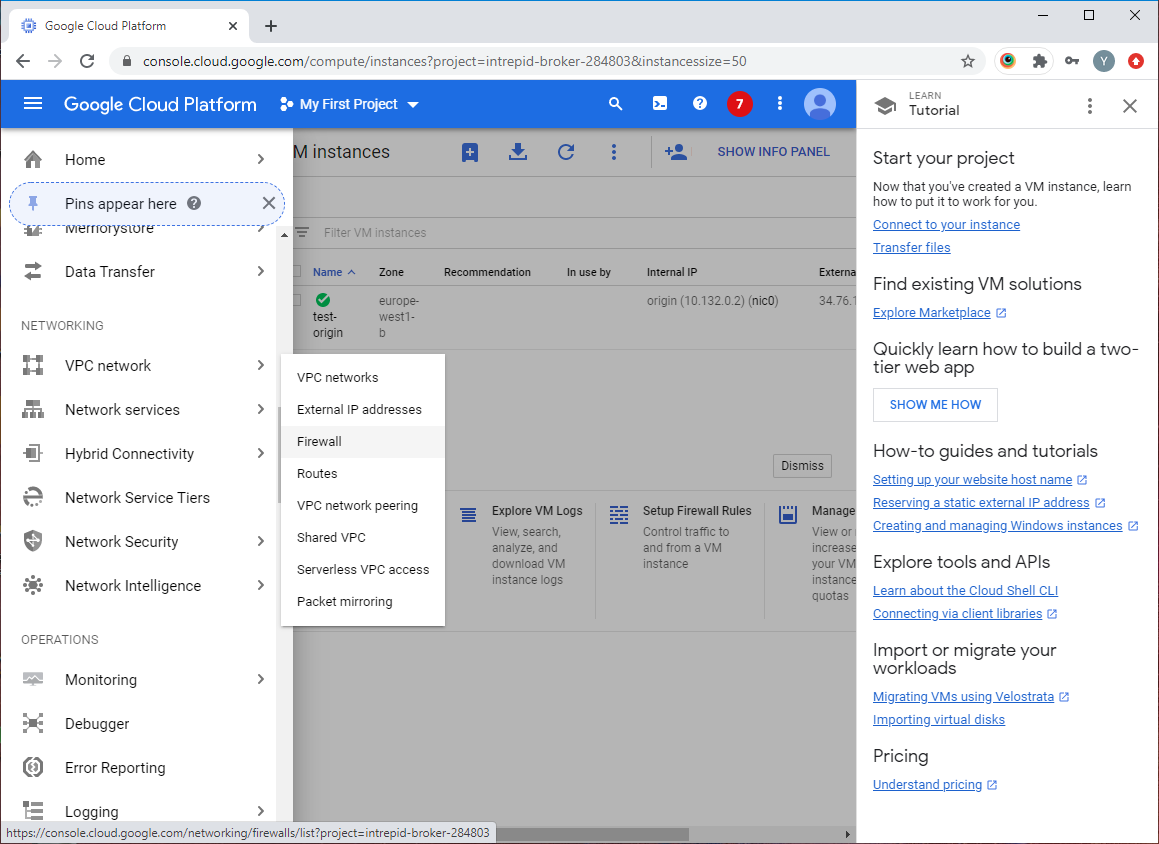
In the Google Cloud console's main menu, open the "VPC networks" section and select the "Firewall" item:
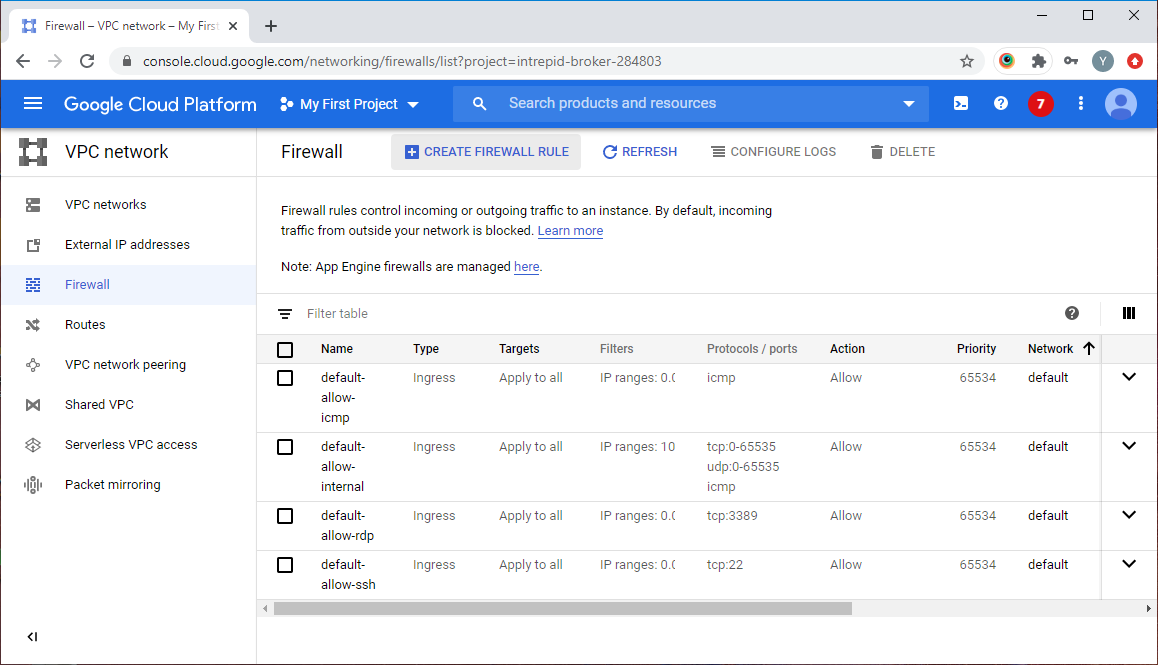
Click the "Create Firewall Rule" button on the next page:
In the wizard, specify a name for the rule:

On the page below, allow incoming traffic from any computers:
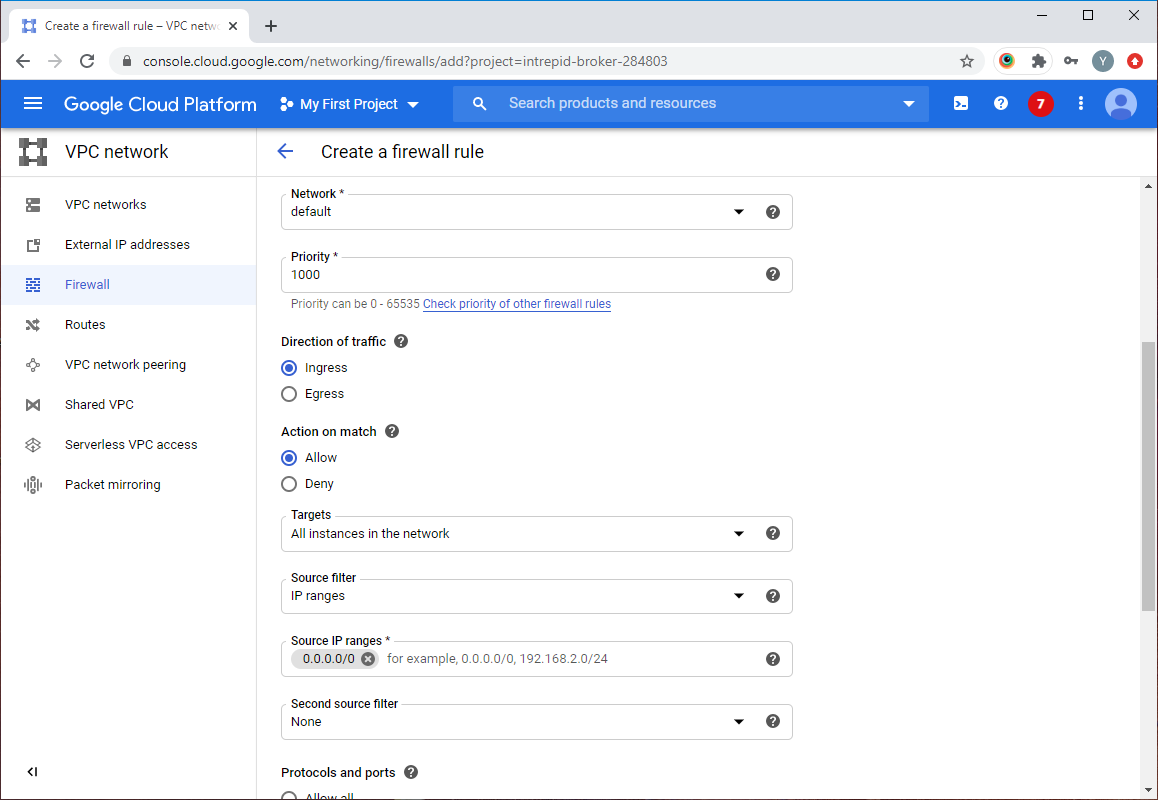
Even lower, in the "Protocols and ports" section, specify ports for WCS's operation and click the "Create" button:
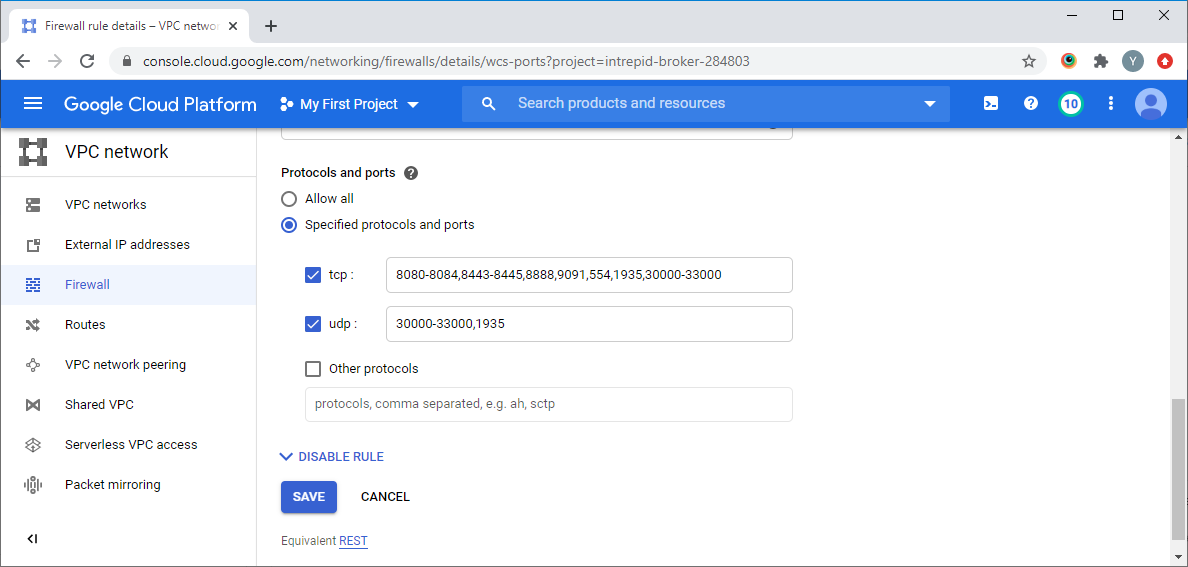
This completes the configuration of the global firewall. Now let's move on to deploying virtual machines, configuring the load balancer and autoscaling.
Deploy a WCS Origin server for WebRTC CDN
In the Google Cloud console, open the "Compute Engine" section and select "VM instances" from the menu on the left. Click the "Create" button in the dialog for creating a new server instance:

In the wizard that opens, specify the server name, select the region and zone of the datacenter location, as well as the server configuration. The choice of server configuration depends on the intended use of WCS, budget, region and zone of the GCP datacenter location. For testing in this article, we use the minimum technical specifications of virtual machines:

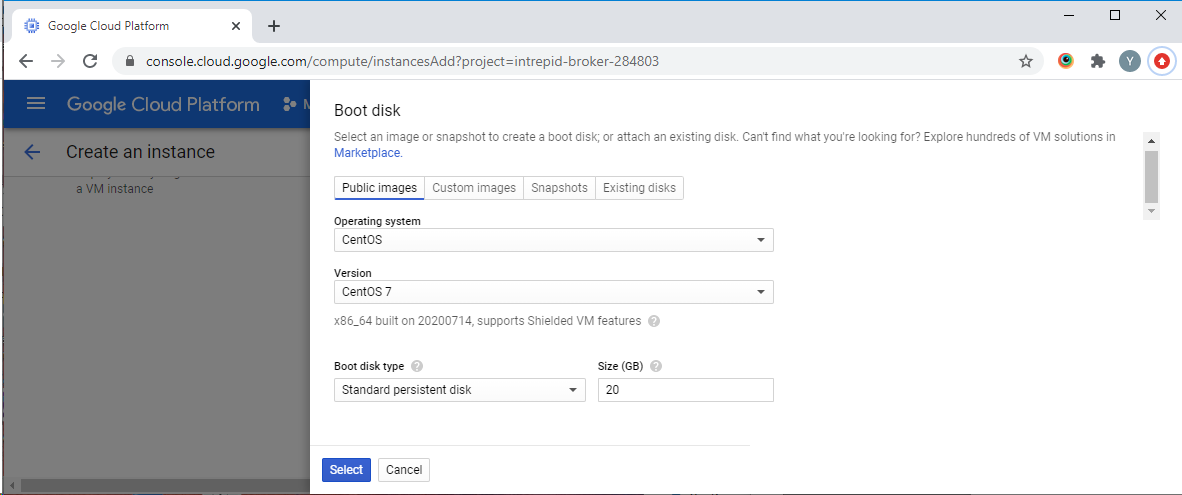
Below on the page in the "Boot disc" section, click the "Change" button and select the "CentOS 7" image:
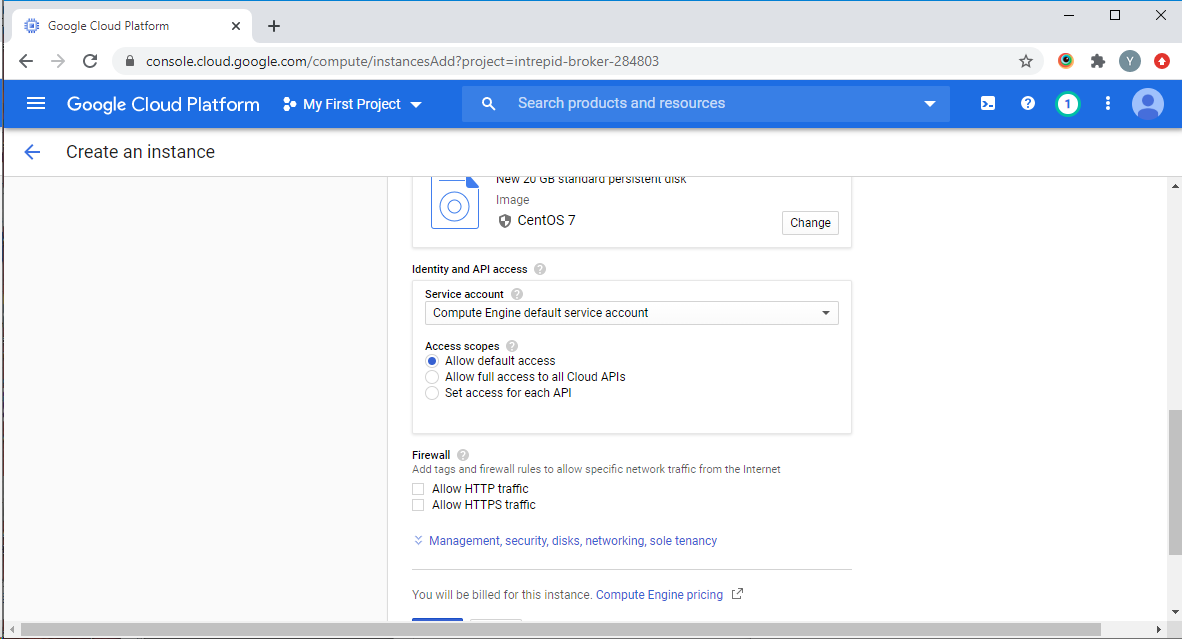
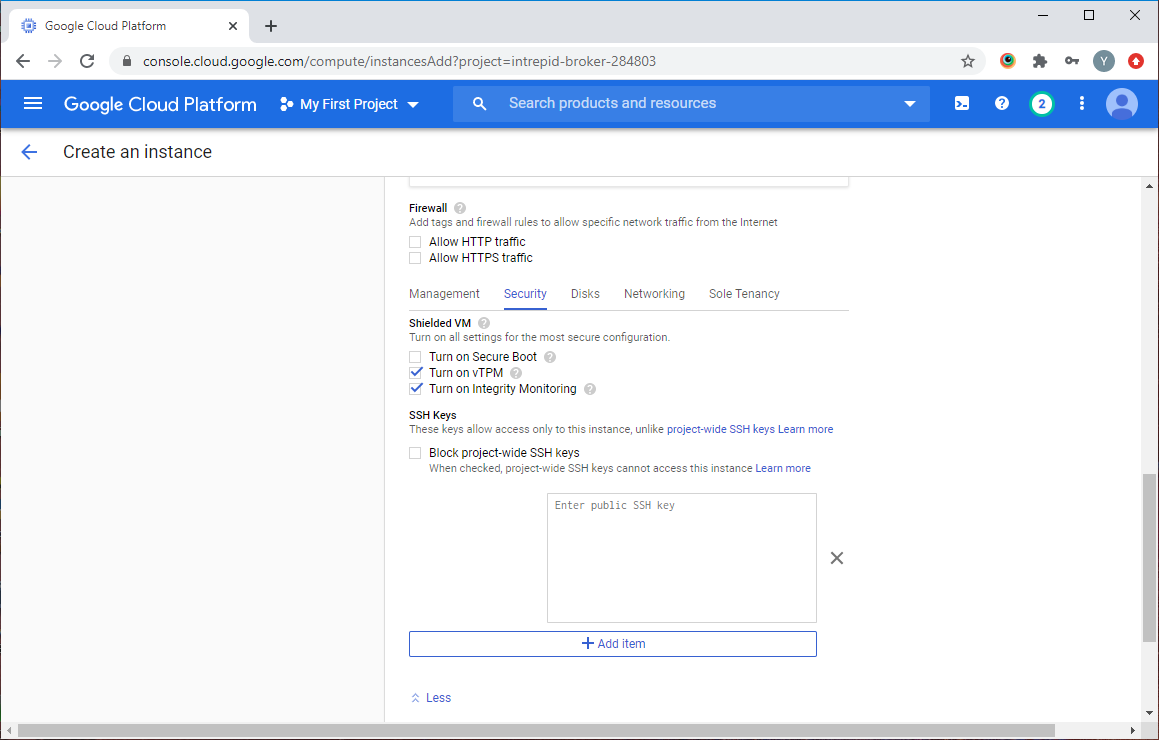
Expand the "Management, security, discs, networking, and sole tenancy" section:
On the "Security" tab, add a public key to access the server via SSH:
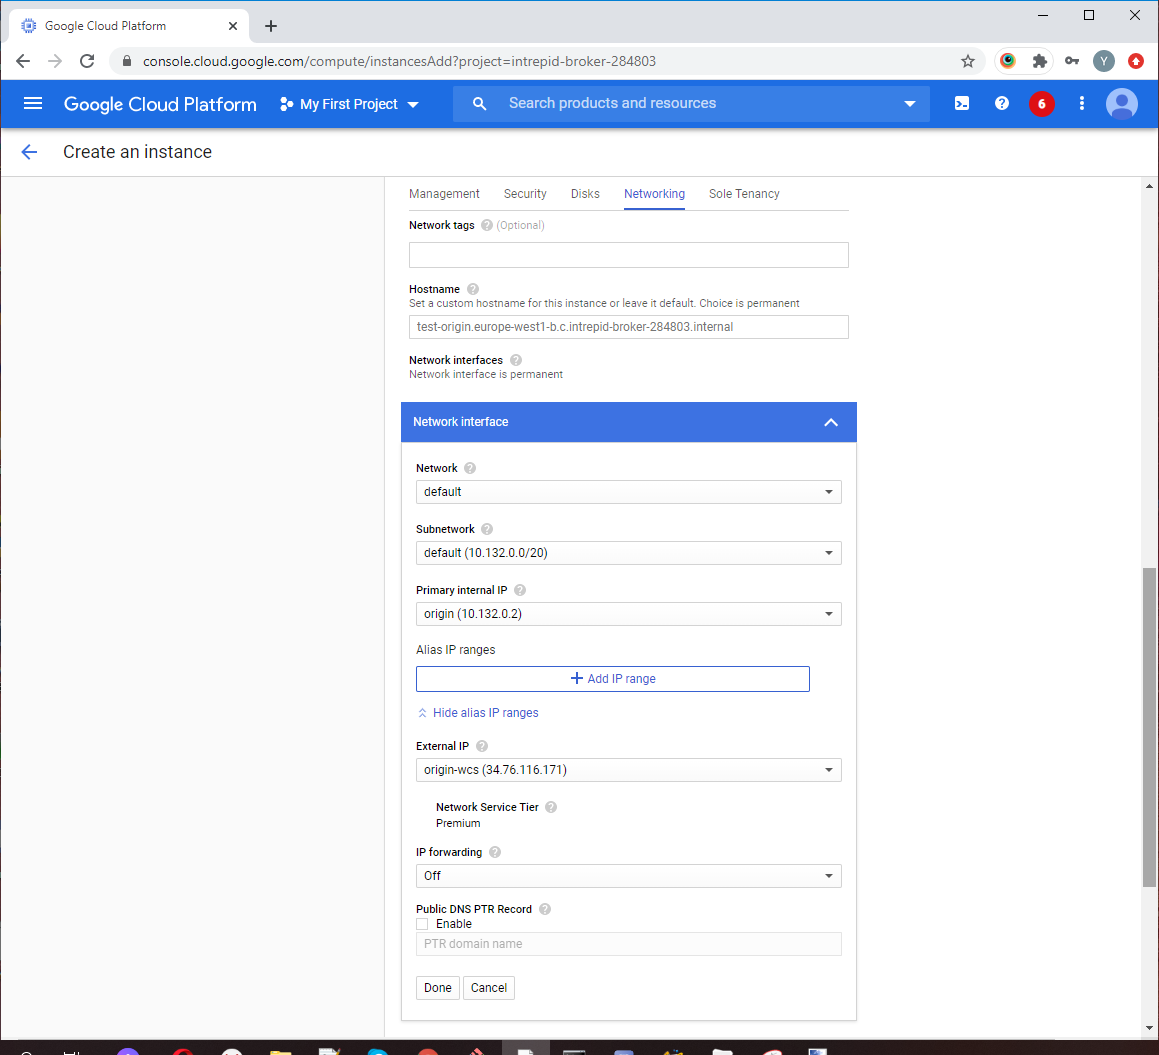
On the "Networking" tab in the "Network interfaces" section, configure the external and internal IP addresses for the server. To work as part of a CDN, the server needs to be assigned a static internal IP address:
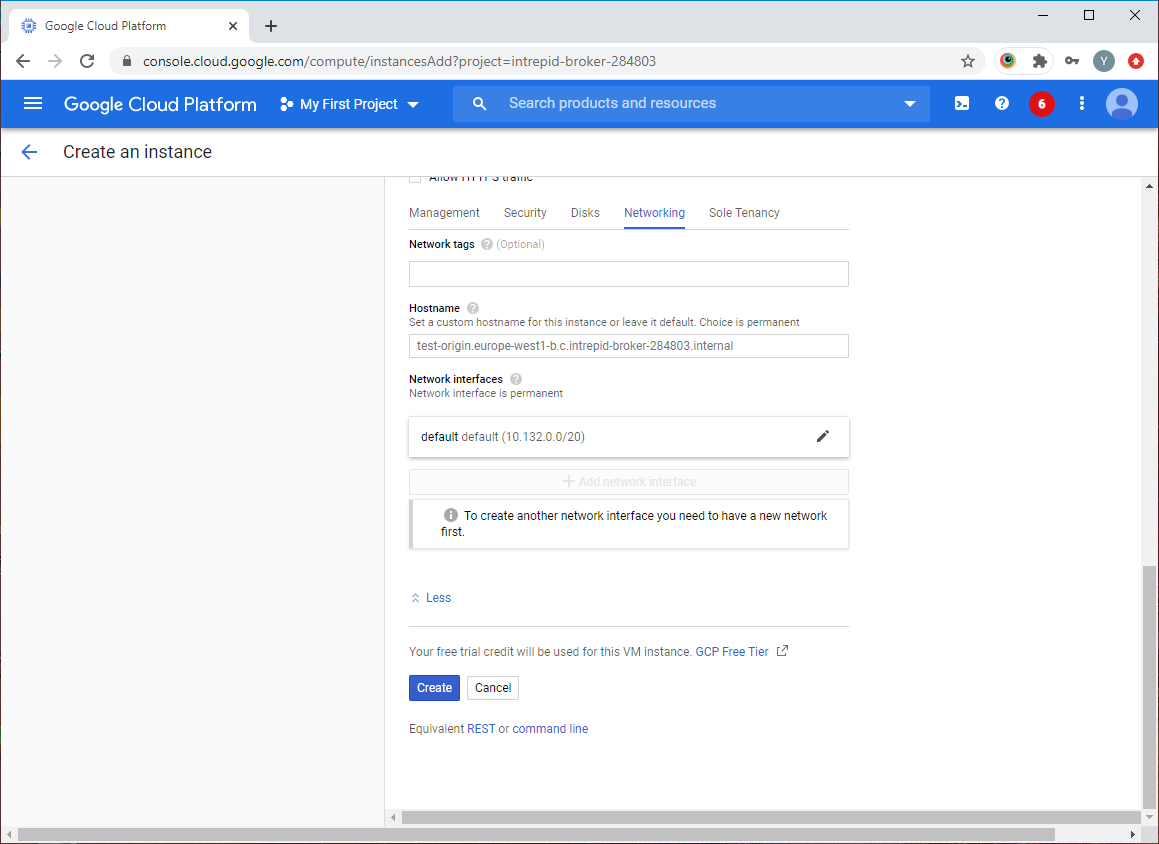
After the configuring, click the "Create" button to create a new instance of the WCS server with the CDN Origin role:
After a couple of minutes, the server will be created and launched. Connect to it via ssh and install WCS. All actions — installing, configuring, starting or restarting WCS — must be performed with root rights, or via sudo.
1.Install Wget, Midnight Commander and additional tools and libraries
sudo yum -y install wget mc tcpdump iperf3 fontconfig2.Install the JDK. For work under heavy loads, JDK 12 or 14 is recommended. It is more convenient to install it using a bash script. Script text:
#!/bin/bash
sudo rm -rf jdk*
curl -s https://download.java.net/java/GA/jdk12.0.2/e482c34c86bd4bf8b56c0b35558996b9/10/GPL/openjdk-12.0.2_linux-x64_bin.tar.gz | tar -zx
[ ! -d jdk-12.0.2/bin ] && exit 1
sudo mkdir -p /usr/java
[ -d /usr/java/jdk-12.0.2 ] && sudo rm -rf /usr/java/jdk-12.0.2
sudo mv -f jdk-12.0.2 /usr/java
[ ! -d /usr/java/jdk-12.0.2/bin ] && exit 1
sudo rm -f /usr/java/default
sudo ln -sf /usr/java/jdk-12.0.2 /usr/java/default
sudo update-alternatives --install "/usr/bin/java" "java" "/usr/java/jdk-12.0.2/bin/java" 1
sudo update-alternatives --install "/usr/bin/jstack" "jstack" "/usr/java/jdk-12.0.2/bin/jstack" 1
sudo update-alternatives --install "/usr/bin/jcmd" "jcmd" "/usr/java/jdk-12.0.2/bin/jcmd" 1
sudo update-alternatives --install "/usr/bin/jmap" "jmap" "/usr/java/jdk-12.0.2/bin/jmap" 1
sudo update-alternatives --set "java" "/usr/java/jdk-12.0.2/bin/java"
sudo update-alternatives --set "jstack" "/usr/java/jdk-12.0.2/bin/jstack"
sudo update-alternatives --set "jcmd" "/usr/java/jdk-12.0.2/bin/jcmd"
sudo update-alternatives --set "jmap" "/usr/java/jdk-12.0.2/bin/jmap"
3.Download the archive to install the latest stable version of WebCallServer:
sudo wget https://flashphoner.com/download-wcs5.2-server.tar.gz4.Unpack the archive, run the WCS installation script, and follow the installation wizard instructions. To run WCS you will need a valid license. For the command to work correctly, specify the build number of the archive you downloaded:
sudo tar -xvzf FlashphonerWebCallServer-5.2.714.tar.gz && cd FlashphonerWebCallServer-5.2.714 && ./install.sh5.To activate the license, run the "./activation.sh" script from the WCS installation directory. If you wish, you can skip this step and activate the license later via the web interface:
sudo cd /usr/local/FlashphonerWebCallServer/bin && sudo ./activation.sh6.Disable firewalld and SELinux. We previously configured the firewall at the Google Cloud Platform level, so there is no need to close ports in the operating system:
sudo systemctl stop firewalld && systemctl disable firewalld && setenforce 07.Open the flashphoner.properties file with any convenient editor, which can be found along the path:
/usr/local/FlashphonerWebCallServer/conf/flashphoner.propertiesand configure it to run the CDN. In the "cdn_ip" parameter, specify the internal IP address of your virtual machine with the CDN Origin role:
cdn_enabled=true
cdn_ip=10.128.0.3 # Local IP address CDN Origin
cdn_nodes_resolve_ip=false
cdn_role=origin
The screenshot below shows an example of the flashphoner.properties file for WCS with the CDN Origin role:

After changing the settings, start (or restart) Web Call Server:
systemctl start webcallserverThis completes the launch and setup of Origin. Let's move on to configuring the load balancer and auto scaling.
Enable load balancing and autoscaling for WebRTC CDN in Google Cloud
The following components are required to run the balancer and autoscaling:
disk image that will be used in the template when creating a new instance of WCS;
template on the basis of which new server instances will be created when scaling;
scaling group;
load balancer;
server activity control settings.
Create a WCS Edge server disk image for WebRTC CDN
Let's start the configuration by deploying a WCS server with the CDN Edge role in order to create a disk image based on it for the template for creating new WCS instances in the balancer.
Repeat the instructions for preparing the Origin server up to the point about making settings in the flashphoner.properties file. For the Edge role, make the following settings in this file:
cdn_enabled=true
cdn_ip=10.128.0.4
cdn_nodes_resolve_ip=false
cdn_point_of_entry=10.128.0.3
cdn_role=edge
http_enable_root_redirect=false
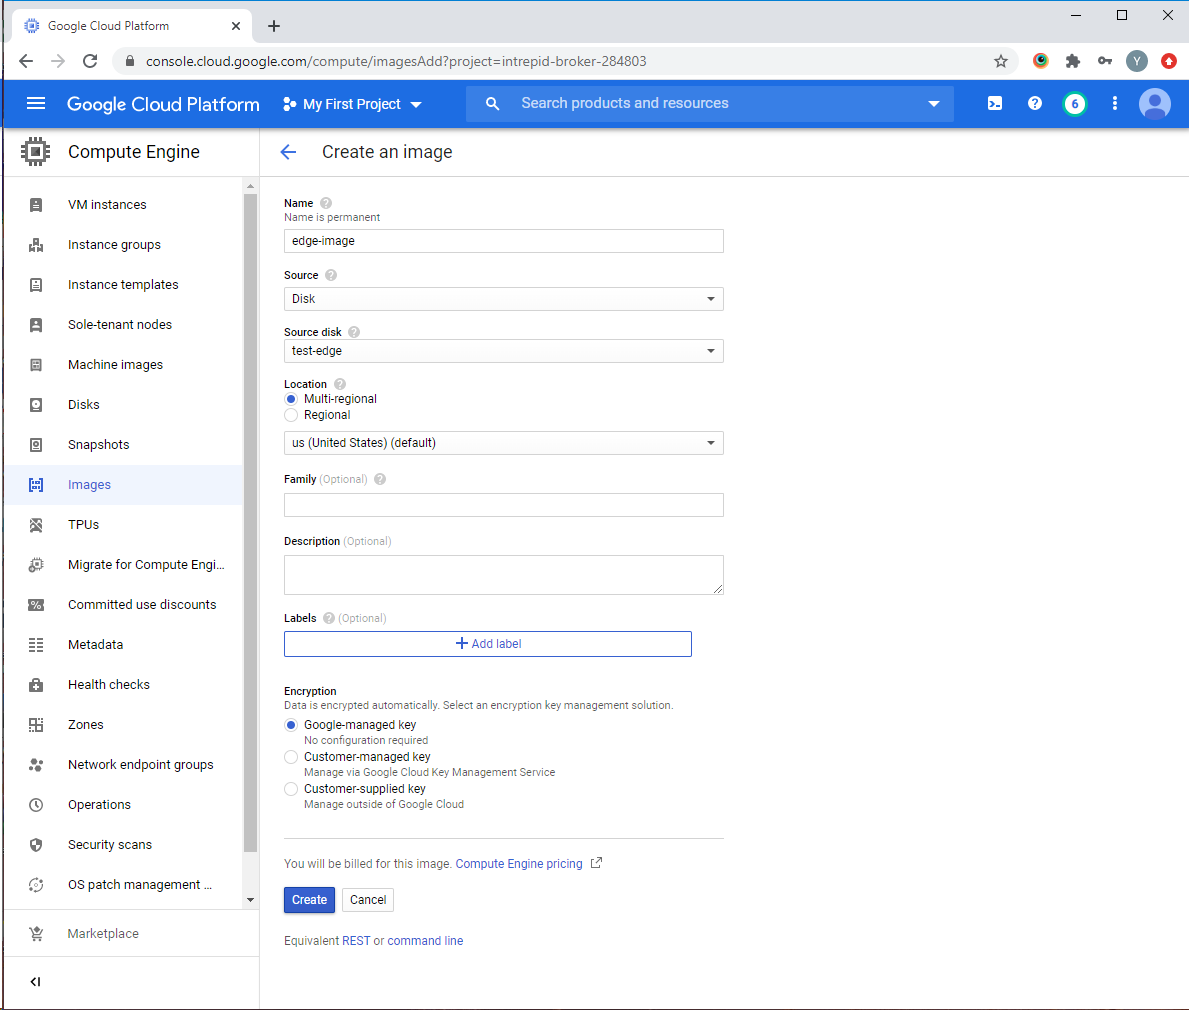
After making and saving the settings, stop the WCS CDN Edge virtual machine in the Google Cloud console, select the "Images" item from the menu on the left and click the "Create Image" button:
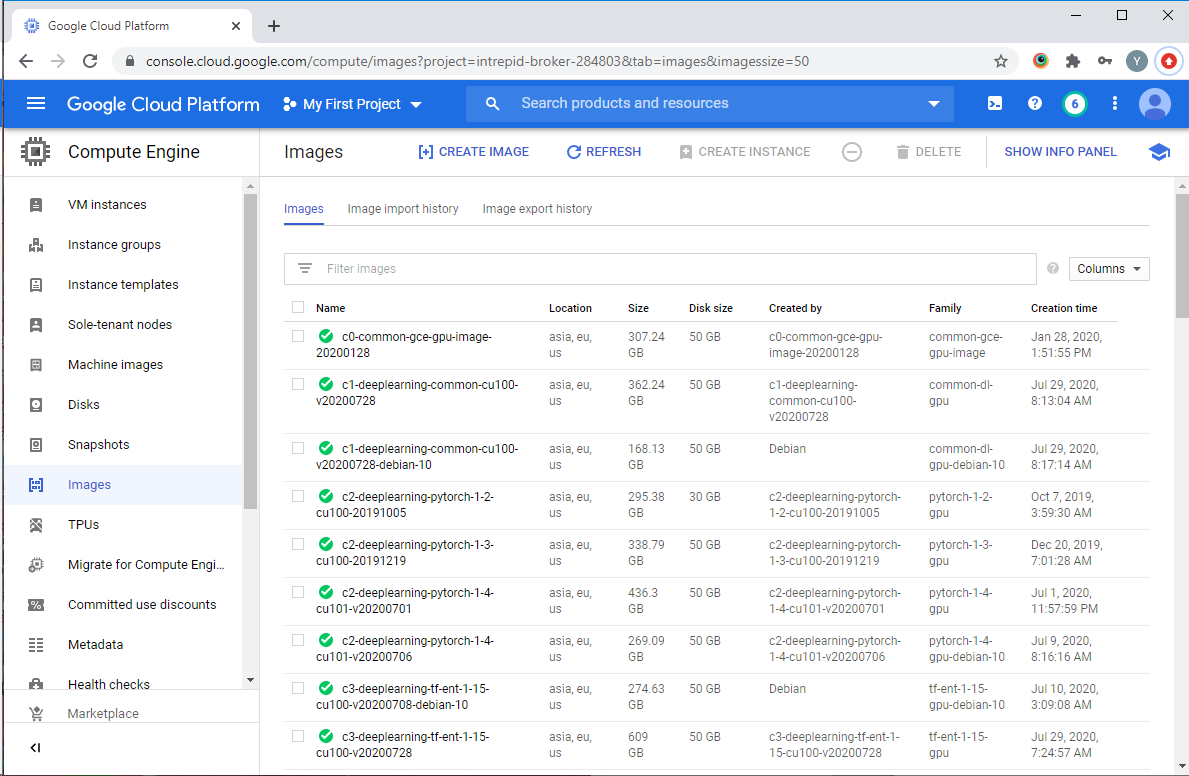
In the wizard that opens, specify the name of the new image, select the disk of the WCS CDN Edge virtual machine as a source, and click the "Create" button:
After the disk image has been created, proceed to creating an Edge server deployment template based on the created image.
Create a deployment template for the Edge server
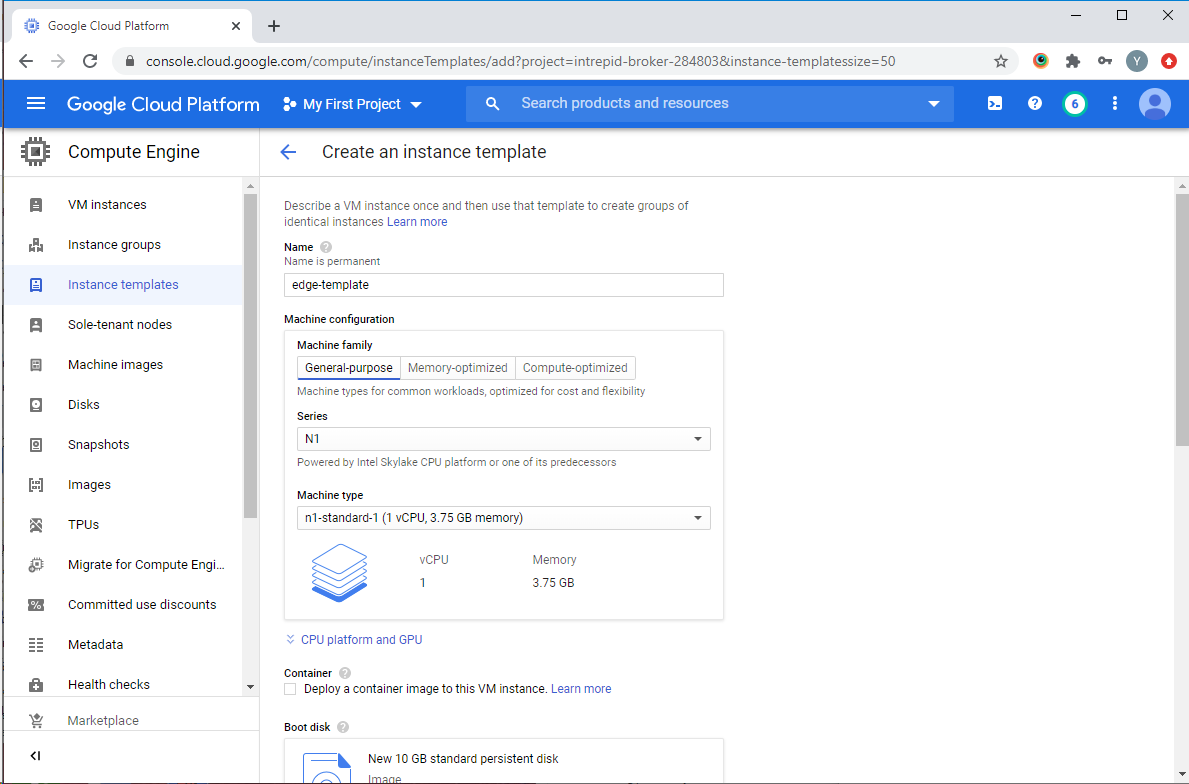
Select "Instance templates" from the menu on the left side of the Google Cloud console window and click the "Create Instance template" button:

In the New Deployment Template Wizard, specify the template name and select the virtual machine configuration:
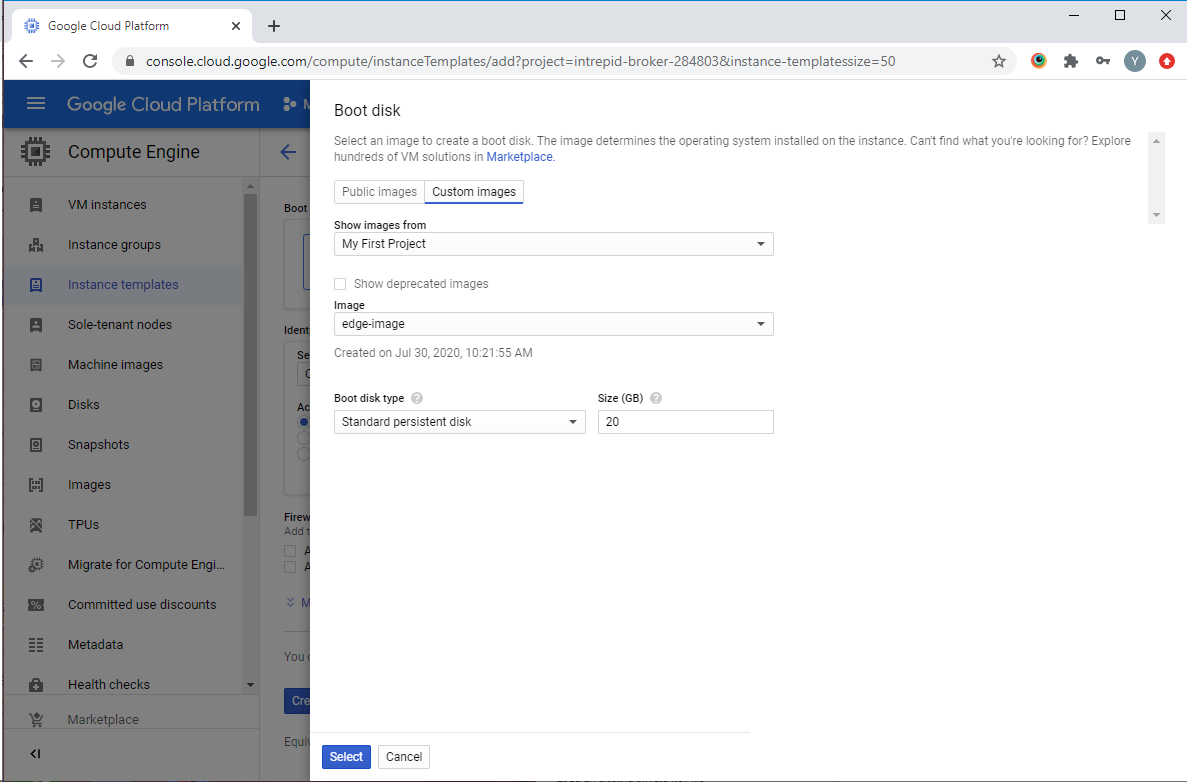
Below on the page in the "Boot disk" section, click the "Change" button. In the next window, go to the "Custom Images" tab and select the WCS CDN Edge disk image that we created earlier. Click "Select":
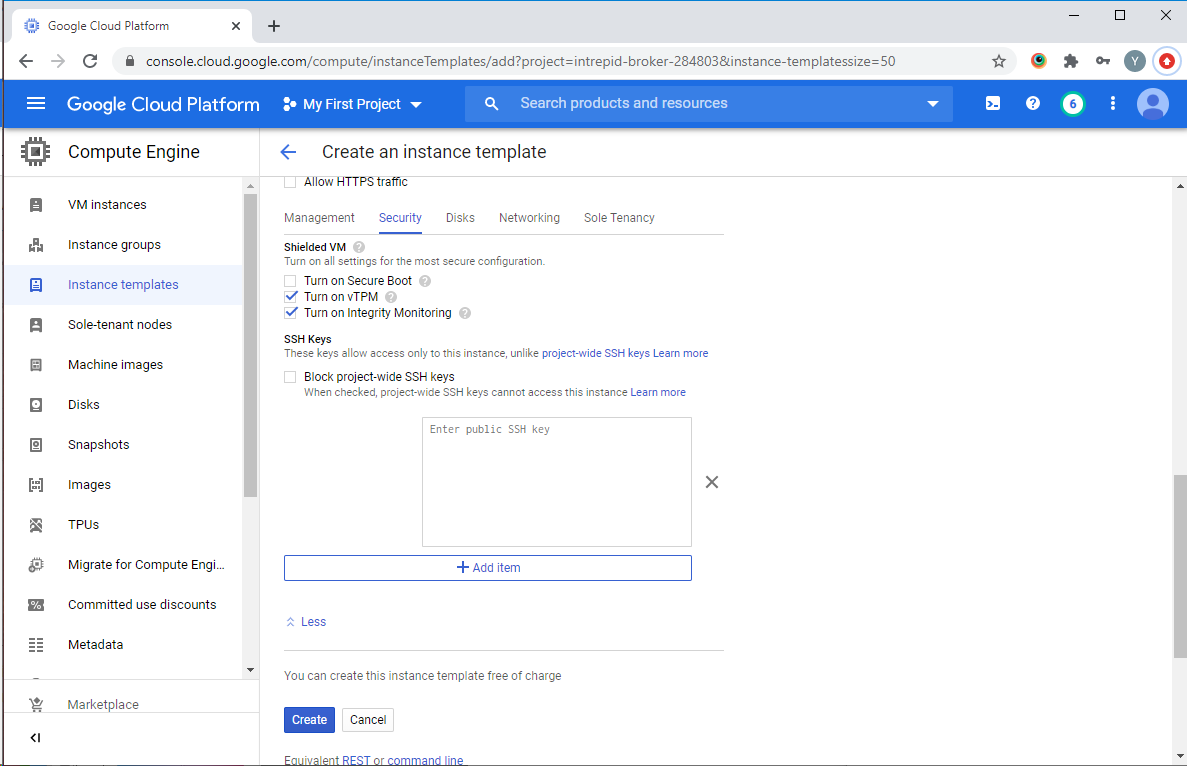
Expand the "Management, security, disks, networking, and sole tenancy" section. On the "Security" tab, add a public key for accessing the server via SSH and click the "Create" button:
A deployment template for WCS with CDN Edge role has been created. Now let's move on to creating a scaling group.
Create scaling groups for the Edge servers
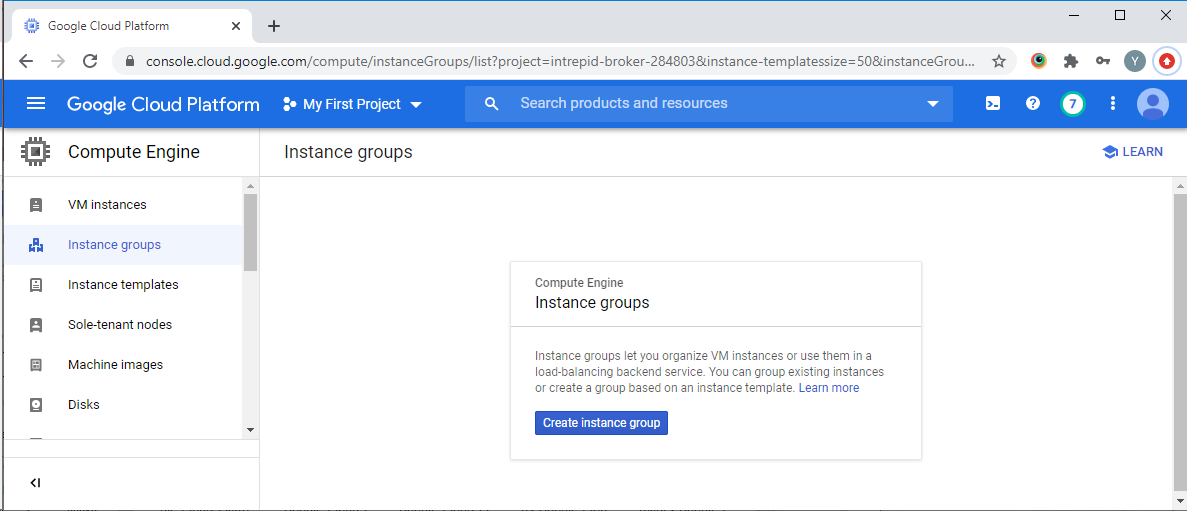
From the menu on the left side of the Google Cloud console window, select the "Instance groups" item and click the "Create Instance group" button:
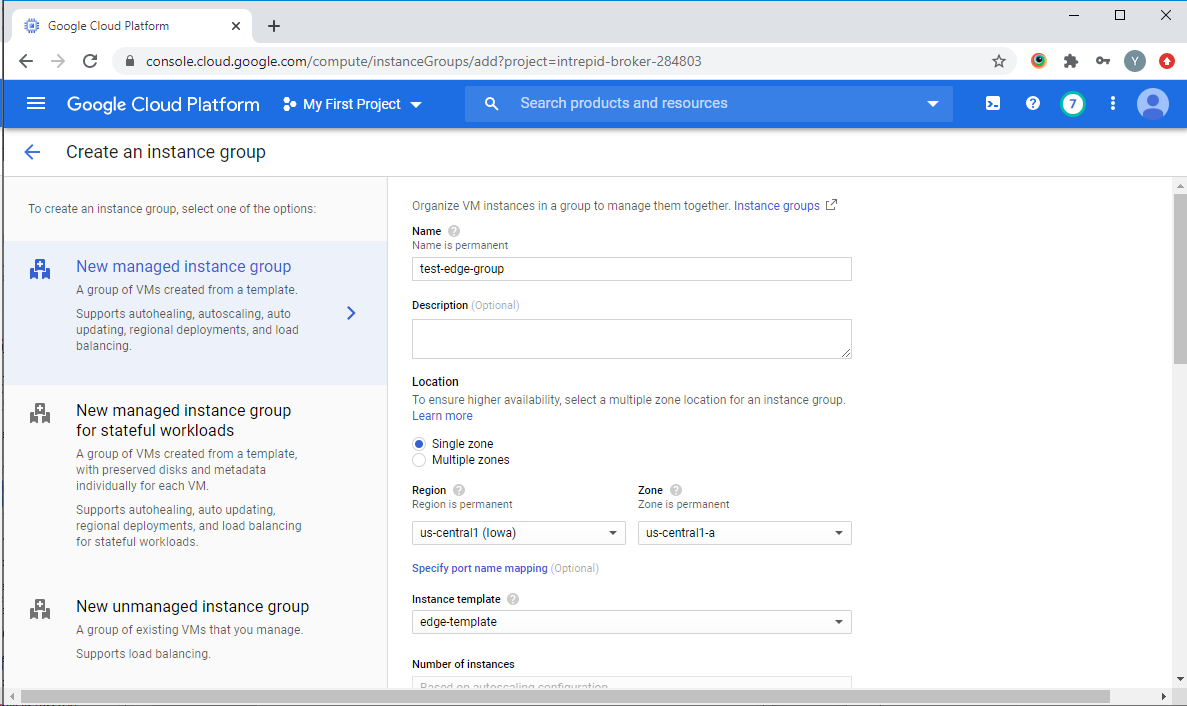
On the page that will appear, select the region and zone of the group location and specify the WCS Edge deployment template that we created earlier:
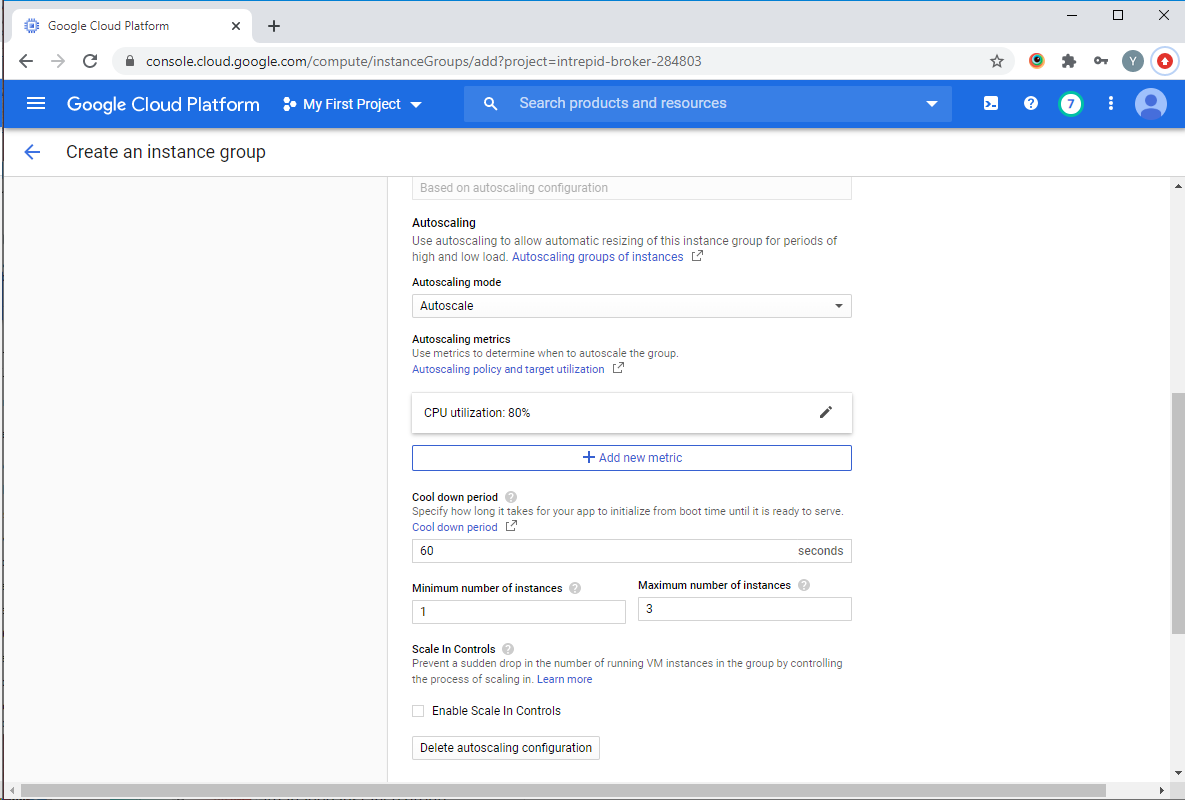
In the "Autoscaling" section on the same page, configure the trigger to launch additional Edge servers. As a trigger, we will use a processor load of more than 80%. In the "Maximum number of instances" field, specify the maximum number of virtual machines that will be launched when the trigger fires:
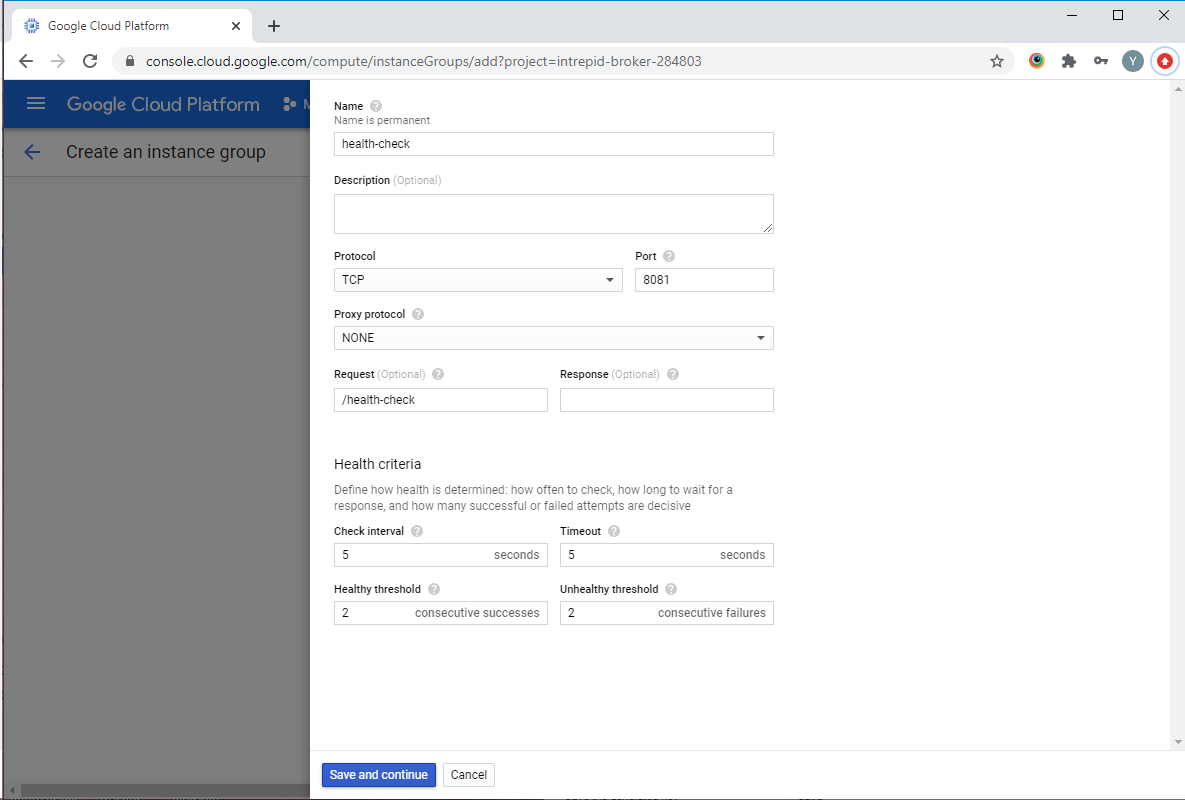
Then enable checking the state of the virtual machine in the "Autohealing" section. In order to create a server check setting, select the "Create a health check" item from the list in the "Health check" field:
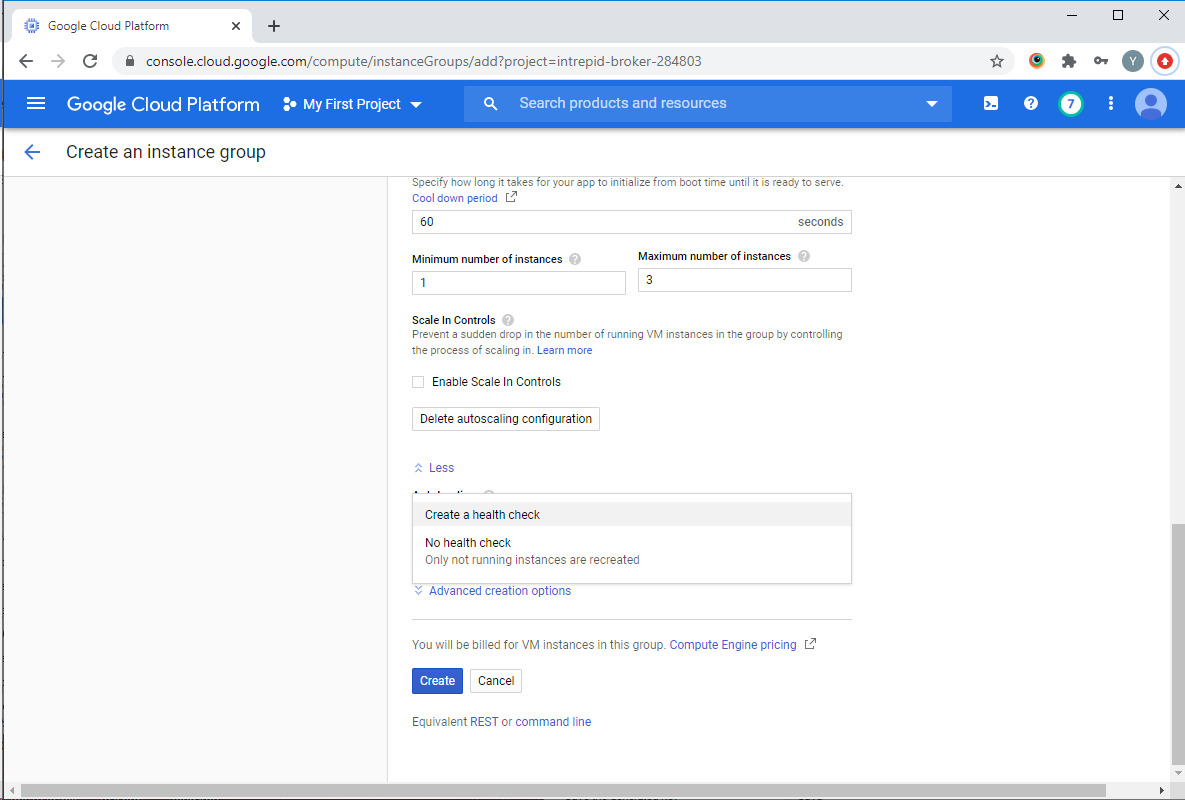
In the new server status check wizard, specify the check name, TCP protocol, port 8081 and the request /health-check. Configure the verification criteria and click the "Save and continue" button:
Expand the "Advanced creation options" section and activate the "Do not retry machine creation" checkbox. After that, click "Create":

A scaling group will be created and one WCS running with the CDN Edge role will be launched. The final step in setting up our CDN with load balancer and autoscaling is to set up the balancer.
Create a load balancer
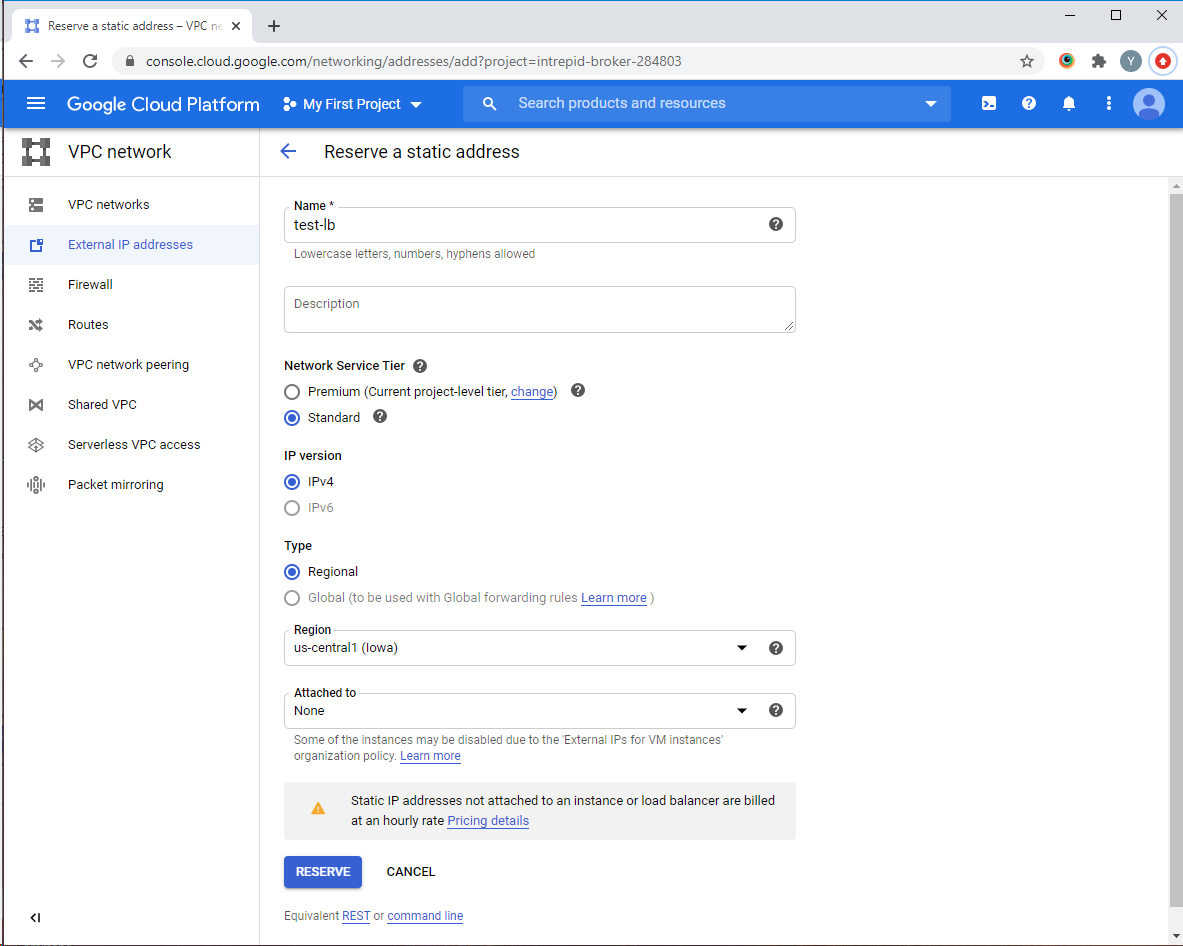
First, we will reserve an external IP address for the balancer. In the main menu of Google Cloud Platform in the "VPC network" section, select the "External IP addresses" item and click the "Reserve static address" button:

On the next page, in the "Name" field, set the name for the reserved IP address. Select the level of quality of network services for the address and the type of distribution. After completing all the settings, click the "Reserve" button:
Then proceed to setting up the balancer.
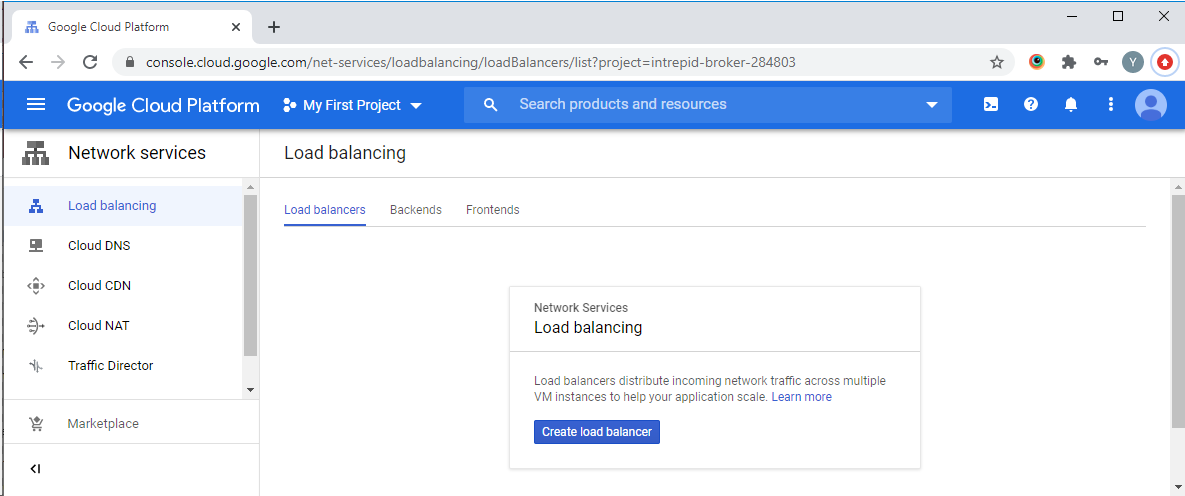
Select the "Load balancing" item in the "Network services" section of the "Networking" section of the main Google Cloud Platform menu:

Click the "Create load balancer" button:
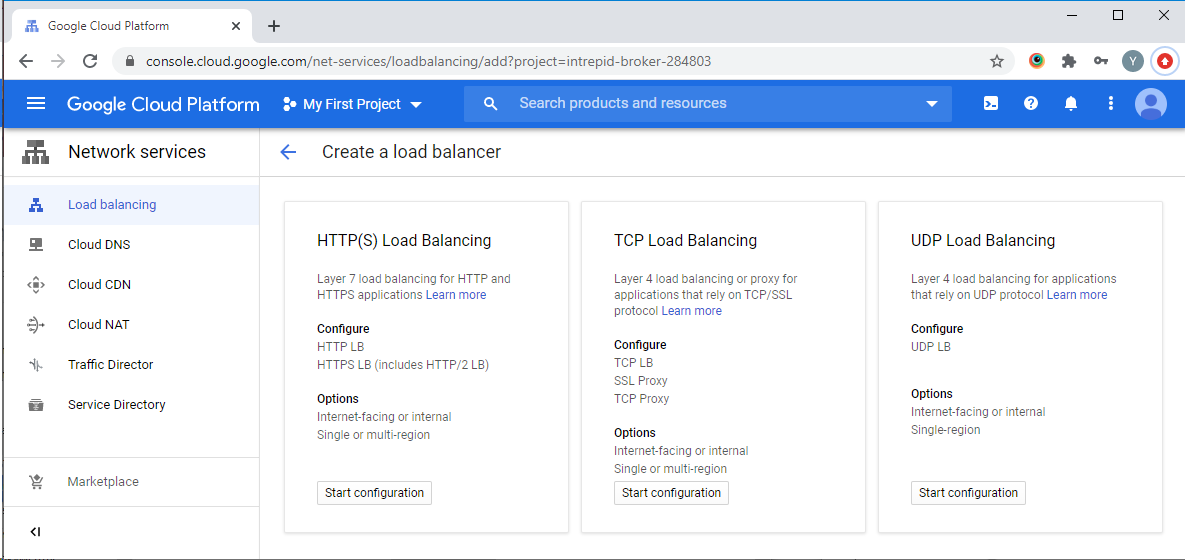
Select the type of balancer — "TCP Load Balancing" and click the "Start configuration" button:
On the page that opens, specify the external balancer "From Internet to my VMs" and the region where the balancer servers are located. After selecting the settings, click the "Continue" button:

On the next page, set the name of the balancer, and then go to the "Backend configuration" settings section and specify in which region the servers included in the balancer will be created. On the "Select existing instance groups" tab, select the Edge server scaling group that we created earlier. Then, in the "Health check" field, select the "Create a health check" item from the drop-down list:

Specify the parameters for checking the status of the balancer — port 8081 and request / on the page that will appear, and then click the "Save and continue" button:

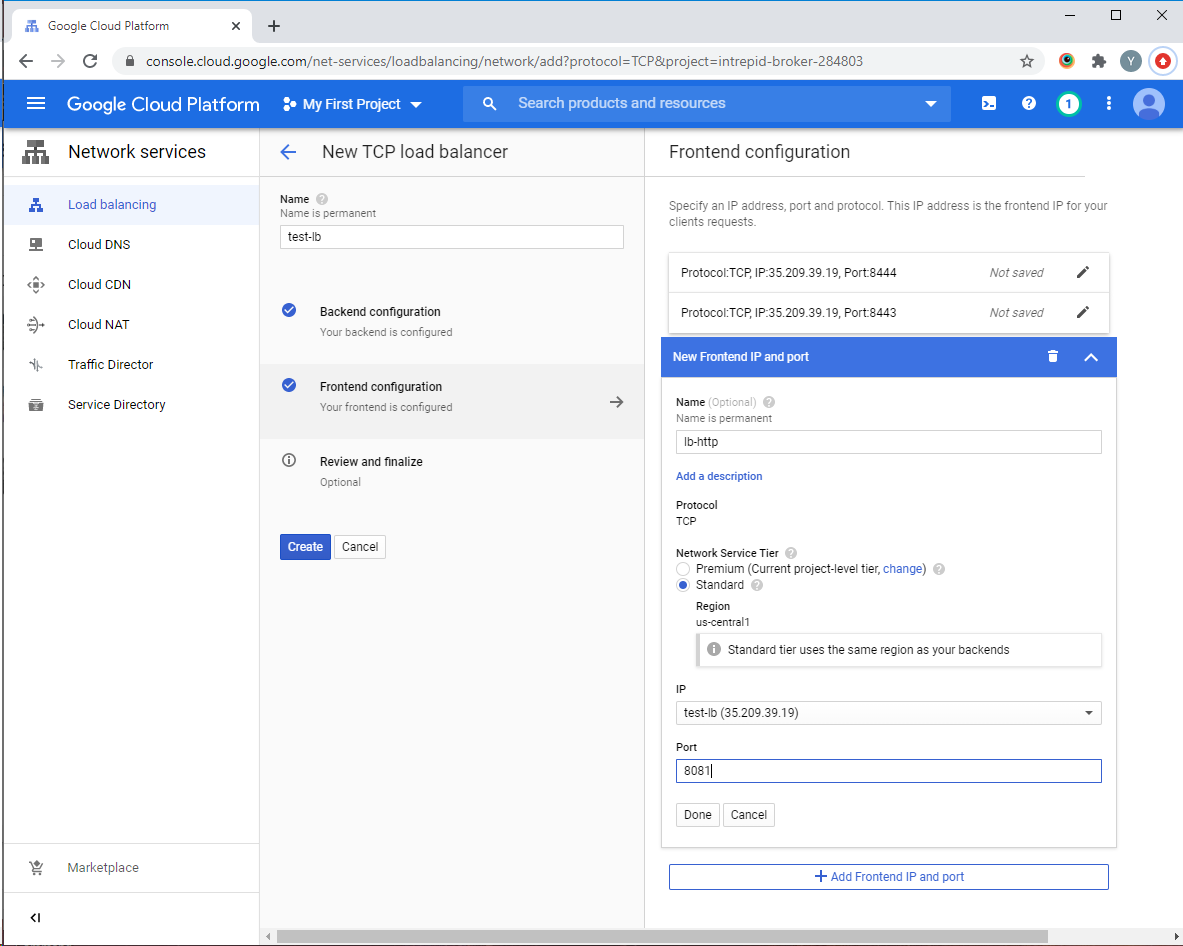
After that, go to the "Frontend configuration" section settings. In this section, you need to create a port binding to an external IP address. Specify the external IP address for the balancer, which we reserved above, and create configurations for TCP ports 8081, 8080, 8443, 8444 for HTTP(S) and WS(S). After creating the required ports, click the "Create" button:
The balancer will be launched. This completes the deployment of the CDN with balancer and scaling. Let's move on to testing.
Test the Google Cloud Platform-based WebRTC CDN with load balancing and autoscaling
Testing Method
For load testing, when creating a scaling group, we set the processor load threshold for triggering to 20%. Testing will be carried out using the Google Chrome browser and a virtual webcam for organizing the video stream broadcast. To simulate the increased load on the processor, let's start playing the stream with transcoding using the "Media Devices" example.
As a result of testing, we must make sure that increasing the load on the virtual machine processor leads to the launch of additional VMs, and the balancer distributes the connections between them.
Testing
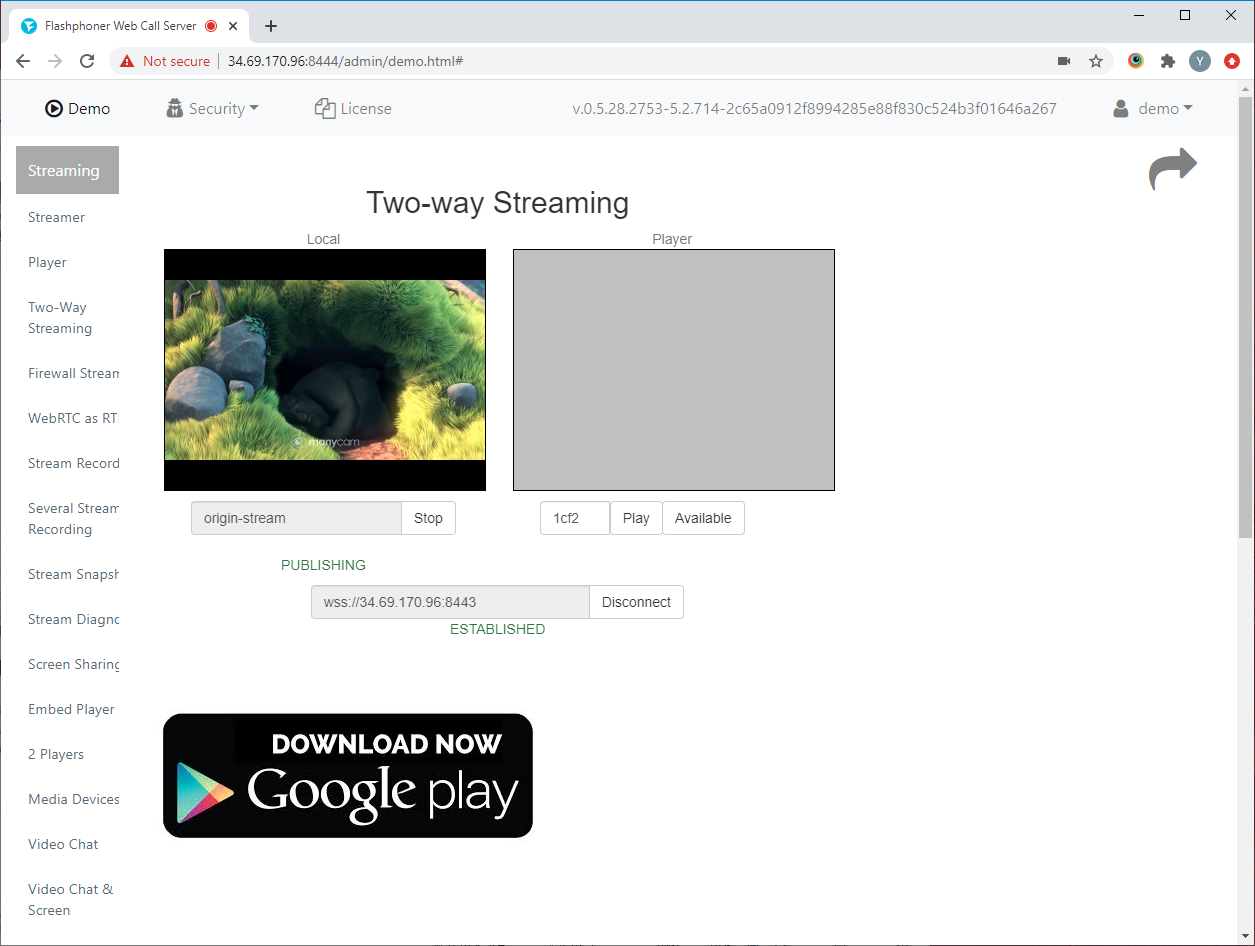
In the Google Chrome browser, open the WCS web interface with the CDN Origin role. Log in, open the "Two-way streaming" example, establish a connection to the server via WebSocket and publish the video stream.
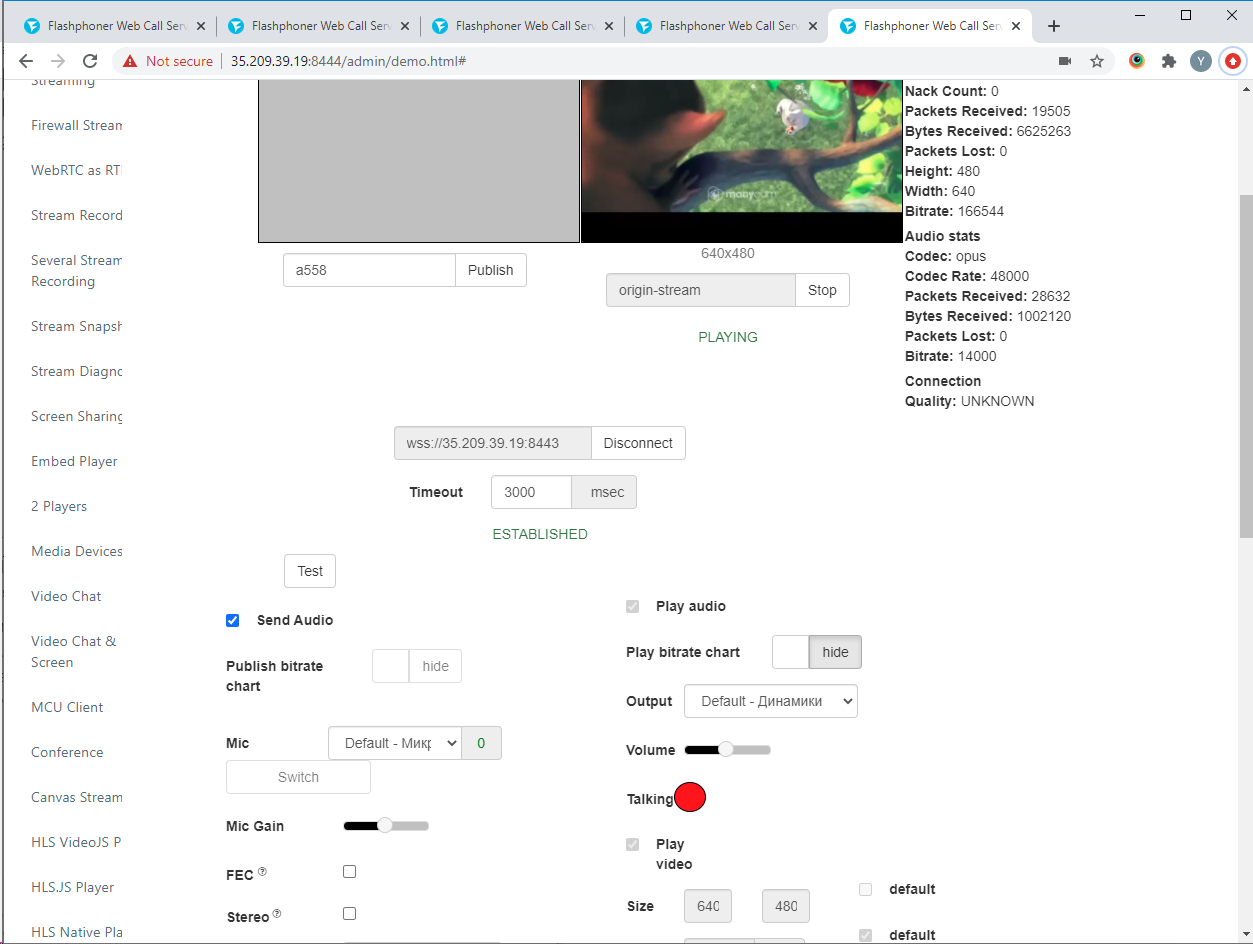
Then, we launch the web interface of the WCS CDN Edge server using the IP address that was reserved when creating the balancer.
Log in, open the "Media Devices" example and establish a WebSocket connection to the balancer. In the right column of the settings, uncheck the "default" checkbox for the "Size" parameter and set the values for transcoding the video stream. For example, if the stream on the Origin server is published with the dimensions of 320x240, set the value to 640x480. Repeat the steps in several browser tabs to simulate a large number of viewers.
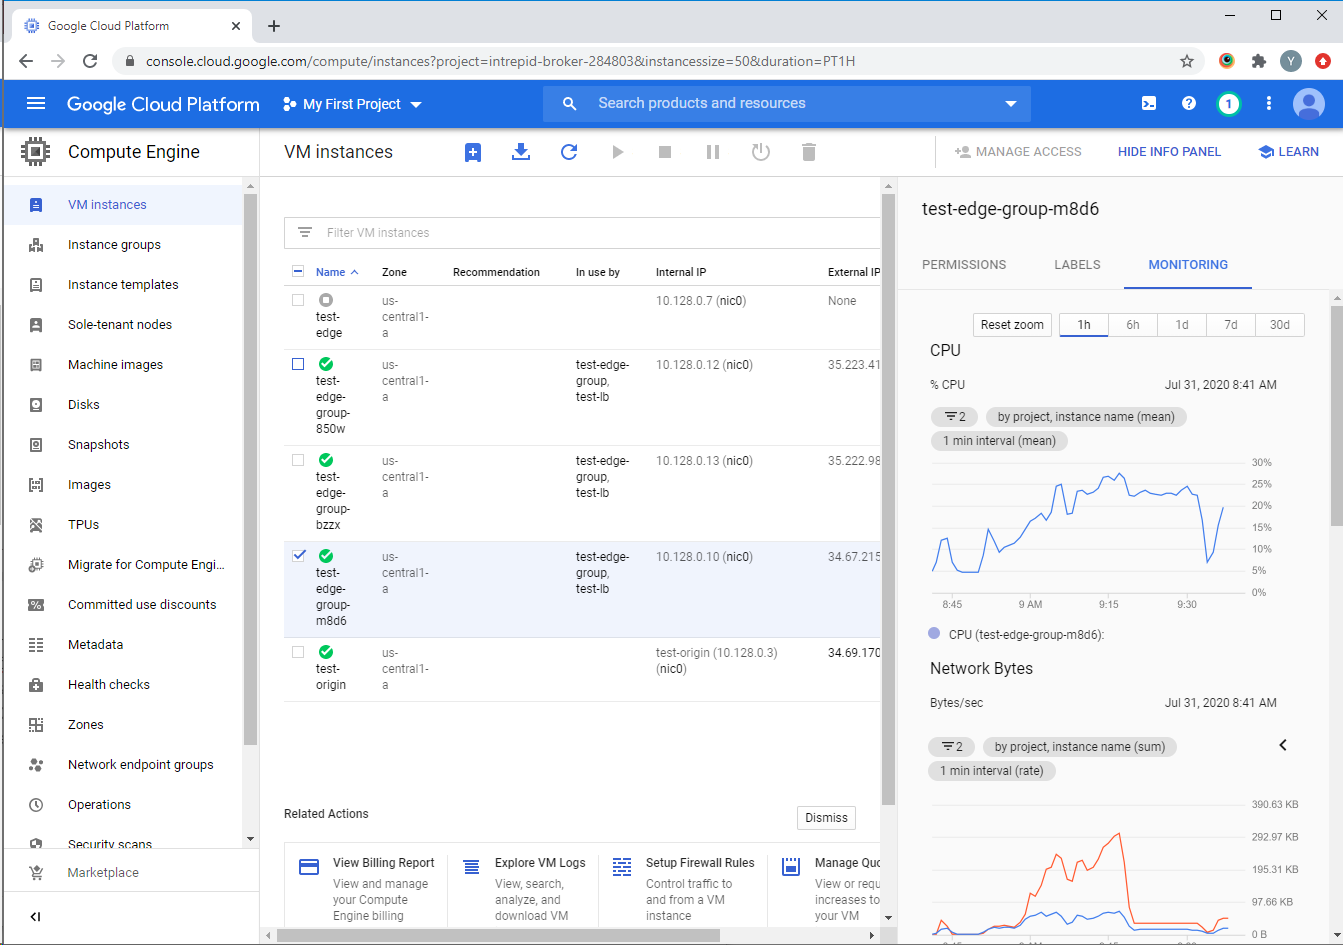
In the Google Cloud console, we see that two additional virtual machines were launched:
In order to check that the balancer distributes connections between active VMs, you can use the statistics page, which is available at:
http://<WCS instance IP address>:8081/?action=statOpen the statistics page for each virtual machine launched by the load balancer. The "connection_websocket" value shows the number of active WebSocket sessions on each virtual machine.

As you can see in the screenshots, our task has been successfully completed. CDN works, additional Edge servers are launched, and WebSocket connections are distributed between them. As a result, we created a CDN in which, when the load on the Edge server increases, additional virtual servers are automatically deployed to distribute the load and maintain low latency in video broadcasting.
Good streaming!
Links
CDN for low latency WebRTC streaming
