I am a system administrator, and I need a small, lightweight notebook for every day carrying. Of course, not just to carry it, but for use it to work.
I already have a ThinkPad x200, but it’s heavier than I would like. And among the lightweight notebooks, I did not find anything suitable. All of them imitate the MacBook Air: thin, shiny, glamorous, and they all critically lack ports. Such notebook is suitable for posting photos on Instagram, but not for work. At least not for mine.
After not finding anything suitable, I thought about how a notebook would turn out if it were developed not with design, but the needs of real users in mind. System administrators, for example. Or people serving telecommunications equipment in hard-to-reach places — on roofs, masts, in the woods, literally in the middle of nowhere.
The results of my thoughts are presented in this article.

Of course, your understanding of the admin notebook does not have to coincide with mine. But I hope you will find a couple of interesting thoughts here.
Just keep in mind that «system administrator» is just the name of my position. And in fact, I have to work as a network engineer, and installer, and perform a significant part of other work related to hardware. Our company is tiny, we are far from large settlements, so all of us have to be universal specialist.
In order not to constantly clarify «this notebook», later in the article I will call it the “adminbook”. Although it can be useful not only to administrators, but also to all who need a small, lightweight notebook with a lot of connectors. In fact, even large laptops don’t have as many connectors.
So let's get started…
Of course, you want it smaller and more lightweight, but the keyboard with the screen should not be too small. And there has to be space for connectors, too.
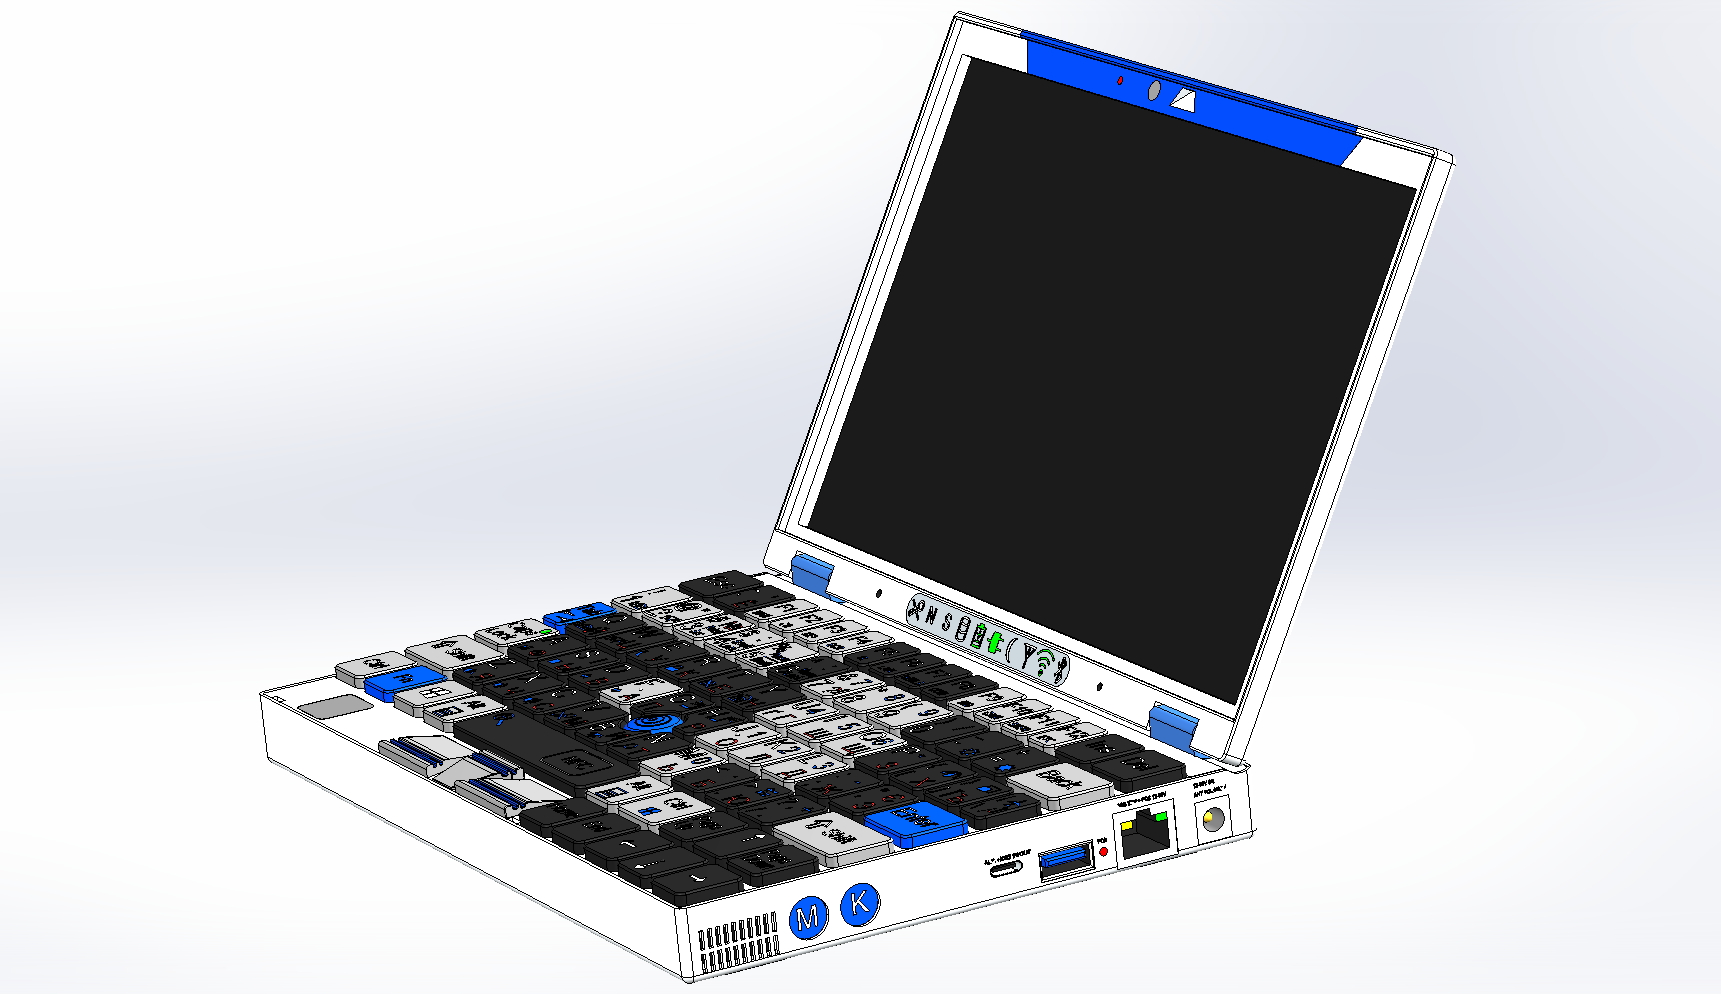
In my opinion, a suitable option is a notebook half the size of an x200. That is, approximately the size of a sheet of A5 paper (210x148mm). In addition, the side pockets of many bags and backpacks are designed for this size. This means that the adminbook doesn’t even have to be carried in the main compartment.
Though I couldn’t fit everything I wanted into 210mm. To make a comfortable keyboard, the width had to be increased to 230mm.
In the illustrations the adminbook may seem too thick. But that’s only an optical illusion. In fact, its thickness is 25mm (28mm taking the rubber feet into account).
Its size is close to the usual hardcover book, 300-350 pages thick.
It’s lightweight, too — about 800 grams (half the weight of the ThinkPad).
The case of the adminbook is made ofmithril aluminum. It’s a lightweight, durable metal with good thermal conductivity.
A quality keyboard is very important for me. “Quality” there means the fastest possible typing and hotkey speed. It needs to be so “matter-of-fact” I don’t have to think about it at all, as if it types seemingly by force of thought.
This is possible if the keys are normal size and in their typical positions. But the adminbook is too small for that. In width, it is even smaller than the main block of keys of a desktop keyboard. So, you have to work around that somehow.
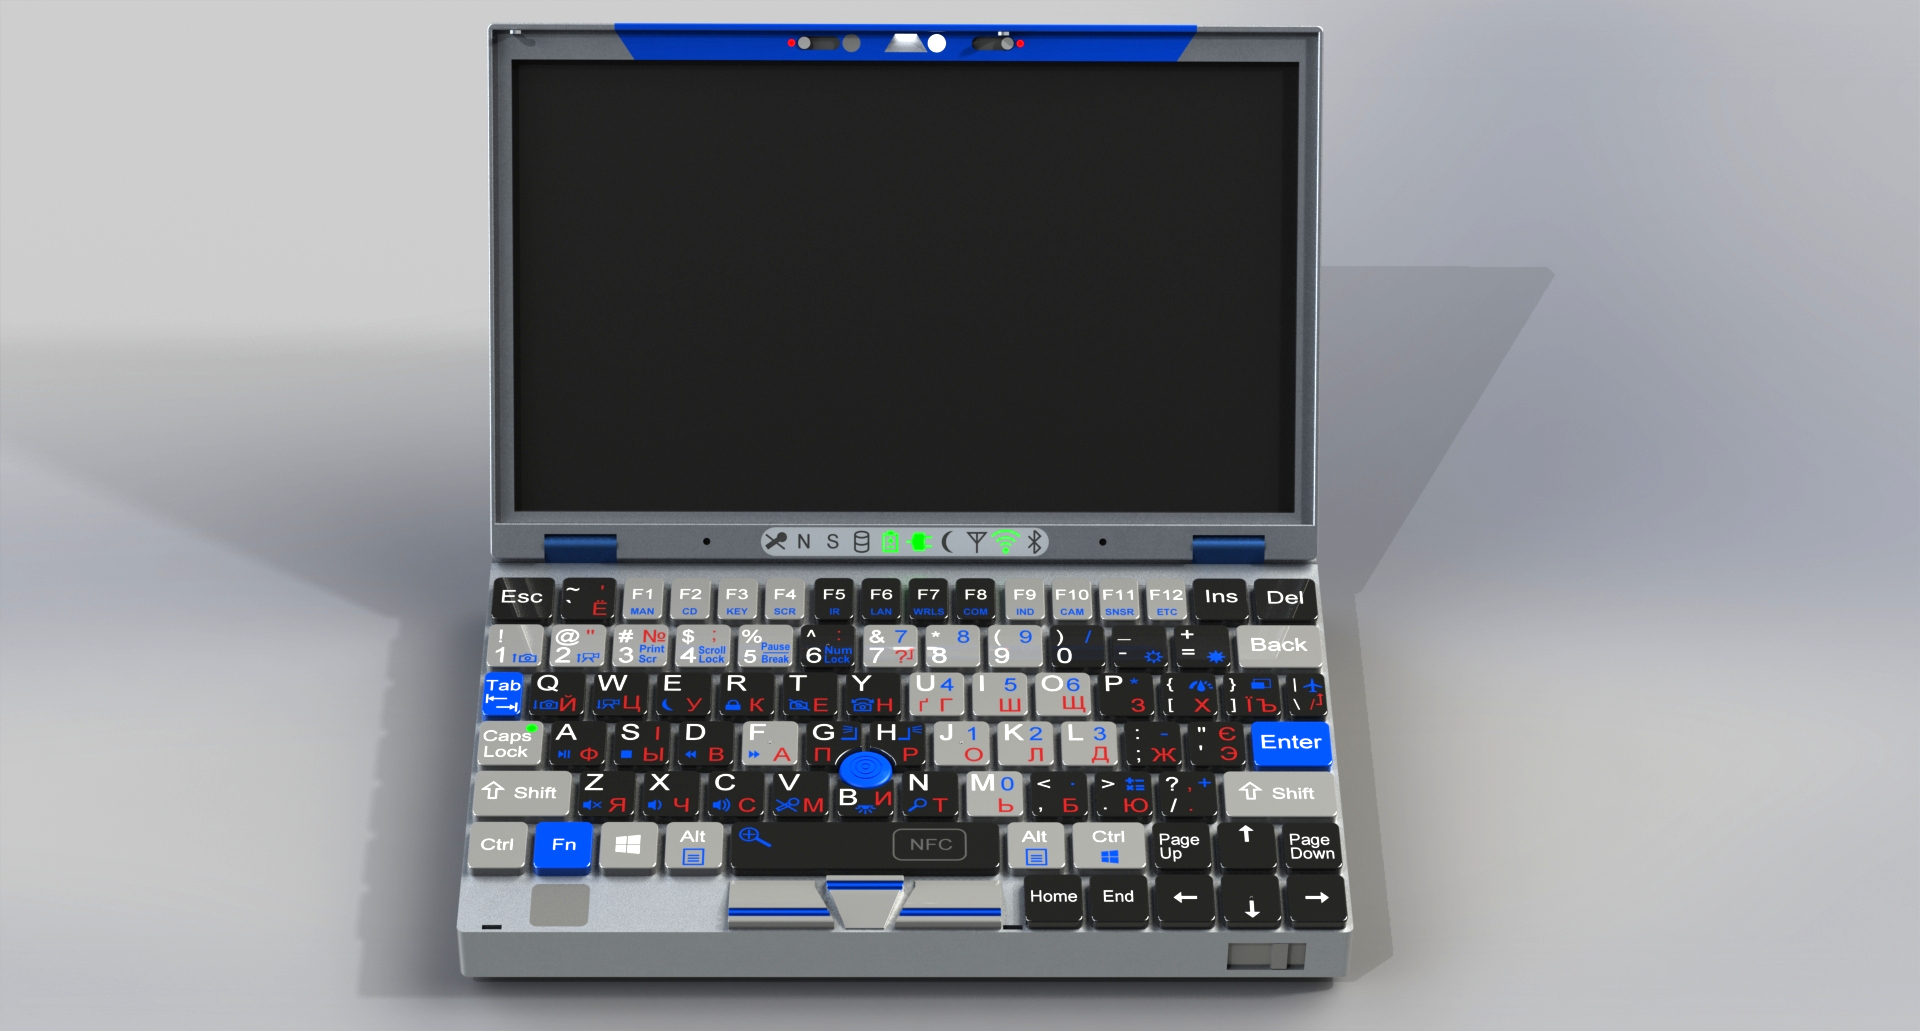
After a long search and numerous tests, I came up with what you see in the picture:

Fig.2.1 — Adminbook keyboard
This keyboard has the same vertical key distance as on a regular keyboard. A horizontal distance decreased just only 2mm (17 instead of 19).
You can even type blindly on this keyboard! To do this, some keys have small bumps for tactile orientation.
However, if you do not sit at a table, the main input method will be to press the keys “at a glance”. And here the muscle memory does not help — you have to look at the keys with your eyes.
To hit the buttons faster, different key colors are used.
For example, the numeric row is specifically colored gray to visually separate it from the QWERTY row, and NumLock is mapped to the “6” key, colored black to stand out.
To the right of NumLock, gray indicates the area of the numeric keypad. These (and neighboring) buttons work like a numeric keypad in NumLock mode or when you press Fn. I must say, this is a useful feature for the admin computer — some users come up with passwords on the numpad in the form of a “cross”, “snake”, “spiral”, etc. I want to be able to type them that way too.
As for the function keys. I don’t know about you, but it annoys me when, in a 15-inch laptop, this row is half-height and only accessible through pressing Fn. Given that there’s a lot free space around the keyboard!
The adminbook doesn’t have free space at all. But the function keys can be pressed without Fn. These are separate keys that are even divided into groups of 4 using color coding and location.
By the way, have you seen which key is to the right of AltGr on modern ThinkPads? I don’t know what they were thinking, but now they have PrintScreen there!
Where? Where, I ask, is the context menu key that I use every day? It’s not there.
So the adminbook has it. Two, even! You can put it up by pressing Fn + Alt. Sorry, I couldn’t map it to a separate key due to lack of space. Just in case, I added the “Right Win” key as Fn + CtrlR. Maybe some people use it for something.
However, the adminbook allows you to customize the keyboard to your liking. The keyboard is fully reprogrammable. You can assign the scan codes you need to the keys. Setting the keyboard parameters is done via the “KEY” button (Fn + F3).
Of course, the adminbook has a keyboard backlight. It is turned on with Fn + B (below the trackpoint, you can even find it in the dark). The backlight here is similar to the ThinkPad ThinkLight. That is, it’s an LED above the display, illuminating the keyboard from the top. In this case, it is better than a backlight from below, because it allows you to distinguish the color of the keys. In addition, keys have several characters printed on them, while only English letters are usually made translucent to the backlight.
Since we’re on the topic of characters… Red letters are Ukrainian and Russian. I specifically drew them to show that keys have space for several alphabets: after all, English is not a native language for most of humanity.
Since there isn’t enough space for a full touchpad, the trackpoint is used as the positioning device. If you have no experience working with it — don’t worry, it’s actually quite handy. The mouse cursor moves with slight inclines of the trackpoint, like an analog joystick, and its three buttons (under the spacebar) work the same as on the mouse.
To the left of the trackpoint keys is a fingerprint scanner. That makes it possible to login by fingerprint. It’s very convenient in most cases.
The space bar has an NFC antenna location mark. You can simply read data from devices equipped with NFC, and you can make it to lock the system while not in use. For example, if you wear an NFC-equipped ring, it looks like this: when you remove hands from the keyboard, the computer locks after a certain time, and unlocks when you put hands on the keyboard again.
And now the unexpected part. The keyboard and the trackpoint can work as a USB keyboard and mouse for an external computer! For this, there are USB Type C and MicroUSB connectors on the back, labeled «OTG». You can connect to an external computer using a standard USB cable from a phone (which is usually always with you).

Fig.2.2 — On the right: the power connector 5.5x2.5mm, the main LAN connector, POE indicator, USB 3.0 Type A, USB Type C (with alternate HDMI mode), microSD card reader and two «magic» buttons
Switching to the external keyboard mode is done with the «K» button on the right side of the adminbook. And there are actually three modes, since the keyboard+trackpoint combo can also work as a Bluetooth keyboard/mouse!
Moreover: to save energy, the keyboard and trackpoint can work autonomously from the rest of the adminbook. When the adminbook is turned off, pressing «K» can turn on only the keyboard and trackpoint to use them by connecting to another computer.
Of course, the keyboard is water-resistant. Excess water is drained down through the drainage holes.
There are some devices that normally do not need a monitor and keyboard. For example, industrial computers, servers or DVRs. And since the monitor is «not needed», it is, in most cases, absent.
And when there is a need to configure such a device from the console, it can be a big surprise that the entire office is working on laptops and there is not a single stationary monitor within reach. Therefore, in some cases you have to take a monitor with you.
But you don’t need to worry about this if you have the adminbook.
The fact is that the video outputs of the adminbook can switch «in the opposite direction» and work as video inputs by displaying the incoming image on the built-in screen. So, the adminbook can also replace the monitor (in addition to replace the mouse and keyboard).

Fig.3.1 — On the left side of the adminbook, there are Mini DisplayPort, USB Type C (with alternate DisplayPort mode), SD card reader, USB 3.0 Type A connectors, HDMI, four audio connectors, VGA and power button
Switching modes between input and output is done by pressing the «M» button on the right side of the adminbook.
The video subsystem, as well as the keyboard, can work autonomously — that is, when used as a monitor, the other parts of the adminbook remain disabled. To turn on to this mode also uses the «M» button.
Detailed screen adjustment (contrast, geometry, video input selection, etc.) is performed using the menu, brought up with the «SCR» button (Fn + F4).
The adminbook has HDMI, MiniDP, VGA and USB Type C connectors (with DisplayPort and HDMI alternate mode) for video input / output. The integrated GPU can display the image simultaneously in three directions (including the integrated display).
The adminbook display is FullHD (1920x1080), 9.5’’, matte screen. The brightness is sufficient for working outside during the day. And to do it better, the set includes folding blinds for protection from sunlight.

Fig.3.2 — Blinds to protect from sunlight
In addition to video output via these connectors, the adminbook can use wireless transmission via WiDi or Miracast protocols.
One of the options for installing the operating system is to install it from a CD / DVD, but now very few computers have optical drives. USB connectors are everywhere, though. Therefore, the adminbook can pretend to be an external optical drive connected via USB.
That allows connecting it to any computer to install an operating system on it, while also running boot discs with test programs or antiviruses.
To connect, it uses the same USB cable that’s used for connecting it to a desktop as an external keyboard/mouse.
The “CD” button (Fn + F2) controls the drive emulation — select a disc image (in an .iso file) and mount / unmount it.
If you need to copy data from a computer or to it, the adminbook can emulate an external hard drive connected via the same USB cable. HDD emulation is also enabled by the “CD” button.
This button also turns on the emulation of bootable USB flash drives. They are now used to install operating systems almost more often than CDs. Therefore, the adminbook can pretend to be a bootable flash drive.
The .iso files are located on a separate partition of the hard disk. This allows you to use them regardless of the operating system. Moreover, in the emulation menu you can connect a virtual drive to one of the USB interfaces of the adminbook. This makes it possible to install an operating system on the adminbook using itself as an installation disc drive.
By the way, the adminbook is designed to work under Windows 10 and Debian / Kali / Ubuntu. The menu system called via function buttons with Fn works autonomously on a separate microcontroller.
First, a classic DB-9 connector for RS-232. Any admin notebook simply has to have it. We have it here, too, and galvanically isolated from the rest of the notebook.
In addition to RS-232, RS-485 widely used in industrial automation is supported. It has a two-wire and four-wire version, with a terminating resistor and without, with the ability to enable a protective offset. It can also work in RS-422 and UART modes.
All these protocols are configured in the on-screen menu, called by the «COM» button (Fn + F8).
Since there are multiple protocols, it is possible to accidentally connect the equipment to a wrong connector and break it.
To prevent this from happening, when you turn off the computer (or go into sleep mode, or close the display lid), the COM port switches to the default mode. This may be a “port disabled” state, or enabling one of the protocols.

Fig.5.1 — The rear connectors: DB-9, SATA + SATA Power, HD Mini SAS, the second wired LAN connector, two USB 3.0 Type A connectors, two USB 2.0 MicroB connectors, three USB Type C connectors, a USIM card tray, a PBD-12 pin connector (jack)
The adminbook has one more serial port. But if the first one uses the hardware UART chipset, the second one is connected to the USB 2.0 line through the FT232H converter.
Thanks to this, via COM2, you can exchange data via I2C, SMBus, SPI, JTAG, UART protocols or use it as 8 outputs for Bit-bang / GPIO. These protocols are used when working with microcontrollers, flashing firmware on routers and debugging any other electronics. For this purpose, pin connectors are usually used with a 2.54mm pitch. Therefore, COM2 is made to look like one of these connectors.

Fig.5.2 — USB to UART adapter replaced by COM2 port
There is also a secondary LAN interface at the back. Like the main one, it is gigabit-capable, with support for VLAN. Both interfaces are able to test the integrity of the cable (for pair length and short circuits), the presence of connected devices, available communication speeds, the presence of POE voltage. With the using a wiremap adapter on the other side (see chapter 17) it is possible to determine how the cable is connected to crimps.
The network interface menu is called with the “LAN” button (Fn + F6).
The adminbook has a combined SATA + SATA Power connector, connected directly to the chipset. That makes it possible to perform low-level tests of hard drives that do not work through USB-SATA adapters. Previously, you had to do it through ExpressCards-type adapters, but the adminbook can do without them because it has a true SATA output.

Fig.5.3 — USB to SATA/IDE and ExpressCard to SATA adapters
The adminbook also has a connector that no other laptops have — HD Mini SAS (SFF-8643). PCIe x4 is routed outside through this connector. Thus, it's possible to connect an external U.2 (directly) or M.2 type (through an adapter) drives. Or even a typical desktop PCIe expansion card (like a graphics card).

Fig.5.4 — HD Mini SAS (SFF-8643) to U.2 cable

Fig.5.5 — U.2 drive

Fig.5.6 — U.2 to M.2 adapter

Fig.5.7 — Combined adapter from U.2 to M.2 and PCIe (sample M.2 22110 drive is installed)
Unfortunately, the limitations of the chipset don’t allow arbitrary use of PCIe lanes. In addition, the processor uses the same data lanes for PCIe and SATA. Therefore, the rear connectors can only work in two ways:
— all four PCIe lanes go to the Mini SAS connector (the second network interface and SATA don’t work)
— two PCIe lanes go to the Mini SAS, and two lanes to the second network interface and SATA connector
On the back there are also two USB connectors (usual and Type C), which are constantly powered. That allows you to charge other devices from your notebook, even when the notebook is turned off.
The adminbook is designed to work in difficult and unpredictable conditions, therefore, it is able to receive power in various ways.
Method number one is Power Delivery. The power supply cable can be connected to any USB Type C connector (except the one marked “OTG”).
The second option is from a normal 5V phone charger with a microUSB or USB Type C connector. At the same time, if you connect to the ports labeled QC 3.0, the QuickCharge fast charging standard will be supported.
The third option — from any source of 12-60V DC power. To connect, use a coaxial ( also known as “barrel”) 5.5x2.5mm power connector, often found in laptop power supplies.
For greater safety, the 12-60V power supply is galvanically isolated from the rest of the notebook. In addition, there’s reverse polarity protection. In fact, the adminbook can receive energy even if positive and negative ends are mismatched.

Fig.6.1 — The cable, connecting the power supply to the adminbook (terminated with 5.5x2.5mm connectors)
Adapters for a car cigarette lighter and crocodile clips are included in the box.

Fig.6.2 — Adapter from 5.5x2.5mm coaxial connector to crocodile clips

Fig.6.3 — Adapter to a car cigarette lighter
The fourth option — Power Over Ethernet (POE) through the main network adapter. Supported options are 802.3af, 802.3at and Passive POE. Input voltage from 12 to 60V. This method is convenient if you have to work on the roof or on the tower, setting up Wi-Fi antennas. Power to them comes through Ethernet cables, and there is no other electricity on the tower.
POE electricity can be used in three ways:
To prevent equipment damage, if one of the Ethernet cables is disconnected, the power to the second network interface is terminated. The power can only be turned on manually through the corresponding menu item.
When using the 802.3af / at protocols, you can set the power class that the adminbook will request from the power supply device. This and other POE properties are configured from the menu called with the “LAN” button (Fn + F6).
By the way, you can remotely reset Ubiquity access points (which is done by closing certain wires in the cable) with the second network interface.
The indicator next to the main network interface shows the presence and type of POE: green — 802.3af / at, red — Passive POE.
The last, fifth power supply is the battery. Here it’s a LiPol, 42W/hour battery.
In case the external power supply does not provide sufficient power, the missing power can be drawn from the battery. Thus, it can draw power from the battery and external sources at the same time.
The display can tilt 180 degrees, and it’s locked with latches while closed (opens with a button on the front side). When the display is closed, adminbook doesn’t react to pressing any external buttons.
In addition to the screen, the notebook lid contains:
The plastic insert for the antennas does not reach the corners of the display lid. This is done because in the «traveling» notebooks the corners are most affected by impacts, and it's desirable that they be made of metal.
The notebook has 2 webcams. The front-facing one is 8MP (4K / UltraHD), while the “selfie” one is 2MP (FullHD). Both cameras have a backlight controlled by separate buttons (Fn + G and Fn + H). Each camera has a mechanical curtain and an activity LED. The shifted mechanical curtain also turns off the microphones of the corresponding side (configurable).
The external camera has two quick launch buttons — Fn + 1 takes an instant photo, Fn + 2 turns on video recording. The internal camera has a combination of Fn + Q and Fn + W.
You can configure cameras and microphones from the menu called up by the “CAM” button (Fn + F10).
It has the following indicators: Microphone, NumLock, ScrollLock, hard drive access, battery charge, external power connection, sleep mode, mobile connection, WiFi, Bluetooth.
Three indicators are made to shine through the back side of the display lid, so that they can be seen while the lid is closed: external power connection, battery charge, sleep mode.
Indicators are color-coded.
Microphone — lights up red when all microphones are muted
Battery charge: more than 60% is green, 30-60% is yellow, less than 30% is red, less than 10% is blinking red.
External power: green — power is supplied, the battery is charged; yellow — power is supplied, the battery is charging; red — there is not enough external power to operate, the battery is drained
Mobile: 4G (LTE) — green, 3G — yellow, EDGE / GPRS — red, blinking red — on, but no connection
Wi-Fi: green — connected to 5 GHz, yellow — to 2.4 GHz, red — on, but not connected
You can configure the indication with the “IND” button (Fn + F9)
Near the indicators (on the front and back of the display lid) there are infrared photo sensors and LEDs to recording and playback commands from IR remotes. You can set it up, as well as emulate a remote control by pressing the “IR” button (Fn + F5).
WiFi — dual-band, 802.11a/b/g/n/ac with support for Wireless Direct, Intel WI-Di / Miracast, Wake On Wireless LAN.
You ask, why is Miracast here? Because is already embedded in many WiFi chips, so its presence does not lead to additional costs. But you can transfer the image wirelessly to TVs, projectors and TV set-top boxes, that already have Miracast built in.
Regarding Bluetooth, there’s nothing special. It’s version 4.2 or newest. By the way, the keyboard and trackpoint have a separate Bluetooth module. This is much easier than connect them to the system-wide module.
Of course, the adminbook has a built-in cellular modem for 4G (LTE) / 3G / EDGE / GPRS, as well as a GPS / GLONASS / Galileo / Beidou receiver. This receiver also doesn’t cost much, because it’s already built into the 4G modem.
There is also an NFC communication module, with the antenna under the spacebar. Antennas of all other wireless interfaces are in a plastic insert above the display.
You can configure wireless interfaces with the «WRLS» button (Fn + F7).
In total, four USB 3.0 Type A connectors and four USB 3.1 Type C connectors are built into the adminbook. Peripherals are connected to the adminbook through these.
One more Type C and MicroUSB are allocated only for keyboard / mouse / drive emulation (denoted as “OTG”).
«QC 3.0» labeled MicroUSB connector can not only be used for power, but it can switch to normal USB 2.0 port mode, except using MicroB instead of normal Type A. Why is it necessary? Because to flash some electronics you sometimes need non-standard USB A to USB A cables.
In order to not make adapters outselves, you can use a regular phone charging cable by plugging it into this Micro B connector. Or use an USB A to USB Type C cable (if you have one).

Fig.12.1 — Homemade USB A to USB A cable
Since USB Type C supports alternate modes, it makes sense to use it. Alternate modes are when the connector works as HDMI or DisplayPort video outputs. Though you’ll need adapters to connect it to a TV or monitor. Or appropriate cables that have Type C on one end and HDMI / DP on the other. However, USB Type C to USB Type C cables might soon become the most common video transfer cable.
The Type C connector on the left side of the adminbook supports an alternate Display Port mode, and on the right side, HDMI. Like the other video outputs of the adminbook, they can work as both input and output.
The one thing left to say is that Type C is bidirectional in regard to power delivery — it can both take in power as well as output it.
On the left side there are four audio connectors: Line In, Line Out, Microphone and the combo headset jack (headphones + microphone). Supports simple stereo, quad and 5.1 mode output.
Audio outputs are specially placed next to the video connectors, so that when connected to any equipment, the wires are on one side.
Built-in speakers are on the sides. Outside, they are covered with grills and acoustic fabric with water-repellent impregnation.
There are also two slots for memory cards — full-size SD and MicroSD. If you think that the first slot is needed only for copying photos from the camera — you are mistaken. Now, both single-board computers like Raspberry Pi and even rack-mount servers are loaded from SD cards. MicroSD cards are also commonly found outside of phones. In general, you need both card slots.
Sensors more familiar to phones — a gyroscope, an accelerometer and a magnetometer — are built into the lid of the notebook. Thanks to this, one can determine where the notebook cameras are directed and use this for augmented reality, as well as navigation. Sensors are controlled via the menu using the “SNSR” button (Fn + F11).
Among the function buttons with Fn, F1 (“MAN”) and F12 (“ETC”) I haven’t described yet. The first is a built-in guide on connectors, modes and how to use the adminbook. The second is the settings of non-standard subsystems that have not separate buttons.
The adminbook is based on the Core i5-7Y57 CPU (Kaby Lake architecture). Although it’s less of a CPU, but more of a real SOC (System On a Chip). That is, almost the entire computer (without peripherals) fits in one chip the size of a thumb nail (2x1.6 cm).
It emits from 3.5W to 7W of heat (depends on the frequency). So, a passive cooling system is adequate in this case.
8GB of RAM are installed by default, expandable up to 16GB.
A 256GB M.2 2280 SSD, connected with two PCIe lanes, is used as the hard drive.
Wi-Fi + Bluetooth and WWAN + GNSS adapters are also designed as M.2 modules.
RAM, the hard drive and wireless adapters are located on the top of the motherboard and can be replaced by the user — just unscrew and lift the keyboard.
The battery is assembled from four LP545590 cells and can also be replaced.
SOC and other irreplaceable hardware are located on the bottom of the motherboard. The heating components for cooling are pressed directly against the case.
External connectors are located on daughter boards connected to the motherboard via ribbon cables. That allows to release different versions of the adminbook based on the same motherboard.
For example, one of the possible version:
 Fig.14.1 — Adminbook A4 (front view)

Fig.14.2 — Adminbook A4 (back view)

Fig.14.3 — Adminbook A4 (keyboard)
This is an adminbook with a 12.5” display, its overall dimensions are 210x297mm (A4 paper format). The keyboard is full-size, with a standard key size (only the top row is a bit narrower). All the standard keys are there, except for the numpad and the Right Win, available with Fn keys. And trackpad added.
Not expecting anything interesting from the bottom? But there is!
First I will say a few words about the rubber feet. On my ThinkPad, they sometimes fall away and lost. I don't know if it's a bad glue, or a backpack is not suitable for a notebook, but it happens.
Therefore, in the adminbook, the rubber feet are screwed in (the screws are slightly buried in rubber, so as not to scratch the tables). The feet are sufficiently streamlined so that they cling less to other objects.
On the bottom there are visible drainage holes marked with a water drop.
And the four threaded holes for connecting the adminbook with fasteners.
 Fig.15.1 — The underside of the adminbook
Large hole in the center has a tripod thread.

Fig.15.2 — Camera clamp mount
Why is it necessary? Because sometimes you have to hang on high, holding the mast with one hand, holding the notebook with the second, and typing something on the third… Unfortunately, I am not Shiva, so these tricks are not easy for me. And you can just screw the adminbook by a camera mount to any protruding part of the structure and free your hands!
No protruding parts? No problem. A plate with neodymium magnets is screwed to three other holes and the adminbook is magnetised to any steel surface — even vertical! As you see, opening the display by 180° is pretty useful.
 Fig.15.3 — Fastening with magnets and shaped holes for nails / screws
And if there is no metal? For example, working on the roof, and next to only a wooden wall. Then you can screw 1-2 screws in the wall and hang the adminbook on them. To do this, there are special slots in the mount, plus an eyelet on the handle.
For especially difficult cases, there’s an arm mount. This is not very convenient, but better than nothing. Besides, it allows you to navigate even with a working notebook.
 Fig.15.4 — Arm mount
In general, these three holes use a regular metric thread, specifically so that you can make some DIY fastening and fasten it with ordinary screws.
Except fasteners, an additional radiator can be screwed to these holes, so that you can work for a long time under high load or at high ambient temperature.
 Fig.15.5 — Adminbook with additional radiator
The adminbook has some unique features, and some of them are implemented using equipment designed specifically for the adminbook. Therefore, these accessories are immediately included. However, non-unique accessories are also available immediately.
Here is a complete list of both:
Since this is a power supply for a system administrator's notebook, it would be nice to make it universal, capable of powering various electronic devices. Fortunately, the vast majority of devices are connected via coaxial connectors or USB. I mean devices with external power supplies: routers, switches, notebooks, nettops, single-board computers, DVRs, IPTV set top boxes, satellite tuners and more.
 Fig.17.1 — Adapters from 5.5x2.5mm coaxial connector to other types of connectors
There aren’t many connector types, which allows to get by with an adjustable-voltage PSU and adapters for the necessary connectors. It also needs to support various power delivery standards.
In our case, the power supply supports the following modes:

Fig.17.2 — Mode display on the 7-segment indicator (1.9. = 19.5V)
 Fig.17.3 — Front and top sides of power supply
USB outputs on the power supply (5V 2A) are always on. On the other outputs the voltage is applied by pressing the ON/OFF button.
The desired mode is selected with the MODE button and this selection is remembered even when the power is turned off. The modes are listed like this: pd, qc, at, then a series of voltages.
Voltage increases by pressing and holding the MODE button, decreases by short pressing. Step to the right — 1 Volt, step to the left — 0.5 Volt. Half a volt is needed because some equipment requires, for example, 19.5 volts. These half volts are displayed on the display with decimal points (19V -> [19], 19.5V -> [1.9.]).
When power is on, the green LED is on. When a short-circuit or overcurrent protection is triggered, [SH] is displayed, and the LED lights up red.
In the Power Delivery and Quick Charge modes, voltage is applied to the USB outputs (Type A and Type C). Only one of them can be used at one time.
In 802.3af/at modes, the power supply acts as an injector, combining the supply voltage with data from the LAN connector and supplying it to the POE connector. Power is supplied only if a device with 802.3af or 802.3at support is plugged into the POE connector.
But in the simple voltage supply mode, electricity throu the POE connector is issued immediately, without any checks. This is the so-called Passive POE — positive charge goes to conductors 4 and 5, and negative charge to conductors 7 and 8. At the same time, the voltage is applied to the coaxial connector. Adapters for various types of connectors are used in this mode.
The power supply unit has a built-in button to remotely reset Ubiquity access points. This is a very useful feature that allows you to reset the antenna to factory settings without having to climb on the mast. I don’t know — is any other manufacturers support a feature like this?
The power supply also has the passive wiremap adapter, which allows you to determine the correct Ethernet cable crimping. The active part is located in the Ethernet ports of the adminbook.
 Fig.17.4 — Back side and wiremap adapter
Of course, the network cable tester built into the adminbook will not replace a professional OTDR, but for most tasks it will be enough.
To prevent overheating, part of the PSU’s body acts as an aluminum heatsink. Power supply power — 65 watts, size 10x5x4cm.
“It won’t fit into such a small case!” — the sceptics will probably say. To be frank, I also sometimes think that way when re-reading what I wrote above.
And then I open the 3D model and see, that all parts fits. Of course, I am not an electronic engineer, and for sure I miss some important things. But, I hope that if there are mistakes, they are “overcorrections”. That is, real engineers would fit all of that into a case even smaller.
By and large, the adminbook can be divided into 5 functional parts:
If we consider them separately, then everything looks quite feasible.
The SOC Kaby Lake contains a CPU, a graphics accelerator, a memory controller, PCIe, SATA controller, USB controller for 6 USB3 and 10 USB2 outputs, Gigabit Ethernet controller, 4 lanes to connect webcams, integrated audio and etc.
All that remains is to trace the lanes to connectors and supply power to it.
Keyboard and trackpoint is a separate module that connects via USB to the adminbook or to an external connector. Nothing complicated here: USB and Bluetooth keyboards are very widespread. In our case, in addition, needs to make a rewritable table of scan codes and transfer non-standard keys over a separate interface other than USB.
The video subsystem receives the video signal from the adminbook or from external connectors. In fact, this is a regular monitor with a video switchboard plus a couple of VGA converters.
Non-standard features are managed independently of the operating system. The easiest way to do it with via a separate microcontroller which receives codes for pressing non-standard keys (those that are pressed with Fn) and performs the corresponding actions.
Since you have to display a menu to change the settings, the microcontroller has a video output, connected to the adminbook for the duration of the setup.
The internal PSU is galvanically isolated from the rest of the system. Why not? On habr.com there was an article about making a 100W, 9.6mm thickness planar transformer! And it only costs $0.5.
So the electronic part of the adminbook is quite feasible. There is the programming part, and I don’t know which part will harder.
This concludes my fairly long article. It long, even though I simplified, shortened and threw out minor details.
The ideal end of the article was a link to an online store where you can buy an adminbook. But it's not yet designed and released. Since this requires money.
Unfortunately, I have no experience with Kickstarter or Indigogo. Maybe you have this experience? Let's do it together!
Many people asked for a simplified version. Ok. Done. Sorry — just a 3d model, without render.
Deleted: second LAN adapter, micro SD card reader, one USB port Type C, second camera, camera lights and camera curtines, display latch, unnecessary audio connectors.
Also in this version there will be no infrared remote control, a reprogrammable keyboard, QC 3.0 charging standard, and getting power by POE.


I already have a ThinkPad x200, but it’s heavier than I would like. And among the lightweight notebooks, I did not find anything suitable. All of them imitate the MacBook Air: thin, shiny, glamorous, and they all critically lack ports. Such notebook is suitable for posting photos on Instagram, but not for work. At least not for mine.
After not finding anything suitable, I thought about how a notebook would turn out if it were developed not with design, but the needs of real users in mind. System administrators, for example. Or people serving telecommunications equipment in hard-to-reach places — on roofs, masts, in the woods, literally in the middle of nowhere.
The results of my thoughts are presented in this article.
Of course, your understanding of the admin notebook does not have to coincide with mine. But I hope you will find a couple of interesting thoughts here.
Just keep in mind that «system administrator» is just the name of my position. And in fact, I have to work as a network engineer, and installer, and perform a significant part of other work related to hardware. Our company is tiny, we are far from large settlements, so all of us have to be universal specialist.
In order not to constantly clarify «this notebook», later in the article I will call it the “adminbook”. Although it can be useful not only to administrators, but also to all who need a small, lightweight notebook with a lot of connectors. In fact, even large laptops don’t have as many connectors.
So let's get started…
1. Dimensions and weight
Of course, you want it smaller and more lightweight, but the keyboard with the screen should not be too small. And there has to be space for connectors, too.
In my opinion, a suitable option is a notebook half the size of an x200. That is, approximately the size of a sheet of A5 paper (210x148mm). In addition, the side pockets of many bags and backpacks are designed for this size. This means that the adminbook doesn’t even have to be carried in the main compartment.
Though I couldn’t fit everything I wanted into 210mm. To make a comfortable keyboard, the width had to be increased to 230mm.
In the illustrations the adminbook may seem too thick. But that’s only an optical illusion. In fact, its thickness is 25mm (28mm taking the rubber feet into account).
Its size is close to the usual hardcover book, 300-350 pages thick.
It’s lightweight, too — about 800 grams (half the weight of the ThinkPad).
The case of the adminbook is made of
2. Keyboard and trackpoint
A quality keyboard is very important for me. “Quality” there means the fastest possible typing and hotkey speed. It needs to be so “matter-of-fact” I don’t have to think about it at all, as if it types seemingly by force of thought.
This is possible if the keys are normal size and in their typical positions. But the adminbook is too small for that. In width, it is even smaller than the main block of keys of a desktop keyboard. So, you have to work around that somehow.
After a long search and numerous tests, I came up with what you see in the picture:
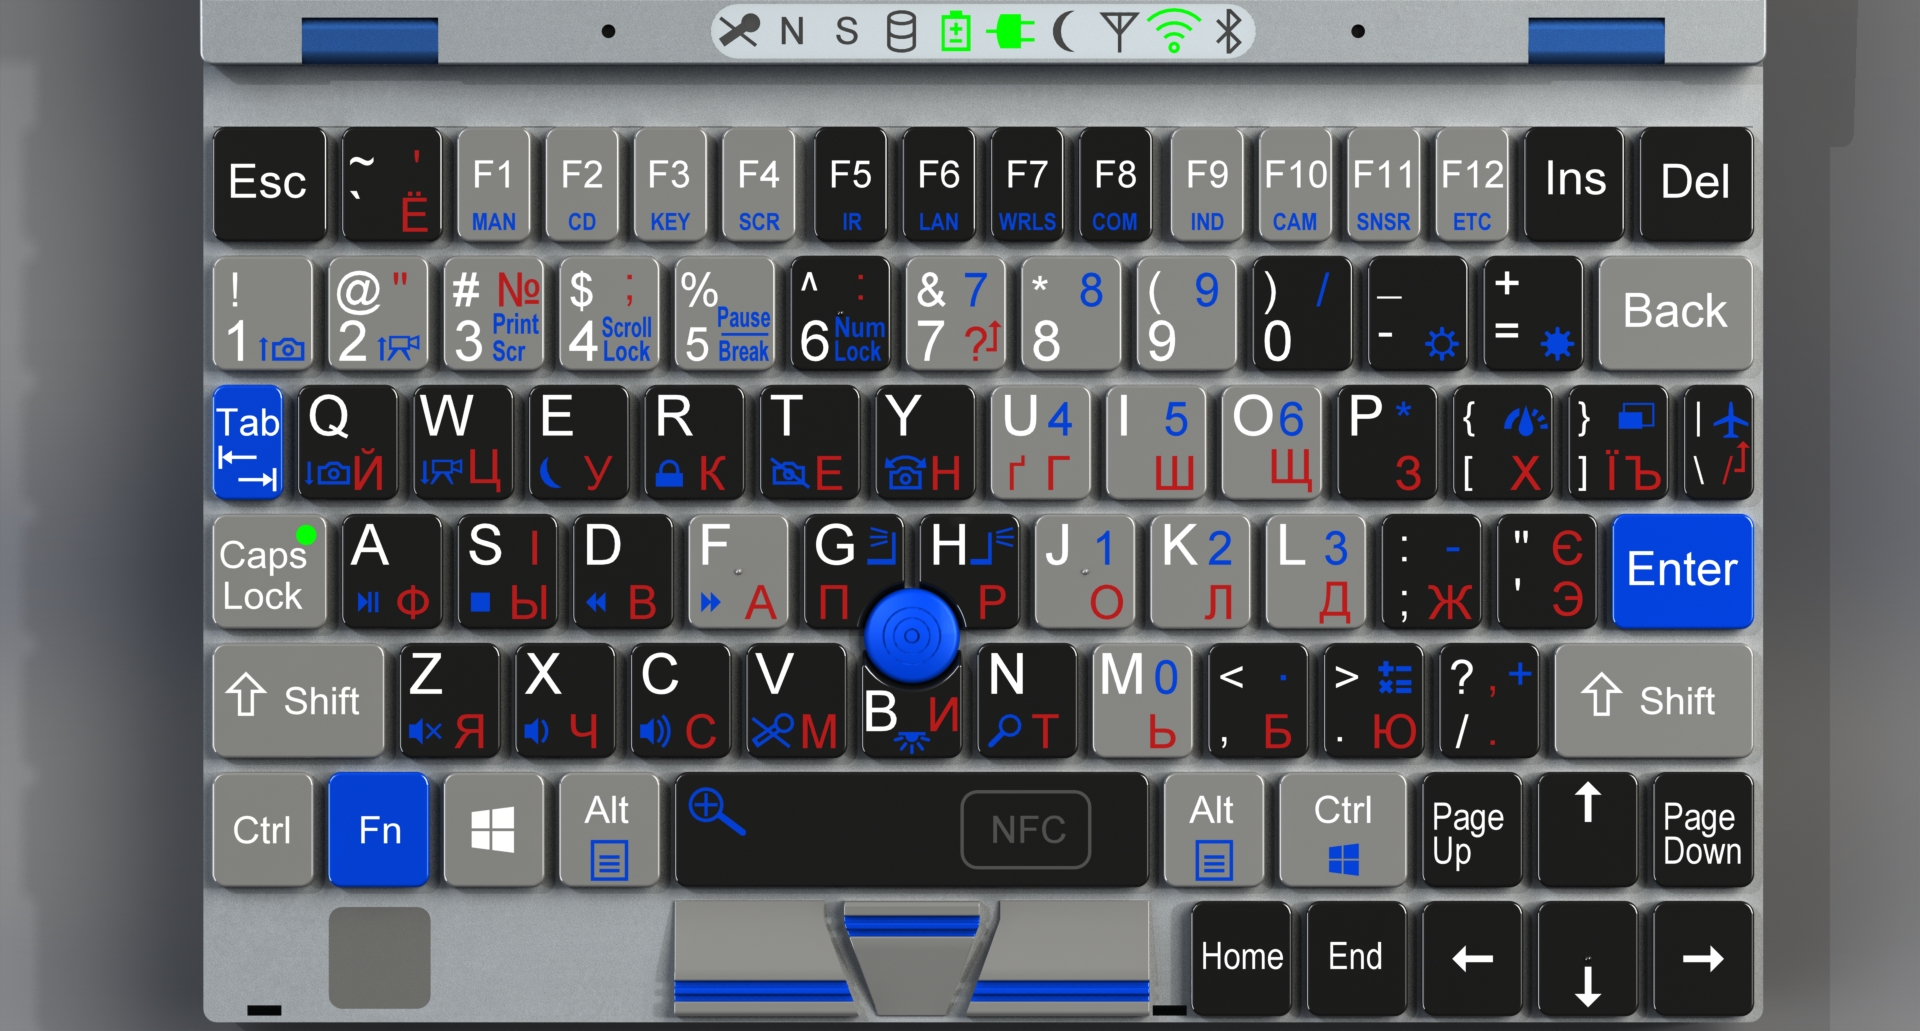
Fig.2.1 — Adminbook keyboard
This keyboard has the same vertical key distance as on a regular keyboard. A horizontal distance decreased just only 2mm (17 instead of 19).
You can even type blindly on this keyboard! To do this, some keys have small bumps for tactile orientation.
However, if you do not sit at a table, the main input method will be to press the keys “at a glance”. And here the muscle memory does not help — you have to look at the keys with your eyes.
To hit the buttons faster, different key colors are used.
For example, the numeric row is specifically colored gray to visually separate it from the QWERTY row, and NumLock is mapped to the “6” key, colored black to stand out.
To the right of NumLock, gray indicates the area of the numeric keypad. These (and neighboring) buttons work like a numeric keypad in NumLock mode or when you press Fn. I must say, this is a useful feature for the admin computer — some users come up with passwords on the numpad in the form of a “cross”, “snake”, “spiral”, etc. I want to be able to type them that way too.
As for the function keys. I don’t know about you, but it annoys me when, in a 15-inch laptop, this row is half-height and only accessible through pressing Fn. Given that there’s a lot free space around the keyboard!
The adminbook doesn’t have free space at all. But the function keys can be pressed without Fn. These are separate keys that are even divided into groups of 4 using color coding and location.
By the way, have you seen which key is to the right of AltGr on modern ThinkPads? I don’t know what they were thinking, but now they have PrintScreen there!
Where? Where, I ask, is the context menu key that I use every day? It’s not there.
So the adminbook has it. Two, even! You can put it up by pressing Fn + Alt. Sorry, I couldn’t map it to a separate key due to lack of space. Just in case, I added the “Right Win” key as Fn + CtrlR. Maybe some people use it for something.
However, the adminbook allows you to customize the keyboard to your liking. The keyboard is fully reprogrammable. You can assign the scan codes you need to the keys. Setting the keyboard parameters is done via the “KEY” button (Fn + F3).
Of course, the adminbook has a keyboard backlight. It is turned on with Fn + B (below the trackpoint, you can even find it in the dark). The backlight here is similar to the ThinkPad ThinkLight. That is, it’s an LED above the display, illuminating the keyboard from the top. In this case, it is better than a backlight from below, because it allows you to distinguish the color of the keys. In addition, keys have several characters printed on them, while only English letters are usually made translucent to the backlight.
Since we’re on the topic of characters… Red letters are Ukrainian and Russian. I specifically drew them to show that keys have space for several alphabets: after all, English is not a native language for most of humanity.
Since there isn’t enough space for a full touchpad, the trackpoint is used as the positioning device. If you have no experience working with it — don’t worry, it’s actually quite handy. The mouse cursor moves with slight inclines of the trackpoint, like an analog joystick, and its three buttons (under the spacebar) work the same as on the mouse.
To the left of the trackpoint keys is a fingerprint scanner. That makes it possible to login by fingerprint. It’s very convenient in most cases.
The space bar has an NFC antenna location mark. You can simply read data from devices equipped with NFC, and you can make it to lock the system while not in use. For example, if you wear an NFC-equipped ring, it looks like this: when you remove hands from the keyboard, the computer locks after a certain time, and unlocks when you put hands on the keyboard again.
And now the unexpected part. The keyboard and the trackpoint can work as a USB keyboard and mouse for an external computer! For this, there are USB Type C and MicroUSB connectors on the back, labeled «OTG». You can connect to an external computer using a standard USB cable from a phone (which is usually always with you).
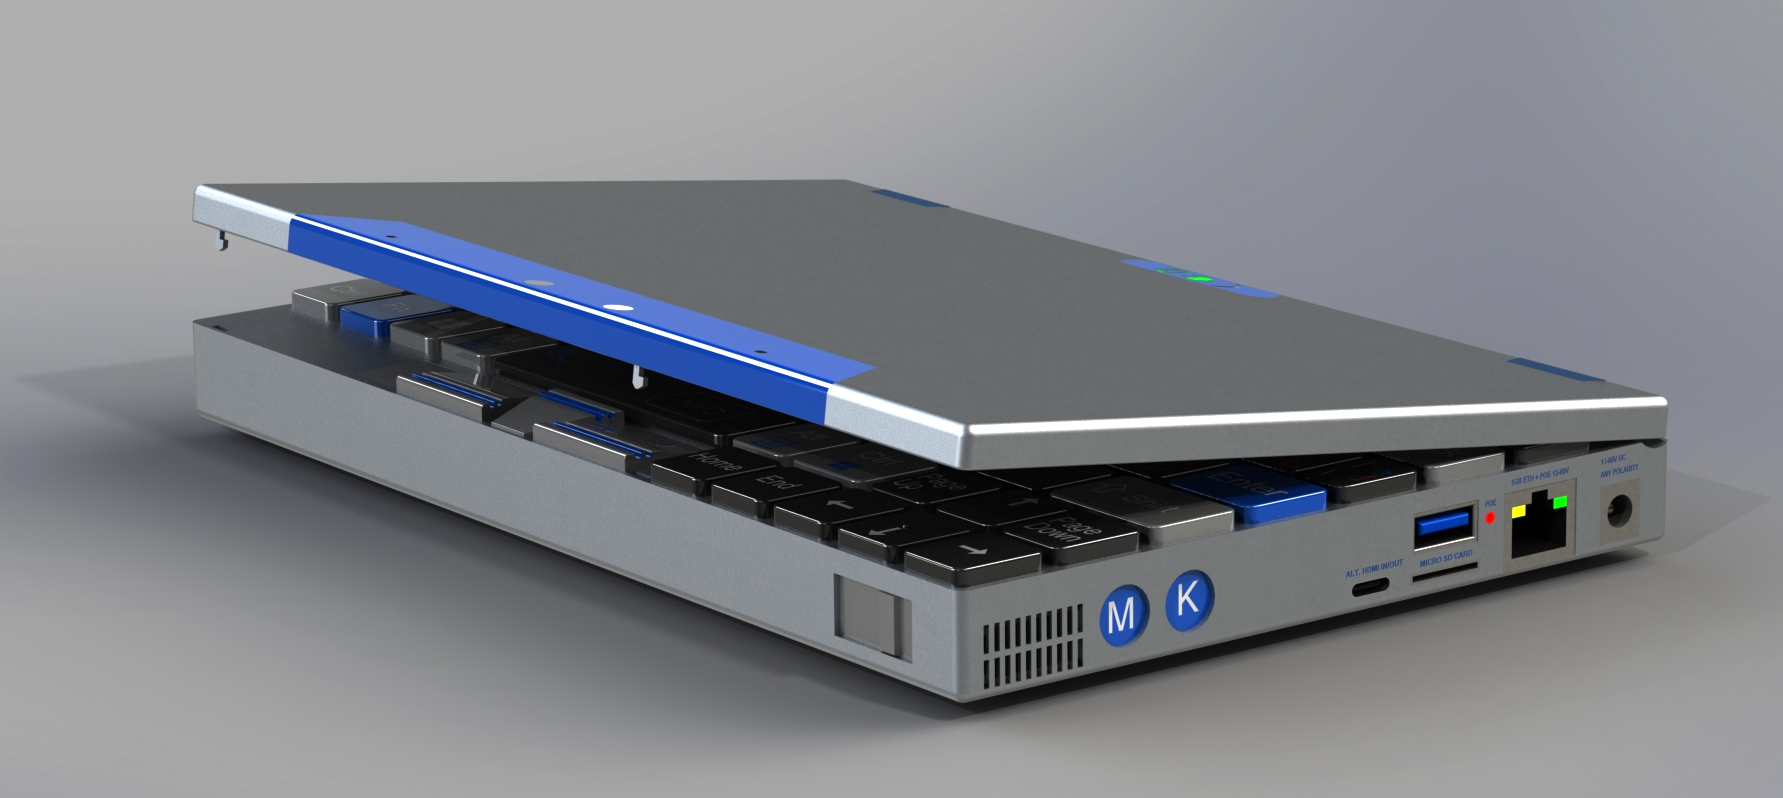
Fig.2.2 — On the right: the power connector 5.5x2.5mm, the main LAN connector, POE indicator, USB 3.0 Type A, USB Type C (with alternate HDMI mode), microSD card reader and two «magic» buttons
Switching to the external keyboard mode is done with the «K» button on the right side of the adminbook. And there are actually three modes, since the keyboard+trackpoint combo can also work as a Bluetooth keyboard/mouse!
Moreover: to save energy, the keyboard and trackpoint can work autonomously from the rest of the adminbook. When the adminbook is turned off, pressing «K» can turn on only the keyboard and trackpoint to use them by connecting to another computer.
Of course, the keyboard is water-resistant. Excess water is drained down through the drainage holes.
3. Video subsystem
There are some devices that normally do not need a monitor and keyboard. For example, industrial computers, servers or DVRs. And since the monitor is «not needed», it is, in most cases, absent.
And when there is a need to configure such a device from the console, it can be a big surprise that the entire office is working on laptops and there is not a single stationary monitor within reach. Therefore, in some cases you have to take a monitor with you.
But you don’t need to worry about this if you have the adminbook.
The fact is that the video outputs of the adminbook can switch «in the opposite direction» and work as video inputs by displaying the incoming image on the built-in screen. So, the adminbook can also replace the monitor (in addition to replace the mouse and keyboard).

Fig.3.1 — On the left side of the adminbook, there are Mini DisplayPort, USB Type C (with alternate DisplayPort mode), SD card reader, USB 3.0 Type A connectors, HDMI, four audio connectors, VGA and power button
Switching modes between input and output is done by pressing the «M» button on the right side of the adminbook.
The video subsystem, as well as the keyboard, can work autonomously — that is, when used as a monitor, the other parts of the adminbook remain disabled. To turn on to this mode also uses the «M» button.
Detailed screen adjustment (contrast, geometry, video input selection, etc.) is performed using the menu, brought up with the «SCR» button (Fn + F4).
The adminbook has HDMI, MiniDP, VGA and USB Type C connectors (with DisplayPort and HDMI alternate mode) for video input / output. The integrated GPU can display the image simultaneously in three directions (including the integrated display).
The adminbook display is FullHD (1920x1080), 9.5’’, matte screen. The brightness is sufficient for working outside during the day. And to do it better, the set includes folding blinds for protection from sunlight.
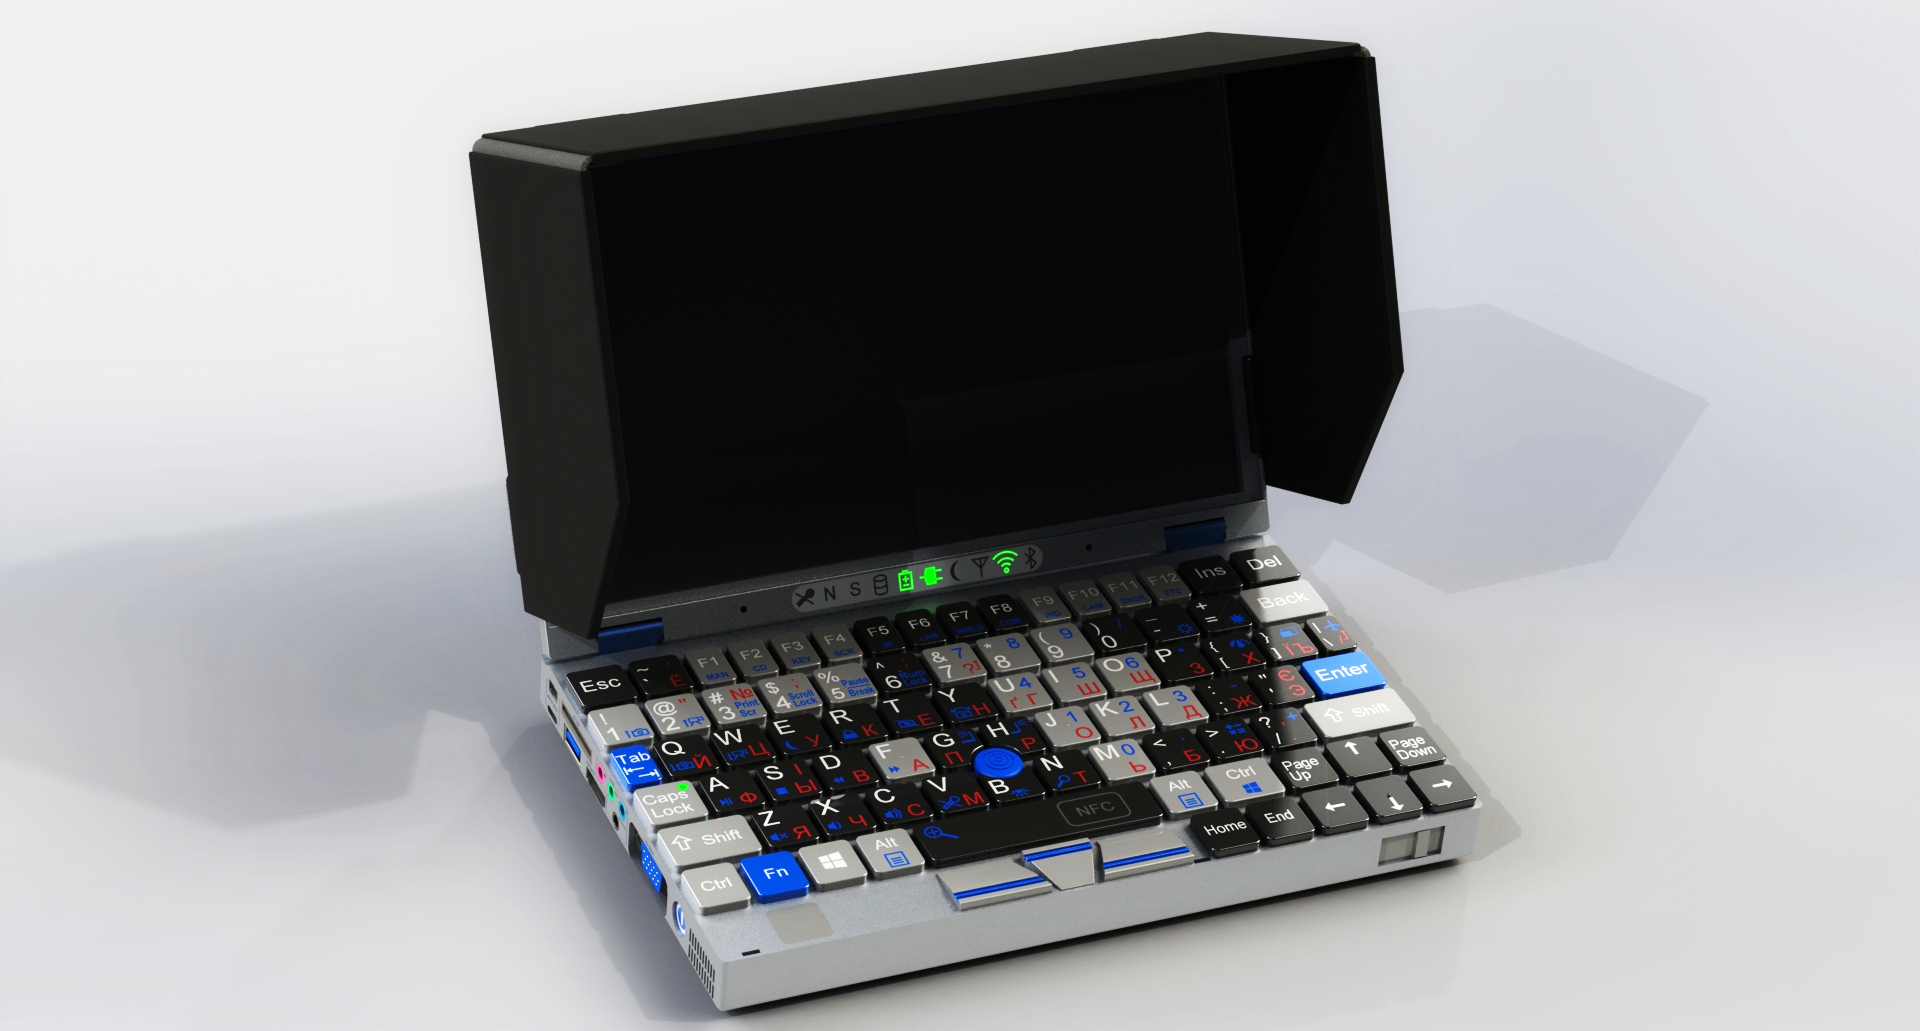
Fig.3.2 — Blinds to protect from sunlight
In addition to video output via these connectors, the adminbook can use wireless transmission via WiDi or Miracast protocols.
4. Emulation of external drives
One of the options for installing the operating system is to install it from a CD / DVD, but now very few computers have optical drives. USB connectors are everywhere, though. Therefore, the adminbook can pretend to be an external optical drive connected via USB.
That allows connecting it to any computer to install an operating system on it, while also running boot discs with test programs or antiviruses.
To connect, it uses the same USB cable that’s used for connecting it to a desktop as an external keyboard/mouse.
The “CD” button (Fn + F2) controls the drive emulation — select a disc image (in an .iso file) and mount / unmount it.
If you need to copy data from a computer or to it, the adminbook can emulate an external hard drive connected via the same USB cable. HDD emulation is also enabled by the “CD” button.
This button also turns on the emulation of bootable USB flash drives. They are now used to install operating systems almost more often than CDs. Therefore, the adminbook can pretend to be a bootable flash drive.
The .iso files are located on a separate partition of the hard disk. This allows you to use them regardless of the operating system. Moreover, in the emulation menu you can connect a virtual drive to one of the USB interfaces of the adminbook. This makes it possible to install an operating system on the adminbook using itself as an installation disc drive.
By the way, the adminbook is designed to work under Windows 10 and Debian / Kali / Ubuntu. The menu system called via function buttons with Fn works autonomously on a separate microcontroller.
5. Rear connectors
First, a classic DB-9 connector for RS-232. Any admin notebook simply has to have it. We have it here, too, and galvanically isolated from the rest of the notebook.
In addition to RS-232, RS-485 widely used in industrial automation is supported. It has a two-wire and four-wire version, with a terminating resistor and without, with the ability to enable a protective offset. It can also work in RS-422 and UART modes.
All these protocols are configured in the on-screen menu, called by the «COM» button (Fn + F8).
Since there are multiple protocols, it is possible to accidentally connect the equipment to a wrong connector and break it.
To prevent this from happening, when you turn off the computer (or go into sleep mode, or close the display lid), the COM port switches to the default mode. This may be a “port disabled” state, or enabling one of the protocols.

Fig.5.1 — The rear connectors: DB-9, SATA + SATA Power, HD Mini SAS, the second wired LAN connector, two USB 3.0 Type A connectors, two USB 2.0 MicroB connectors, three USB Type C connectors, a USIM card tray, a PBD-12 pin connector (jack)
The adminbook has one more serial port. But if the first one uses the hardware UART chipset, the second one is connected to the USB 2.0 line through the FT232H converter.
Thanks to this, via COM2, you can exchange data via I2C, SMBus, SPI, JTAG, UART protocols or use it as 8 outputs for Bit-bang / GPIO. These protocols are used when working with microcontrollers, flashing firmware on routers and debugging any other electronics. For this purpose, pin connectors are usually used with a 2.54mm pitch. Therefore, COM2 is made to look like one of these connectors.
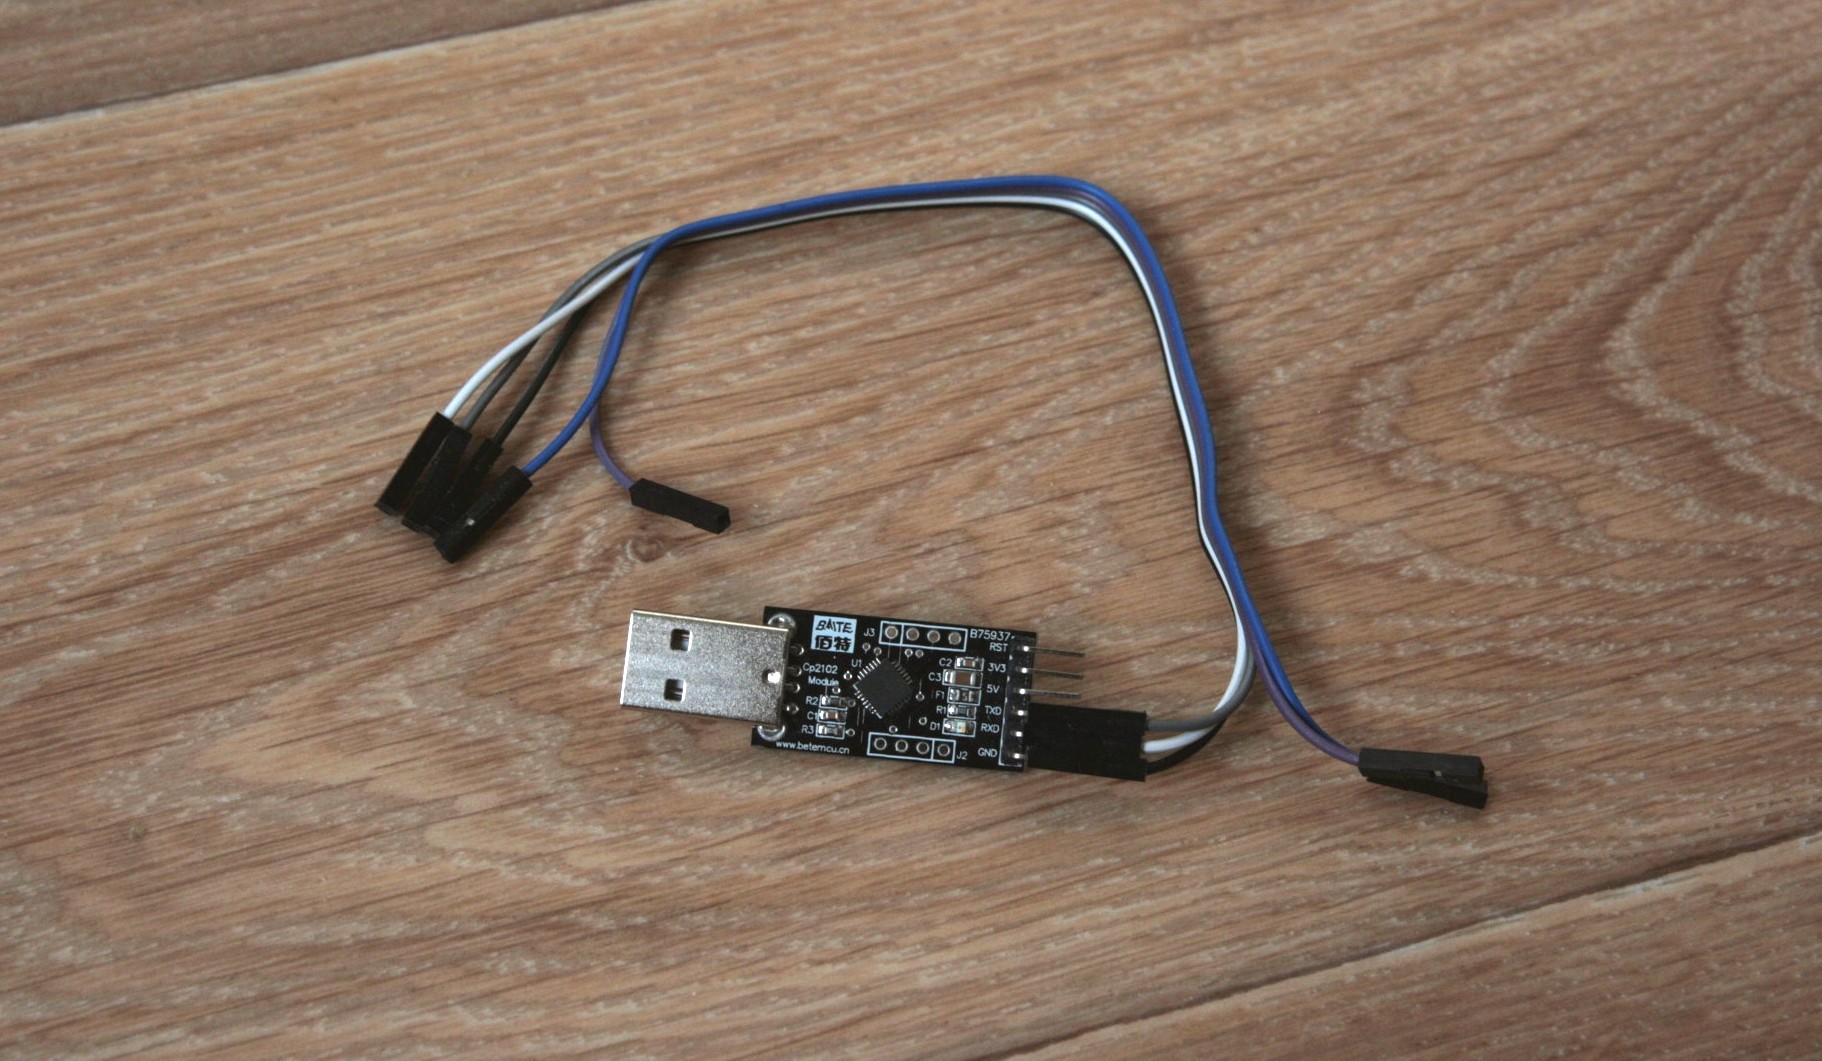
Fig.5.2 — USB to UART adapter replaced by COM2 port
There is also a secondary LAN interface at the back. Like the main one, it is gigabit-capable, with support for VLAN. Both interfaces are able to test the integrity of the cable (for pair length and short circuits), the presence of connected devices, available communication speeds, the presence of POE voltage. With the using a wiremap adapter on the other side (see chapter 17) it is possible to determine how the cable is connected to crimps.
The network interface menu is called with the “LAN” button (Fn + F6).
The adminbook has a combined SATA + SATA Power connector, connected directly to the chipset. That makes it possible to perform low-level tests of hard drives that do not work through USB-SATA adapters. Previously, you had to do it through ExpressCards-type adapters, but the adminbook can do without them because it has a true SATA output.
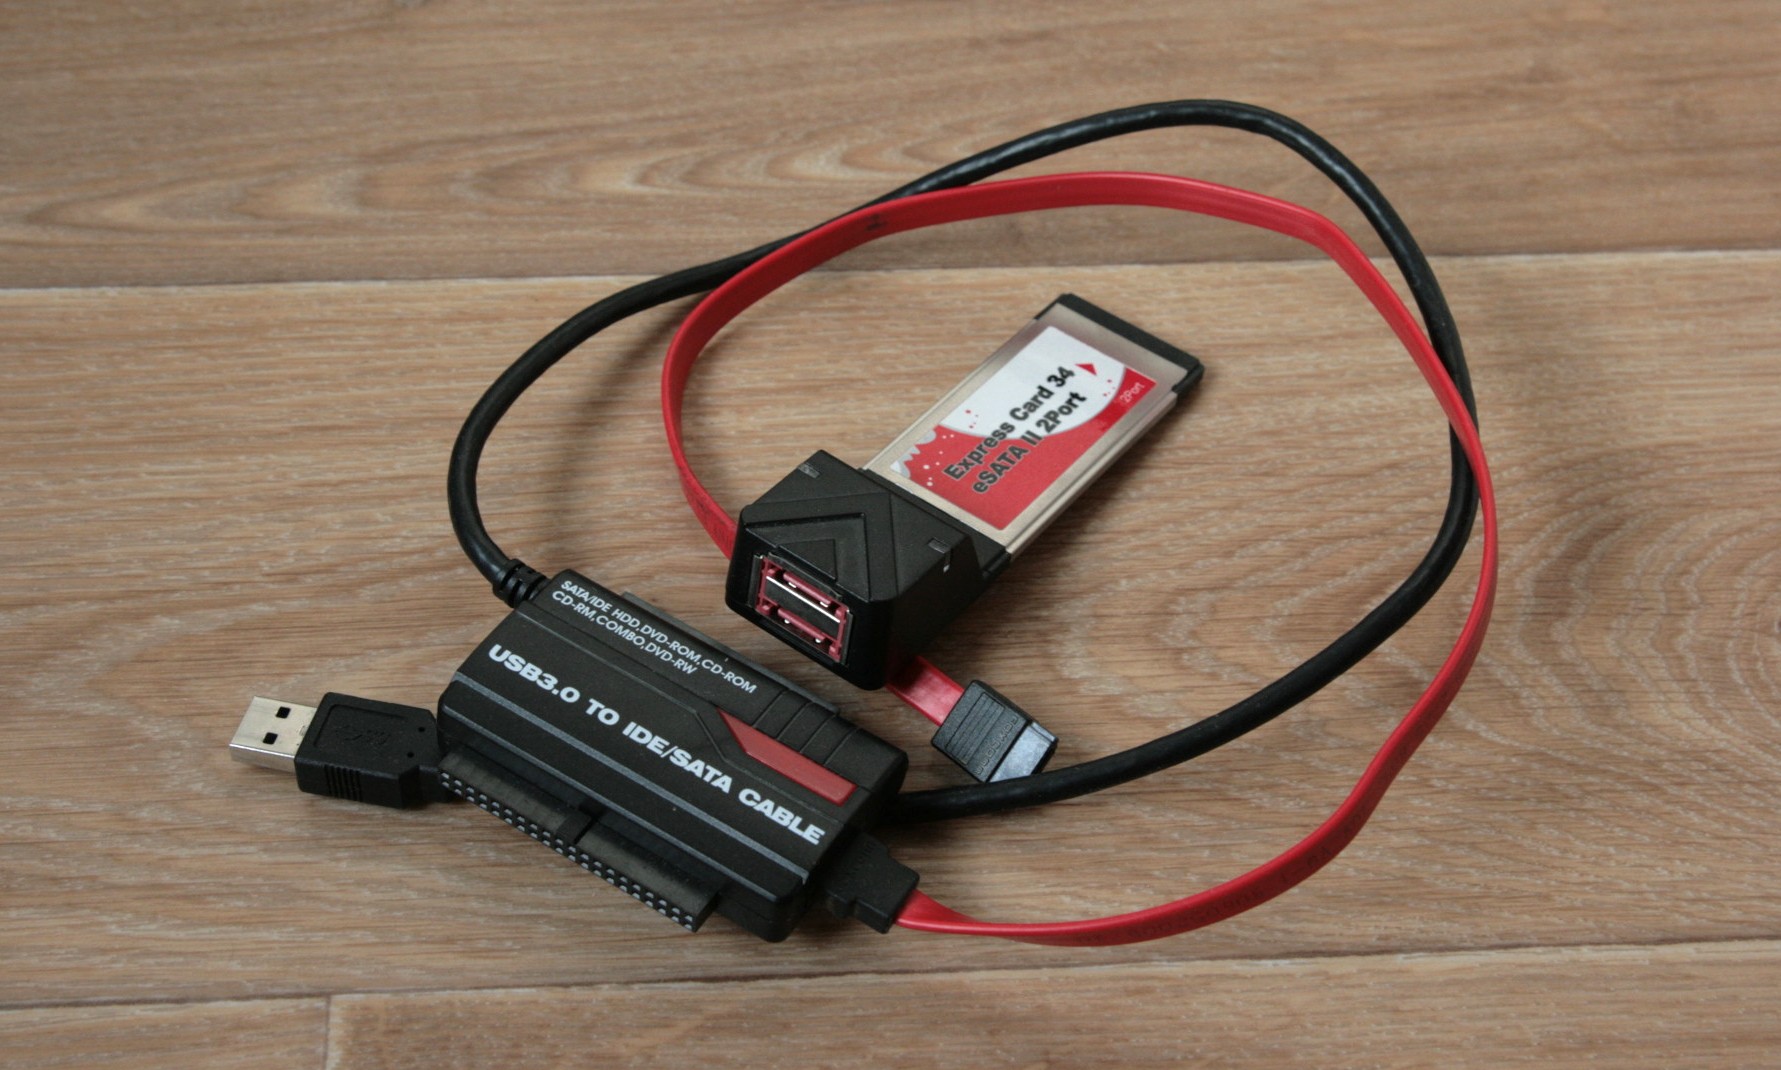
Fig.5.3 — USB to SATA/IDE and ExpressCard to SATA adapters
The adminbook also has a connector that no other laptops have — HD Mini SAS (SFF-8643). PCIe x4 is routed outside through this connector. Thus, it's possible to connect an external U.2 (directly) or M.2 type (through an adapter) drives. Or even a typical desktop PCIe expansion card (like a graphics card).

Fig.5.4 — HD Mini SAS (SFF-8643) to U.2 cable
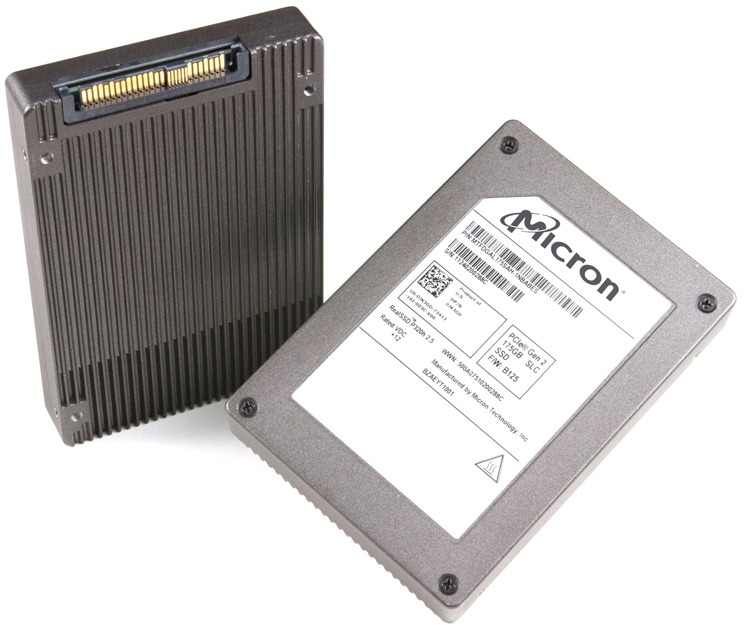
Fig.5.5 — U.2 drive
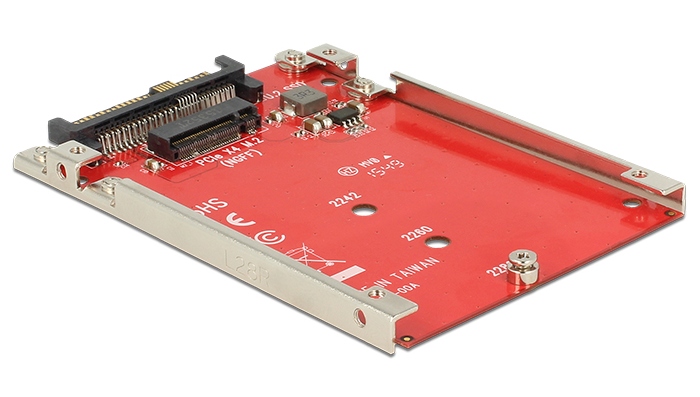
Fig.5.6 — U.2 to M.2 adapter
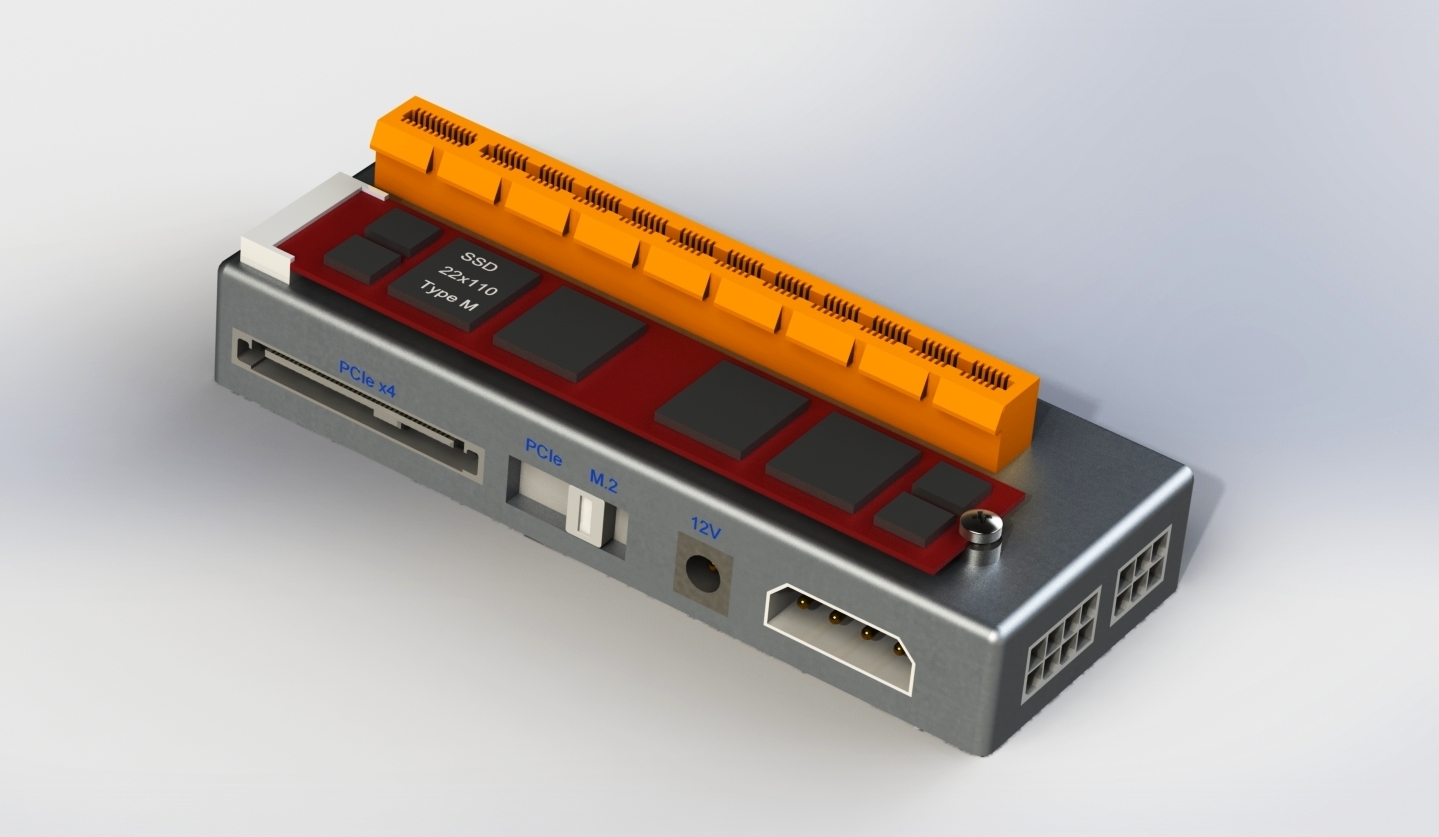
Fig.5.7 — Combined adapter from U.2 to M.2 and PCIe (sample M.2 22110 drive is installed)
Unfortunately, the limitations of the chipset don’t allow arbitrary use of PCIe lanes. In addition, the processor uses the same data lanes for PCIe and SATA. Therefore, the rear connectors can only work in two ways:
— all four PCIe lanes go to the Mini SAS connector (the second network interface and SATA don’t work)
— two PCIe lanes go to the Mini SAS, and two lanes to the second network interface and SATA connector
On the back there are also two USB connectors (usual and Type C), which are constantly powered. That allows you to charge other devices from your notebook, even when the notebook is turned off.
6. Power Supply
The adminbook is designed to work in difficult and unpredictable conditions, therefore, it is able to receive power in various ways.
Method number one is Power Delivery. The power supply cable can be connected to any USB Type C connector (except the one marked “OTG”).
The second option is from a normal 5V phone charger with a microUSB or USB Type C connector. At the same time, if you connect to the ports labeled QC 3.0, the QuickCharge fast charging standard will be supported.
The third option — from any source of 12-60V DC power. To connect, use a coaxial ( also known as “barrel”) 5.5x2.5mm power connector, often found in laptop power supplies.
For greater safety, the 12-60V power supply is galvanically isolated from the rest of the notebook. In addition, there’s reverse polarity protection. In fact, the adminbook can receive energy even if positive and negative ends are mismatched.
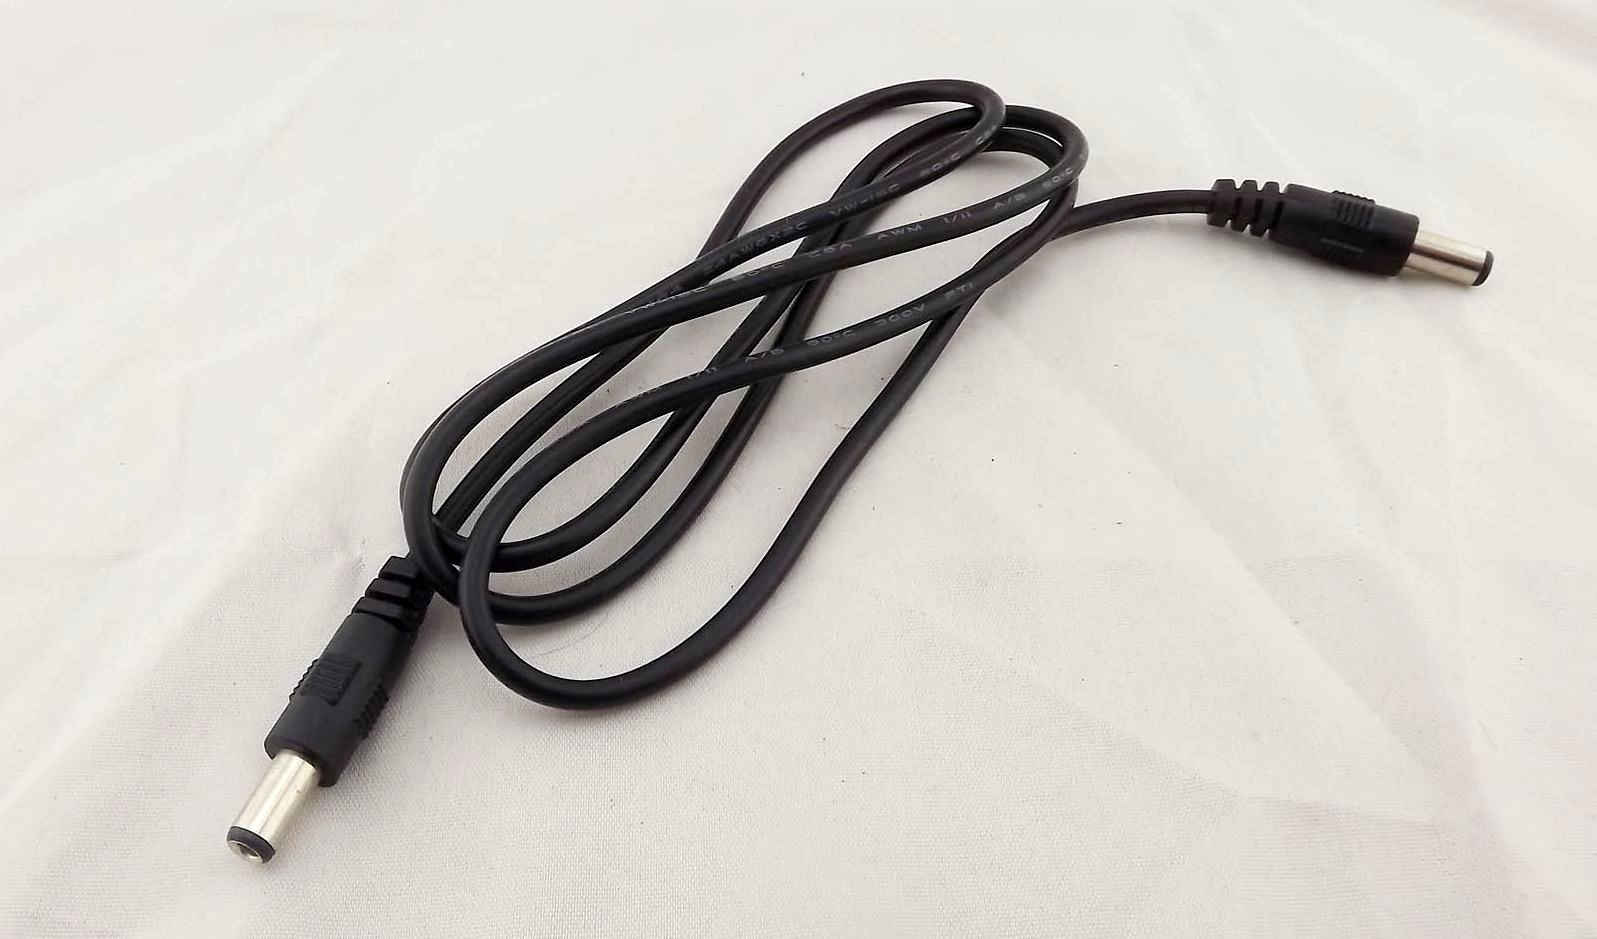
Fig.6.1 — The cable, connecting the power supply to the adminbook (terminated with 5.5x2.5mm connectors)
Adapters for a car cigarette lighter and crocodile clips are included in the box.
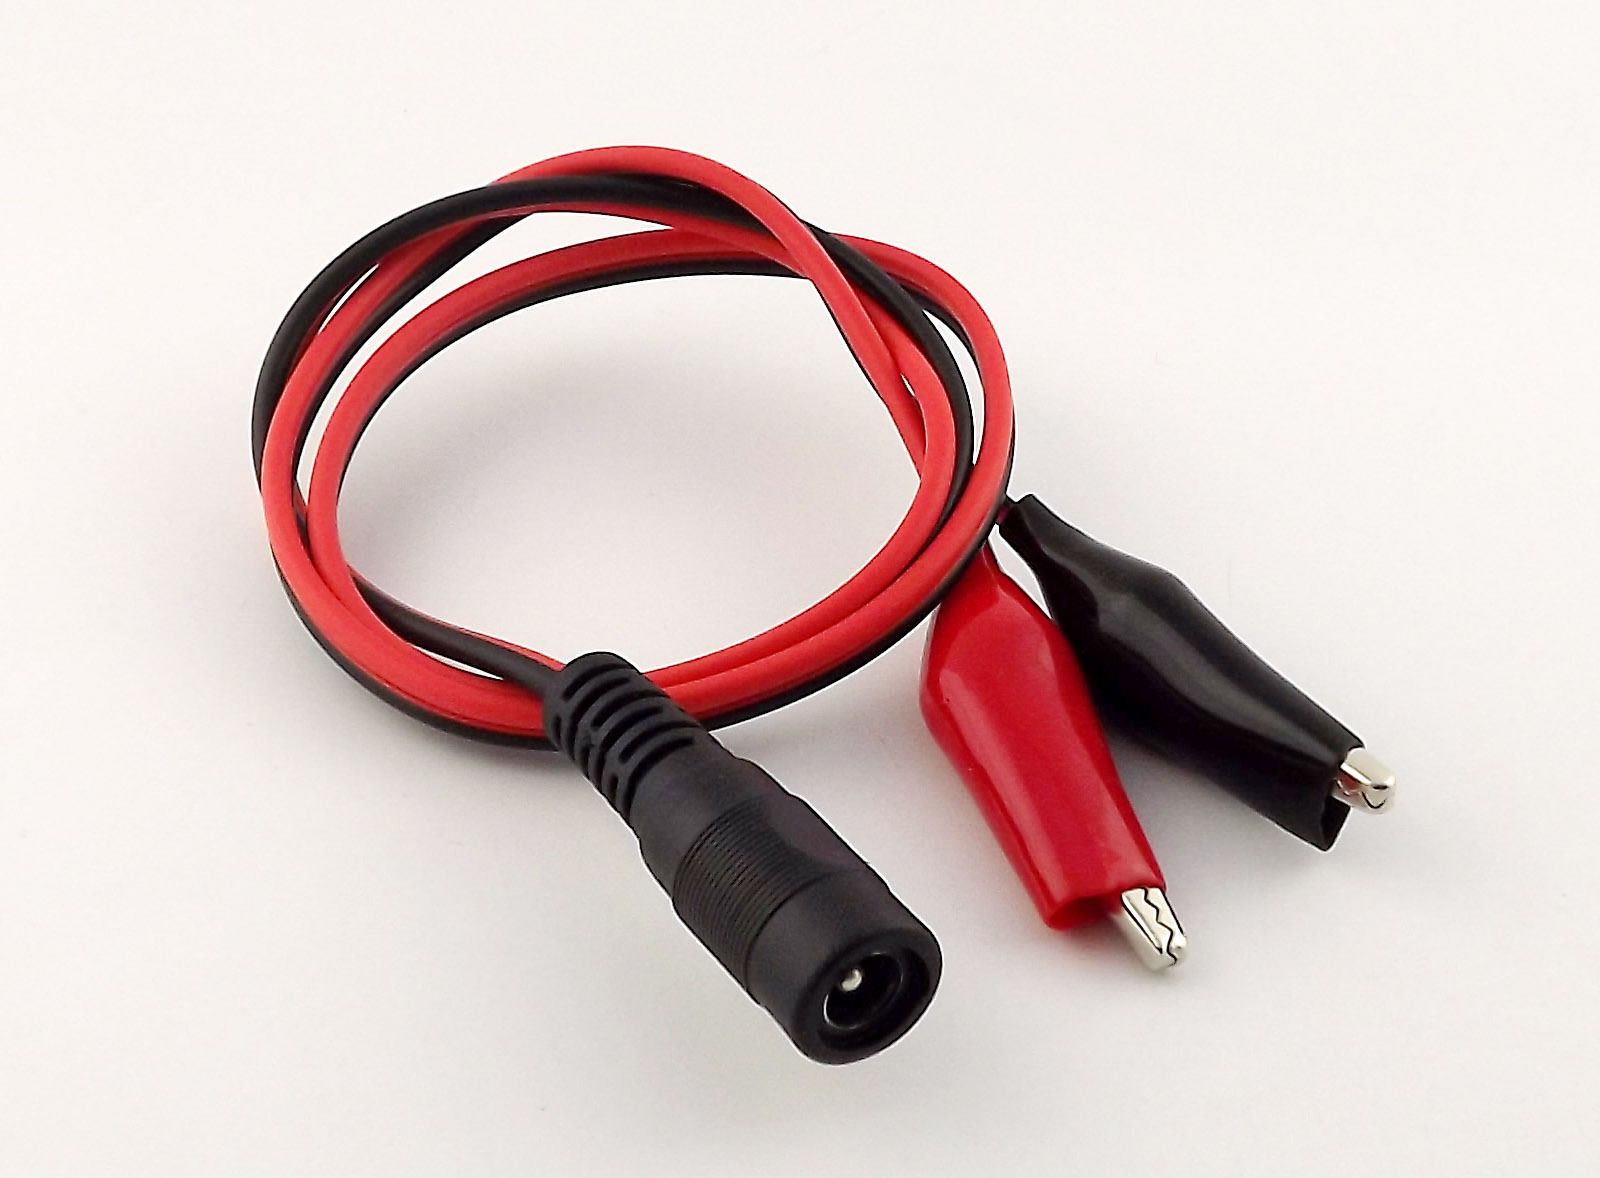
Fig.6.2 — Adapter from 5.5x2.5mm coaxial connector to crocodile clips
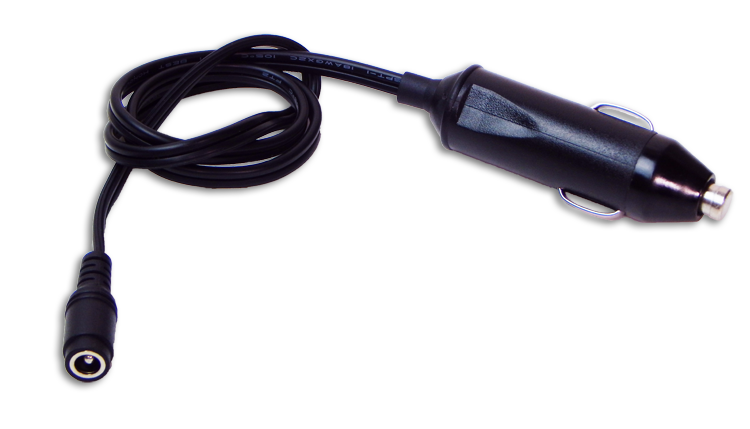
Fig.6.3 — Adapter to a car cigarette lighter
The fourth option — Power Over Ethernet (POE) through the main network adapter. Supported options are 802.3af, 802.3at and Passive POE. Input voltage from 12 to 60V. This method is convenient if you have to work on the roof or on the tower, setting up Wi-Fi antennas. Power to them comes through Ethernet cables, and there is no other electricity on the tower.
POE electricity can be used in three ways:
- power the notebook only
- forward to a second network adapter and power the notebook from batteries
- power the notebook and the antenna at the same time
To prevent equipment damage, if one of the Ethernet cables is disconnected, the power to the second network interface is terminated. The power can only be turned on manually through the corresponding menu item.
When using the 802.3af / at protocols, you can set the power class that the adminbook will request from the power supply device. This and other POE properties are configured from the menu called with the “LAN” button (Fn + F6).
By the way, you can remotely reset Ubiquity access points (which is done by closing certain wires in the cable) with the second network interface.
The indicator next to the main network interface shows the presence and type of POE: green — 802.3af / at, red — Passive POE.
The last, fifth power supply is the battery. Here it’s a LiPol, 42W/hour battery.
In case the external power supply does not provide sufficient power, the missing power can be drawn from the battery. Thus, it can draw power from the battery and external sources at the same time.
7. Display unit
The display can tilt 180 degrees, and it’s locked with latches while closed (opens with a button on the front side). When the display is closed, adminbook doesn’t react to pressing any external buttons.
In addition to the screen, the notebook lid contains:
- front and rear cameras with lights, microphones, activity LEDs and mechanical curtains
- LED of the upper backlight of the keyboard (similar to ThinkLight)
- LED indicators for Wi-Fi, Bluetooth, HDD and others
- wireless protocol antennas (in the blue plastic insert)
- photo sensors and LEDs for the infrared remote
- gyroscope, accelerometer, magnetometer
The plastic insert for the antennas does not reach the corners of the display lid. This is done because in the «traveling» notebooks the corners are most affected by impacts, and it's desirable that they be made of metal.
8. Webcams
The notebook has 2 webcams. The front-facing one is 8MP (4K / UltraHD), while the “selfie” one is 2MP (FullHD). Both cameras have a backlight controlled by separate buttons (Fn + G and Fn + H). Each camera has a mechanical curtain and an activity LED. The shifted mechanical curtain also turns off the microphones of the corresponding side (configurable).
The external camera has two quick launch buttons — Fn + 1 takes an instant photo, Fn + 2 turns on video recording. The internal camera has a combination of Fn + Q and Fn + W.
You can configure cameras and microphones from the menu called up by the “CAM” button (Fn + F10).
9. Indicator row
It has the following indicators: Microphone, NumLock, ScrollLock, hard drive access, battery charge, external power connection, sleep mode, mobile connection, WiFi, Bluetooth.
Three indicators are made to shine through the back side of the display lid, so that they can be seen while the lid is closed: external power connection, battery charge, sleep mode.
Indicators are color-coded.
Microphone — lights up red when all microphones are muted
Battery charge: more than 60% is green, 30-60% is yellow, less than 30% is red, less than 10% is blinking red.
External power: green — power is supplied, the battery is charged; yellow — power is supplied, the battery is charging; red — there is not enough external power to operate, the battery is drained
Mobile: 4G (LTE) — green, 3G — yellow, EDGE / GPRS — red, blinking red — on, but no connection
Wi-Fi: green — connected to 5 GHz, yellow — to 2.4 GHz, red — on, but not connected
You can configure the indication with the “IND” button (Fn + F9)
10. Infrared remote control
Near the indicators (on the front and back of the display lid) there are infrared photo sensors and LEDs to recording and playback commands from IR remotes. You can set it up, as well as emulate a remote control by pressing the “IR” button (Fn + F5).
11. Wireless interfaces
WiFi — dual-band, 802.11a/b/g/n/ac with support for Wireless Direct, Intel WI-Di / Miracast, Wake On Wireless LAN.
You ask, why is Miracast here? Because is already embedded in many WiFi chips, so its presence does not lead to additional costs. But you can transfer the image wirelessly to TVs, projectors and TV set-top boxes, that already have Miracast built in.
Regarding Bluetooth, there’s nothing special. It’s version 4.2 or newest. By the way, the keyboard and trackpoint have a separate Bluetooth module. This is much easier than connect them to the system-wide module.
Of course, the adminbook has a built-in cellular modem for 4G (LTE) / 3G / EDGE / GPRS, as well as a GPS / GLONASS / Galileo / Beidou receiver. This receiver also doesn’t cost much, because it’s already built into the 4G modem.
There is also an NFC communication module, with the antenna under the spacebar. Antennas of all other wireless interfaces are in a plastic insert above the display.
You can configure wireless interfaces with the «WRLS» button (Fn + F7).
12. USB connectors
In total, four USB 3.0 Type A connectors and four USB 3.1 Type C connectors are built into the adminbook. Peripherals are connected to the adminbook through these.
One more Type C and MicroUSB are allocated only for keyboard / mouse / drive emulation (denoted as “OTG”).
«QC 3.0» labeled MicroUSB connector can not only be used for power, but it can switch to normal USB 2.0 port mode, except using MicroB instead of normal Type A. Why is it necessary? Because to flash some electronics you sometimes need non-standard USB A to USB A cables.
In order to not make adapters outselves, you can use a regular phone charging cable by plugging it into this Micro B connector. Or use an USB A to USB Type C cable (if you have one).
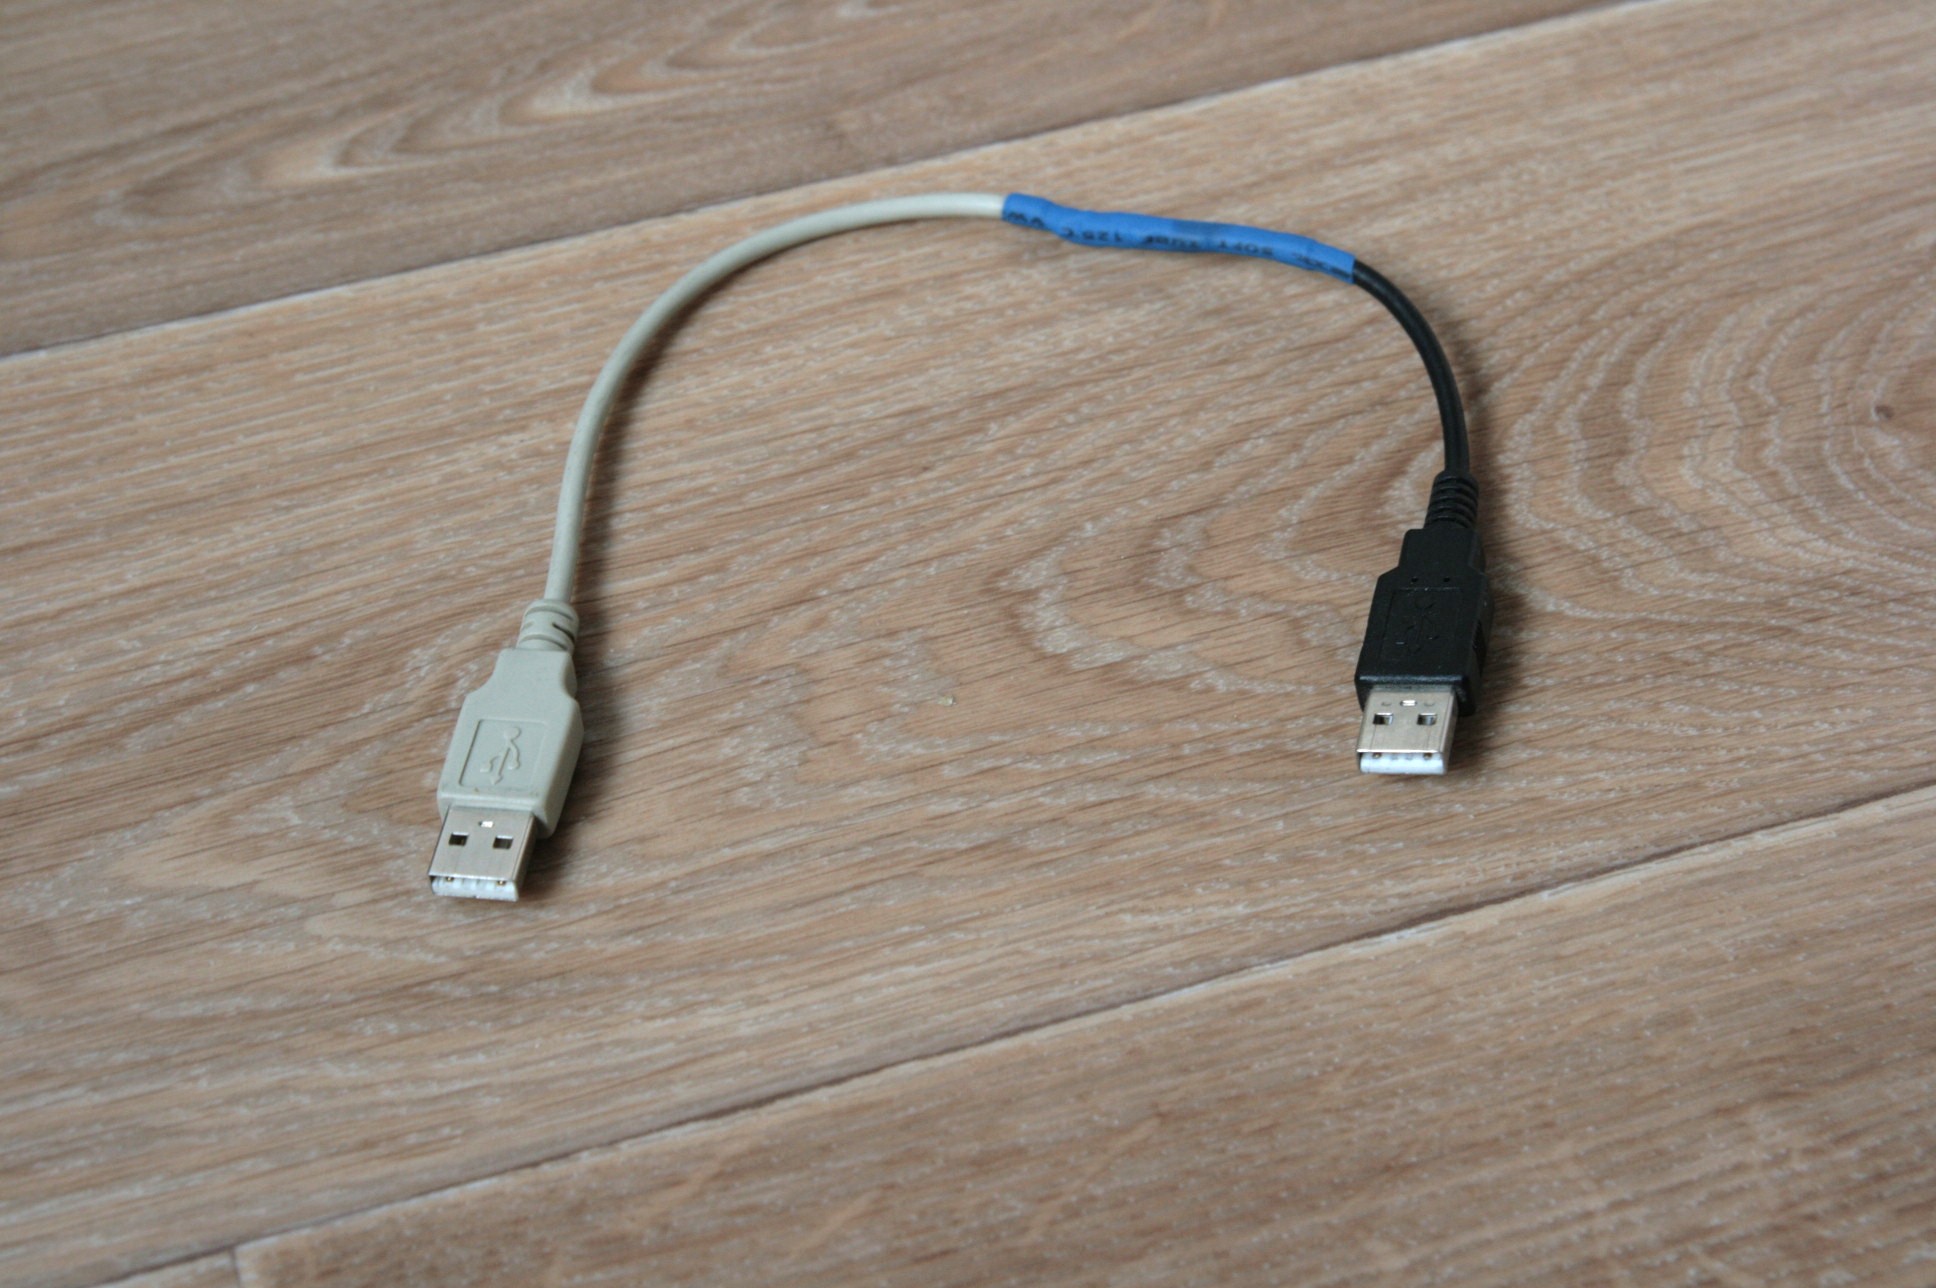
Fig.12.1 — Homemade USB A to USB A cable
Since USB Type C supports alternate modes, it makes sense to use it. Alternate modes are when the connector works as HDMI or DisplayPort video outputs. Though you’ll need adapters to connect it to a TV or monitor. Or appropriate cables that have Type C on one end and HDMI / DP on the other. However, USB Type C to USB Type C cables might soon become the most common video transfer cable.
The Type C connector on the left side of the adminbook supports an alternate Display Port mode, and on the right side, HDMI. Like the other video outputs of the adminbook, they can work as both input and output.
The one thing left to say is that Type C is bidirectional in regard to power delivery — it can both take in power as well as output it.
13. Other
On the left side there are four audio connectors: Line In, Line Out, Microphone and the combo headset jack (headphones + microphone). Supports simple stereo, quad and 5.1 mode output.
Audio outputs are specially placed next to the video connectors, so that when connected to any equipment, the wires are on one side.
Built-in speakers are on the sides. Outside, they are covered with grills and acoustic fabric with water-repellent impregnation.
There are also two slots for memory cards — full-size SD and MicroSD. If you think that the first slot is needed only for copying photos from the camera — you are mistaken. Now, both single-board computers like Raspberry Pi and even rack-mount servers are loaded from SD cards. MicroSD cards are also commonly found outside of phones. In general, you need both card slots.
Sensors more familiar to phones — a gyroscope, an accelerometer and a magnetometer — are built into the lid of the notebook. Thanks to this, one can determine where the notebook cameras are directed and use this for augmented reality, as well as navigation. Sensors are controlled via the menu using the “SNSR” button (Fn + F11).
Among the function buttons with Fn, F1 (“MAN”) and F12 (“ETC”) I haven’t described yet. The first is a built-in guide on connectors, modes and how to use the adminbook. The second is the settings of non-standard subsystems that have not separate buttons.
14. What's inside
The adminbook is based on the Core i5-7Y57 CPU (Kaby Lake architecture). Although it’s less of a CPU, but more of a real SOC (System On a Chip). That is, almost the entire computer (without peripherals) fits in one chip the size of a thumb nail (2x1.6 cm).
It emits from 3.5W to 7W of heat (depends on the frequency). So, a passive cooling system is adequate in this case.
8GB of RAM are installed by default, expandable up to 16GB.
A 256GB M.2 2280 SSD, connected with two PCIe lanes, is used as the hard drive.
Wi-Fi + Bluetooth and WWAN + GNSS adapters are also designed as M.2 modules.
RAM, the hard drive and wireless adapters are located on the top of the motherboard and can be replaced by the user — just unscrew and lift the keyboard.
The battery is assembled from four LP545590 cells and can also be replaced.
SOC and other irreplaceable hardware are located on the bottom of the motherboard. The heating components for cooling are pressed directly against the case.
External connectors are located on daughter boards connected to the motherboard via ribbon cables. That allows to release different versions of the adminbook based on the same motherboard.
For example, one of the possible version:
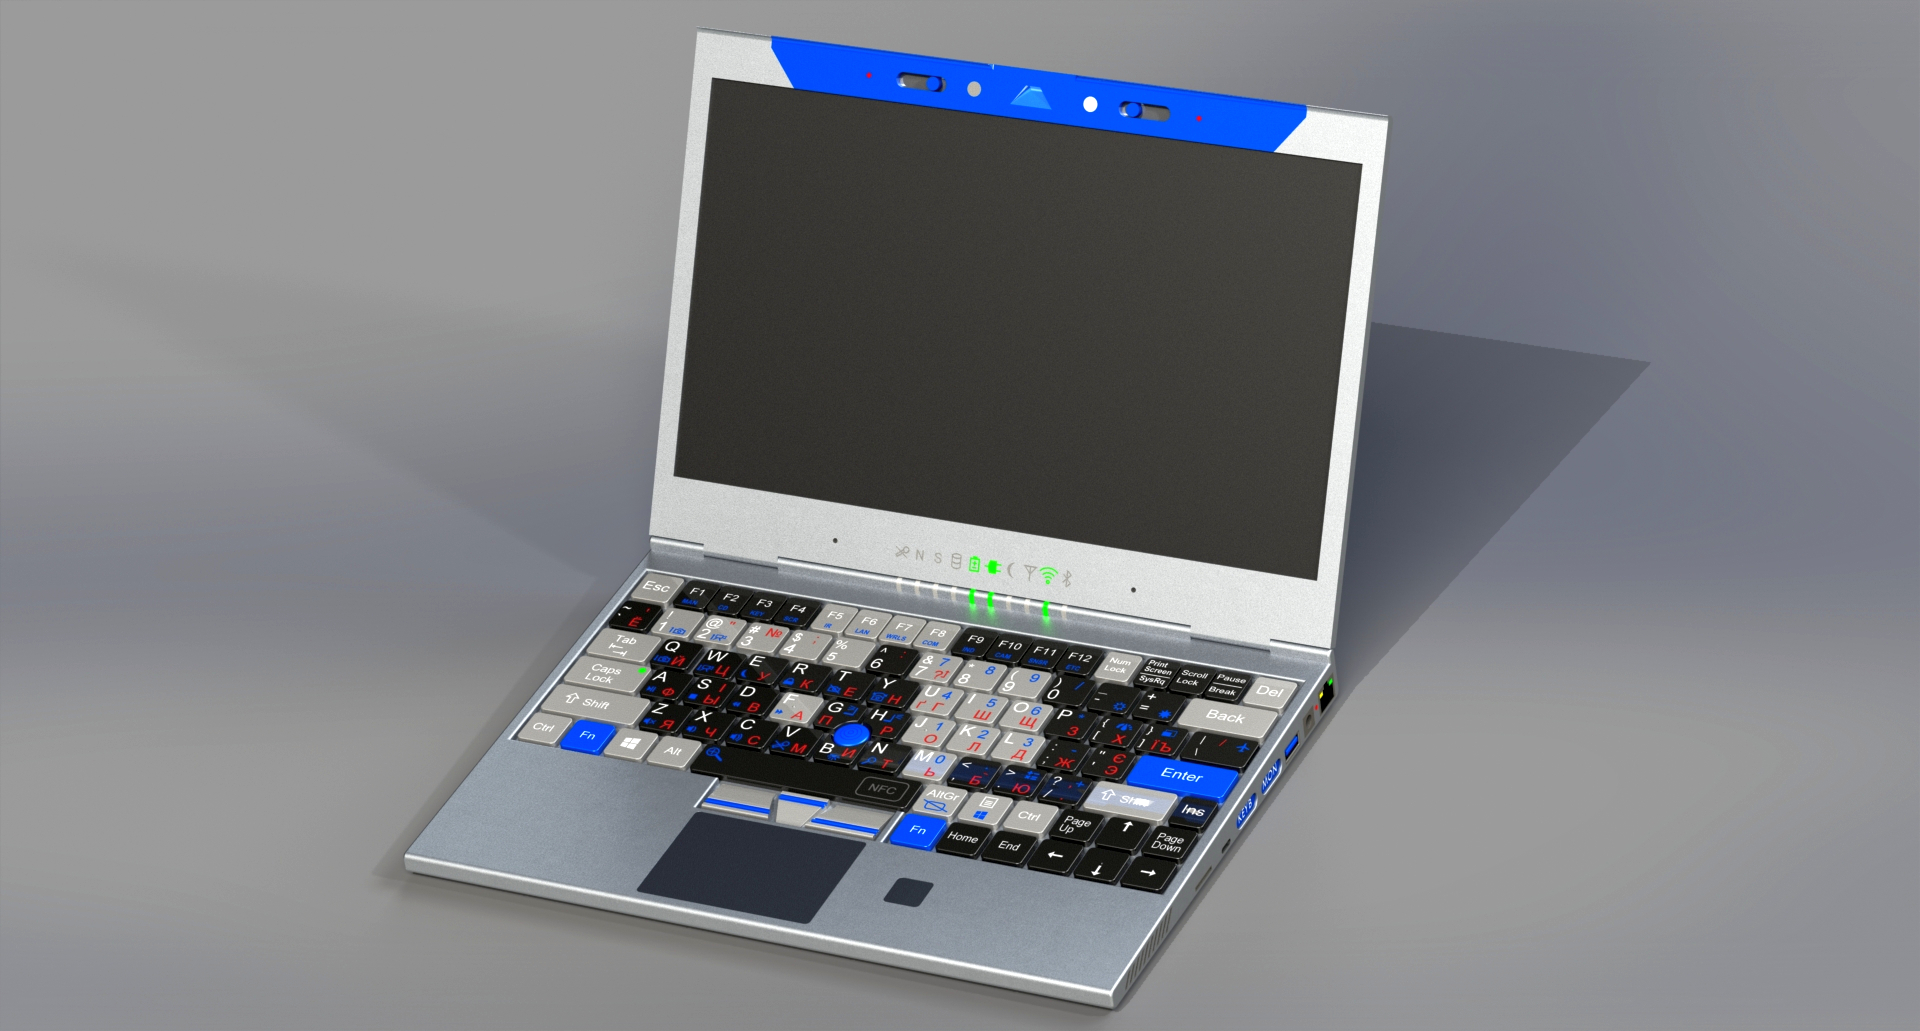 Fig.14.1 — Adminbook A4 (front view)
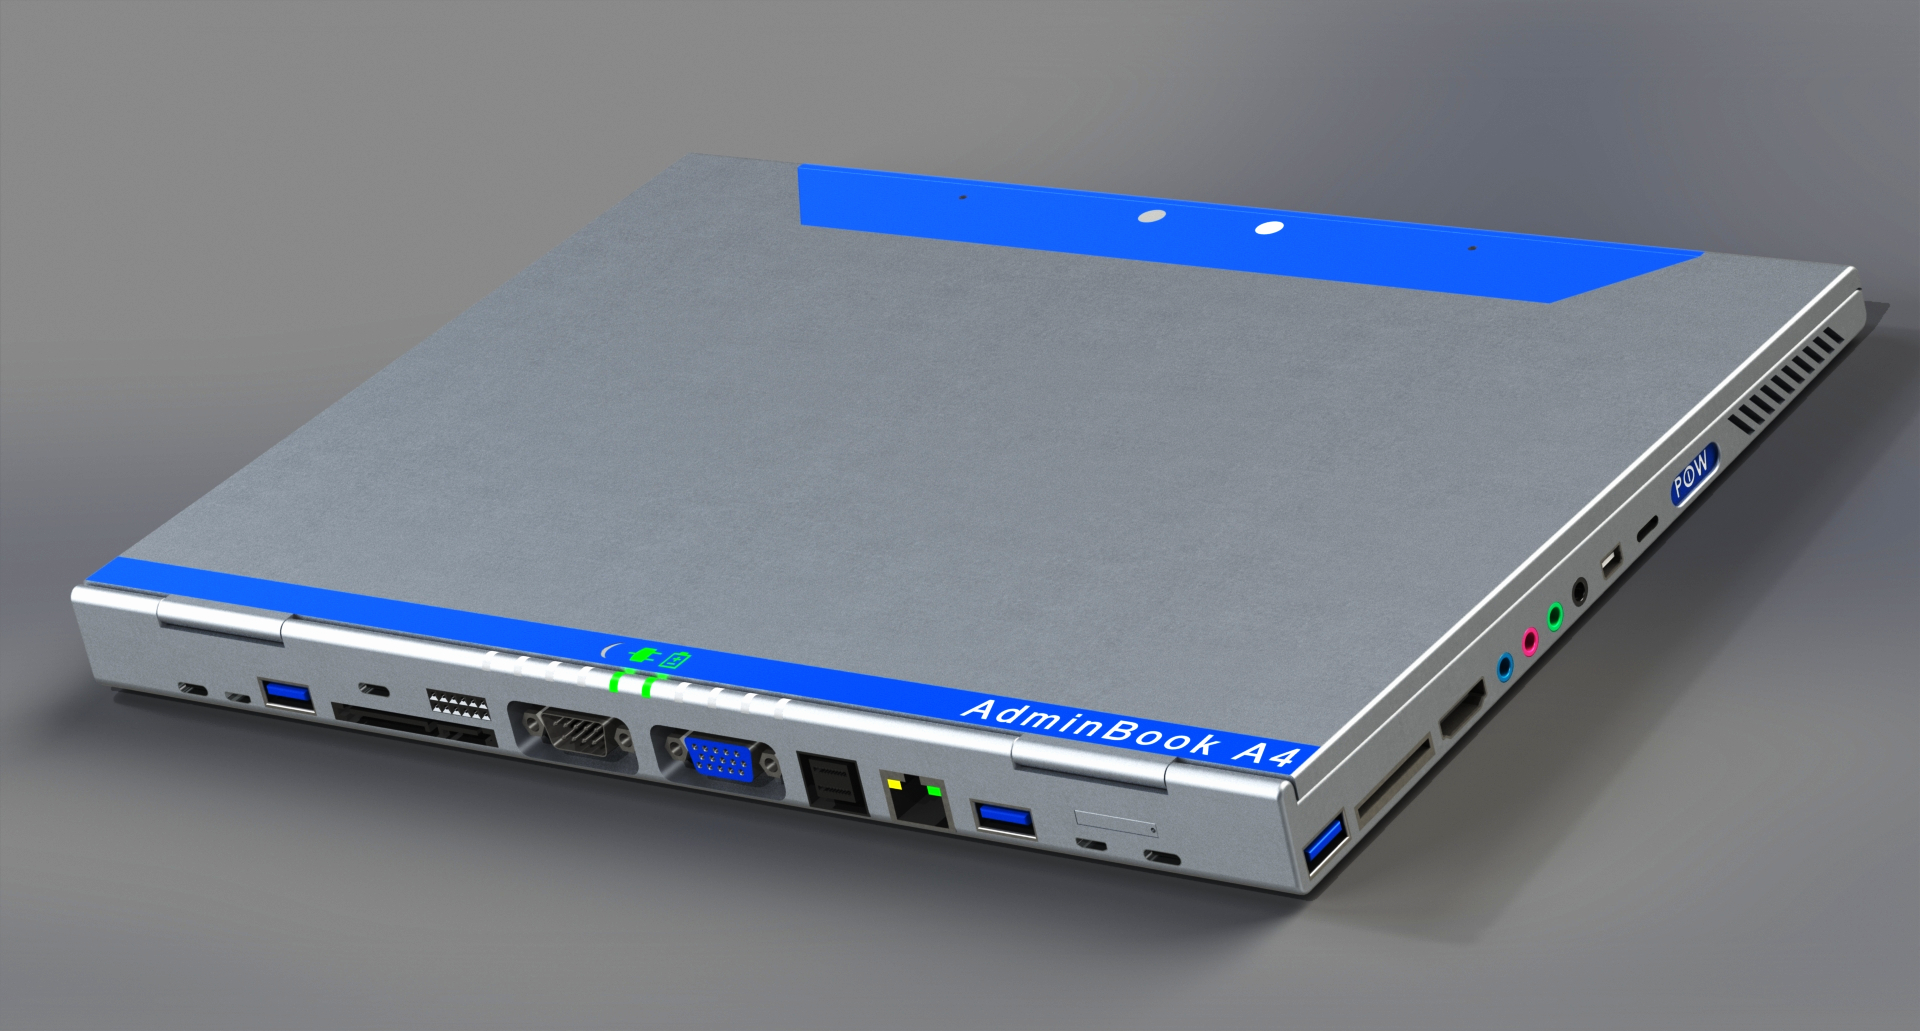
Fig.14.2 — Adminbook A4 (back view)
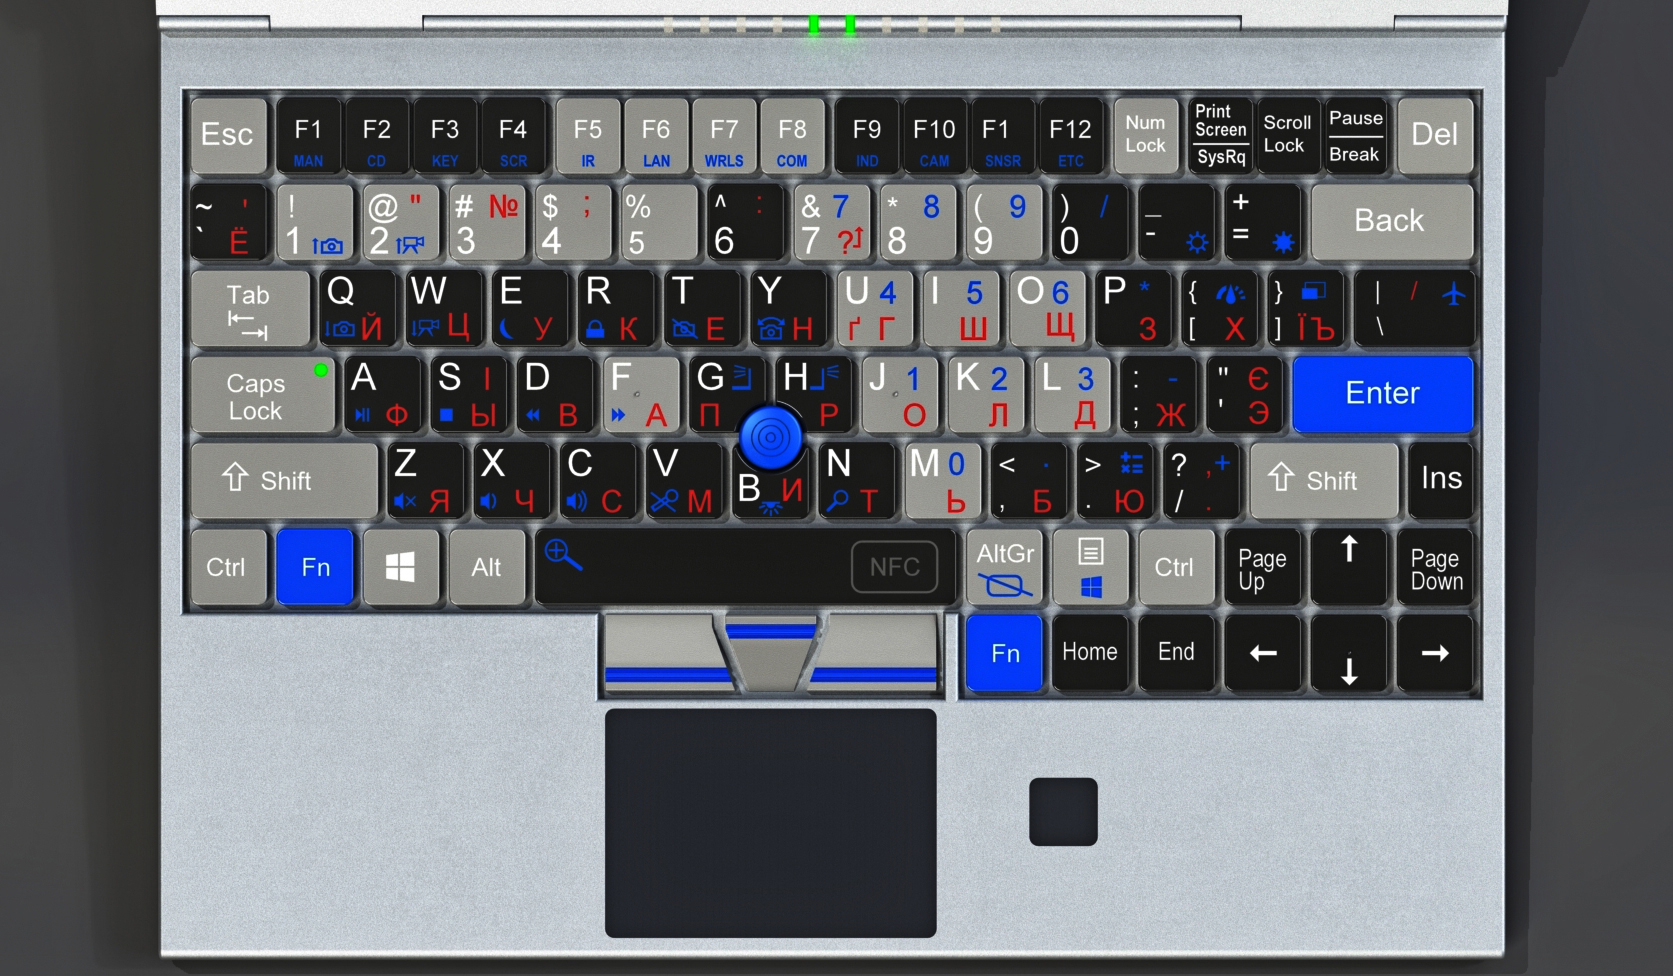
Fig.14.3 — Adminbook A4 (keyboard)
This is an adminbook with a 12.5” display, its overall dimensions are 210x297mm (A4 paper format). The keyboard is full-size, with a standard key size (only the top row is a bit narrower). All the standard keys are there, except for the numpad and the Right Win, available with Fn keys. And trackpad added.
15. The underside of the adminbook
Not expecting anything interesting from the bottom? But there is!
First I will say a few words about the rubber feet. On my ThinkPad, they sometimes fall away and lost. I don't know if it's a bad glue, or a backpack is not suitable for a notebook, but it happens.
Therefore, in the adminbook, the rubber feet are screwed in (the screws are slightly buried in rubber, so as not to scratch the tables). The feet are sufficiently streamlined so that they cling less to other objects.
On the bottom there are visible drainage holes marked with a water drop.
And the four threaded holes for connecting the adminbook with fasteners.
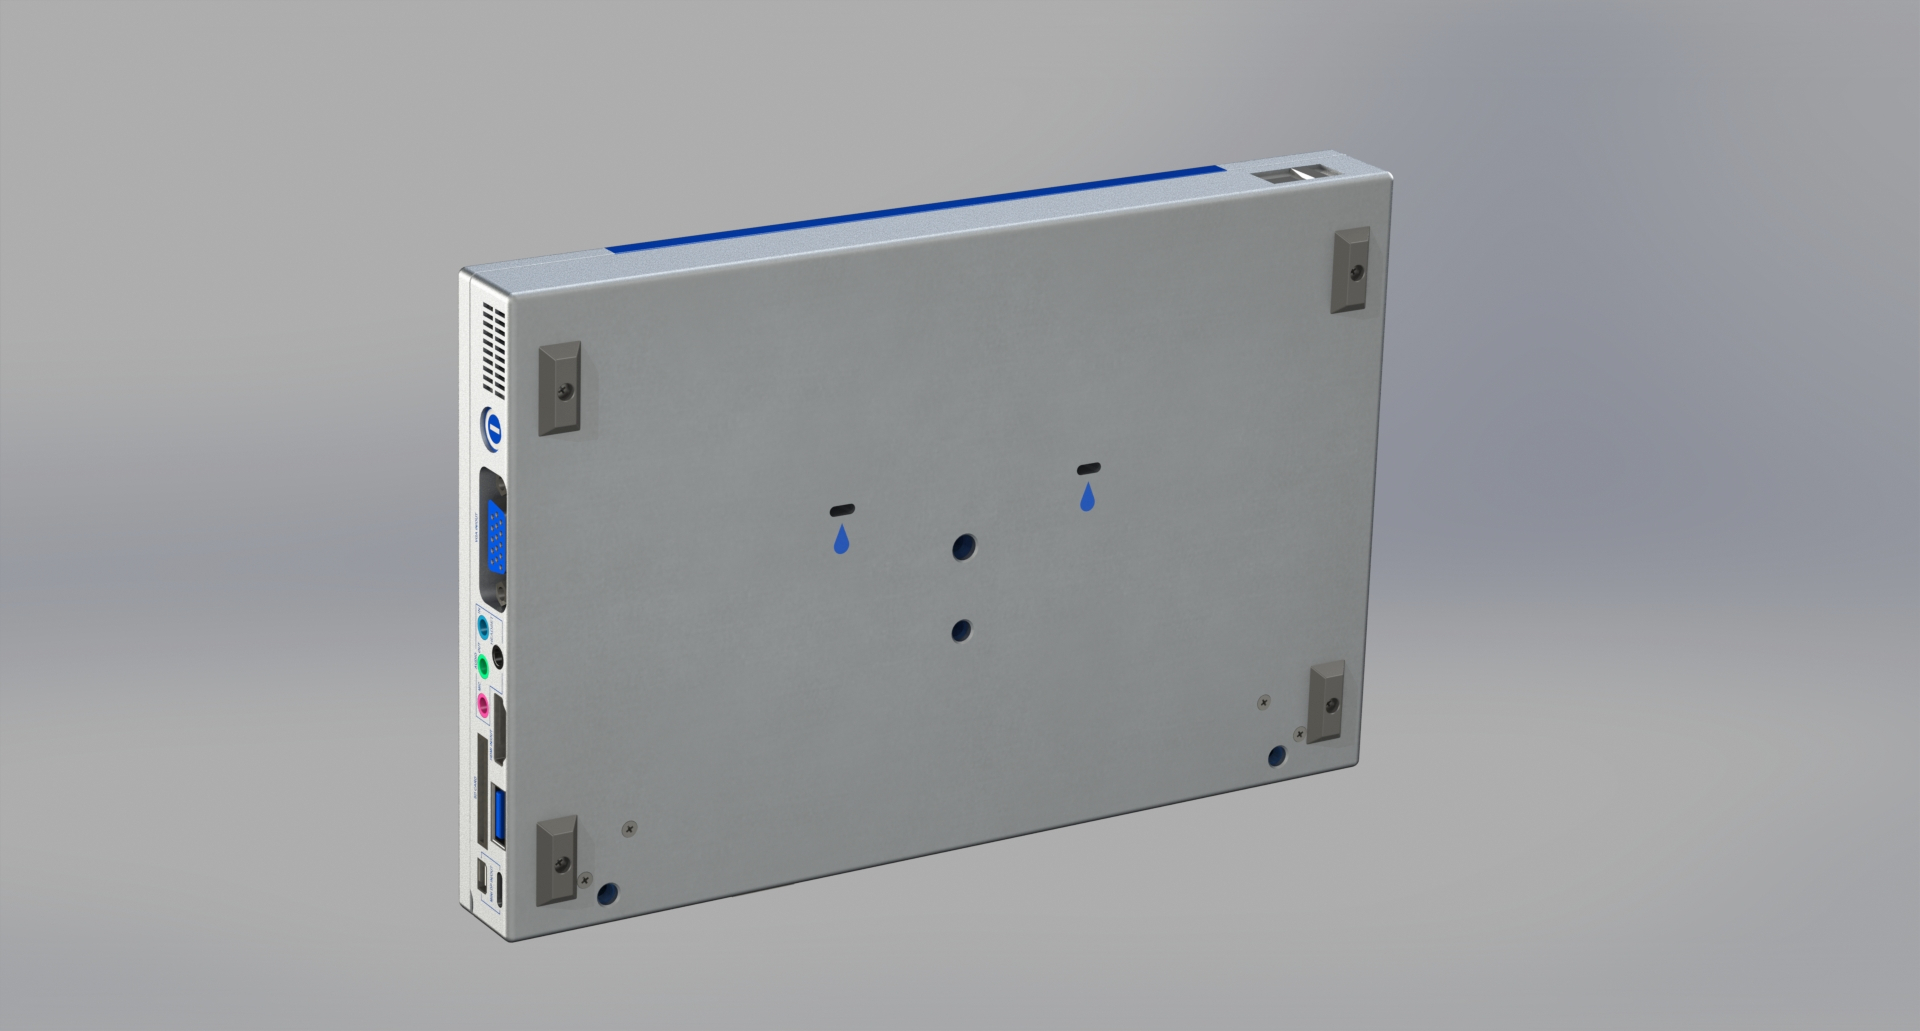 Fig.15.1 — The underside of the adminbook
Large hole in the center has a tripod thread.
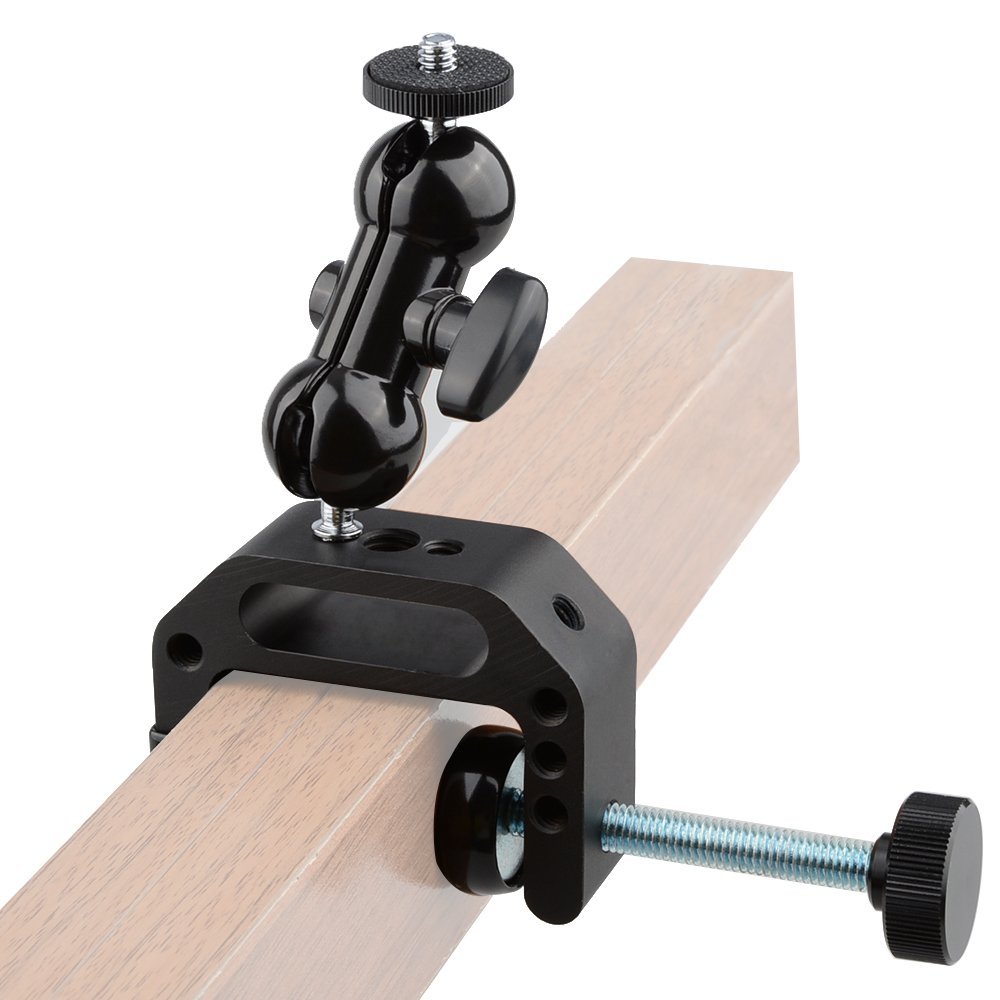
Fig.15.2 — Camera clamp mount
Why is it necessary? Because sometimes you have to hang on high, holding the mast with one hand, holding the notebook with the second, and typing something on the third… Unfortunately, I am not Shiva, so these tricks are not easy for me. And you can just screw the adminbook by a camera mount to any protruding part of the structure and free your hands!
No protruding parts? No problem. A plate with neodymium magnets is screwed to three other holes and the adminbook is magnetised to any steel surface — even vertical! As you see, opening the display by 180° is pretty useful.
 Fig.15.3 — Fastening with magnets and shaped holes for nails / screws
And if there is no metal? For example, working on the roof, and next to only a wooden wall. Then you can screw 1-2 screws in the wall and hang the adminbook on them. To do this, there are special slots in the mount, plus an eyelet on the handle.
For especially difficult cases, there’s an arm mount. This is not very convenient, but better than nothing. Besides, it allows you to navigate even with a working notebook.
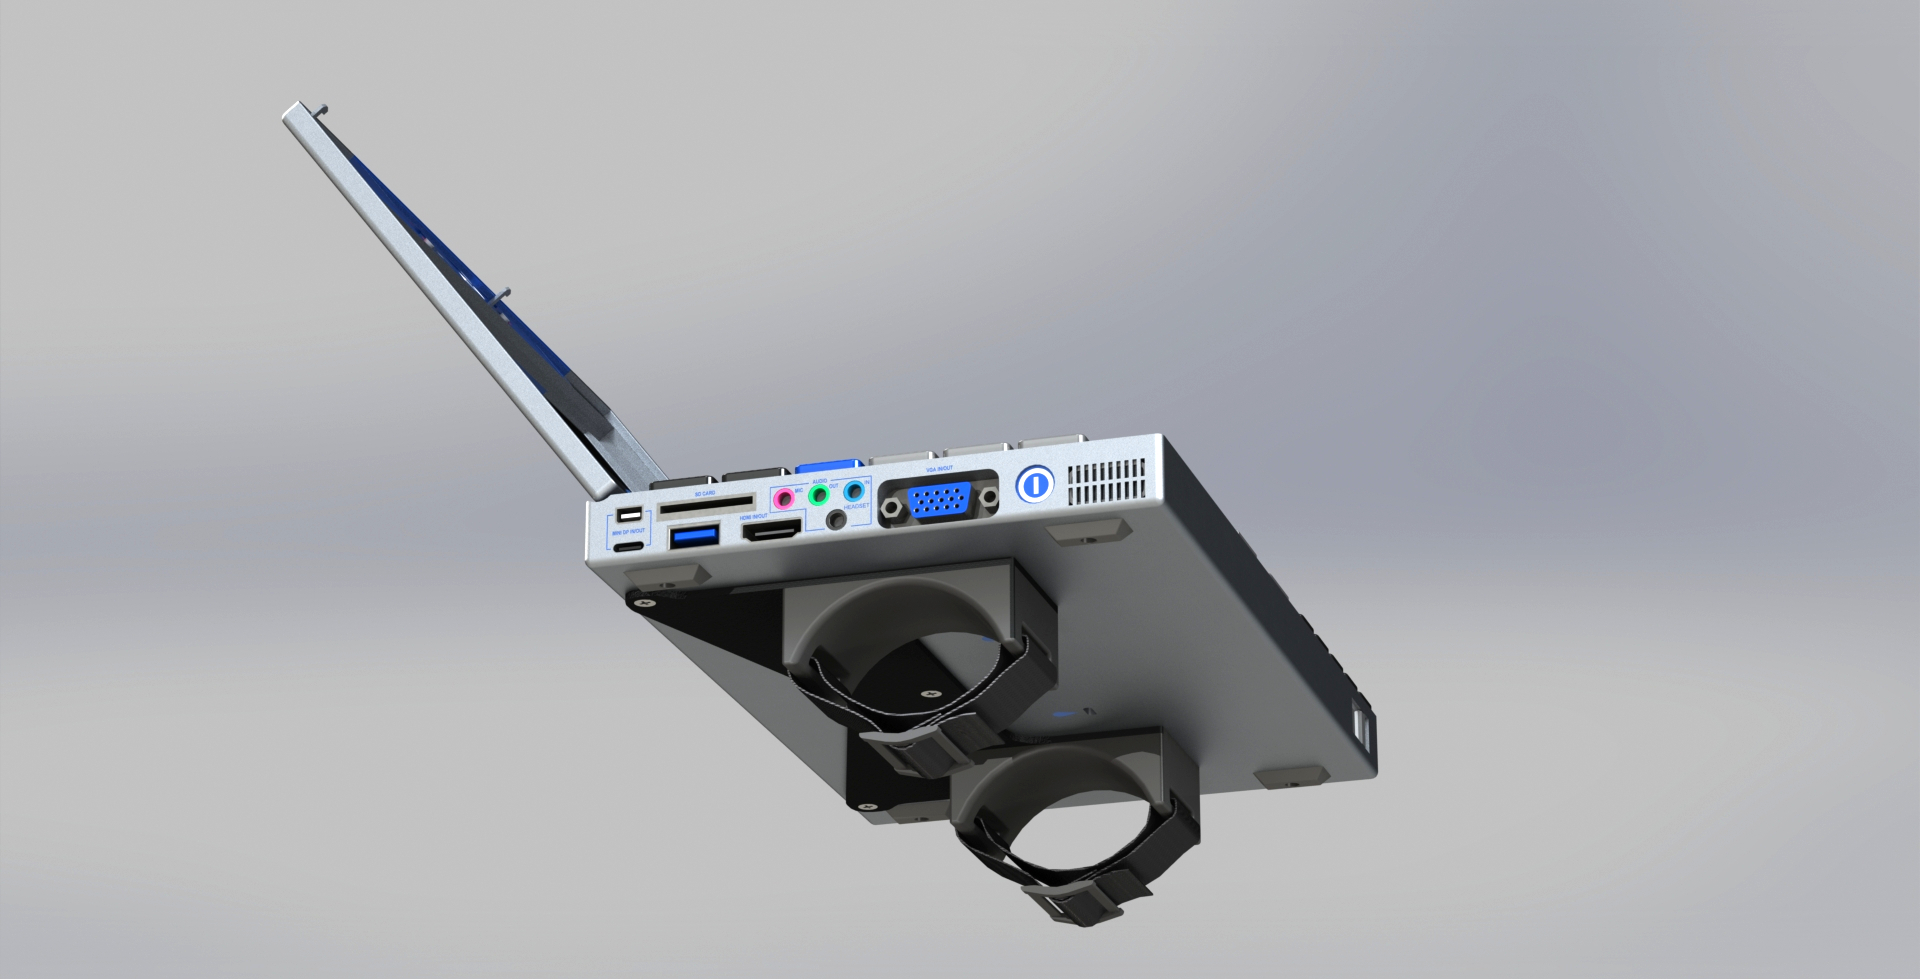 Fig.15.4 — Arm mount
In general, these three holes use a regular metric thread, specifically so that you can make some DIY fastening and fasten it with ordinary screws.
Except fasteners, an additional radiator can be screwed to these holes, so that you can work for a long time under high load or at high ambient temperature.
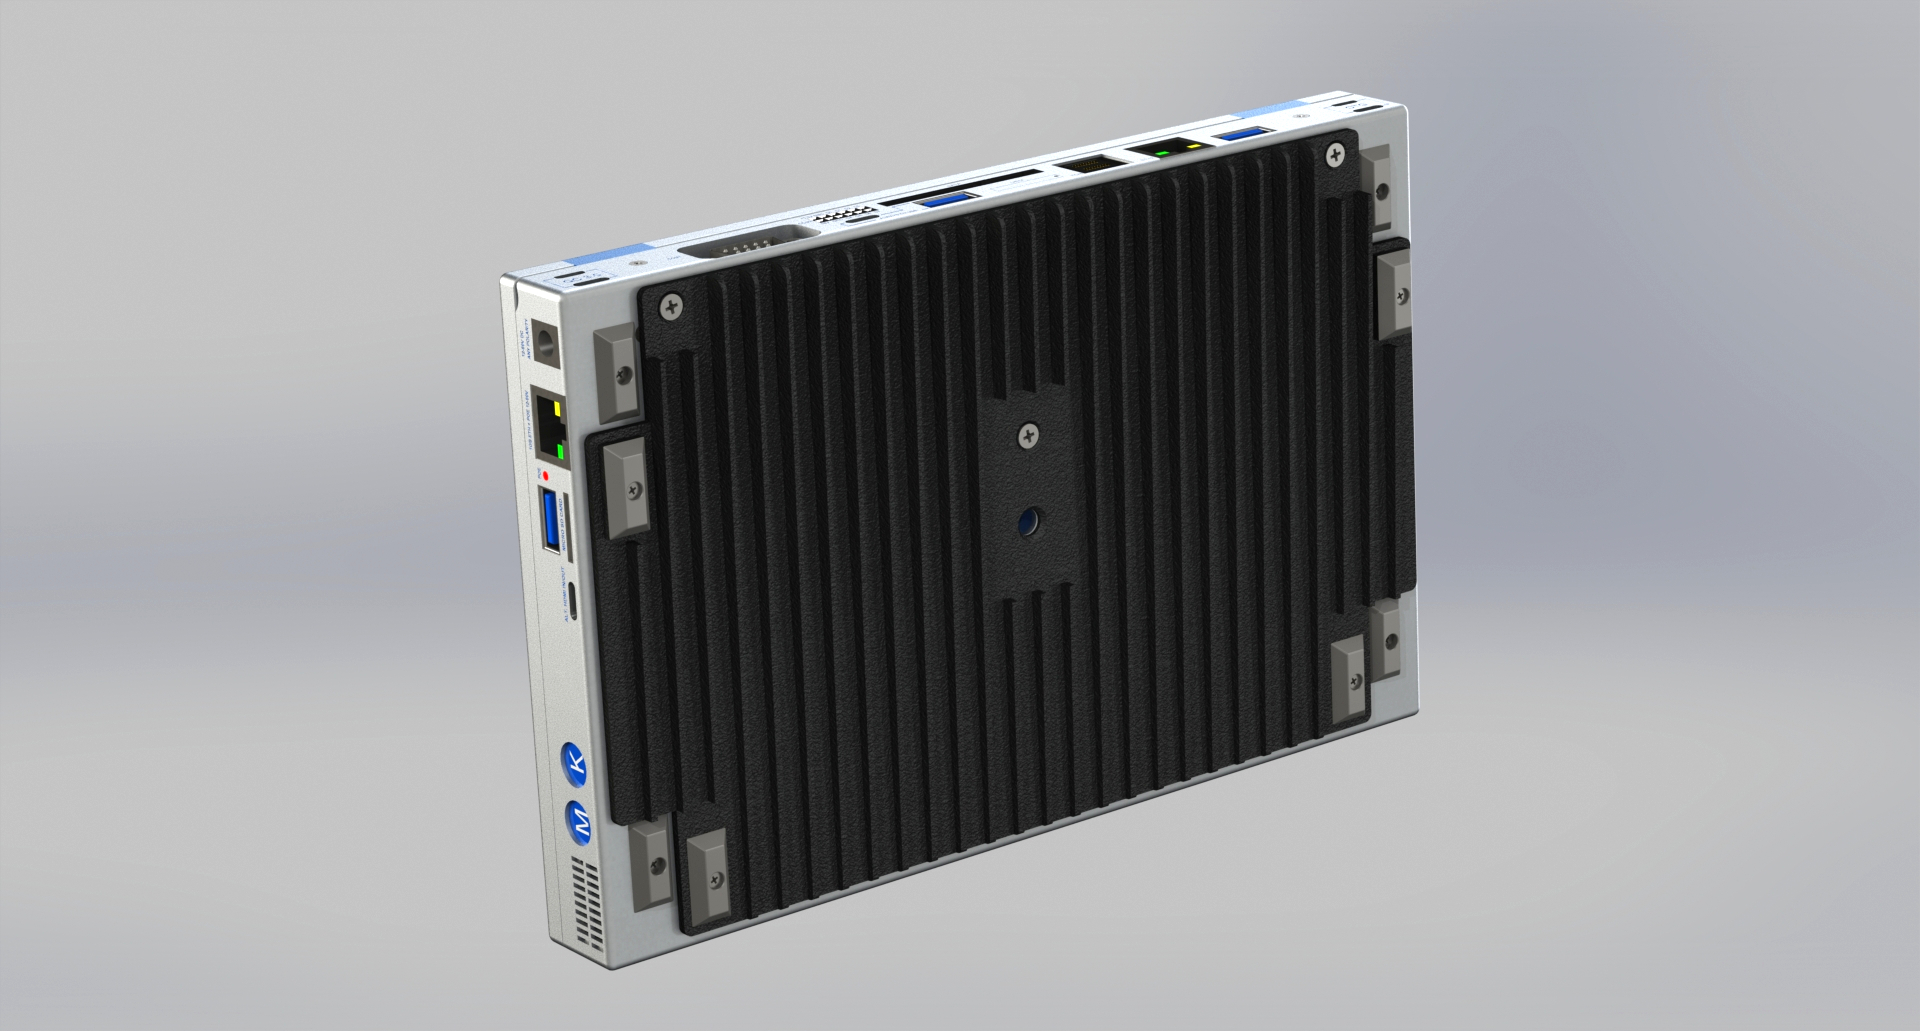 Fig.15.5 — Adminbook with additional radiator
16. Accessories
The adminbook has some unique features, and some of them are implemented using equipment designed specifically for the adminbook. Therefore, these accessories are immediately included. However, non-unique accessories are also available immediately.
Here is a complete list of both:
- fasteners with magnets
- arm mount
- heatsink
- screen blinds covering it from sunlight
- HD Mini SAS to U.2 cable
- combined adapter from U.2 to M.2 and PCIe
- power cable, terminated by coaxial 5.5x2.5mm connectors
- adapter from power cable to cigarette lighter
- adapter from power cable to crocodile clips
- different adapters from the power cable to coaxial connectors
- universal power supply and power cord from it into the outlet
17. Power supply
Since this is a power supply for a system administrator's notebook, it would be nice to make it universal, capable of powering various electronic devices. Fortunately, the vast majority of devices are connected via coaxial connectors or USB. I mean devices with external power supplies: routers, switches, notebooks, nettops, single-board computers, DVRs, IPTV set top boxes, satellite tuners and more.
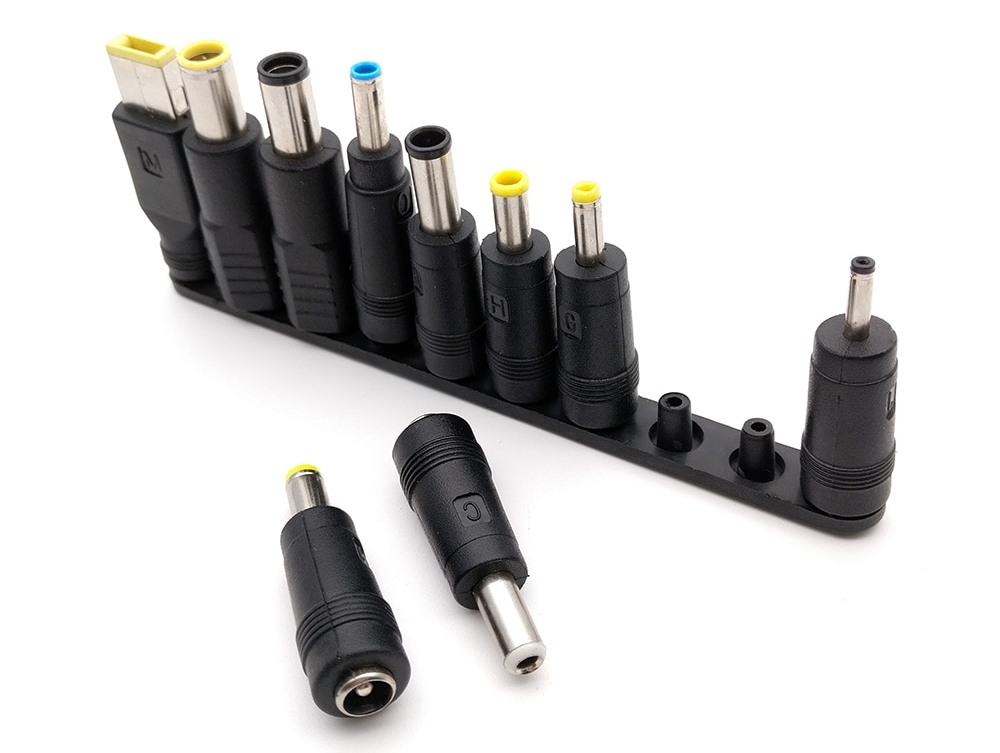 Fig.17.1 — Adapters from 5.5x2.5mm coaxial connector to other types of connectors
There aren’t many connector types, which allows to get by with an adjustable-voltage PSU and adapters for the necessary connectors. It also needs to support various power delivery standards.
In our case, the power supply supports the following modes:
- Power Delivery — displayed as [pd]
- Quick Charge [qc]
- 802.3af/at [at]
- voltage from 5 to 54 volts in 0.5V increments (displayed voltage)

Fig.17.2 — Mode display on the 7-segment indicator (1.9. = 19.5V)
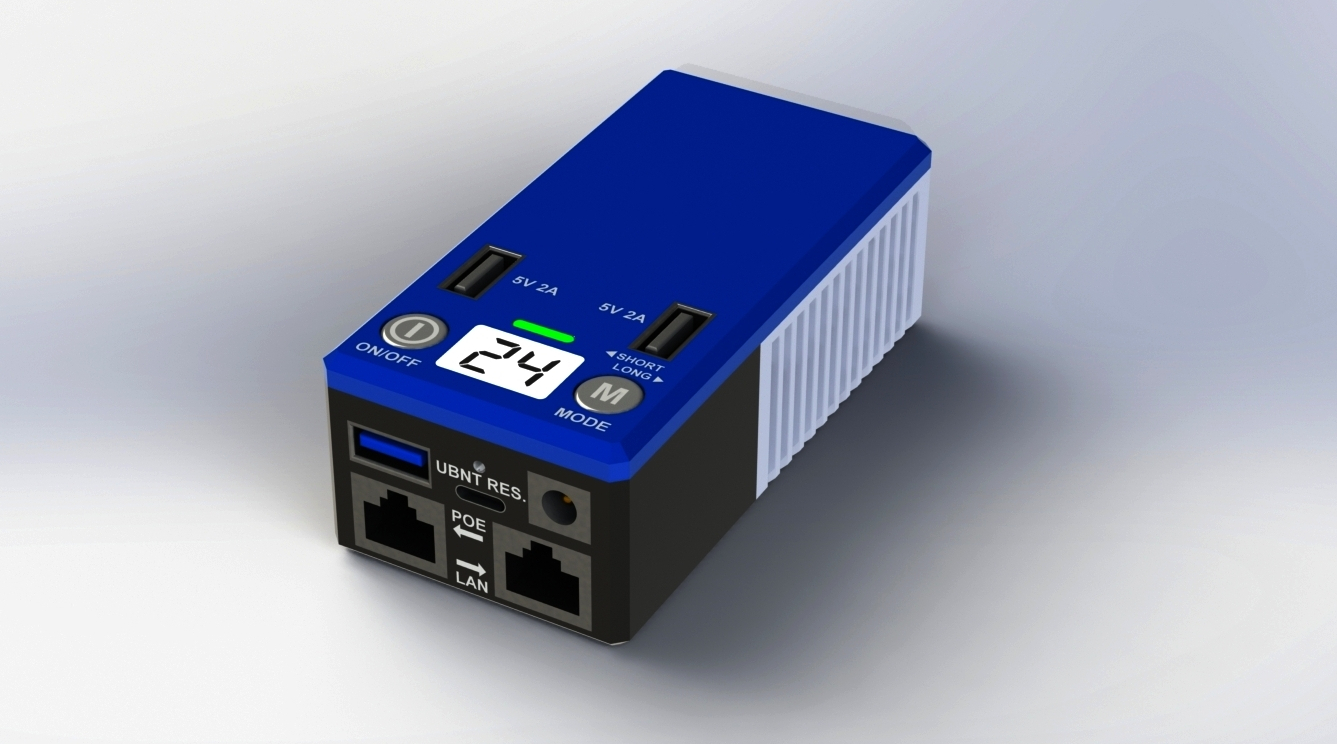 Fig.17.3 — Front and top sides of power supply
USB outputs on the power supply (5V 2A) are always on. On the other outputs the voltage is applied by pressing the ON/OFF button.
The desired mode is selected with the MODE button and this selection is remembered even when the power is turned off. The modes are listed like this: pd, qc, at, then a series of voltages.
Voltage increases by pressing and holding the MODE button, decreases by short pressing. Step to the right — 1 Volt, step to the left — 0.5 Volt. Half a volt is needed because some equipment requires, for example, 19.5 volts. These half volts are displayed on the display with decimal points (19V -> [19], 19.5V -> [1.9.]).
When power is on, the green LED is on. When a short-circuit or overcurrent protection is triggered, [SH] is displayed, and the LED lights up red.
In the Power Delivery and Quick Charge modes, voltage is applied to the USB outputs (Type A and Type C). Only one of them can be used at one time.
In 802.3af/at modes, the power supply acts as an injector, combining the supply voltage with data from the LAN connector and supplying it to the POE connector. Power is supplied only if a device with 802.3af or 802.3at support is plugged into the POE connector.
But in the simple voltage supply mode, electricity throu the POE connector is issued immediately, without any checks. This is the so-called Passive POE — positive charge goes to conductors 4 and 5, and negative charge to conductors 7 and 8. At the same time, the voltage is applied to the coaxial connector. Adapters for various types of connectors are used in this mode.
The power supply unit has a built-in button to remotely reset Ubiquity access points. This is a very useful feature that allows you to reset the antenna to factory settings without having to climb on the mast. I don’t know — is any other manufacturers support a feature like this?
The power supply also has the passive wiremap adapter, which allows you to determine the correct Ethernet cable crimping. The active part is located in the Ethernet ports of the adminbook.
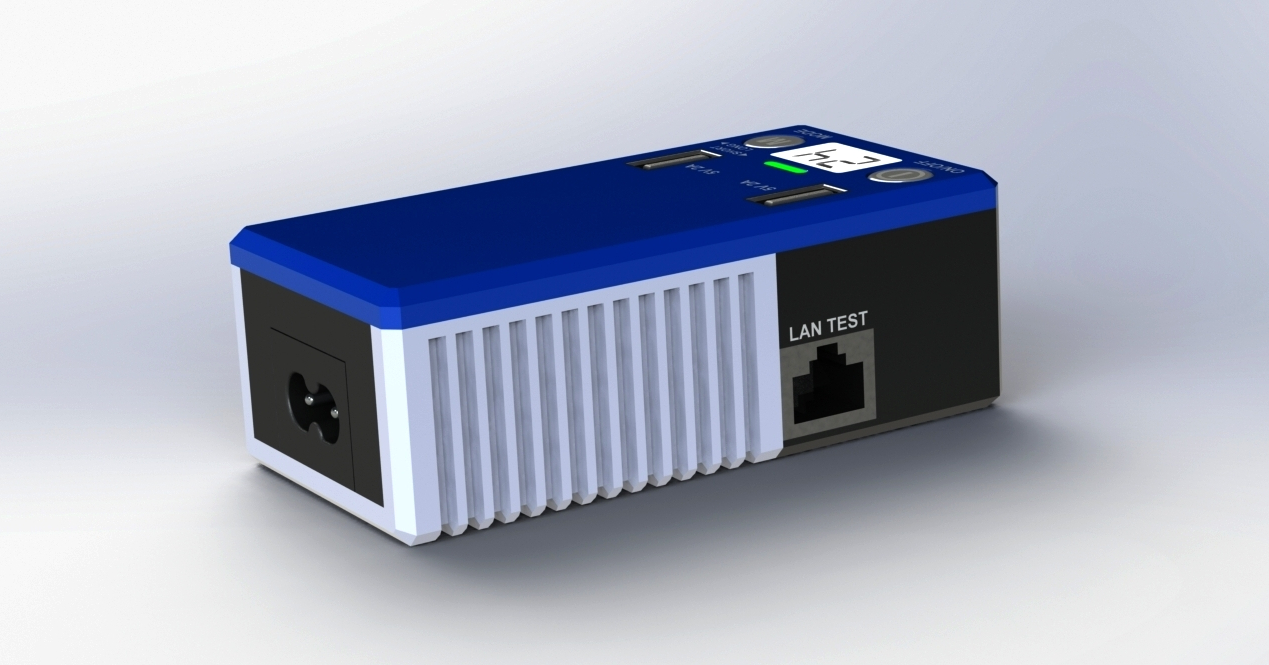 Fig.17.4 — Back side and wiremap adapter
Of course, the network cable tester built into the adminbook will not replace a professional OTDR, but for most tasks it will be enough.
To prevent overheating, part of the PSU’s body acts as an aluminum heatsink. Power supply power — 65 watts, size 10x5x4cm.
18. Afterword
“It won’t fit into such a small case!” — the sceptics will probably say. To be frank, I also sometimes think that way when re-reading what I wrote above.
And then I open the 3D model and see, that all parts fits. Of course, I am not an electronic engineer, and for sure I miss some important things. But, I hope that if there are mistakes, they are “overcorrections”. That is, real engineers would fit all of that into a case even smaller.
By and large, the adminbook can be divided into 5 functional parts:
- the usual part, as in all notebooks — processor, memory, hard drive, etc.
- keyboard and trackpoint that can work separately
- autonomous video subsystem
- subsystem for managing non-standard features (enable / disable POE, infrared remote control, PCIe mode switching, LAN testing, etc.)
- power subsystem
If we consider them separately, then everything looks quite feasible.
The SOC Kaby Lake contains a CPU, a graphics accelerator, a memory controller, PCIe, SATA controller, USB controller for 6 USB3 and 10 USB2 outputs, Gigabit Ethernet controller, 4 lanes to connect webcams, integrated audio and etc.
All that remains is to trace the lanes to connectors and supply power to it.
Keyboard and trackpoint is a separate module that connects via USB to the adminbook or to an external connector. Nothing complicated here: USB and Bluetooth keyboards are very widespread. In our case, in addition, needs to make a rewritable table of scan codes and transfer non-standard keys over a separate interface other than USB.
The video subsystem receives the video signal from the adminbook or from external connectors. In fact, this is a regular monitor with a video switchboard plus a couple of VGA converters.
Non-standard features are managed independently of the operating system. The easiest way to do it with via a separate microcontroller which receives codes for pressing non-standard keys (those that are pressed with Fn) and performs the corresponding actions.
Since you have to display a menu to change the settings, the microcontroller has a video output, connected to the adminbook for the duration of the setup.
The internal PSU is galvanically isolated from the rest of the system. Why not? On habr.com there was an article about making a 100W, 9.6mm thickness planar transformer! And it only costs $0.5.
So the electronic part of the adminbook is quite feasible. There is the programming part, and I don’t know which part will harder.
This concludes my fairly long article. It long, even though I simplified, shortened and threw out minor details.
The ideal end of the article was a link to an online store where you can buy an adminbook. But it's not yet designed and released. Since this requires money.
Unfortunately, I have no experience with Kickstarter or Indigogo. Maybe you have this experience? Let's do it together!
Update
Many people asked for a simplified version. Ok. Done. Sorry — just a 3d model, without render.
Deleted: second LAN adapter, micro SD card reader, one USB port Type C, second camera, camera lights and camera curtines, display latch, unnecessary audio connectors.
Also in this version there will be no infrared remote control, a reprogrammable keyboard, QC 3.0 charging standard, and getting power by POE.