This post is about weighted blended order-independent transparency (WBOIT) — the trick that was covered in JCGT in 2013.
When multiple transparent objects appear on a screen, pixel color depends on which one is closer to the viewer. Here is a well-known blending operator used in that case:
Fragments ordering is important. The operator contains color (Cnear) and opacity (α) of a near fragment and overall color (Cfar) of all fragments behind it. Opacity may range from 0 to 1; 0 means that the object is completely transparent (invisible) and 1 means that it’s completely opaque.
In order to use this operator you need to sort fragments by depth. Imagine what a curse it is. Generally, you need to make one sorting per frame. If you sort objects then you may have to deal with irregular shaped surfaces that must be cut into sections, and then cut-off PARTS of those surfaces must be sorted (you definitely need to do it for intersecting surfaces). If you sort fragments then you’re going to place the actual sorting in your shaders. This method is known as “Order-independent transparency” (OIT), and it is based on a linked list stored in video memory. It’s nearly impossible to predict how much memory must be allocated for that list. And if you are short of memory, you get artifacts on the screen.
Consider yourself lucky if you can regulate the number of transparent objects on your scene and adjust their relative positions. But if you develop a CAD then it’s up to users to position their objects, so there will be as many objects as they want, and their placement will be plain arbitrary.
Now you see why is it so tempting to find a blending operator that doesn’t require preliminary sorting. And there is such an operator — in a paper I mentioned in the beginning. In fact, there are several formulas, but one of them the authors (and myself) consider the best:
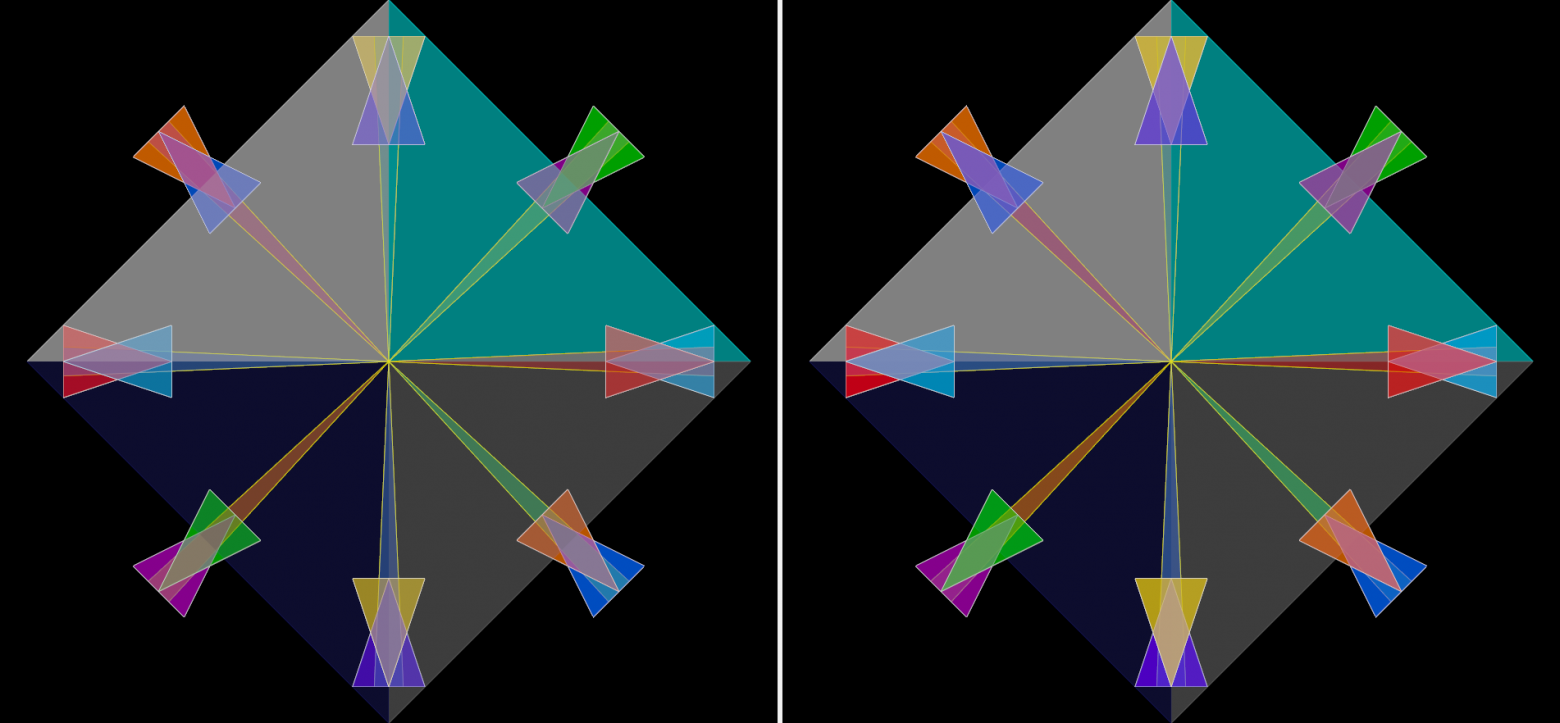
On the screenshot one can see groups of transparent triangles arranged on four depth layers. On the left side they were rendered with WBOIT, and on the right side the classic order-dependent blending — with formula (1) — was used (I will call it CODB from now on).
Before we can start rendering transparent objects, we need to render all non-transparent ones. After that, transparent objects are rendered with depth test but without writing anything to a depth buffer (it can be done this way:
Now, let’s look into what happen in some point with screen-space coords (x, y). Transparent fragments — that happen to be nearer than the non-transparent one — pass depth test, no matter how they are placed relative to the transparent fragments already rendered. Those transparent fragments that fall behind the non-transparent one — well, they don’t pass depth test and are discarded, naturally.
C0 in formula (2) is color of the non-transparent fragment rendered in that point (x, y). We have n transparent fragments in total that passed depth test, and they have indices i ∈ [1, n]. Ci is color of ith transparent fragment and αi is its opacity.
Formula (2) is slightly similar to formula (1), though it’s not very obvious. Replace with Cnear, C0 with Cfar and
 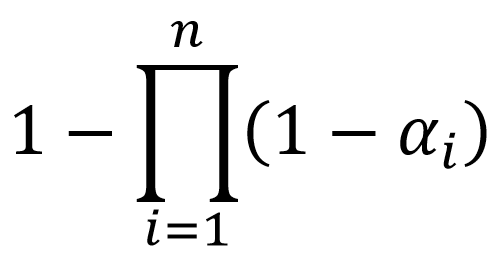 with α and formula (1) will be exactly what you’ll get. Indeed, is weighted arithmetic mean of colors of all transparent fragments (there is similar formula in mechanics for «center of mass»), and it will go for color of near fragment Cnear. C0 is color of the non-transparent fragment behind all those transparent fragments for which we calculate weighted arithmetic mean. In other words, we replace all transparent fragments with one «weighted mean» fragment and use the standard blending operator — formula (1). Now, there is a bit sophisticated formula for α, and we have yet to figure out its meaning.
It is a scalar function in n-dimensional space. All αi are contained in [0, 1] so its partial derivative with respect to any of αi is some non-negative constant. It means that opacity of the «weighted mean» fragment increases when you increase opacity of any of the transparent fragments, which is exactly what we want. Moreover, it increases linearly.
If opacity of some fragment is 0 then it is completely invisible. It doesn’t contribute to resulting color at all.
If at least one fragment has opacity of 1 then α is 1 too. That is, non-transparent fragment becomes invisible, which is good. The problem is, the other transparent fragments (behind this fragment with opacity = 1) can still be seen through it and contribute to resulting color:

The orange triangle on this image lies on the top, the green triangle lies beneath it and beneath the green triangle lie gray and cyan triangles. The background is black. The orange triangle’s opacity is 1; all others have opacity = 0.5. Here you can see that WBOIT looks very poor. The only place where true orange color appears is the edge of the green triangle outlined with non-transparent white line. As I just mentioned, non-transparent fragment is invisible if it has a transparent fragment on top of it with opacity = 1.
It is seen better on the next picture:
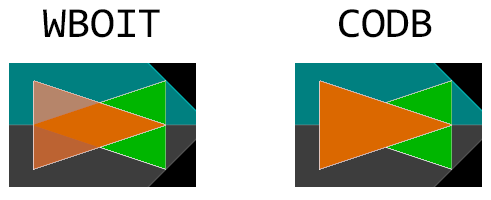
Orange triangle’s opacity is 1, the green triangle with transparency turned off is just rendered with non-transparent objects. It looks like GREEN color of the triangle behind sifts through the top triangle as ORANGE color.
The simplest way to make your picture look plausible is to not set high opacity to your objects. In a project where I use this technique, I don’t set opacity more than 0.5. It is 3D CAD where objects are drawn schematically and don’t need to look very realistic, so this restriction is acceptable.
With low opacities left and right pictures look very similar:

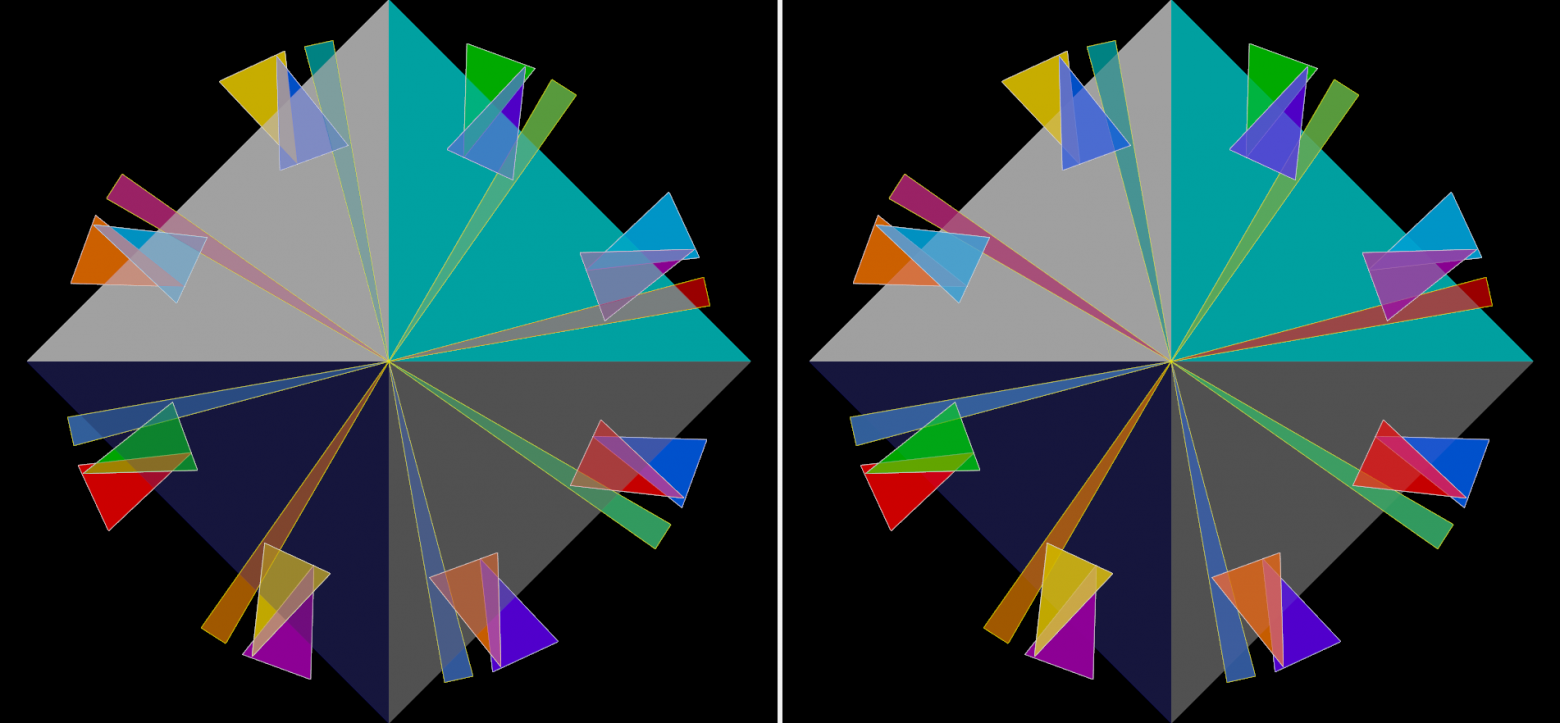
And they noticeably differ with high opacities:
Here is a transparent polyhedron:


It has orange side faces and green horizontal faces, which is, unfortunately, not obvious, meaning that the picture doesn’t look credible. Wherever an orange face happens to be on top, the color must be more orange, and where it is behind a green face, the color must be more green. Better to draw them with one color:

In order to compensate the lack of depth sorting, authors of aforementioned JCGT paper came up with several ways to inject depth in formula (2). It complicates implementation and makes the result less predictable. To make it work, blending parameters must be attuned according to a specific 3D scene. I didn’t delve deeply into this topic, so if you want to know more, read the paper.
Authors claim that sometimes WBOIT is capable to do something that CODB can’t. For instance, consider drawing a smoke as a particle system with two particles: dark smoke and lighter smoke. When the particles are moving and one particle passes through another, their blended color instantly switch from dark to light, which is not good. WBOIT operator with depth produces more preferable result with smooth transition of color. Hair or fur modeled as a set of thin tubes has the same property.
Now for the OpenGL implementation of the formula (2). You can see the implementation on GitHub. It’s a Qt-based app, and the pictures you see here mostly came from it.
If you are new to transparent rendering, here is a good entry-level material:
Learn OpenGL. Blending
I recommend reading it before proceeding with this post.
In order to evaluate formula (2) we need 2 extra framebuffers, 3 multisamle textures and a depth renderbuffer. Non-transparent objects will be rendered to the first texture, colorTextureNT. Its type is GL_RGB10_A2. The second texture (colorTexture) will be of type GL_RGBA16F. First three components of colorTexture will contain this part of formula (2): , and
, and  will be written to the fourth component. The last texture, alphaTexture, of type GL_R16 will contain
  .
.
First, we need to create all those objects and obtain their identifiers from OpenGL:
I use Qt framewok, as you remember, and all calls to OpenGL are made from an object of type QOpenGLFunctions_4_5_Core, for which I always use name f.
Memory allocation comes next:
Framebuffer setup:
During the second rendering pass, the output of the fragment shader will go in two textures, which must be explicitly specified with glDrawBuffers.
Most of this code is executed one time, when the program starts. The code for texture and renderbuffer memory allocation is executed each time the window size is changed. Now we proceed to the code executed each time window’s contents is updated.
We just rendered all non-transparent objects to colorTextureNT and wrote depths in the renderbuffer. Before using that same renderbuffer on the next rendering pass, we need to assure that all write operations in the depth renderbuffer from non-transparent objects are finished. It is achieved with GL_FRAMEBUFFER_BARRIER_BIT. After the transparent objects are rendered we’re going to call ApplyTextures() function which will perform the final rendering pass where the fragment shader will sample from textures colorTextureNT, colorTexture and alphaTexture in order to apply formula (2). The textures must be ready by that moment, so we use GL_TEXTURE_FETCH_BARRIER_BIT before invoking ApplyTextures().
defaultFBO is a framebuffer we use to show the picture on the screen. In most cases it is 0, but in Qt it is QOpenGLWidget::defaultFramebufferObject().
In each invocation of a fragment shader we’ll have access to color and opacity of the current fragment. But in colorTexture must appear a sum (and in alphaTexture a product) of those entities. For that, we’ll use blending. Besides, considering that for the first texture we calculate a sum while for the second we calculate a product, we must provide different blending settings (glBlendFunc and glBlendEquation) for each attachment.
Here is contents of PrepareToTransparentRendering() function:
And contents of CleanupAfterTransparentRendering() function:
In my fragment shader, w stands for opacity. Product of color and w — and w itself — will go to the first output parameter, and 1 – w will go to the second output parameter. A layout qualifier must be set for each output parameter in the form of «location = X», where X is an index of an element in the attachments array — the one we gave to glDrawBuffers function. To be precise, the output parameter with location = 0 goes to the texture bound to GL_COLOR_ATTACHMENT0, and the parameter with location = 1 goes to the texture bound to GL_COLOR_ATTACHMENT1. That same numbers are used in glBlendFunci and glBlendEquationi functions to indicate which color attachment we set the blending parameters for.
The fragment shader:
In the ApplyTextures() function we simply draw a rectangle covering the whole viewport. The fragment shader samples data from all three textures using current screen-space coords as texture coords, and a current sample index (gl_SampleID) as a sample index for multisample textures. Presence of gl_SampleID variable in the shader code makes the system to invoke fragment shader once per sample (while normally it’s invoked once per pixel, writing its output to all samples that fall within a primitive).
The vertex shader is plain trivial:
The fragment shader:
And finally — ApplyTextures() function:
In the end, OpenGL resources must be freed. I do it in the destructor of my OpenGL widget:
When multiple transparent objects appear on a screen, pixel color depends on which one is closer to the viewer. Here is a well-known blending operator used in that case:

Fragments ordering is important. The operator contains color (Cnear) and opacity (α) of a near fragment and overall color (Cfar) of all fragments behind it. Opacity may range from 0 to 1; 0 means that the object is completely transparent (invisible) and 1 means that it’s completely opaque.
In order to use this operator you need to sort fragments by depth. Imagine what a curse it is. Generally, you need to make one sorting per frame. If you sort objects then you may have to deal with irregular shaped surfaces that must be cut into sections, and then cut-off PARTS of those surfaces must be sorted (you definitely need to do it for intersecting surfaces). If you sort fragments then you’re going to place the actual sorting in your shaders. This method is known as “Order-independent transparency” (OIT), and it is based on a linked list stored in video memory. It’s nearly impossible to predict how much memory must be allocated for that list. And if you are short of memory, you get artifacts on the screen.
Consider yourself lucky if you can regulate the number of transparent objects on your scene and adjust their relative positions. But if you develop a CAD then it’s up to users to position their objects, so there will be as many objects as they want, and their placement will be plain arbitrary.
Now you see why is it so tempting to find a blending operator that doesn’t require preliminary sorting. And there is such an operator — in a paper I mentioned in the beginning. In fact, there are several formulas, but one of them the authors (and myself) consider the best:

On the screenshot one can see groups of transparent triangles arranged on four depth layers. On the left side they were rendered with WBOIT, and on the right side the classic order-dependent blending — with formula (1) — was used (I will call it CODB from now on).
Before we can start rendering transparent objects, we need to render all non-transparent ones. After that, transparent objects are rendered with depth test but without writing anything to a depth buffer (it can be done this way:
glEnable(GL_DEPTH_TEST); glDepthMask(GL_FALSE);).Now, let’s look into what happen in some point with screen-space coords (x, y). Transparent fragments — that happen to be nearer than the non-transparent one — pass depth test, no matter how they are placed relative to the transparent fragments already rendered. Those transparent fragments that fall behind the non-transparent one — well, they don’t pass depth test and are discarded, naturally.
C0 in formula (2) is color of the non-transparent fragment rendered in that point (x, y). We have n transparent fragments in total that passed depth test, and they have indices i ∈ [1, n]. Ci is color of ith transparent fragment and αi is its opacity.
Formula (2) is slightly similar to formula (1), though it’s not very obvious. Replace
with Cnear, C0 with Cfar and with α and formula (1) will be exactly what you’ll get. Indeed, is weighted arithmetic mean of colors of all transparent fragments (there is similar formula in mechanics for «center of mass»), and it will go for color of near fragment Cnear. C0 is color of the non-transparent fragment behind all those transparent fragments for which we calculate weighted arithmetic mean. In other words, we replace all transparent fragments with one «weighted mean» fragment and use the standard blending operator — formula (1). Now, there is a bit sophisticated formula for α, and we have yet to figure out its meaning.
It is a scalar function in n-dimensional space. All αi are contained in [0, 1] so its partial derivative with respect to any of αi is some non-negative constant. It means that opacity of the «weighted mean» fragment increases when you increase opacity of any of the transparent fragments, which is exactly what we want. Moreover, it increases linearly.
If opacity of some fragment is 0 then it is completely invisible. It doesn’t contribute to resulting color at all.
If at least one fragment has opacity of 1 then α is 1 too. That is, non-transparent fragment becomes invisible, which is good. The problem is, the other transparent fragments (behind this fragment with opacity = 1) can still be seen through it and contribute to resulting color:
The orange triangle on this image lies on the top, the green triangle lies beneath it and beneath the green triangle lie gray and cyan triangles. The background is black. The orange triangle’s opacity is 1; all others have opacity = 0.5. Here you can see that WBOIT looks very poor. The only place where true orange color appears is the edge of the green triangle outlined with non-transparent white line. As I just mentioned, non-transparent fragment is invisible if it has a transparent fragment on top of it with opacity = 1.
It is seen better on the next picture:
Orange triangle’s opacity is 1, the green triangle with transparency turned off is just rendered with non-transparent objects. It looks like GREEN color of the triangle behind sifts through the top triangle as ORANGE color.
The simplest way to make your picture look plausible is to not set high opacity to your objects. In a project where I use this technique, I don’t set opacity more than 0.5. It is 3D CAD where objects are drawn schematically and don’t need to look very realistic, so this restriction is acceptable.
With low opacities left and right pictures look very similar:
And they noticeably differ with high opacities:
Here is a transparent polyhedron:
It has orange side faces and green horizontal faces, which is, unfortunately, not obvious, meaning that the picture doesn’t look credible. Wherever an orange face happens to be on top, the color must be more orange, and where it is behind a green face, the color must be more green. Better to draw them with one color:
Inject depth into the blending operator
In order to compensate the lack of depth sorting, authors of aforementioned JCGT paper came up with several ways to inject depth in formula (2). It complicates implementation and makes the result less predictable. To make it work, blending parameters must be attuned according to a specific 3D scene. I didn’t delve deeply into this topic, so if you want to know more, read the paper.
Authors claim that sometimes WBOIT is capable to do something that CODB can’t. For instance, consider drawing a smoke as a particle system with two particles: dark smoke and lighter smoke. When the particles are moving and one particle passes through another, their blended color instantly switch from dark to light, which is not good. WBOIT operator with depth produces more preferable result with smooth transition of color. Hair or fur modeled as a set of thin tubes has the same property.
The code
Now for the OpenGL implementation of the formula (2). You can see the implementation on GitHub. It’s a Qt-based app, and the pictures you see here mostly came from it.
If you are new to transparent rendering, here is a good entry-level material:
Learn OpenGL. Blending
I recommend reading it before proceeding with this post.
In order to evaluate formula (2) we need 2 extra framebuffers, 3 multisamle textures and a depth renderbuffer. Non-transparent objects will be rendered to the first texture, colorTextureNT. Its type is GL_RGB10_A2. The second texture (colorTexture) will be of type GL_RGBA16F. First three components of colorTexture will contain this part of formula (2):
, and will be written to the fourth component. The last texture, alphaTexture, of type GL_R16 will contain .First, we need to create all those objects and obtain their identifiers from OpenGL:
    f->glGenFramebuffers (1, &framebufferNT    );
    f->glGenTextures     (1, &colorTextureNT   );
    f->glGenRenderbuffers(1, &depthRenderbuffer);

    f->glGenFramebuffers(1, &framebuffer );
    f->glGenTextures    (1, &colorTexture);
    f->glGenTextures    (1, &alphaTexture);
I use Qt framewok, as you remember, and all calls to OpenGL are made from an object of type QOpenGLFunctions_4_5_Core, for which I always use name f.
Memory allocation comes next:
    f->glBindTexture(GL_TEXTURE_2D_MULTISAMPLE, colorTextureNT);
    f->glTexImage2DMultisample( GL_TEXTURE_2D_MULTISAMPLE, numOfSamples,
                                GL_RGB16F, w, h, GL_TRUE                 );
    f->glBindRenderbuffer(GL_RENDERBUFFER, depthRenderbuffer);
    f->glRenderbufferStorageMultisample( GL_RENDERBUFFER, numOfSamples,
                                         GL_DEPTH_COMPONENT, w, h        );

    f->glBindTexture(GL_TEXTURE_2D_MULTISAMPLE, colorTexture);
    f->glTexImage2DMultisample( GL_TEXTURE_2D_MULTISAMPLE, numOfSamples,
                                GL_RGBA16F, w, h, GL_TRUE                );
    f->glBindTexture(GL_TEXTURE_2D_MULTISAMPLE, alphaTexture);
    f->glTexImage2DMultisample( GL_TEXTURE_2D_MULTISAMPLE, numOfSamples,
                                GL_R16F, w, h, GL_TRUE                   );
Framebuffer setup:
    f->glBindFramebuffer(GL_FRAMEBUFFER, framebufferNT);
    f->glFramebufferTexture2D( GL_FRAMEBUFFER, GL_COLOR_ATTACHMENT0,
                               GL_TEXTURE_2D_MULTISAMPLE, colorTextureNT, 0
                             );
    f->glFramebufferRenderbuffer( GL_FRAMEBUFFER, GL_DEPTH_ATTACHMENT,
                                  GL_RENDERBUFFER, depthRenderbuffer
                                );

    f->glBindFramebuffer(GL_FRAMEBUFFER, framebuffer);
    f->glFramebufferTexture2D( GL_FRAMEBUFFER, GL_COLOR_ATTACHMENT0,
                               GL_TEXTURE_2D_MULTISAMPLE, colorTexture, 0
                             );
    f->glFramebufferTexture2D( GL_FRAMEBUFFER, GL_COLOR_ATTACHMENT1,
                               GL_TEXTURE_2D_MULTISAMPLE, alphaTexture, 0
                             );
    GLenum attachments[2] = {GL_COLOR_ATTACHMENT0, GL_COLOR_ATTACHMENT1};
    f->glDrawBuffers(2, attachments);
    f->glFramebufferRenderbuffer( GL_FRAMEBUFFER, GL_DEPTH_ATTACHMENT,
                                  GL_RENDERBUFFER, depthRenderbuffer
                                );
During the second rendering pass, the output of the fragment shader will go in two textures, which must be explicitly specified with glDrawBuffers.
Most of this code is executed one time, when the program starts. The code for texture and renderbuffer memory allocation is executed each time the window size is changed. Now we proceed to the code executed each time window’s contents is updated.
    f->glBindFramebuffer(GL_FRAMEBUFFER, framebufferNT);
    // ... rendering non-transparent objects ...
    // .......
    // done! (you didn't expect me to explain how do I render primitives in OpenGL, did you?
    // It's not relevant for this topic
We just rendered all non-transparent objects to colorTextureNT and wrote depths in the renderbuffer. Before using that same renderbuffer on the next rendering pass, we need to assure that all write operations in the depth renderbuffer from non-transparent objects are finished. It is achieved with GL_FRAMEBUFFER_BARRIER_BIT. After the transparent objects are rendered we’re going to call ApplyTextures() function which will perform the final rendering pass where the fragment shader will sample from textures colorTextureNT, colorTexture and alphaTexture in order to apply formula (2). The textures must be ready by that moment, so we use GL_TEXTURE_FETCH_BARRIER_BIT before invoking ApplyTextures().
    static constexpr GLfloat clearColor[4] = { 0.0f, 0.0f, 0.0f, 0.0f };
    static constexpr GLfloat clearAlpha = 1.0f;

    f->glBindFramebuffer(GL_FRAMEBUFFER, framebuffer);

    f->glClearBufferfv(GL_COLOR, 0,  clearColor);
    f->glClearBufferfv(GL_COLOR, 1, &clearAlpha);

    f->glMemoryBarrier(GL_FRAMEBUFFER_BARRIER_BIT);

    PrepareToTransparentRendering();
    {
        // ... rendering transparent objects ...
    }
    CleanupAfterTransparentRendering();

    f->glMemoryBarrier(GL_TEXTURE_FETCH_BARRIER_BIT);

    f->glBindFramebuffer(GL_FRAMEBUFFER, defaultFBO);
    ApplyTextures();
defaultFBO is a framebuffer we use to show the picture on the screen. In most cases it is 0, but in Qt it is QOpenGLWidget::defaultFramebufferObject().
In each invocation of a fragment shader we’ll have access to color and opacity of the current fragment. But in colorTexture must appear a sum (and in alphaTexture a product) of those entities. For that, we’ll use blending. Besides, considering that for the first texture we calculate a sum while for the second we calculate a product, we must provide different blending settings (glBlendFunc and glBlendEquation) for each attachment.
Here is contents of PrepareToTransparentRendering() function:
    f->glEnable(GL_DEPTH_TEST); f->glDepthMask(GL_FALSE);
    f->glDepthFunc(GL_LEQUAL);
    f->glDisable(GL_CULL_FACE);
    f->glEnable(GL_MULTISAMPLE);

    f->glEnable(GL_BLEND);

    f->glBlendFunci(0, GL_ONE, GL_ONE);
    f->glBlendEquationi(0, GL_FUNC_ADD);

    f->glBlendFunci(1, GL_DST_COLOR, GL_ZERO);
    f->glBlendEquationi(1, GL_FUNC_ADD);
And contents of CleanupAfterTransparentRendering() function:
    f->glDepthMask(GL_TRUE);
    f->glDisable(GL_BLEND);
In my fragment shader, w stands for opacity. Product of color and w — and w itself — will go to the first output parameter, and 1 – w will go to the second output parameter. A layout qualifier must be set for each output parameter in the form of «location = X», where X is an index of an element in the attachments array — the one we gave to glDrawBuffers function. To be precise, the output parameter with location = 0 goes to the texture bound to GL_COLOR_ATTACHMENT0, and the parameter with location = 1 goes to the texture bound to GL_COLOR_ATTACHMENT1. That same numbers are used in glBlendFunci and glBlendEquationi functions to indicate which color attachment we set the blending parameters for.
The fragment shader:
#version 450 core

in vec3 color;

layout (location = 0) out vec4 outData;
layout (location = 1) out float alpha;

layout (location = 2) uniform float w;
void main()
{
    outData = vec4(w * color, w);
    alpha = 1 - w;
}
In the ApplyTextures() function we simply draw a rectangle covering the whole viewport. The fragment shader samples data from all three textures using current screen-space coords as texture coords, and a current sample index (gl_SampleID) as a sample index for multisample textures. Presence of gl_SampleID variable in the shader code makes the system to invoke fragment shader once per sample (while normally it’s invoked once per pixel, writing its output to all samples that fall within a primitive).
The vertex shader is plain trivial:
#version 450 core
const vec2 p[4] = vec2[4](
     vec2(-1, -1), vec2( 1, -1), vec2( 1,  1), vec2(-1,  1)
                         );
void main() { gl_Position = vec4(p[gl_VertexID], 0, 1); }
The fragment shader:
#version 450 core
out vec4 outColor;

layout (location = 0) uniform  sampler2DMS colorTextureNT;
layout (location = 1) uniform  sampler2DMS colorTexture;
layout (location = 2) uniform  sampler2DMS alphaTexture;

void main() {
    ivec2 upos = ivec2(gl_FragCoord.xy);
    vec4 cc = texelFetch(colorTexture, upos, gl_SampleID);
    vec3 sumOfColors = cc.rgb;
    float sumOfWeights = cc.a;

    vec3  colorNT = texelFetch(colorTextureNT, upos, gl_SampleID).rgb;

    if (sumOfWeights == 0)
    { outColor = vec4(colorNT, 1.0); return; }

    float alpha = 1 - texelFetch(alphaTexture, upos, gl_SampleID).r;
    colorNT = sumOfColors / sumOfWeights * alpha +
              colorNT * (1 - alpha);
    outColor = vec4(colorNT, 1.0);
}
And finally — ApplyTextures() function:
    f->glActiveTexture(GL_TEXTURE0);
    f->glBindTexture(GL_TEXTURE_2D_MULTISAMPLE, colorTextureNT);
    f->glUniform1i(0, 0);
    f->glActiveTexture(GL_TEXTURE1);
    f->glBindTexture(GL_TEXTURE_2D_MULTISAMPLE, colorTexture);
    f->glUniform1i(1, 1);
    f->glActiveTexture(GL_TEXTURE2);
    f->glBindTexture(GL_TEXTURE_2D_MULTISAMPLE, alphaTexture);
    f->glUniform1i(2, 2);

    f->glEnable(GL_MULTISAMPLE); f->glDisable(GL_DEPTH_TEST);
    f->glDrawArrays(GL_TRIANGLE_FAN, 0, 4);
In the end, OpenGL resources must be freed. I do it in the destructor of my OpenGL widget:
    f->glDeleteFramebuffers (1, &framebufferNT);
    f->glDeleteTextures     (1, &colorTextureNT);
    f->glDeleteRenderbuffers(1, &depthRenderbuffer);

    f->glDeleteFramebuffers (1, &framebuffer);
    f->glDeleteTextures     (1, &colorTexture);
    f->glDeleteTextures     (1, &alphaTexture);
