There’s a lot of IoT SCADA solutions for factories and other manufacturing needs. Yet, there are cases (and quite a lot), when you need to develop your own SCADA system to cover specific needs of your project.
Original article — IoT dashboard library: visualize SCADA at a snap [Free IoT library]
We often use awesome Qt framework for implementing complex IoT solutions. For a bunch SCADA and SCADA-like projects, we came across the need for quick tool for developing device dashboards. That’s why we developed super lightweight unofficial Qt library. The library is open source, customizable, and free to use under MIT license. We also share a small set of developed widgets.
Enjoy and use Qt ;)
README: This library is created for desktop, mobile, and embedded projects developed on Qt. To use it, you should know Qt/ C++ and QML.
Let us introduce you to a nifty library for your IoT projects. We created QSimpleScada to speed up and simplify visualising any data, so we (and you) can concentrate on developing automation algorithms that rock.
It was mainly created to quicken and, consequently, reduce the cost of IoT solution.
It’s a library that completely handles connection to and editing of widgets. Using QSimpleScada, you can easily create a visualization of IoT data using your mouse and a little code. After you are satisfied with the layout, save the generated .xml file and use it in your project.
Library is created with Qt/C++ and basic widget is based on C++. There is interface for QML, so you can independently create individual widgets on QML (as when creating classic QML UIs) and upload them to your app on a go.
Well, you do if you are a Qt developer or a company and:
If neither of the above is about you, then you don’t.
Well, it may sound a bit redundant, so feel free to skip this section if this question is self-evident to you. Otherwise, there are quite a few reasons to visualize info you got from Internet of Things.
It’s the basic HMI (Human-Machine Interface) component for literally any IoT or control system. Far better than textual approach if you want users to see relevant data on the go. That applies both to classic SCADA and SCADA-ish projects.
For example, on our UBreez we used QSimpleScada to visualize air readings. Compare the display for yourself. So, what looks more neat and clear even when comprising lots of sensor widgets?l
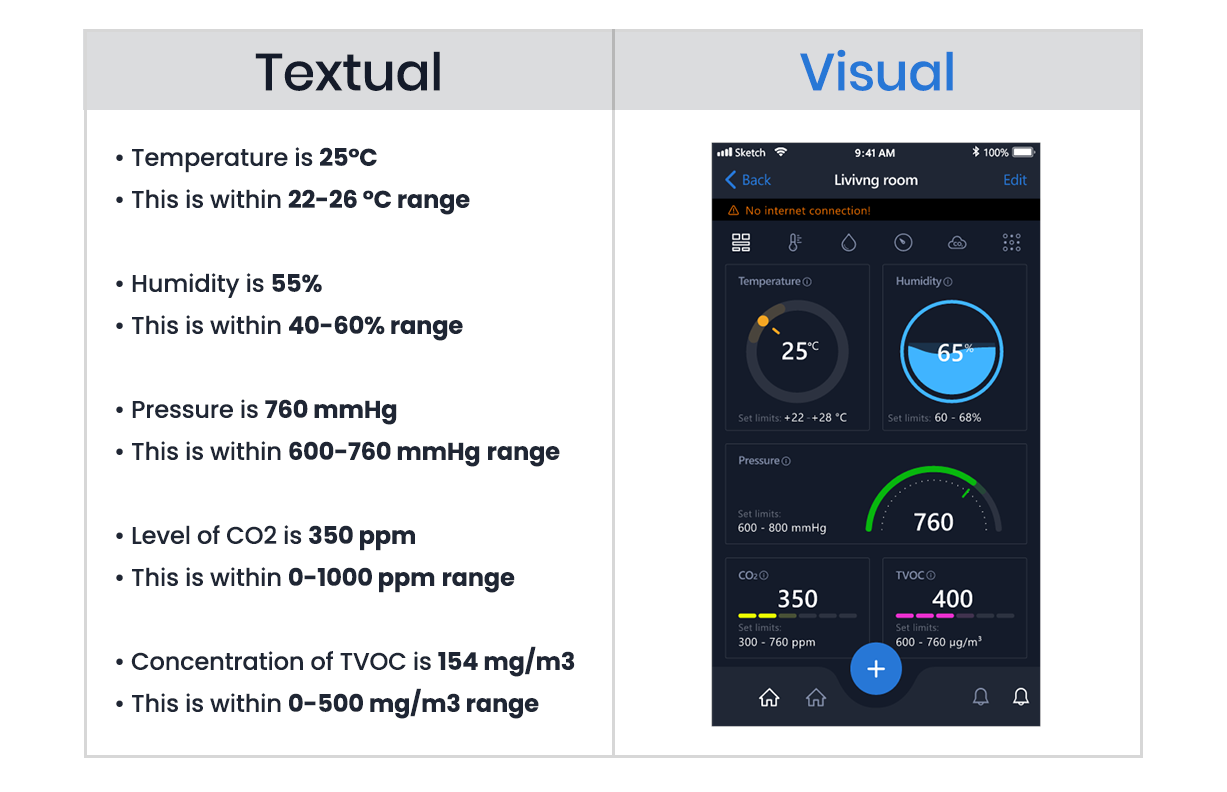
Using dashboards, you can immediately highlight any deviations from standards, pinpoint where a malfunction occurs, track live location, see trends and any other valuable info. It saves users time on understanding data you SCADA system collects, and they can respond and decide how to act faster.
Here are the steps for integrating QSimpleScada version 0.9.x in your project:
Via package manager:
If you’re building savvy solutions using Qt, you most likely use qpm package manager so no further chit-chat is required. In case you don’t (yet), download it from here https://www.qpm.io
To install via qpm, run:
And add:
To *.pro file of your project.
As a bonus, try out our preset of widgets:
From GitHub:
To clone the repo, go to:
https://github.com/IndeemaSoftware/QSimpleScada
To also add preconfigured widgets, clone:
https://github.com/IndeemaSoftware/EEIoT
And add:
To the *.pro file.
Using binary release:
https://github.com/IndeemaSoftware/QSimpleScada/releases
Once you download and install the library to your project:
1. Create a new device that is going to be represented on your dashboard. Give it a name and it IP address:
2. Create a controller class that will handle all later devices and all boards that are connected to devices:
3. Call initBoardForDeviceIp method to create a new board for already appended device. If there is no device on specific IP, the board will not be created.
4. Set editable mode for your controller to enable creating, moving, and resizing the controllers.
If the editing mode is enabled, the modal window will feature dotted background:
5. Add grid layout on your widget and then add your controller to that widget:
Working with widgets
We’ve also developed an EEIoT library with a set of preconfigured widgets. You can download it at https://github.com/IndeemaSoftware/EEIoT and try it out as a start.
To use a widget collection:
Call the function with url to QML resources to let the controller know the location of QML widgets:
Singletone QMLConfig is located in “qscadaconfig.h”
Here we use EEIoT as a group for all widgets inside. You can configure 1 or more groups.
Note, if you create two folders with the same name in different locations, the second one (created later) will erase the first.
You can access all the dynamic properties that form QML (mentioned in a metaData list) from QSimpleScada, so you can create your own complex dashboards fast and easy.
You can use our simple editor to create your first dashboard https://github.com/IndeemaSoftware/QSimpleScadaSample
Then set up QScadaBoardController in your app without any devices and boards and call:
where <file> is a full path to your project file (*.irp)
For example:
Visit our GitHub profile to explore simple apps that show the work of QSimpleScada library:
This is a plain app that visualizes weather-related data of 3 widgets:
QSimpleScada and EEIoT are used to handle the display and connectivity of the dashboard. All the weather real-time data we receive from Openweathermap API. You can download the code at https://github.com/IndeemaSoftware/QSimpleScadaSample
To see the current readings for your city:
Enter your city followed by comma and country code as follows:
Kyiv,ua
and click the Send button.
This will update temperature, humidity and pressure for your region.

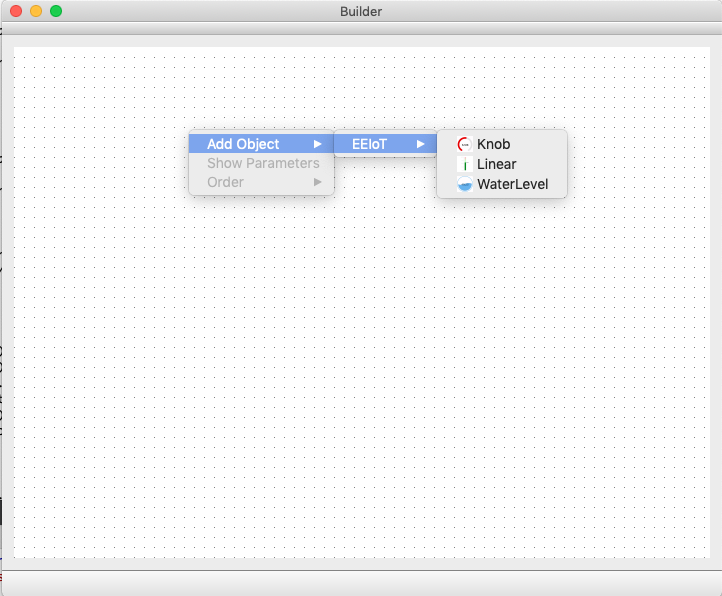
One more example of how to use QSimpleScada is Builder application that gives us the possibility to create our dashboards and save to *.irp files. A simple dashboard editor that uses QSimpleScada to create needed dashboard with EEIoT widgets and save dashboard setup for later usage. In the example, we created dashboard that was used in Weather application mentioned above.
The code is also available at https://github.com/IndeemaSoftware/QSimpleScadaSample
We find that introducing Internet of Things impacts every industry and redefines our approach to using tech. We’ve gone through that topic in detail at 6 promising applications for the industrial IoT article, and it is our pleasure to drive the progress with automatization that 4th Industrial Revolution brings.
If all projects got specs set in stone, the development world would be a utopia. Yet, the clearer the initial goal and requirements are as well as the better the whole team understands them, the more streamlined is a project. To deepen your knowledge about specifics and typical pitfalls that follow IoT projects, read:
Spoiler: find the templates for project-related documentation, so you can communicate the requirements and turn them into actionable specifications with less effort.
Get a thorough understanding of the time and resources you’ll need is nearly impossible. So, to forearm you with a general idea of the complexity (calculated in time and cost), here’s an IoT-specific calculator:

Sharing our toolkit for faster and more efficient development of IoT project, we upload our Qt and IoT related open source projects at https://github.com/IndeemaSoftware with Q at the beginning of the repo titles. You can also find a bunch of tools for React, Android, and iOS development there.

At Indeema, we are accustomed to tight deadlines and challenging projects. And, being committed to creating savvy solutions, we gradually realized that:
Thanks for reading & hope you enjoyed this article. Subscribe for updates and let us know what you’re interested in.
Original article — IoT dashboard library: visualize SCADA at a snap [Free IoT library]
We often use awesome Qt framework for implementing complex IoT solutions. For a bunch SCADA and SCADA-like projects, we came across the need for quick tool for developing device dashboards. That’s why we developed super lightweight unofficial Qt library. The library is open source, customizable, and free to use under MIT license. We also share a small set of developed widgets.
Enjoy and use Qt ;)
README: This library is created for desktop, mobile, and embedded projects developed on Qt. To use it, you should know Qt/ C++ and QML.
Introducing QSimpleScada
Let us introduce you to a nifty library for your IoT projects. We created QSimpleScada to speed up and simplify visualising any data, so we (and you) can concentrate on developing automation algorithms that rock.
It was mainly created to quicken and, consequently, reduce the cost of IoT solution.
What is QSimpleScada?
It’s a library that completely handles connection to and editing of widgets. Using QSimpleScada, you can easily create a visualization of IoT data using your mouse and a little code. After you are satisfied with the layout, save the generated .xml file and use it in your project.
Library is created with Qt/C++ and basic widget is based on C++. There is interface for QML, so you can independently create individual widgets on QML (as when creating classic QML UIs) and upload them to your app on a go.
Why do I need it?
Well, you do if you are a Qt developer or a company and:
- Have strict deadlines and complex data evaluations at your project
- Need to prototype mobile/embedded/desktop IoT projects often
- Need a one-stop tool for diverse Qt projects
- Don’t want/have time/resources to develop dashboards from scratch
If neither of the above is about you, then you don’t.
Why build IoT dashboards?
Well, it may sound a bit redundant, so feel free to skip this section if this question is self-evident to you. Otherwise, there are quite a few reasons to visualize info you got from Internet of Things.
It’s the basic HMI (Human-Machine Interface) component for literally any IoT or control system. Far better than textual approach if you want users to see relevant data on the go. That applies both to classic SCADA and SCADA-ish projects.
For example, on our UBreez we used QSimpleScada to visualize air readings. Compare the display for yourself. So, what looks more neat and clear even when comprising lots of sensor widgets?l
Using dashboards, you can immediately highlight any deviations from standards, pinpoint where a malfunction occurs, track live location, see trends and any other valuable info. It saves users time on understanding data you SCADA system collects, and they can respond and decide how to act faster.
Using QSimpleScada
Here are the steps for integrating QSimpleScada version 0.9.x in your project:
Step 1: Install
Via package manager:
If you’re building savvy solutions using Qt, you most likely use qpm package manager so no further chit-chat is required. In case you don’t (yet), download it from here https://www.qpm.io
To install via qpm, run:
qpm install com.indeema.qsimplescadaAnd add:
include (../vendor/vendor.pri) To *.pro file of your project.
As a bonus, try out our preset of widgets:
qpm install com.indeema.eeiotFrom GitHub:
To clone the repo, go to:
https://github.com/IndeemaSoftware/QSimpleScada
To also add preconfigured widgets, clone:
https://github.com/IndeemaSoftware/EEIoT
And add:
include($$PWD/com/indeema/QSimpleScada/com_indeema_QSimpleScada.pri)
include($$PWD/com/indeema/eeiot/com_indeema_eeiot.pri)
To the *.pro file.
Using binary release:
https://github.com/IndeemaSoftware/QSimpleScada/releases
Step 2: Configure
Once you download and install the library to your project:
1. Create a new device that is going to be represented on your dashboard. Give it a name and it IP address:
QScadaDeviceInfo *lDeviceInfo = new QScadaDeviceInfo();
lDeviceInfo->setName("Test Device");
lDeviceInfo->setIp(QHostAddress("127.0.0.1"));
2. Create a controller class that will handle all later devices and all boards that are connected to devices:
QScadaBoardController *</code><code>mController</code><code> = new QScadaBoardController(); mController->appendDevice(lDeviceInfo)
3. Call initBoardForDeviceIp method to create a new board for already appended device. If there is no device on specific IP, the board will not be created.
mController->initBoardForDeviceIp("127.0.0.1");
4. Set editable mode for your controller to enable creating, moving, and resizing the controllers.
mController->setEditingMode(true);
If the editing mode is enabled, the modal window will feature dotted background:
5. Add grid layout on your widget and then add your controller to that widget:
QGridLayout *mainLayout = new QGridLayout(ui->centralWidget);mainLayout->addWidget(mController);Working with widgets
We’ve also developed an EEIoT library with a set of preconfigured widgets. You can download it at https://github.com/IndeemaSoftware/EEIoT and try it out as a start.
To use a widget collection:
Call the function with url to QML resources to let the controller know the location of QML widgets:
QMLConfig::instance.appendQMLPath(:/com/indeema/eeiot/EEIoT/);Singletone QMLConfig is located in “qscadaconfig.h”
Here we use EEIoT as a group for all widgets inside. You can configure 1 or more groups.
Note, if you create two folders with the same name in different locations, the second one (created later) will erase the first.
You can access all the dynamic properties that form QML (mentioned in a metaData list) from QSimpleScada, so you can create your own complex dashboards fast and easy.
Step 3: Use
You can use our simple editor to create your first dashboard https://github.com/IndeemaSoftware/QSimpleScadaSample
Then set up QScadaBoardController in your app without any devices and boards and call:
mController->openProject(QString <file>)where <file> is a full path to your project file (*.irp)
For example:
mController->openProject(QString :/com/indeema/eeiot/EEIoT/)
See QSimpleScada in action
Visit our GitHub profile to explore simple apps that show the work of QSimpleScada library:
-
Weather app
This is a plain app that visualizes weather-related data of 3 widgets:
- Temperature
- Humidity
- Pressure
QSimpleScada and EEIoT are used to handle the display and connectivity of the dashboard. All the weather real-time data we receive from Openweathermap API. You can download the code at https://github.com/IndeemaSoftware/QSimpleScadaSample
To see the current readings for your city:
Enter your city followed by comma and country code as follows:
Kyiv,ua
and click the Send button.
This will update temperature, humidity and pressure for your region.
-
Builder app
One more example of how to use QSimpleScada is Builder application that gives us the possibility to create our dashboards and save to *.irp files. A simple dashboard editor that uses QSimpleScada to create needed dashboard with EEIoT widgets and save dashboard setup for later usage. In the example, we created dashboard that was used in Weather application mentioned above.
The code is also available at https://github.com/IndeemaSoftware/QSimpleScadaSample
More tools for you
We find that introducing Internet of Things impacts every industry and redefines our approach to using tech. We’ve gone through that topic in detail at 6 promising applications for the industrial IoT article, and it is our pleasure to drive the progress with automatization that 4th Industrial Revolution brings.
Understanding and context
If all projects got specs set in stone, the development world would be a utopia. Yet, the clearer the initial goal and requirements are as well as the better the whole team understands them, the more streamlined is a project. To deepen your knowledge about specifics and typical pitfalls that follow IoT projects, read:
- How to create a startup: IoT project from idea to production
- B2C & B2B specifics of developing IoT products
- Internet of Things development: 5 steps to creating your project
Spoiler: find the templates for project-related documentation, so you can communicate the requirements and turn them into actionable specifications with less effort.
Estimating the cost and time
Get a thorough understanding of the time and resources you’ll need is nearly impossible. So, to forearm you with a general idea of the complexity (calculated in time and cost), here’s an IoT-specific calculator:
Dev tools
Sharing our toolkit for faster and more efficient development of IoT project, we upload our Qt and IoT related open source projects at https://github.com/IndeemaSoftware with Q at the beginning of the repo titles. You can also find a bunch of tools for React, Android, and iOS development there.
Recap
At Indeema, we are accustomed to tight deadlines and challenging projects. And, being committed to creating savvy solutions, we gradually realized that:
- Understanding comes first.
Be curious. Clarify each requirement, no matter how evident you think it is. Make sure you do understand. Because you can design a logical and scalable architecture, write awesome clean code, and yet fail to convey the desired result. Devil is in the details (so make sure you leave no details unnoticed).
- Reinventing the bicycle is futile.
Each project contains unique challenges and requires out-of-the-box thoughts. And there’s no need to develop everything from scratch. Why? Because you’ll only cut the time you have to find and implement really challenging features, modules, and architecture.
- Quality is a standard.
Be responsible for your work. You are engaged in making the future. If you are a developer, test your code against specifications, against best practices, common sense, stability of the project, etc. And the same applies to any other role.
Thanks for reading & hope you enjoyed this article. Subscribe for updates and let us know what you’re interested in.
