Disclaimer
The laws of my country allow me to reverse and modify programs. Please make sure that it is also legal in your country before repeating what follows. Otherwise, I disclaim responsibility for any negative consequences.
Introduction
Once I was asked to save a traffic dump of an Instagram app while viewing one particular user profile. Simply saving the traffic dump on the router didn't make sense because the app used TLS to communicate with the server. Existing solutions didn't work because they worked with an older version of Instagram.
Below I will describe how I managed to do it myself using mitmproxy, ghidra and frida.
Naive attempt
The first thing I tried was to set up a mitm-proxy that would allow for transparent interception of traffic between the app and the server. Luckily I have ethernet and a wifi adapter as well. I had Ubuntu 20.04 installed which allows me to enable a wifi hotspot.

The scheme is about as follows
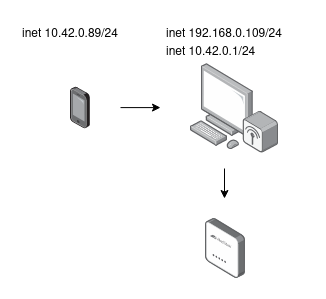
Afterwards, I installed the app on my old rooted Nexus 5 and connected to the hotspot. To check that everything was working properly, I ran Wireshark on my computer and saw the packets that the application was sending.
Next I had to redirect these packets to my mitm-proxy. This can be accomplished by using iptables:
sudo iptables -t nat -I PREROUTING 1 -i wlx00e100884785 -p tcp -m multiport --dports 80,443 -j DNAT --to-destination 192.168.0.109:8081wlx00e100884785 is the name of the hotspot interface and 192.168.0.109 is the ip address of my computer's ethernet interface.
We also need to prohibit UDP traffic on port 443.
sudo iptables -I FORWARD 1 -p udp -i wlx00e100884785 --dport 443 -j REJECTMost proxies do not support QUIC. Blocking UDP will force the application to use TCP instead of QUIC.
After that, it was necessary to bring up the mitm-proxy itself. In the beginning, I used BurpSuite CE in invisible proxy mode. Later I had to give it up, because for some unknown reason Instagram was unstable through it. Some requests went through, and some did not. Therefore, I decided to use mitmproxy. You can run it with the command:
docker run --rm -it -v ~/.mitmproxy:/home/mitmproxy/.mitmproxy --network host mitmproxy/mitmproxy mitmproxy --mode transparent --showhost --set listen_port=8081 --set=console_focus_follow=trueIn addition, you need to add the mitmproxy certificate to the trusted certificates on the device itself. How to do this is described here.
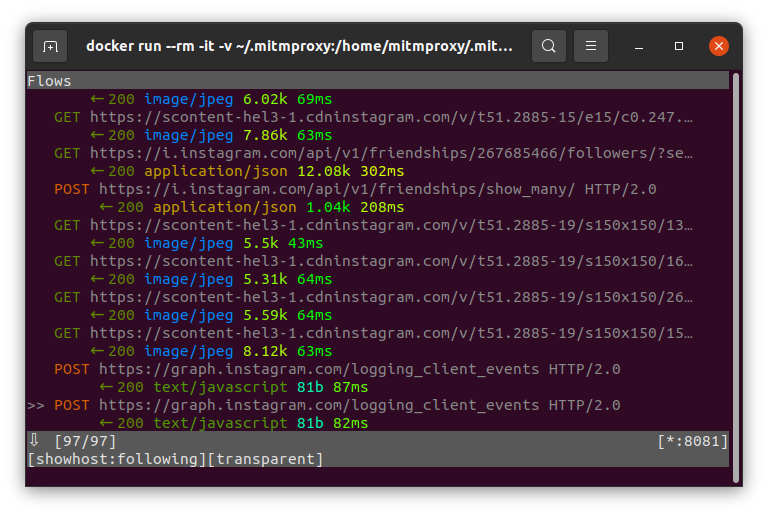
Now to make sure that everything works, you can open any https site through the browser on your phone and the proxy will display these requests.

Unfortunately, if you open the Instagram app, you will see warnings in the proxy's event logs that our certificate is not recognized.
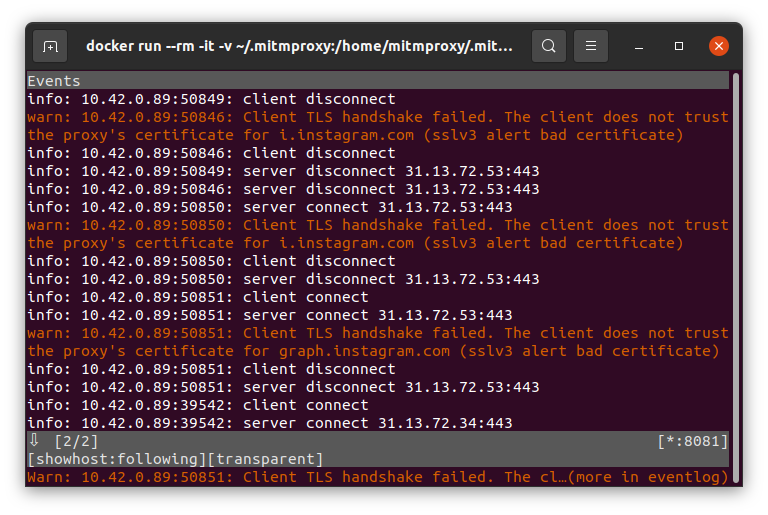
This means that the application can have its own certificate store (like firefox browser for example) and not use the system one. Alternatively, the application has a list of certificates which can be trusted. This is a technique known as certificate pinning. I will not go into details about this. Check the Internet about the pros and cons of using certificate pinning in your applications.
Bypassing certificate verification
So, we know that Instagram somehow verifies the certificate of the host it connects to. So how do we find that place? I thought that after a failed certificate verification the connection should be closed, which means that the close system call should be called. So we can try to intercept the close in libc and see where it is called from.
To find the code that calls close, we need to intercept the close call and look at the stack. But my phone has a Qualcomm Snapdragon 800 MSM897 ARM processor, which means that the return address from close is not in the stack, but in the LR register.
So how to intercept a close call? In my opinion, the easiest way to do this is to use the frida toolkit. To do that you need to run frida-server on the phone, and then you can interact with it via JavaScript API.
We will use the frida-trace utility to intercept the close call
frida-trace -H 10.42.0.89:12345 -f com.instagram.android -i close10.42.0.89:12345 is the address of the frida-server running on the phone.
This will create a file __handlers/libc.so/close.js, which you can modify to output the desired information.
Replace the lines:
onEnter(log, args, state) {
 log(close(fd=${args[0]}));
},
By:
onEnter(log, args, state) {
 const sockfd = args[0].toInt32();
 const socktype = Socket.type(sockfd);
 if (!socktype || socktype !== "tcp" ) return;
 const sockLocal = Socket.localAddress(sockfd)
 const tcpEpLocal = sockLocal && sockLocal.ip ? sockLocal : null
 const sockRemote = Socket.peerAddress(sockfd)
 const tcpEpRemote = sockRemote && sockRemote.ip ? sockRemote : null
 if (tcpEpLocal !== null) {
     log(addr=${tcpEpLocal.ip}:${tcpEpLocal.port}, lr=${this.context.lr}, ${new ModuleMap().find(ptr(this.context.lr)).path});
 }
 if (tcpEpRemote !== null) {
   log(addr=${tcpEpRemote.ip}:${tcpEpRemote.port}, lr=${this.context.lr}, ${new ModuleMap().find(ptr(this.context.lr)).path});
 }
},
And restart frida-trace. As a result, we will get a lot of lines like this:
2359 ms addr=31.13.72.53:443, lr=0x939d4791, /data/data/com.instagram.android/lib-superpack-br/libliger.so
Now we see the value of the address that is in the LR register and the path to the module that this address belongs to. Let's try to analyze this module with Ghidra.
Let's copy it from the phone (feel free to ask me to send a copy):
adb pull /data/data/com.instagram.android/lib-superpack-br/libliger.soand open it in Ghidra.
The next step is static and dynamic analysis. I tried to intercept functions that I found interesting and looked at where they were called from and what parameters were passed to them. As a result, I stumbled upon the function
_ZN8proxygen10TraceEvent5startERKNS_15TimeUtilGenericINSt6__ndk16chrono12steady_clockEEE
which after demangling becomes proxygen::TraceEvent::start(proxygen::TimeUtilGeneric<std::__ndk1::chrono::steady_clock> const&)

Interception of this function showed that it is constantly called during interaction with the application. You can find the source code of this library on github, and if you look closely at the TraceEvent class, you'll find that the class objects have a method:
std::string toString() const;
Let's try to intercept the start method and then call toString. In the case of my ABI, to call toString() you need to put a pointer to the memory where the string object will be written into r0 and put a pointer to this into r1. I determined this throug trial and error and by reading https://github.com/ARM-software/abi-aa.
If everything is done correctly, then after launching we will see all TraceEvents that were created. Among them, we can see events with the type 'cert_verification':
TraceEvent::start(lr=0x9388790f) TraceEvent(type='cert_verification', id='441', parentID='0', start='0', end='0', metaData='{verification_impl: openSSL, }')
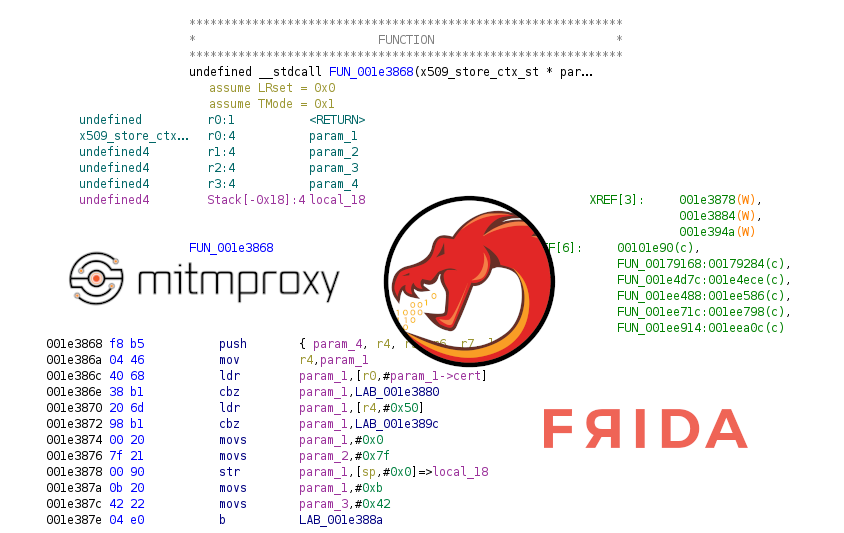
By tracing where they are called from (just like we did with the close method), we come to the function FUN_001898b0.

This function takes a pointer to the x509_store_ctx_st structure. It needs to be edited to match the one used in openssl 1.1.0. Why this version? Because libliger.so has a lot of lines like:
xplat/third-party/openssl/openssl-1.1.0/ssl/ssl_lib.c
Which gives a hint about which version of the library is in use.
Let's try to print the fields of this structure at the moment of function call. We are especially interested in the verify and verify_cb fields. Having done this, we get verify=0x937e7ae3, verify_cb=0x9377c561.
The address of verify corresponds to the address of the function FUN_001e4ae2. According to the sources the signature of this function:
int (*verify) (X509_STORE_CTX *ctx);
So the updated signature in Ghidra will look like this:

Next, let's walk through the call chain and find that it looks like this:
verify(FUN_001e4ae2) <- FUN_001e3a28 <- FUN_001e3868
If you look closely at FUN_001e3868, you will notice that it returns int, which is an error code. For example, here is a fragment of the decompiled code of this function:
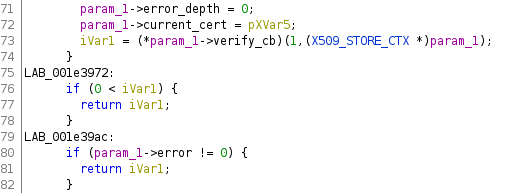
So FUN_001e3868 is the function which is responsible for certificate verification and it returns 1 on success.
Now we can patch it and make it always return 1.
const module = Process.getModuleByName('libliger.so');
const pattern = 'f8 b5 04 46 40 68 38 b1 20 6d 98 b1 00 20';
const target_addresses = Memory.scanSync(module.base, module.size, pattern);
Memory.patchCode(target_addresses[0].address, 8, code => {
   const cw = new ThumbWriter(code);
   cw.putLdrRegU32('r0', 1);
   cw.putMovRegReg('pc', 'lr');
   cw.flush();
});
Before:

After:

Then we check our proxy and see that requests are proxied and there are no more problems with certificates!