Hearing is one of the few basic senses that we humans have along with the other our abilities to see, smell, taste and touch. If we couldn't hear, the world as we know it would be less interesting and colorful to us. It would be a total silence - a scary thing, even to imagine. And speaking makes our life so much fun, because what else can be better than talking to our friends and family? Also, we're able to listen to our favorite music wherever we are, thanks to computers and headphones. With the help of tiny microphones integrated into our phones and laptops we are now able to talk to the people around the world from any place with an Internet connection. But computer hardware alone isn't enough - it is computer software that really defines the way how and when the hardware should operate. Operating Systems provide the means for that to the apps that want to use computer's audio capabilities. In real use-cases audio data usually goes the long way from one end to another, being transformed and (un)compressed on-the-fly, attenuated, filtered, and so on. But in the end it all comes down to just 2 basic processes: playing the sound or recording it.
Today we're going to discuss how to make use of the API that popular OS provide: this is an essential knowledge if you want to create an app yourself which works with audio I/O. But there's just one problem standing on our way: there is no single API that all OS support. In fact, there are completely different API, different approaches, slightly different logic. We could just use some library which solves all those problems for us, but in that case we won't understand what's really going on under the hood - what's the point? But humans are built the way that we sometimes want to dig a little bit deeper, to learn a little bit more than what just lies on the surface. That's why we're going to learn the API that OS provide by default: ALSA (Linux), PulseAudio (Linux), WASAPI (Windows), OSS (FreeBSD), CoreAudio (macOS).
Although I try to explain every detail that I think is important, these API are so complex that in any case you need to find the official documentation which explains all functions, identificators, parameters, etc, in much more detail. Going through this tutorial doesn't mean you don't need to read official docs - you have to, or you'll end up with an incomplete understanding of the code you write.
All sample code for this guide is available here: https://github.com/stsaz/audio-api-quick-start-guide. I recommend that while reading this tutorial you should have an example file opened in front of you so that you better understand the purpose of each code statement in global context. When you're ready for slightly more advanced usage of audio API, you can analyze the code of ffaudio library: https://github.com/stsaz/ffaudio.
Contents:
Overview
First, I'm gonna describe how to work with audio devices in general, without any API specifics.
Step 1. It all starts with enumerating the available audio devices. There are 2 types of devices OS have: a playback device, in which we write audio data, or a capture device, from which we read audio data. Every device has its own unique ID, name and other properties. Every app can access this data to select the best device for its need or to show all devices to its user so he can select the one he likes manually. However, most of the time we don't need to select a specific device, but rather just use the default device. In this case we don't need to enumerate devices and we won't even need to retrieve any properties.
Note that there can be a registered device in the system but unavailable, for example when the user disabled it in system settings. If we perform all necessary error checks when writing our code, we won't normally see any disabled devices.
Sometimes we can retrieve the list of all supported audio formats for a particular device, but I wouldn't rely on this info very much - it's not cross-platform, after all. Instead, it's better to try to assign an audio buffer to this device and see if the audio format is supported for sure.
Step 2. After we have determined what device we want to use, we continue with creating an audio buffer and assigning it to device. At this point we must know the audio format we'd like to use: sample format (e.g. signed integer), sample width (e.g. 16 bit), sample rate (e.g. 48000 Hz) and the number of channels (e.g. 2 for stereo).
Sample format is either signed integer, unsigned integer or a floating point number. Some audio drivers support all integers and floats, while some may support just 16-bit signed integers and nothing else. This doesn't always mean that the device works with them natively - it's possible that audio device software converts samples internally.
Sample width is the size of each sample, 16 bit is the standard for CD Audio quality, but it's not the best choice for audio processing use-cases because it can easily produce artifacts (although, it's unlikely that we can really tell the difference). 24 bit is much better and it's supported by many audio devices. But nevertheless, the professional sound apps don't give any chance to sound artifacts: they use 64-bit float samples internally when performing mixing operations and other types of filtering.
Sample rate is the number of samples necessary to get 1 whole second of audio data. The most popular rates are 44.1KHz and 48KHz, but audiophiles may argue that 96KHz sample rate is the best. Usually, audio devices can work with rates up to 192KHz, but I really don't believe that anybody can hear any difference between 48KHz and higher values. Note that sample rate is the number of samples per second for one channel only. So in fact for 16bit 48KHz stereo stream the number of bytes we have to process is 2 * 48000 * 2.
0 sec                                   1 sec
|      (Sample 0)  ...  (Sample 47999)  |
|       short[L]   ...     short[L]     |
|       short[R]   ...     short[R]     |
Sometimes samples are called frames, similar to video frames. An audio sample/frame is a stack of numerical values which together form the audio signal strength for each hardware device channel for the same point in time. Note, however, that some official docs don't agree with me on this: they specifically define that a sample is just 1 numerical value, while the frame is a set of those values for all channels. Why don't they call sample rate a frame rate then? Please take a look at the diagram above once again. There, the sample width (column width) is still 16bit, no matter how many channels (rows below) we have. Sample format (which is a signed integer in our case) always stays the same too. Sample rate is the number of columns for 1 second of audio, no matter how many channels we have. Therefore, my own logic tells me the definition of an audio sample to me (no matter how others may define it), but your logic may be different - that's totally fine.
Sample size (or frame size) is another property that you will often use while working with digital audio. This is just a constant value to conveniently convert the number of bytes to the number of audio samples and vice versa:
	int sample_size = sample_width/8 * channels;
	int bytes_in_buffer = samples_in_buffer * sample_size;
Of course, we can also set more parameters for our audio buffer, such as the length of our buffer (in milliseconds or in bytes) which is the main property for controlling sound latency. But keep in mind that every device has its own limits for this parameter: we can't set the length too low when device just doesn't support it. I think that 250ms is a fine starting point for most applications, but some real-time apps require the minimum possible latency at the cost of higher CPU usage - it all depends on your particular use-case.
When opening an audio device we should always be ready if the API we use returns with a "bad format" error which means that the audio format we chose isn't supported by the underlying software or by physical device itself. In this case we should select a more suitable format and recreate the buffer.
Note that one physical device can be opened only once, we can't attach 2 or more audio buffers to the same device - what a mess it would be otherwise, right? But in this case we need to solve a problem with having multiple audio apps that want to play some audio in parallel via the single device. Windows solves this problem in WASAPI by introducing 2 different modes: shared and exclusive. In shared mode we attach our audio buffers to a virtual device, which mixes all streams from different apps together, applies some filtering such as sound attenuation and then passes the data to a physical device. And PulseAudio on Linux works the same way on top of ALSA. Of course, the downside is that the shared mode has to have a higher latency and a higher CPU usage. On the other hand, in exclusive mode we have almost direct connection to audio device driver meaning that we can achieve the maximum sound quality and minimum latency, but no other app will be able to use this device while we're using it.
Step 3. After we have prepared and configured an audio buffer, we can start using it: writing data to it for playback or reading data from it to record audio. Audio buffer is in fact a circular buffer, where reading and writing operations are performed infinitely in circle.

But there is one problem: CPU must be in synchronization with the audio device when performing I/O on the same memory buffer. If not, CPU will work at its full speed and run over the audio buffer some million times while the audio device only finishes its first turn. Therefore, CPU must always wait for the audio device to slowly do its work. Then, after some time, CPU wakes up for a short time period to get some more audio data from the device (when recording) or to feed some more data to the device (in playback mode), and then CPU should continue sleeping. Note that this is where the audio buffer length parameter comes into play: the less the buffer size - the more times CPU must wake up to perform its work. A circular buffer can be in 3 different states: empty, half-full and full. And we need to understand how to properly handle all those states in our code.
Empty buffer while recording means that there are no audio samples available to us at the moment. We must wait until audio device puts something new into it.
Empty buffer while playing means that we are free to write audio data into the buffer at any time. However, if the audio device is running and it comes to this point when there's no more data available for it to read, it means that we have failed to keep up with it, this situation is called buffer underrun. If we are in this state, we should pause the device, fill the audio buffer and then resume the normal operation.
Half-full buffer while recording means that there are some audio samples inside the buffer, but it's not yet completely full. We should process the available data as soon as we can and mark this data region as read (or useless) so that the next time we won't see this data as available.
Half-full buffer for playback streams means that we can put some more data into it.
Full buffer for recording streams means that we are falling behind the audio device to read the available data. Audio device has filled the buffer completely and there's no more room for new data. This state is called buffer overrun. In this case we must reset the buffer and resume (unpause) the device to continue normally.
Full buffer for playback streams is a normal situation and we should just wait until some free space is available.
A few words about how the waiting process is performed. Some API provide the means for us to subscribe to notifications to achieve I/O with the least possible latency. For example, ALSA can send SIGIO signal to our process after it has written some data into audio recording buffer. WASAPI in exclusive mode can notify us via a Windows kernel event object. However, for apps that don't require so much accuracy we can simply use our own timers, or we can just block our process with functions like usleep/Sleep. When using these methods we just have to make sure that we sleep not more than half of our audio buffer length, .e.g. for 500ms buffer we may set the timer to 250ms and perform I/O 2 times per each buffer rotation. Of course you understand that we can't do it reliably for very small buffers, because even a slight delay can cause audio stutter. Anyway, in this tutorial we don't need high accuracy, but we need small code that is easier to understand.
Step 4. For playback buffers there's one more thing. After we have completed writing all our data into audio buffer, we must still wait for it to process the data. In other words, we should drain the buffer. Sometimes we should manually add silence to the buffer, otherwise it could play a chunk of some old invalid data, resulting in audio artifacts. Then, after we see that the whole buffer has become empty, we can stop the device and close the buffer.
Also, keep in mind that during the normal operation these problems may arise:
The physical audio device can be switched off by user and become unavailable for us.
The virtual audio device could be reconfigured by user and require us to reopen and reconfigure audio buffers.
CPU was too busy performing some other operations (for another app or system service) resulting in buffer overrun/underrun condition.
Careful programmer must always check for all possible scenarios, check all return codes from API functions that we call and handle them or show an error message to user. I don't do it in my sample code just because this tutorial is for you to understand an audio API. And this purpose is fulfilled with the shortest possible code for you to read - error checking everywhere will make the things worse in this case.
Of course, after we are done, we must close the handlers to audio buffers and devices, free allocated memory regions. But we don't wanna do that in case we just want to play another audio file, for example. Preparing a new audio buffer can take a lot of time, so always try to reuse it when you can.
Audio Data Representation
Now let's talk about how audio data is actually organized and how to analyze it. There are 2 types of audio buffers: interleaved and non-interleaved. Interleaved buffer is a single contiguous memory region where the sets of audio samples go one by one. This is how it looks like for 16bit stereo audio:
short[0][L]
short[0][R]
short[1][L]
short[1][R]
...
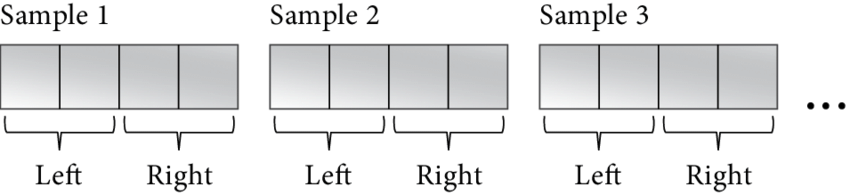
Here, 0 and 1 are the sample indexes, and L and R are the channels. For example, how we can read the values for both channels for sample #9 is we take the sample index and multiply it by the number of channels:
	short *samples = (short*)buffer;
	short sample_9_left = samples[9*2];
	short sample_9_right = samples[9*2 + 1];
These 16-bit signed values are the signal strength where 0 is silence. But the signal strength is usually measured in dB values. Here's how we can convert our integer values to dB:
	short sample = ...;
	double gain = (double)sample * (1 / 32768.0);
	double db = log10(gain) * 20;
Here we first convert integer to a float number - this is gain value where 0.0 is silence and +/-1.0 - max signal. Then, using gain = 10 ^ (db / 20) formula we convert the gain into dB value. If we want to do an opposite conversion, we may use this code:
	#include <emmintrin.h> // SSE2 functions. All AMD64 CPU support them.

	double db = ...;
	double gain = pow(10, db / 20);
	double d = gain * 32768.0;
	short sample;
	if (d < -32768.0)
		sample = -0x8000;
	else if (d > 32768.0 - 1)
		sample = 0x7fff;
	else
		sample = _mm_cvtsd_si32(_mm_load_sd(&d));
I'm not an expert in audio math, I'm just showing you how I do it, but you may find a better solution.
The most popular audio codecs and the most audio API use interleaved audio data format.
Non-interleaved buffer is an array of (potentially) different memory regions, one for each channel:
L -> {
	short[0][L]
	short[1][L]
	...
}
R -> {
	short[0][R]
	short[1][R]
	...
}
For example, the mainstream Vorbis and FLAC audio codecs use this format. As you can see, it's very easy to operate on samples within a single channel in non-interleaved buffers. For example, swapping left and right channels would take just a couple of CPU cycles to swap the pointers.
I think we've had enough theory and we're ready for some real code with a real audio API.
Linux and ALSA
ALSA is Linux's default audio subsystem, so let's start with it. ALSA consists of 2 parts: audio drivers that live inside the kernel and user API which provides universal access to the drivers. We're going to learn user mode ALSA API - it's the lowest level for accessing sound hardware in user mode.
First, we must install development package, which is libalsa-devel for Fedora. Now we can include it in our code:
#include <alsa/asoundlib.h>
And when linking our binaries we add -lalsa flag.
ALSA: Enumerating Devices
First, iterate over all sound cards available in the system, until we get a -1 index:
	int icard = -1;
	for (;;) {
		snd_card_next(&icard);
		if (icard == -1)
			break;
		...
	}
For each sound card index we prepare a NULL-terminated string, e.g. hw:0, which is a unique ID of this sound card. We receive the sound card handler from snd_ctl_open(), which we later close with snd_ctl_close().
	char scard[32];
	snprintf(scard, sizeof(scard), "hw:%u", icard);

	snd_ctl_t *sctl = NULL;
	snd_ctl_open(&sctl, scard, 0);
	...
	snd_ctl_close(sctl);
For each sound card we walk through all its devices until we get -1 index:
	int idev = -1;
	for (;;) {
		if (0 != snd_ctl_pcm_next_device(sctl, &idev)
			|| idev == -1)
			break;
		...
	}
Now prepare a NULL-terminated string, e.g. plughw:0,0, which is the device ID we can later use when assigning an audio buffer. plughw: prefix means that ALSA will try to apply some audio conversion when necessary. If we want to use hardware device directly, we should use hw: prefix instead. For default device we may use plughw:0,0 string, but in theory it can be unavailable - you should provide a way for the user to select a specific device.
	char device_id[64];
	snprintf(device_id, sizeof(device_id), "plughw:%u,%u", icard, idev);
ALSA: Opening Audio Buffer
Now that we know the device ID, we can assign a new audio buffer to it with snd_pcm_open(). Note that we won't be able to open the same ALSA device twice. And if this device is used by system PulseAudio process, no other app in the system will be able to use audio while we're holding it.
	snd_pcm_t *pcm;
	const char *device_id = "plughw:0,0";
	int mode = (playback) ? SND_PCM_STREAM_PLAYBACK : SND_PCM_STREAM_CAPTURE;
	snd_pcm_open(&pcm, device_id, mode, 0);
	...
	snd_pcm_close(pcm);
Next, set the parameters for our buffer. Here we tell ALSA that we want to use mmap-style functions to get direct access to its buffers and that we want an interleaved buffer. Then, we set audio format and the buffer length. Note that ALSA updates some values for us if the values we supplied are not supported by device. However, if sample format isn't supported, we have to find the right value manually by probing with snd_pcm_hw_params_get_format_mask()/snd_pcm_format_mask_test(). In real life you should check if your higher-level code supports this new configuration.
snd_pcm_hw_params_t *params; snd_pcm_hw_params_alloca(¶ms); snd_pcm_hw_params_any(pcm, params); int access = SND_PCM_ACCESS_MMAP_INTERLEAVED; snd_pcm_hw_params_set_access(pcm, params, access); int format = SND_PCM_FORMAT_S16_LE; snd_pcm_hw_params_set_format(pcm, params, format); u_int channels = 2; snd_pcm_hw_params_set_channels_near(pcm, params, &channels); u_int sample_rate = 48000; snd_pcm_hw_params_set_rate_near(pcm, params, &sample_rate, 0); u_int buffer_length_usec = 500 * 1000; snd_pcm_hw_params_set_buffer_time_near(pcm, params, &buffer_length_usec, NULL); snd_pcm_hw_params(pcm, params);
Finally, we need to remember the frame size and the whole buffer size (in bytes).
	int frame_size = (16/8) * channels;
	int buf_size = sample_rate * (16/8) * channels * buffer_length_usec / 1000000;
ALSA: Recording Audio
To start recording we call snd_pcm_start():
snd_pcm_start(pcm);
During normal operation we ask ALSA for some new audio data with snd_pcm_mmap_begin() which returns the buffer, offset to the valid region and the number of valid frames. For this function to work correctly we should first call snd_pcm_avail_update() which updates the buffer's internal pointers. After we have processed the data, we must dispose of it with snd_pcm_mmap_commit().
	for (;;) {
		snd_pcm_avail_update(pcm);

		const snd_pcm_channel_area_t *areas;
		snd_pcm_uframes_t off;
		snd_pcm_uframes_t frames = buf_size / frame_size;
		snd_pcm_mmap_begin(pcm, &areas, &off, &frames);
		...
		snd_pcm_mmap_commit(pcm, off, frames);
	}
When we get 0 frames available, it means that the buffer is empty. Start the recording stream if necessary, then wait for some more data. I use 100ms interval, but actually it should be computed using the real buffer size.
	if (frames == 0) {
		int period_ms = 100;
		usleep(period_ms*1000);
		continue;
	}
After we've got some data, we get the pointer to the actual interleaved data and the number of available bytes in this region:
	const void *data = (char*)areas[0].addr + off * areas[0].step/8;
	int n = frames * frame_size;
ALSA: Playing Audio
Writing audio is almost the same as reading it. We get the buffer region by snd_pcm_mmap_begin(), copy our data to it and then mark it as complete with snd_pcm_mmap_commit(). When the buffer is full, we receive 0 available free frames. In this case we start the playback stream for the first time and start waiting until some free space is available in the buffer.
	if (frames == 0) {
		if (SND_PCM_STATE_RUNNING != snd_pcm_state(pcm))
			snd_pcm_start(pcm);

		int period_ms = 100;
		usleep(period_ms*1000);
		continue;
	}
ALSA: Draining
To drain playback buffer we don't need to do anything special. First, we check whether there is still some data in buffer and if so, wait until the buffer is completely empty.
	for (;;) {
		if (0 >= snd_pcm_avail_update(pcm))
			break;

		if (SND_PCM_STATE_RUNNING != snd_pcm_state(pcm))
			snd_pcm_start(pcm);

		int period_ms = 100;
		usleep(period_ms*1000);
	}
But why do we always check the state of our buffer and then call snd_pcm_start() if necessary? It's because ALSA never starts streaming automatically. We need to start it initially after the buffer is full, and we need to start it every time an error such as buffer overrun occurs. We also need to start it in case we haven't filled the buffer completely.
ALSA: Error Checking
Most of the ALSA functions we use here return integer result codes. They return 0 on success and non-zero error code on failure. To translate an error code to a user-friendly error message we can use snd_strerror() function. I also recommend storing the name of the function that returned with an error so that the user has complete information about what went wrong exactly.
But there's more. During normal operation while recording or playing audio we should handle buffer overrun/underrun cases. Here's how to do it. First, check if the error code is -EPIPE. Then, call snd_pcm_prepare() to reset the buffer. If it fails, then we can't continue normal operation, it's a fatal error. If it completes successfully, we continue normal operation as if there was no buffer overrun. Why can't ALSA just handle this case internally? To give us more control over our program. For example, some app in this case must notify the user that an audio data chunk was lost.
	if (err == -EPIPE)
		assert(0 == snd_pcm_prepare(pcm));
Next case when we need special error handling is after we have called snd_pcm_mmap_commit() function. The problem is that even if it returns some data and not an error code, we still need to check whether all data is processed. If not, we set -EPIPE error code ourselves and we can then handle it with the same code as shown above.
	err = snd_pcm_mmap_commit(pcm, off, frames);
	if (err >= 0 && (snd_pcm_uframes_t)err != frames)
		err = -EPIPE;
Next, the functions may return -ESTRPIPE error code which means that for some reason the device we're currently using has been temporarily stopped or paused. If it happens, we should wait until the device comes online again, periodically checking its state with snd_pcm_resume(). And then we call snd_pcm_prepare() to reset the buffer and continue as usual.
	if (err == -ESTRPIPE) {
		while (-EAGAIN == snd_pcm_resume(pcm)) {
			int period_ms = 100;
			usleep(period_ms*1000);
		}
		snd_pcm_prepare(pcm);
	}
Don't forget that after handling those errors we need to call snd_pcm_start() to start the buffer. For recording streams we do it immediately, and for playback streams we do it when the buffer is full.
Linux and PulseAudio
PulseAudio works on top of ALSA, it can't substitute ALSA - it's just an audio layer with several useful features for graphical multi-app environment, e.g. sound mixing, conversion, rerouting, playing audio notifications. Therefore, unlike ALSA, PulseAudio can share a single audio device between multiple apps - I think this is the main reason why it's useful.
Note that on Fedora PulseAudio is not the default audio layer anymore, it's replaced with PipeWire with yet another audio API (though PulseAudio apps will continue to work via the PipeWire-PulseAudio layer). But until PipeWire isn't the default choice on other popular Linux distributions, PulseAudio is more useful overall.
First, we must install development package, which is libpulse-devel for Fedora. Now we can include it in our code:
#include <pulse/pulseaudio.h>
And when linking our binaries we add -lpulse flag.
A couple words about how PulseAudio is different from others. PulseAudio has a client-server design which means we don't operate on an audio device directly but just issue commands to PulseAudio server and receive the response from it. Thus, we always start with connecting to PulseAudio server. We have to implement somewhat complex logic to do it, because the interaction between us and the server is asynchronous: we have to send a command to server and then wait for it to process our command and receive the result, all via a socket (UNIX) connection. Of course, this communication takes some time, and we can do some other stuff while waiting for the server's response. But with our sample code here we won't be that clever: we will just wait for responses synchronously which is easier to understand.
We begin by creating a separate thread which will process socket I/O operations for us. Don't forget to stop this thread and close its handlers after we're done with PulseAudio.
	pa_threaded_mainloop *mloop = pa_threaded_mainloop_new();
	pa_threaded_mainloop_start(mloop);
	...
	pa_threaded_mainloop_stop(mloop);
	pa_threaded_mainloop_free(mloop);
The first thing to remember when using PulseAudio is that we must perform all operations while holding the internal lock for this I/O thread. "Lock the thread", perform necessary calls to PA objects, and then "unlock the thread". Failing to properly lock the thread may at any point result in race condition. This lock is recursive, meaning that it's safe to lock it several time from the same thread. Just call the unlocking function the same number of times. However, I don't see how the lock recursiveness is useful in real life. Recursive locks usually mean that we have a bad architecture and they can cause difficult to find problems - I never advise to use this feature.
	pa_threaded_mainloop_lock(mloop);
	...
	pa_threaded_mainloop_unlock(mloop);
Now begin connection to PA server. Note that pa_context_connect() function usually returns immediately even if the connection isn't yet established. We'll receive the result of connection later in a callback function we set via pa_context_set_state_callback(). Don't forget to disconnect from the server when we're done.
	pa_mainloop_api *mlapi = pa_threaded_mainloop_get_api(mloop);
	pa_context *ctx = pa_context_new_with_proplist(mlapi, "My App", NULL);

	void *udata = NULL;
	pa_context_set_state_callback(ctx, on_state_change, udata);

	pa_context_connect(ctx, NULL, 0, NULL);
	...
	pa_context_disconnect(ctx);
	pa_context_unref(ctx);
After we've issued the connection command we have nothing more to do except waiting for the result. We ask for the connection status, and if it's not yet ready, we call pa_threaded_mainloop_wait() which blocks our thread until a signal is received.
	while (PA_CONTEXT_READY != pa_context_get_state(ctx))  {
		pa_threaded_mainloop_wait(mloop);
	}
And here's how our on-state-change callback function looks like. Nothing clever: we just signal the our thread to exit from pa_threaded_mainloop_wait() where we're currently hanging. Note that this function is called not from our own thread (it still keeps hanging), but from the I/O thread we started previously with pa_threaded_mainloop_start(). As a general rule, try to keep the code in these callback functions as small as possible. Your function is called, you receive the result and send a signal to your thread - that should be enough.
	void on_state_change(pa_context *c, void *userdata)
	{
		pa_threaded_mainloop_signal(mloop, 0);
	}
I hope this call-stack diagram makes this PA server connection logic a little bit clearer for you:
	[Our Thread]
	|- pa_threaded_mainloop_start()
	|                                       [PA I/O Thread]
	   |- pa_context_connect()              |
	   |- pa_threaded_mainloop_wait()       |
	   |                                    |- on_state_change()
	   |                                       |- pa_threaded_mainloop_signal()
	[pa_threaded_mainloop_wait() returns]
The same logic applies to handling all operations results with our callback functions.
PulseAudio: Enumerating Devices
After the connection to PA server is established, we proceed by listing the available devices. We create a new operation with a callback function. We can also pass some pointer to our callback function, but I just use NULL value. Don't forget to release the pointer after the operation is complete. And of course, this code should be executed only while holding the mainloop thread lock.
	pa_operation *op;
	void *udata = NULL;
	if (playback)
		op = pa_context_get_sink_info_list(ctx, on_dev_sink, udata);
	else
		op = pa_context_get_source_info_list(ctx, on_dev_source, udata);
	...
	pa_operation_unref(op);
Now wait until the operation is complete.
	for (;;) {
		int r = pa_operation_get_state(op);
		if (r == PA_OPERATION_DONE || r == PA_OPERATION_CANCELLED)
			break;
		pa_threaded_mainloop_wait(mloop);
	}
While we're at it, the I/O thread is receiving data from server and performs several successful calls to our callback function where we can access all properties for each available device. When an error occurrs or when there are no more devices, eol parameter is set to a non-zero value. When this happens we just send the signal to our thread. The function for listing playback devices looks this way:
	void on_dev_sink(pa_context *c, const pa_sink_info *info, int eol, void *udata)
	{
		if (eol != 0) {
			pa_threaded_mainloop_signal(mloop, 0);
			return;
		}

		const char *device_id = info->name;
	}
And the function for listing recording devices looks similar:
void on_dev_source(pa_context *c, const pa_source_info *info, int eol, void *udata)
The value of udata is the value we set while calling pa_context_get_*_info_list(). In our code they always NULL because my mloop variable is global and we don't need anything else.
PulseAudio: Opening Audio Buffer
We create a new audio buffer with pa_stream_new() passing our connection context to it, the name of our application and the sound format we want to use.
	pa_sample_spec spec;
	spec.format = PA_SAMPLE_S16LE;
	spec.rate = 48000;
	spec.channels = 2;
	pa_stream *stm = pa_stream_new(ctx, "My App", &spec, NULL);
	...
	pa_stream_unref(stm);
Next, we attach our buffer to device with pa_stream_connect_*(). We set buffer length in pa_buffer_attr::tlength in bytes, and we leave all other parameters as default (setting them to -1). We also assign with pa_stream_set_*_callback() our callback function which will be called every time audio I/O is complete. We can use device_id value we obtained while enumerating devices or we can use NULL for default device.
	pa_buffer_attr attr;
	memset(&attr, 0xff, sizeof(attr));

	int buffer_length_msec = 500;
	attr.tlength = spec.rate * 16/8 * spec.channels * buffer_length_msec / 1000;
For recording streams we do:
	void *udata = NULL;
	pa_stream_set_read_callback(stm, on_io_complete, udata);
	const char *device_id = ...;
	pa_stream_connect_record(stm, device_id, &attr, 0);
	...
	pa_stream_disconnect(stm);
And for playback streams:
	void *udata = NULL;
	pa_stream_set_write_callback(stm, on_io_complete, udata);
	const char *device_id = ...;
	pa_stream_connect_playback(stm, device_id, &attr, 0, NULL, NULL);
	...
	pa_stream_disconnect(stm);
As usual, we have to wait until our operation is complete. We read the current state of our buffer with pa_stream_get_state(). PA_STREAM_READY means that recording is started successfully and we can proceed with normal operation. PA_STREAM_FAILED means an error occurred.
	for (;;) {
		int r = pa_stream_get_state(stm);
		if (r == PA_STREAM_READY)
			break;
		else if (r == PA_STREAM_FAILED)
			error

		pa_threaded_mainloop_wait(mloop);
	}
While we're hanging inside pa_threaded_mainloop_wait() our callback function on_io_complete() will be called at some point inside I/O thread. Now we just send a signal to our main thread.
	void on_io_complete(pa_stream *s, size_t nbytes, void *udata)
	{
		pa_threaded_mainloop_signal(mloop, 0);
	}
PulseAudio: Recording Audio
We obtain the data region with audio samples from PulseAudio with pa_stream_peek() and after we have processed it, we discard this data with pa_stream_drop().
	for (;;) {
		const void *data;
		size_t n;
		pa_stream_peek(stm, &data, &n);
		if (n == 0) {
			// Buffer is empty. Process more events
			pa_threaded_mainloop_wait(mloop);
			continue;

		} else if (data == NULL && n != 0) {
			// Buffer overrun occurred

		} else {
			...
		}

		pa_stream_drop(stm);
	}
pa_stream_peek() returns 0 samples when buffer is empty. In this case we don't need to call pa_stream_drop() and we should wait until more data arrives. When buffer overrun occurs we have data=NULL. This is just a notification to us and we can proceed by calling pa_stream_drop() and then pa_stream_peek() again.
PulseAudio: Playing Audio
When we write data to an audio device, we first must get the amount of free space in the audio buffer with pa_stream_writable_size(). It returns 0 when the buffer is full, and we must wait until some free space is available and then try again.
	size_t n = pa_stream_writable_size(stm);
	if (n == 0) {
		pa_threaded_mainloop_wait(mloop);
		continue;
	}
We get the buffer region where into we can copy audio samples with pa_stream_begin_write(). After we've filled the buffer, we call pa_stream_write() to release this memory region.
	void *buf;
	pa_stream_begin_write(stm, &buf, &n);
	...
	pa_stream_write(stm, buf, n, NULL, 0, PA_SEEK_RELATIVE);
PulseAudio: Draining
To drain the buffer we create a drain operation with pa_stream_drain() and pass our callback function to it which will be called when draining is complete.
	void *udata = NULL;
	pa_operation *op = pa_stream_drain(stm, on_op_complete, udata);
	...
	pa_operation_unref(op);
Now wait until our callback function signals us.
	for (;;) {
		int r = pa_operation_get_state(op);
		if (r == PA_OPERATION_DONE || r == PA_OPERATION_CANCELLED)
			break;
		pa_threaded_mainloop_wait(mloop);
	}
Here's how our callback function looks like:
	void on_op_complete(pa_stream *s, int success, void *udata)
	{
		pa_threaded_mainloop_signal(mloop, 0);
	}
Windows and WASAPI
WASAPI is default sound subsystem starting with Windows Vista. It's a successor to DirectSound API which we don't discuss here, because I doubt you want to support old Windows XP. But if you do, please check out the appropriate code in ffaudio yourself. WASAPI can work in 2 different modes: shared and exclusive. In shared mode multiple apps can use the same physical device and it's the right mode for usual playback/recording apps. In exclusive mode we have an exclusive access to audio device, this is suitable for professional real-time sound apps.
WASAPI include directives must be preceded by COBJMACROS preprocessor definition, this is for pure C definitions to work correctly.
	#define COBJMACROS
	#include <mmdeviceapi.h>
	#include <audioclient.h>
Before doing anything else we must initialize COM-interface subsystem.
CoInitializeEx(NULL, 0);
We must link all WASAPI apps with -lole32 linker flag.
The most of WASAPI functions return 0 on success and non-zero on failure.
WASAPI: Enumerating Devices
We create device enumerator object with CoCreateInstance(). Don't forget to release it when we're done.
	IMMDeviceEnumerator *enu;
	const GUID _CLSID_MMDeviceEnumerator = {0xbcde0395, 0xe52f, 0x467c, {0x8e,0x3d, 0xc4,0x57,0x92,0x91,0x69,0x2e}};
	const GUID _IID_IMMDeviceEnumerator = {0xa95664d2, 0x9614, 0x4f35, {0xa7,0x46, 0xde,0x8d,0xb6,0x36,0x17,0xe6}};
	CoCreateInstance(&_CLSID_MMDeviceEnumerator, NULL, CLSCTX_ALL, &_IID_IMMDeviceEnumerator, (void**)&enu);
	...
	IMMDeviceEnumerator_Release(enu);
We use this device enumerator object to get array of available devices with IMMDeviceEnumerator_EnumAudioEndpoints().
	IMMDeviceCollection *dcoll;
	int mode = (playback) ? eRender : eCapture;
	IMMDeviceEnumerator_EnumAudioEndpoints(enu, mode, DEVICE_STATE_ACTIVE, &dcoll);
	...
	IMMDeviceCollection_Release(dcoll);
Enumerate devices by asking IMMDeviceCollection_Item() to return device handler for the specified array index.
	for (int i = 0;  ;  i++) {
		IMMDevice *dev;
		if (0 != IMMDeviceCollection_Item(dcoll, i, &dev))
			break;
		...
		IMMDevice_Release(dev);
	}
Then, get set of properties for this device.
	IPropertyStore *props;
	IMMDevice_OpenPropertyStore(dev, STGM_READ, &props);
	...
	IPropertyStore_Release(props);
Read a single property value with IPropertyStore_GetValue(). Here's how to get user-friendly name for the device.
	PROPVARIANT name;
	PropVariantInit(&name);
	const PROPERTYKEY _PKEY_Device_FriendlyName = {{0xa45c254e, 0xdf1c, 0x4efd, {0x80, 0x20, 0x67, 0xd1, 0x46, 0xa8, 0x50, 0xe0}}, 14};
	IPropertyStore_GetValue(props, &_PKEY_Device_FriendlyName, &name);
	const wchar_t *device_name = name.pwszVal;
	...
	PropVariantClear(&name);
And now the main reason why we need to list devices: we get the unique device ID with IMMDevice_GetId().
	wchar_t *device_id = NULL;
	IMMDevice_GetId(dev, &device_id);
	...
	CoTaskMemFree(device_id);
To get system default device we use IMMDeviceEnumerator_GetDefaultAudioEndpoint(). Then we can get its ID and name exactly the same way as described above.
	IMMDevice *def_dev = NULL;
	IMMDeviceEnumerator_GetDefaultAudioEndpoint(enu, mode, eConsole, &def_dev);
	IMMDevice_Release(def_dev);
WASAPI: Opening Audio Buffer in Shared Mode
Here's the most simple way to open an audio buffer in shared mode. Once again we start by creating a device enumerator object.
	IMMDeviceEnumerator *enu;
	const GUID _CLSID_MMDeviceEnumerator = {0xbcde0395, 0xe52f, 0x467c, {0x8e,0x3d, 0xc4,0x57,0x92,0x91,0x69,0x2e}};
	const GUID _IID_IMMDeviceEnumerator = {0xa95664d2, 0x9614, 0x4f35, {0xa7,0x46, 0xde,0x8d,0xb6,0x36,0x17,0xe6}};
	CoCreateInstance(&_CLSID_MMDeviceEnumerator, NULL, CLSCTX_ALL, &_IID_IMMDeviceEnumerator, (void**)&enu);
	...
	IMMDeviceEnumerator_Release(enu);
Now we either use the default capture device or we already know the specific device ID. In either case we get the device descriptor.
	IMMDevice *dev;
	wchar_t *device_id = NULL;
	if (device_id == NULL) {
		int mode = (playback) ? eRender : eCapture;
		IMMDeviceEnumerator_GetDefaultAudioEndpoint(enu, mode, eConsole, &dev);
	} else {
		IMMDeviceEnumerator_GetDevice(enu, device_id, &dev);
	}
	...
	IMMDevice_Release(dev);
We create an audio capture buffer with IMMDevice_Activate() passing IID_IAudioClient identificator to it.
	IAudioClient *client;
	const GUID _IID_IAudioClient = {0x1cb9ad4c, 0xdbfa, 0x4c32, {0xb1,0x78, 0xc2,0xf5,0x68,0xa7,0x03,0xb2}};
	IMMDevice_Activate(dev, &_IID_IAudioClient, CLSCTX_ALL, NULL, (void**)&client);
	...
	IAudioClient_Release(client);
Because we want to open WASAPI audio buffer in shared mode, we can't order it to use the audio format that we want. Audio format is the subject of system-level configuration and we just have to comply with it. Most likely this format will be 16bit/44100/stereo or 24bit/44100/stereo, but we can never be sure. To be completely honest, WASAPI can accept a different sample format from us (e.g. we can use float32 format and WASAPI will automatically convert our samples to 16bit), but again, we must not rely on this behaviour. The most robust way to get the right audio format is by calling IAudioClient_GetMixFormat() which creates a WAVE-format header for us. The same header format is used in .wav files, by the way. Note that for recoding and for playback there are 2 different settings for audio format in Windows. It depends on which device our buffer is assigned to.
	WAVEFORMATEX *wf;
	IAudioClient_GetMixFormat(client, &wf);
	...
	CoTaskMemFree(wf);
Now we just use this audio format to set up our buffer with IAudioClient_Initialize(). Note that we use AUDCLNT_SHAREMODE_SHARED flag here which means that we want to configurate the buffer in shared mode. The buffer length parameter must be in 100-nanoseconds interval. Keep in mind that this is just a hint, and after the function returns successfully, we should always get the actual buffer length chosen by WASAPI.
	int buffer_length_msec = 500;
	REFERENCE_TIME dur = buffer_length_msec * 1000 * 10;
	int mode = AUDCLNT_SHAREMODE_SHARED;
	int aflags = 0;
	IAudioClient_Initialize(client, mode, aflags, dur, dur, (void*)wf, NULL);

	u_int buf_frames;
	IAudioClient_GetBufferSize(client, &buf_frames);
	buffer_length_msec = buf_frames * 1000 / wf->nSamplesPerSec;
WASAPI: Recording Audio in Shared Mode
We initialized the buffer, but it doesn't provide us with an interface we can use to perform I/O. In our case for recording streams we have to get IAudioCaptureClient interface object from it.
	IAudioCaptureClient *capt;
	const GUID _IID_IAudioCaptureClient = {0xc8adbd64, 0xe71e, 0x48a0, {0xa4,0xde, 0x18,0x5c,0x39,0x5c,0xd3,0x17}};
	IAudioClient_GetService(client, &_IID_IAudioCaptureClient, (void**)&capt);
Preparation is complete, we're ready to start recording.
IAudioClient_Start(client);
To get a chunk of recorded audio data we call IAudioCaptureClient_GetBuffer(). It returns AUDCLNT_S_BUFFER_EMPTY error when there's no unread data inside the buffer. In this case we just wait then try again. After we've processed the audio samples, we release the data with IAudioCaptureClient_ReleaseBuffer().
	for (;;) {
		u_char *data;
		u_int nframes;
		u_long flags;
		int r = IAudioCaptureClient_GetBuffer(capt, &data, &nframes, &flags, NULL, NULL);

		if (r == AUDCLNT_S_BUFFER_EMPTY) {
			// Buffer is empty. Wait for more data.
			int period_ms = 100;
			Sleep(period_ms);
			continue;
		} else (r != 0) {
			// error
		}
		...
		IAudioCaptureClient_ReleaseBuffer(capt, nframes);
	}
WASAPI: Playing Audio in Shared Mode
Playing audio is very similar to recording but we need to use another interface for I/O. This time we pass IID_IAudioRenderClient identificator and get the IAudioRenderClient interface object.
	IAudioRenderClient *render;
	const GUID _IID_IAudioRenderClient = {0xf294acfc, 0x3146, 0x4483, {0xa7,0xbf, 0xad,0xdc,0xa7,0xc2,0x60,0xe2}};
	IAudioClient_GetService(client, &_IID_IAudioRenderClient, (void**)&render);
	...
	IAudioRenderClient_Release(render);
The normal playback operation is when we add some more data into audio buffer in a loop as soon as there is some free space in buffer. To get the amount of used space we call IAudioClient_GetCurrentPadding(). To get the amount of free space we use the size of our buffer (buf_frames) we got while opening the buffer. These numbers are in samples, not in bytes.
	u_int filled;
	IAudioClient_GetCurrentPadding(client, &filled);
	int n_free_frames = buf_frames - filled;
The function sets the number of used space to 0 when the buffer is full. Now for the first time we have the full buffer must start the playback.
	if (!started) {
		IAudioClient_Start(client);
		started = 1;
	}
We get the free buffer region with IAudioRenderClient_GetBuffer() and after we've filled it with audio samples we release it with IAudioRenderClient_ReleaseBuffer().
	u_char *data;
	IAudioRenderClient_GetBuffer(render, n_free_frames, &data);
	...
	IAudioRenderClient_ReleaseBuffer(render, n_free_frames, 0);
WASAPI: Draining
We never forget to drain the audio buffer before closing it otherwise the last audio data won't be played because we haven't given it enough time. The algorithm is the same as for ALSA. We get the number of samples still left to be played, and when the buffer is empty the draining is complete.
	for (;;) {
		u_int filled;
		IAudioClient_GetCurrentPadding(client, &filled);
		if (filled == 0)
			break;
		...
	}
In case our input data was too small to even fill our audio buffer, we still haven't started the playback at this point. We do it, otherwise IAudioClient_GetCurrentPadding() will never signal us with "buffer empty" condition.
	if (!started) {
		IAudioClient_Start(client);
		started = 1;
	}
WASAPI: Error Reporting
The most WASAPI functions return 0 on success and an error code on failure. The problem with this error code is that sometimes we can't convert it to user-friendly error message directly - we have to do it manually. First, we check if it's AUDCLNT_E_* code. In this case we have to set our own error message depending on the value. For example, we may have an array of strings for each possible AUDCLNT_E_* code. Don't forget index-out-of-bounds checks!
	int err = ...;
	if ((err & 0xffff0000) == MAKE_HRESULT(SEVERITY_ERROR, FACILITY_AUDCLNT, 0)) {
		err = err & 0xffff;
		static const char audclnt_errors[][39] = {
			"",
			"AUDCLNT_E_NOT_INITIALIZED", // 0x1
			...
			"AUDCLNT_E_RESOURCES_INVALIDATED", //  0x26
		};
		const char *error_name = audclnt_errors[err];
	}
But in case it's not a AUDCLNT_E_* code, we can get error message from Windows the usual way.
	wchar_t buf[255];
	int n = FormatMessageW(FORMAT_MESSAGE_FROM_SYSTEM | FORMAT_MESSAGE_IGNORE_INSERTS | FORMAT_MESSAGE_MAX_WIDTH_MASK
		, 0, err, 0, buf, sizeof(buf)/sizeof(*buf), 0);
	if (n == 0)
		buf[0] = '\0';
And it's always good practice to store names of the functions that return with an error. User must know which function exactly has failed and which code it has returned along with error description.
FreeBSD and OSS
OSS is the default audio subsystem on FreeBSD and some other OS. It was default on Linux too before ALSA replaced it. Some docs say that OSS layer is still supported on modern Linux, but I don't think it's useful for new software. OSS API is very simple comparing to other API: we only use standard syscalls. I/O with OSS is just like I/O with regular files, which makes OSS quite easy to understand and use.
Include necessary header files:
	#include <sys/soundcard.h>
	#include <fcntl.h>
	#include <unistd.h>
	#include <stdlib.h>
	#include <string.h>
	#include <math.h>
OSS: Enumerating Devices
Open system mixer device exactly the same way as we open regular files.
	int mixer = open("/dev/mixer", O_RDONLY, 0);
	...
	close(mixer);
We communicate with this device by issuing commands via ioctl(). Get the number of registered devices with SNDCTL_SYSINFO device control code.
	oss_sysinfo si = {};
	ioctl(mixer, SNDCTL_SYSINFO, &si);
	int n_devs = si.numaudios;
We get the properties for each device with SNDCTL_AUDIOINFO_EX.
	for (int i = 0;  i != n_devs;  i++) {
		oss_audioinfo ainfo = {};
		ainfo.dev = i;
		ioctl(mixer, SNDCTL_AUDIOINFO_EX, &ainfo);
		...
	}
Because we iterate over all devices, both playback and recording, we must use oss_audioinfo::cap field to filter what we need: PCM_CAP_OUTPUT means this is a playback device and PCM_CAP_INPUT means this is a recording device. We get other necessary information, most importantly - device ID, from the same oss_audioinfo object.
	int is_playback_device = !!(ainfo.caps & PCM_CAP_OUTPUT);
	int is_capture_device = !!(ainfo.caps & PCM_CAP_INPUT);
	const char *device_id = ainfo.devnode;
	const char *device_name = ainfo.name;
OSS: Opening Audio Buffer
We open audio device with open() and get the device descriptor. To use default device we pass "/dev/dsp" string. We need to pass the correct flags to the function: O_WRONLY for playback because we will write data to audio device and O_RDONLY for recording because we will read from it. We can also use O_NONBLOCK flag here which makes our descriptor non-blocking, i.e. read/write functions won't block and return immediately with EAGAIN error.
	const char *device_id = NULL;
	if (device_id == NULL)
		device_id = "/dev/dsp";
	int flags = (playback) ? O_WRONLY : O_RDONLY;
	int dsp = open(device_id, flags | O_EXCL, 0);
	...
	close(dsp);
Let's configure the device for the audio format we want to use. We pass the value we want to use to ioctl(), and it updates it on return with the actual value that device driver has set. Of course, this value can be different from the one we passed. In real code we must detect such cases and notify the user about the format change or exit with an error.
	int format = AFMT_S16_LE;
	ioctl(dsp, SNDCTL_DSP_SETFMT, &format);

	int channels = 2;
	ioctl(dsp, SNDCTL_DSP_CHANNELS, &channels);

	int sample_rate = 44100;
	ioctl(dsp, SNDCTL_DSP_SPEED, &sample_rate);
To set audio buffer length we first get "fragment size" property for our device. Then we use this value to convert the buffer length to the number of fragments. Fragments are not audio frames, fragment size is not the size of a sample! Then we set the number of fragments with SNDCTL_DSP_SETFRAGMENT control code. Note that we can skip this section if we don't want to set our own buffer length and use the default buffer length.
	audio_buf_info info = {};
	if (playback)
		ioctl(dsp, SNDCTL_DSP_GETOSPACE, &info);
	else
		ioctl(dsp, SNDCTL_DSP_GETISPACE, &info);
	int buffer_length_msec = 500;
	int frag_num = sample_rate * 16/8 * channels * buffer_length_msec / 1000 / info.fragsize;
	int fr = (frag_num << 16) | (int)log2(info.fragsize); // buf_size = frag_num * 2^n
	ioctl(dsp, SNDCTL_DSP_SETFRAGMENT, &fr);
We've finished preparing the device. Now we get the actual buffer length with SNDCTL_DSP_GETOSPACE for playback or SNDCTL_DSP_GETISPACE for recording streams.
	audio_buf_info info = {};
	int r;
	if (playback)
		r = ioctl(dsp, SNDCTL_DSP_GETOSPACE, &info);
	else
		r = ioctl(dsp, SNDCTL_DSP_GETISPACE, &info);
	buffer_length_msec = info.fragstotal * info.fragsize * 1000 / (sample_rate * 16/8 * channels);
	int buf_size = info.fragstotal * info.fragsize;
	frame_size = 16/8 * sample_rate * channels;
Finally, we allocate the buffer of the required size.
	void *buf = malloc(buf_size);
	...
	free(buf);
OSS: Recording Audio
There's nothing easier than audio I/O with OSS. We use the usual read() function passing to it our audio buffer and the maximum number of bytes available inside it. It returns the number of bytes read. The function also blocks the execution when the buffer is empty, so there's no need in calling sleep functions for us.
int n = read(dsp, buf, buf_size);
OSS: Playing Audio
For playback streams we first write audio samples to our buffer, then pass this region to the device with write(). It returns the number of bytes actually written. The functions blocks execution when the buffer is full.
int n = write(dsp, buf, n);
OSS: Draining
To drain the buffer we just use SNDCTL_DSP_SYNC control code. It blocks until the playback is complete.
ioctl(dsp, SNDCTL_DSP_SYNC, 0);
OSS: Error Reporting
On failure, open(), ioctl(), read() and write() return with a negative value and set errno. We can convert the code into an error message as usual with strerror().
	int err = ...;
	const char *error_message = strerror(err);
macOS and CoreAudio
CoreAudio is the default sound subsystem on macOS and iOS. I have little experience with it because I don't like Apple's products. I'm just showing you the way it worked for me, but theoretically there may be better solutions than mine. The necessary includes are:
	#include <CoreAudio/CoreAudio.h>
	#include <CoreFoundation/CFString.h>
When linking we pass -framework CoreFoundation -framework CoreAudio linker flags.
CoreAudio: Enumerating Devices
We get the array of audio devices with AudioObjectGetPropertyData(). But first we need to know the minimum number of bytes to allocate for the array - we get the required size with AudioObjectGetPropertyDataSize().
	const AudioObjectPropertyAddress prop_dev_list = { kAudioHardwarePropertyDevices, kAudioObjectPropertyScopeGlobal, kAudioObjectPropertyElementMaster };
	u_int size;
	AudioObjectGetPropertyDataSize(kAudioObjectSystemObject, &prop_dev_list, 0, NULL, &size);

	AudioObjectID *devs = (AudioObjectID*)malloc(size);
	AudioObjectGetPropertyData(kAudioObjectSystemObject, &prop_dev_list, 0, NULL, &size, devs);

	int n_dev = size / sizeof(AudioObjectID);
	...
	free(devs);
Then we iterate over the array to get the device ID.
	for (int i = 0;  i != n_dev;  i++) {
		AudioObjectID device_id = devs[i];
		...
	}
For each device we can get a user-friendly name, but we have to convert the CoreFoundation's string object to a NULL-terminated string with CFStringGetCString().
	const AudioObjectPropertyAddress prop_dev_outname = { kAudioObjectPropertyName, kAudioDevicePropertyScopeOutput, kAudioObjectPropertyElementMaster };
	const AudioObjectPropertyAddress prop_dev_inname = { kAudioObjectPropertyName, kAudioDevicePropertyScopeInput, kAudioObjectPropertyElementMaster };
	const AudioObjectPropertyAddress *prop = (playback) ? &prop_dev_outname : &prop_dev_inname;
	u_int size = sizeof(CFStringRef);
	CFStringRef cfs;
	AudioObjectGetPropertyData(devs[i], prop, 0, NULL, &size, &cfs);

	CFIndex len = CFStringGetMaximumSizeForEncoding(CFStringGetLength(cfs), kCFStringEncodingUTF8);
	char *device_name = malloc(len + 1);
	CFStringGetCString(cfs, device_name, len + 1, kCFStringEncodingUTF8);
	CFRelease(cfs);
	...
	free(device_name);
CoreAudio: Opening Audio Buffer
If we want to use the default device, here's how we can get its ID.
	AudioObjectID device_id;
	const AudioObjectPropertyAddress prop_odev_default = { kAudioHardwarePropertyDefaultOutputDevice, kAudioObjectPropertyScopeGlobal, kAudioObjectPropertyElementMaster };
	const AudioObjectPropertyAddress prop_idev_default = { kAudioHardwarePropertyDefaultInputDevice, kAudioObjectPropertyScopeGlobal, kAudioObjectPropertyElementMaster };
	const AudioObjectPropertyAddress *a = (playback) ? &prop_odev_default : &prop_idev_default;
	u_int size = sizeof(AudioObjectID);
	AudioObjectGetPropertyData(kAudioObjectSystemObject, a, 0, NULL, &size, &device_id);
Get the supported audio format. It seems that CoreAudio uses float32 samples by default.
	const AudioObjectPropertyAddress prop_odev_fmt = { kAudioDevicePropertyStreamFormat, kAudioDevicePropertyScopeOutput, kAudioObjectPropertyElementMaster };
	const AudioObjectPropertyAddress prop_idev_fmt = { kAudioDevicePropertyStreamFormat, kAudioDevicePropertyScopeInput, kAudioObjectPropertyElementMaster };
	AudioStreamBasicDescription asbd = {};
	u_int size = sizeof(asbd);
	const AudioObjectPropertyAddress *a = (playback) ? &prop_odev_fmt : &prop_idev_fmt;
	AudioObjectGetPropertyData(device_id, a, 0, NULL, &size, &asbd);
	int sample_rate = asbd.mSampleRate;
	int channels = asbd.mChannelsPerFrame;
Create the buffer with 500ms audio length. Note that we use our own ring buffer here to transfer data between the callback function and our I/O loop.
	int buffer_length_msec = 500;
	int buf_size = 32/8 * sample_rate * channels * buffer_length_msec / 1000;
	ring_buf = ringbuf_alloc(buf_size);
	...
	ringbuf_free(ring_buf);
Register I/O callback function which will be called by CoreAudio when there's some more data for us (for recording) or when it wants to read some data from us (for playback). We can pass our ring buffer as a user-parameter. The return value is a pointer which we later use to control the stream.
	AudioDeviceIOProcID io_proc_id = NULL;
	void *udata = ring_buf;
	AudioDeviceCreateIOProcID(device_id, proc, udata, &io_proc_id);
	...
	AudioDeviceDestroyIOProcID(device_id, io_proc_id);
The callback function looks like this:
	OSStatus io_callback(AudioDeviceID device, const AudioTimeStamp *now,
		const AudioBufferList *indata, const AudioTimeStamp *intime,
		AudioBufferList *outdata, const AudioTimeStamp *outtime,
		void *udata)
	{
		...
		return 0;
	}
CoreAudio: Recording Audio
We start recording with AudioDeviceStart().
AudioDeviceStart(device_id, io_proc_id);
Then after some time our callback function is called. While inside it, we must add all audio samples to our ring buffer.
	const float *d = indata->mBuffers[0].mData;
	size_t n = indata->mBuffers[0].mDataByteSize;

	ringbuf *ring = udata;
	ringbuf_write(ring, d, n);
	return 0;
In our I/O loop we try to read some data from the buffer. If the buffer is empty, we wait, and then try again. My ring buffer implementation here allows us to use the buffer directly. We get the buffer region, process it, and then release it.
	ringbuffer_chunk buf;
	size_t h = ringbuf_read_begin(ring_buf, -1, &, NULL);
	if (.len == 0) {
		// Buffer is empty. Wait until some new data is available
		int period_ms = 100;
		usleep(period_ms*1000);
		continue;
	}
	...
	ringbuf_read_finish(ring_buf, h);
CoreAudio: Playing Audio
Inside the callback function we write audio samples from our ring buffer to CoreAudio's buffer. Note that we read from the buffer 2 times, because once we reach the end of memory region in our ring buffer, we have to continue from the beginning. In case there wasn't enough data in our buffer we pass silence (data region filled with zeros) so that there are no audible surprises when this data is played.
	float *d = outdata->mBuffers[0].mData;
	size_t n = outdata->mBuffers[0].mDataByteSize;

	ringbuf *ring = udata;
	ringbuffer_chunk buf;

	size_t h = ringbuf_read_begin(ring, n, &buf, NULL);
	memcpy(buf.ptr, d, buf.len);
	ringbuf_read_finish(ring, h);
	d = (char*)d + buf.len;
	n -= buf.len;

	if (n != 0) {
		h = ringbuf_read_begin(ring, n, &buf, NULL);
		memcpy(buf.ptr, d, buf.len);
		ringbuf_read_finish(ring, h);
		d = (char*)d + buf.len;
		n -= buf.len;
	}

	if (n != 0)
		memset(d, 0, n);
In our main I/O loop we first get the free buffer region where we write new audio samples. When the buffer is full we start the stream for the first time and wait until our callback function is called.
	ringbuffer_chunk buf;
	size_t h = ringbuf_write_begin(ring_buf, 16*1024, &buf, NULL);

	if (buf.len == 0) {
		if (!started) {
			AudioDeviceStart(device_id, io_proc_id);
			started = 1;
		}

		// Buffer is full. Wait.
		int period_ms = 100;
		usleep(period_ms*1000);
		continue;
	}

	...
	ringbuf_write_finish(ring_buf, h);
CoreAudio: Draining
To drain the buffer we just wait until our ring buffer is empty. When it is, I stop the stream with AudioDeviceStop(). Remember that in case the input data was less than the size of our buffer, our stream isn't yet started. We start it with AudioDeviceStart() if it's the case.
	size_t free_space;
	ringbuffer_chunk d;
	ringbuf_write_begin(ring_buf, 0, &d, &free_space);

	if (free_space == ring_buf->cap) {
		AudioDeviceStop(device_id, io_proc_id);
		break;
	}

	if (!started) {
		AudioDeviceStart(device_id, io_proc_id);
		started = 1;
	}

	// Buffer isn't empty. Wait.
	int period_ms = 100;
	usleep(period_ms*1000);
Final Results
I think we covered the most common audio API and their use-cases, I hope that you've learned something new and useful. There are few things, though, that didn't make it into this tutorial:
ALSA's SIGIO notifications. Not all devices support this, as far as I know.
WASAPI notifications via Windows events. This is only useful for real-time low-latency apps.
WASAPI exclusive mode, loopback mode. Explaining the details around opening audio buffer in exclusive mode would make me invest so much more time, that I'm not sure I can do it right now. And the loopback mode is not cross-platform. You can learn about this stuff, if you want, by reading official docs or ffaudio's source code for example.
The official API documentation links:
https://www.freedesktop.org/software/pulseaudio/doxygen/index.html
https://docs.microsoft.com/en-us/windows/win32/coreaudio/wasapi
P.S. I used some images from here (thanks to the authors!):
