17-19 min read
Hi y'all, my name is Labertte and I use Arch btw.
Probably like every other Linux user, I'd like to buy a ThinkPad, put some lightweight distribution like Arch or Gentoo on it, and then go to Starbucks, get a soy latte and tell everyone that I use "linux". But I decided to go a little different route and give a chance to my old laptop that I was using about five or seven years ago.
Plan of the article:
Disclaimer
I wanna warn you from the beginning that this post is nothing more than my story. It's not a full-fledged tutorial or a step-by-step guide to follow. However, if you are interested in how this or that technology works, how to make smth better, then be free to write in the comments and I'll try to write a technical article that will help you understand the topic you're interested in.
1. What to do with an old laptop?
From the attic was yanked an old laptop running Windows 7, which has such characteristics:
CPU: Intel(R) Celeron(R) CPU B815, 2 cores, 1.6GHz
RAM: 2Gb
GPU: AMD ATI Radeon HD 6400M/7400M Series
Monitor resolution: 1366x768
But what can be done with this marvel-present for gamers?
In fact, there are a huge number of options, it all depends on your imagination and the time you take to implement them.
Here are just a few examples of what you can turn a dusty and useless laptop/PC:
File storage
Mail server
Build-automation server
Web server
Proxy server
Database server
The only thing I originally planned to do was to install Arch on it, run ssh and use scp to transfer some music or video files so they would be on the server and not on my active workstation.
A stripped-down version of NAS, you could say.
So, the first thing to do is to install the operating system. Following all the steps in the excellent article on the ArchWiki, the bare OS has been installed. After connecting laptop to the local network (via Ethernet or WiFi) I got its internal IP address and MAC address with the command:# ip a

Next I need to do is to enter the settings of my router (192.168.0.1) and then into DHCP Address Reservation where I connect the MAC address to the IP address. This is necessary in order to if my server 'll reconnect to the network, the router 'll give my laptop the same IP address. Make the internal IP address "static".
So, once the operating system is completely installed I can proceed to the first stage of the server configuration.
Installing and configuring ssh
First of all, I install the necessary package to the server:# pacman -S openssh
And start the service:# systemctl enable sshd --now
I don't wanna enter the password every time I connect to the server, so I add ssh keys, which 'll not only increase login speed, but also enhance security.
For this purpose, I generate keys on the local computer:$ ssh-keygen
The program prompts to enter the name of the file in which the private key 'll be written, as well as a password for it. I confirm the password and here I have two files - home_server and home_server.pub.
After this it is necessary to make the server trust me. To do this I copy the key to the server:$ ssh-copy-id -i home_server root@<server local ip>
And test the connection:$ ssh root@<server local ip>
The password is no longer required, however, I can still use it to log in, which means the server is still vulnerable to bruteforce. For this reason I prohibit login by password on the server in the configuration file /etc/ssh/sshd_config:
PubkeyAuthentication yes            # Authentication through ssh public key
PasswordAuthentication no           # Prohibit login through password
ChallengeResponseAuthentication no  # This setting also could ask a password so disable it
UsePAM no                           # Depending on your PAM configuration may bypass the setting of "PermitRootLogin without-password" so disable it
Then I restarted the ssh daemon to apply the changes from the config:
# systemctl reload sshd
Next, I install a simple firewall on which open only one port - 22 (ssh):
# pacman -S ufw
And firewall setup:
# ufw default deny incoming # block all incoming connections by default
# ufw allow from 192.168.0.0/24 to any port 22
# ufw enable
And after that, start it up:# systemctl enable ufw --now
Now I've ssh configured and can upload some files to the server via it.
But of course this is not enough - for what I need a server that stores files that are only accessible from my active device? I could make some kind oow to make the world see your sitef web site and/or just broadcast some files to the whole internet.
Thus, I'm smoothly approaching the idea that I wanna make a site that 'll be visible to the entire Internet.
2. How to make the world see your site
In the beginning it's necessary to think about the domain for the site. After decided on choice, go to any domain registrar and register it. (Costs ~$8 per year). When I bought a domain, went to the
"Set DNS Host Records" tab, and opposite to the my domain put my public IP address (it can be found out by using the command $ curl ifconfig.co) and click on "Save".

After changes put in the terminal:$ ping <domain name>
If the site is ping-able and the IP is defined - everything fine. Now it's time to create the site itself.
For now, only one file will be enough - index.html. The simplest version of the site:
<!DOCTYPE html>
<html>
<head>
    <title>Welcome to this site!</title>
</head>
<body>
    <h1 style="text-align:center">Welcome to my site!</h1>
</body>
</html>
Great, there is the source code to the simplest site, which so far consists of just one file. However, at the moment the only way to view our website is to save the above code to a file and then open it in a browser.
Q: Then how do we view our site from a work computer or phone?
A: Set up a local web server!
To do this, I install nginx - a program that 'll display our static content, in my case a single .html page.
Note: nginx has a lot of other interesting features, but let's not go into them now
It's done by the command:# pacman -S nginx nginx-mod-headers-more certbot-nginx
The web server is installed, and with it some headers for it and certbot. In order for the site to have https and traffic encrypted I run certbot:# certbot --nginx
I entered the email, domain and also specified that the traffic should be redirected from http to https. After certbot will edit the configuration file nginx. But this is not all the settings, so I'll add few more rows to the /etc/nginx/nginx.conf configuration file:
load_module "/usr/lib/nginx/modules/ngx_http_headers_more_filter_module.so"; # Add the dynamic library with headers for nginx web server
user http http; # Specify with which user nginx 'll run the web server

error_log  logs/error.log; # Capture detailed information about errors and request processing in log files
error_log  logs/error.log  notice;
error_log  logs/error.log  info;

events {
    worker_connections  1024; # Maximum number of simultaneous connections that each worker process can manage
}

http {
    server_tokens off; # Hide nginx version in 404 page
    include /etc/nginx/mime.types; # Include all mime types to correctly show them in browser
    types_hash_max_size 4096; # Sets the maximum size of the types hash table
    server_names_hash_bucket_size 128; # Sets the bucket size for the server names hash tables

    more_set_headers "Server: serverrr"; # Specify the response header
    add_header Server "Serverrr"; # Describes the software used by the origin server that handled the request
    add_header Strict-Transport-Security "max-age=31536000; includeSubDomains" always; # HTTP Strict Transport Security is an excellent feature to support on your site and strengthens your implementation of TLS by getting the User Agent to enforce the use of HTTPS
    add_header Content-Security-Policy "default-src 'self';" always; # CSP is an effective measure to protect your site from XSS attacks. By whitelisting sources of approved content, you can prevent the browser from loading malicious assets
    add_header X-Frame-Options "SAMEORIGIN"; # X-Frame-Options tells the browser whether you want to allow your site to be framed or not. By preventing a browser from framing your site you can defend against attacks like clickjacking.
    add_header X-Content-Type-Options "nosniff"; # X-Content-Type-Options stops a browser from trying to MIME-sniff the content type and forces it to stick with the declared content-type
    add_header 'Referrer-Policy' 'same-origin'; # When a user clicks a link on one site, the origin, that takes them to another site, the destination site receives information about the origin the user came from. This is how we get metrics like those provided by Google Analytics on where our traffic came from.
    add_header Permissions-Policy "geolocation=(),midi=(),sync-xhr=(),microphone=(),camera=(),magnetometer=(),gyroscope=(),fullscreen=(self),payment=()"; # This header allows a site to control which features and APIs can be used in the browser.

    server {
        server_name <my domain name>;
        server_name <my ip address>;

        listen 443 ssl; # managed by Certbot
        ssl_certificate /etc/letsencrypt/live/<my domain name>/fullchain.pem; # managed by Certbot
        ssl_certificate_key /etc/letsencrypt/live/<my domain name>/privkey.pem; # managed by Certbot
        include /etc/letsencrypt/options-ssl-nginx.conf; # managed by Certbot
        ssl_dhparam /etc/letsencrypt/ssl-dhparams.pem; # managed by Certbot

        root <path to directory with site>; # Specify the root directory that 'll be used to search for a file
        location / {
            index index.html; # The greetings html file
        }
    }

    server {
        if ($host = <my domain name>) {
            return 301 https://$host$request_uri;
        } # managed by Certbot
        if ($host = <my ip address>) {
            return 301 https://$host$request_uri;
        }
        listen       80;
        server_name <my ip address>;
        server_name <my domain name>;
        return 404; # managed by Certbot
    }
}
After the config is done, nginx can be started:# systemctl enable nginx --now
And it is necessary to open ports 80 and 443 in the firewall, so that it was possible to access the web server via http and https:Buying an IP camera, recording from the camera to the server# ufw allow 80# ufw allow 443
Now if I go from work computer or phone to the address: https://<my server local ip> then a welcome message should be displayed.
Awesome site is ready, but it's local, which means users from another network won't be able to go to it and see my frontend skills. In order to solve this problem I need to forward the ports on the router. To do this I again go to 192.168.0.1 and go to Forwarding -> Virtual Servers. Here I add a new rule where specify that port 80 should be triggered to the local server IP. The same thing I do the same with the 443 port.
What happens when we add a rule?
From now when the user enters the domain of my site in the url string and presses Enter, it 'll go to my public ip address on port 443. Router looks where this port leads - to which local IP address (in this case server local IP). And redirects the request to our home server. Then the home server sends the result of the request (index.html file) and the user sees it in his browser. (*Very simplified, but enough to understand the overall structure. If you wanna know more about what happens, write a comment and I'll write a separate article, where this point will be described in details).
Now every user on the Internet can go to my site!
3. Buying an IP camera, recording from the camera to the server
Okay, I have a server where I can upload some files, and my website is hosted on it as well. But then what? It's extremely boring to just sit there and look at the only page of the site, though from another network.
Then I saw on Ebay IP camera, which is clearly cheaper than similar ads. I met with the camera guy and he told me that he had bought this camera relatively recently, but "he couldn't make it possible to watch video online from an external network". I figured I could do it, I'm a Linux user and have a googling skills after all, and I bought a D-Link DCS-2132L/B.
Brought it home, unpacked, connected it via Ethernet to the router, as well as to the power outlet. Idk if it's on or if it even works yet, but the first thought that came to me was to go to the router settings and look at the list of connected devices to find the IP address of the camera, and then just type that IP in the search box and see what happens. Once again I go to the router settings -> DHCP -> "DHCP Client List" and look for smth similar to camera device. Once I found my DCS-2132L I copy the IP and go to it.
A window opens with the entry of the login and password. Trying the standardlogin: admin, password: admin
and... unfortunately, it didn't work. I'm looking on the Internet to find out how to get into the camera settings and finally I found an option where I had to specifylogin: admin, password:
Tried it an... it doesn't work either. Still not very good, what to do?
Oh, exactly, on the camera there is a reset button! I clamped it for 15 seconds and the camera is reset to factory settings. Re-login again - and damn yeah, I'm in. I can see a picture from the camera and a bunch of some settings.
On the first thing I changed the password from the admin account and added a new user with fewer rights. Great, now there is an account where the user can view the video, but don't do any changes. The picture is very slow to be honest, so i changed the resolution from 1280x720 to 800x448 and change the codec from H.264 to JPEG. Now the picture can give out even 25 FPS.
Video movements became much smoother. To watch live broadcast from local network just go to link:http://<camera local ip>/video1.mjpg
Again, watching only from the local network isn't interesting, so I wanna add the ability to watch live streaming from an external network. To do this I add to nginx configuration file in the server block the following lines:
location = /camera {
	proxy_pass http://<camera local ip>/video1.mjpg;
}
And surely reload the config:# systemctl reload nginx
Great, now when someone goes to the address https://<my domain name>/camera he'll get a window with username and password. Without the credentials no one 'll have access to the video from the camera. And this is good.
But you must admit that we don't always have time to see what is going on in the camera, so it'd be good if the recording would go directly to the server and we could get access to the video files at any time. Looking in the settings of the camera, we can see the section Setup -> Event Setup.

There is a possibility to configure separately where and what will be recorded. In the subsection Server we can specify where the video/photos/logs from the camera 'll be recorded. There are a total of 4 options where we can record:
Email
FTP
Network Storage
SD Card

Just below we can see the next item - Media. Here it is possible to specify what to save:
Snapshots
Videos
Logs

Then it's possible to configure when we need to make a record, this is done in the item Event. There are such options when it's possible to record:
Video motion event
Periodic
Digital input
System boot
Network lost
Passive infrared sensor
Sound detection

Also in this tab it's possible to configure at which days (and hours) the event 'll be "listened on". This event and among other things here specifies where the recording 'll go.
And the last item in the tab - Recording. In this tab we choose on what days (and hours) the full recording of what happens on the camera, and it's possible to configure where the recording 'll be made + its size (or duration).

After I got acquainted with all the possible settings I decided to set up FTP and record video from the camera via it.
Installing and configuring FTP
Firstly, install the needed package from the repository:# pacman -S vsftpd
After this create a new user, through which we 'll connect to the server:# useradd ftpuser
And also add a password to it:# passwd ftpuser
Great, opened up the required ports so that we can connect to the server:# ufw allow 21
Afterwards I created a new directory where files from camera will be saved:# mkdir /var/www/camera_videos
Thereafter changed the owner of that directory:# chown ftpuser /var/www/camera_videos
All that remains is to modify the vsftpd configuration file /etc/vsftpd.conf:
anonymous_enable=NO # Disable anonymous
local_enable=YES # Allow local users to log in
write_enable=YES # Allow to write smth on our server
nopriv_user=ftpuser # A user which the ftp server can use as a totally isolated and unprivileged user.
chroot_list_enable=YES # Mark that we 'll use a list of users that can be chroot'ed
chroot_list_file=/etc/vsftpd.chroot_list # Specify the path to the file with chroot'ed users
allow_writeable_chroot=YES # Allow chroot()'ing a user to a directory writable by that user
local_root=/var/www/camera_videos # Specify the default directory for ftp connections
Now create a list with the users: /etc/vsftpd.chroot_list, where I added only one newly created user: ftpuser
Eventually the ftp service can be run:# systemctl enable vsftpd --now
And we can test the connection to the server through ftp:$ ftp <server local ip>
Next, I entered the login and password from ftp user and I can view the contents of the directory with ls, create a directory with mkdir or transfer some local files to the remote server.
Then I went to the camera settings via it IP, go to Setup -> Event Setup -> Server, add a new ftp server, where I give the server a name, specify the server address, the port on which I'll connect, the name of the ftp user and his password. Then press the Test button and see the message: Test Ok. It means that everything is configured correctly and the camera can now record video to the server via ftp.
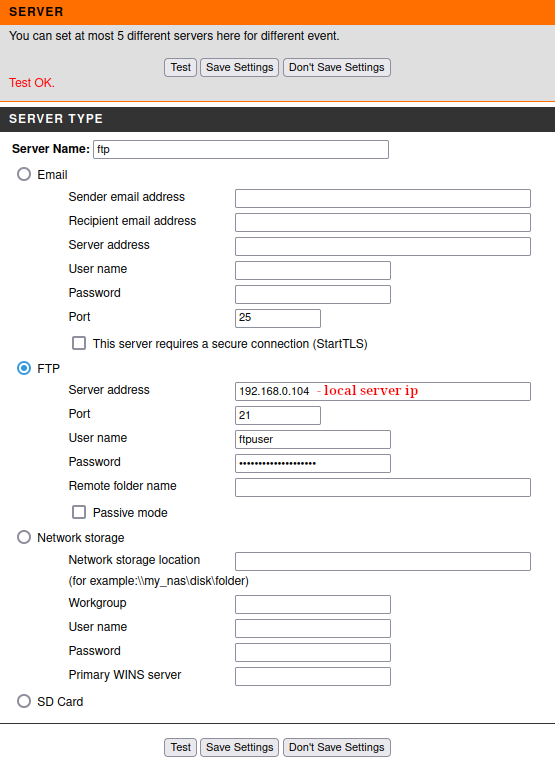
In order to make sure that the test connection to the server was successful in the directory specified in local_root in the vsftpd configuration file, there should be a test.txt file with the following content: "The Result of Server Test of Your IP Camera.". If it present - the camera has established contact with the server.
Save the server settings and go to the item below - Media. There I specified Media name, also chose video and which video profile to use. The video duration, its maximum size in Kbytes and the prefix which will be added before the name of the recorded video were specified as well.
Note: For the ftp server, the maximum video file size can be 5 MBytes.

The next item is setting up Event. Again, I gave a name to the event, select the trigger - Video Motion Detection, the time when this trigger should be active leave the default (always on), specified which server to use for recording and which Media to take.
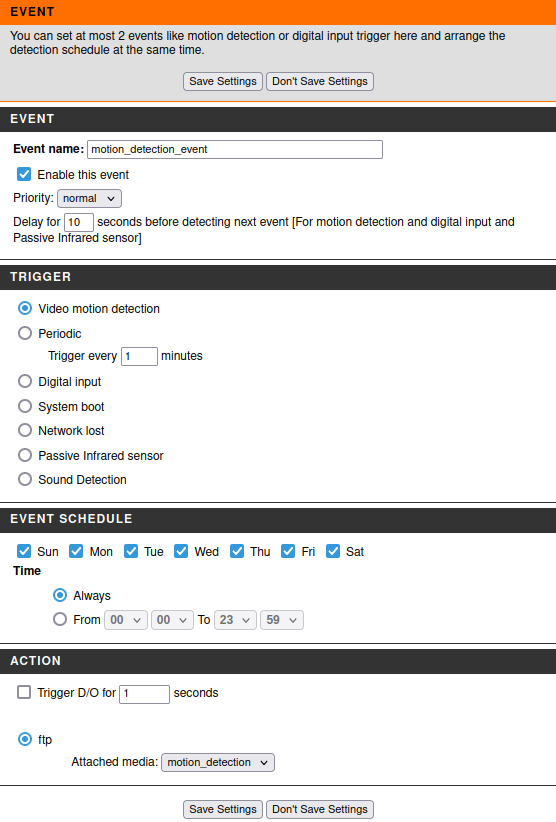
Save the settings and move on to select the area to trigger Motion Detection: Setup -> Motion Detection. To use motion detection, you must first select the checkboxes and then select the areas you want to monitor for motion with the mouse.

Walk in front of the camera and look at the contents of the directory /var/www/camera_videos on the server - there should appear a new file that begins with the prefix specified in Media and the date the video was created.
With this setting:
Frame size: 800x448
Maximum frame rate: 25
Video quality: Standard
Mode: JPEG
Pre-event recording: 2 seconds
Maximum duration: 100 Seconds
Maximum file size: 5000 Kbytes
I got the video with such metadata:
{
  "FileName": "motion_20210806_172133.mp4",
  "FileSize": "5.1 MB",
  "FileModifyDate": "2022:08:06 17:21:33+03:00",
  "FileAccessDate": "2022:08:06 17:23:47+03:00",
  "FilePermissions": "-rw-------",
  "FileType": "MP4",
  "Duration": "10.24 s",
  "Encoder": "Lavf54.63.104",
  "TrackDuration": "10.21 s",
  "ImageWidth": 800,
  "ImageHeight": 448,
  "XResolution": 72,
  "YResolution": 72,
  "BitDepth": 24,
  "VideoFrameRate": 25.159,
  "MediaDuration": "10.24 s",
  "AudioChannels": 2,
  "AudioBitsPerSample": 16,
  "AudioSampleRate": 8000,
  "MediaDataSize": 5075314,
  "MediaDataOffset": 60044,
  "ImageSize": "800x448",
  "Megapixels": 0.358,
  "AvgBitrate": "3.97 Mbps",
}
As we can see, on average it is about 10-second video of relatively good resolution.
And now we already have our own budget "security system", but smth is missing again.... Exactly - recordings of what's going on on the camera at all times, 24/7.
4. Problem with recording video directly to the server
Well, let's go to the Recording tab and try to start recording via ftp. But I found that I can't even select FTP server. Why is that? Do you remember in the previous section I mentioned the write limit is only 5 MBytes, while the maximum limit is 50 MBytes? Turns out that the camera supports writing more than 5 MBytes, only to the SD card. This is extremely disappointing, it appears that everything I did was a waste of time? If I can't record video 24/7 then what's the point of the camera? Yes, I can watch the online broadcast from external network and I've Motion Detection, but it's pointless if I can't review the camera recordings over a period of time. I'm writing to D-Link support with the hope that I haven't noticed some secret clause and it's still possible to record directly to the server, not to the SD card.
The variant with the SD card is bad because it has a limited capacity (mostly 16-32 Gbytes). And what is 32 Gbytes of video?
If we take those settings I gave above, then after simple calculations we can get the "1 day recording volume":
5.1 MBytes / 10.21 sec = 0.499510284 MBytes/sec, in other words 86400 sec (1 day) * 0.499510284 MBytes/sec = 43157.6885376 MBytes (~43.1576885376 GBytes).
Even if I take an ordinary 32 GBytes microSD card, it won't even enough for 1 day!
While I was waiting for a reply from the support, I decided to buy a 32 GBytes card hoping that it'd be possible to transfer the data from SD to the server automatically. Bought a micro SD card, put it in the camera. Now went to the camera settings - Setup -> Event Setup and add a new server, where I chose SD Card.
Then I go to the item Recording and add a new item, where specify the profile from which to record, the size of a single video, as well as the size at which the video will begin to be re-recorded.

The Setup -> SD Card tab allows to view the contents of microSD card. The videos are conveniently sorted by day as well as by hour.
Thus it'd be easy to find the video of the desired time fragment.

Everything seems to work, it records videos to the SD card, but in order to view them, the video must first be downloaded locally. And as you understand, even with a pretty good Internet, downloading videos is not an option. This is a monotonous and routine work that should be automated, because it is Sisyphus work to download each video separately to your computer and then transfer it to the server.
And then I got a reply from D-Link’s support. I hopefully open the letter and see:"Unfortunately, it looks like the model number of your D-Link device is discontinued, and free technical assistance has already ended"Thanks for the reply, much appreciated, so useful
Unfortunately, D-Link didn’t help me, so I’ll have to find a solution myself.
5. Recording solution
I'm not going to give up. If necessary, I will personally re-flash the camera circuit board, twist every wire, connect it directly to the server, and run it as a built-in camera. Of course it's too early to go to extremes yet, but if shit happens I'm ready.
In the meantime, let's see what options I have and what I can do:
Hide in a corner and cry
Leave everything as is
Search for the answer on the Internet, how other people have solved it
For now, let's leave the first two options for later. I started googling how to record video from the camera directly to the server and in one of the posts I see that the guy can connect to his camera directly via ssh. I decided that I'm not worse, maybe I can do this with my camera too. I scanned the ports in the hope that 22 is still open and... only ports open for http, https, rtsp and upnp.
I went to look for the documentation of the camera and saw that the firmware update v1.08.03 had the ssh port closed. So I decided to dig up the firmware version below v1.08.03 and download it. And I even found the needed version, so I try to update it in Maintenance -> Firmware Upgrade, but even here I failed - no downgrade is possible.
At this point I really had a thought that that was it, the end...
Then I remembered that there are a few more options to add servers beside the FTP server and the SD card. I quickly go in there and see - Email and Network Storage. Version with Email was discarded at once, because direct recording from camera to server would be impossible, it can only
send the whole video and even then free api have their own limitations (eg, google mail api have limit to send a file above 35 MBytes), and to set up my own mail server seemed not the brightest idea (just for this specific purpose, but in general it's very interesting and useful to have a personal mail server, at least for secure reasons).
So there remains one last option - Network Storage. And it seems that this is it, my last chance for a happy, successful life. I start googling about this option on the camera, whether it's possible to write video directly to the server. Didn't find a straight answer to my question, but noticed that a huge number of people failed to add their server as a NAS to the camera.
In the example saw what I need to enter in the fields to connect to the server and realized that it's about samba server.

Okay, I'll try to set up samba server, and then connect to it as well as by ftp, maybe I can kick it.
Installing and configuring samba
Install the package from the repository:# pacman -S samba
Edit the config file /etc/samba/smb.conf:
[global]
    server role = standalone server
    map to guest = Bad User
    usershare allow guests = yes
    hosts allow = 192.168.0.0/16
    log file = /var/log/samba/%m.log
    log level = 1 auth:5 winbind:5
    smb ports = 139
    idmap config * : backend = tdb
    idmap config * : range = 3000-7999
    idmap config SAMDOM:backend = ad
    idmap config SAMDOM:schema_mode = rfc2307
    idmap config SAMDOM:range = 10000-999999
    idmap config SAMDOM:unix_nss_info = yes
    vfs objects = acl_xattr
    map acl inherit = yes
    store dos attributes = yes
    server min protocol = NT1
    client min protocol = NT1

[recordings]
    comment = recordings from cam
    path = /var/www/recordings
    read only = no
    guest ok = yes
    force user = root
    force group = root
After the configuration file has been set up, start the samba service:# systemctl enable smb --now
and don't forgot about# systemctl enable nmb --now.
Also open port for smb protocol:# ufw allow from 192.168.0.0/24 to any port 139
Then the samba server can be added to the camera:
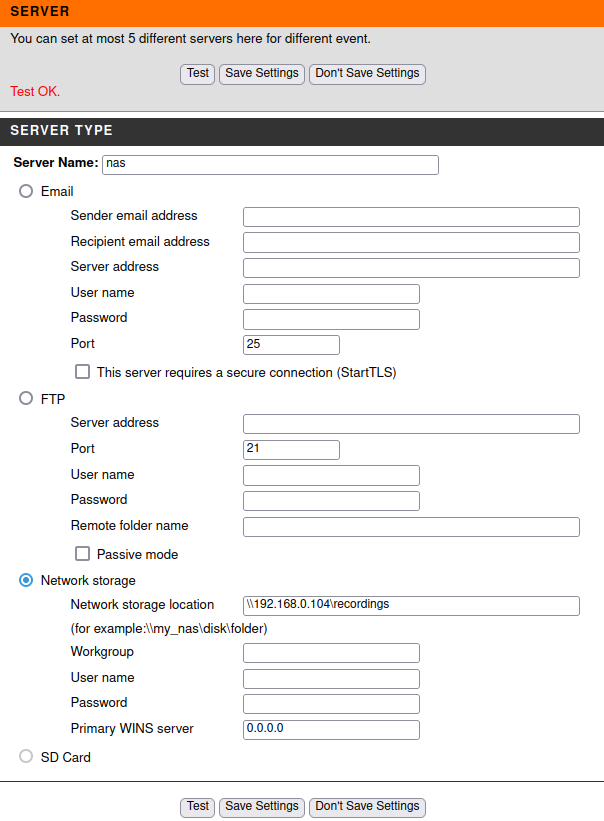
Press the Test button and get Test Ok.
Now try to record directly to our server, go to Setup -> Event setup -> Recording, add a new item and see that in addition to the SD card there is another option where a record can be written - SAMBA . Select it, change the size of rewritable files and save.

Turn on the setting and see that in the directory that was specified in smb.conf appeared directory Video. The general structure of the directory is approximately as follows:
.
├── test.txt
└── Video
    ├── 20220801
    │   ├── 21
    │   ├── 22
    │   └── 23
    ├── 20220802
    │   ├── 00
    │   ├── 01
    │   ├── 02
    │   └── 03
    └── 20220803
        ├── 17
        ├── 18
        ├── 19
        └── 20
Great, now I have both video recording and motion detection set up. Everything works exactly as I wanted it to.
6. What I learned from this experiment
During the server setup, as well as solving problems that gradually appear on my way I figured out how to set up an ftp server, how to configure a samba server, played with the camera and its configuration. Dug deeper into how to configure ssh, how to make nginx web server more secure, which headers to include and much more besides. It has been a very interesting and educational experience but I'd recommend its repetition only for those who sincerely wanna understand how each technology works "under the hood".
Wish you all success and more patience to yourself! Good luck
